


Seth you didn't by chance keep track of the dimensional changes you made in order to get all to line up ? this looks to be a better option then hunting down a 67 master cylinder and then having to rebuild it.
+15
jrdunn96
paradiddle
WYO George
cole63
Das Boot
vanny
Udo
Big W
jimthefred
stanyon
BoneMan
FIZGIG
SDEconoTruck
Barnabas
Seth G
19 posters
My 250 Swap

stanyon- Number of posts : 147
Location : Spokane, WA.
Registration date : 2013-08-29
Seth G- Vintage-Vans Listings Manager

- Number of posts : 2086
Location : Anacortes, WA
Age : 50
Registration date : 2013-04-24
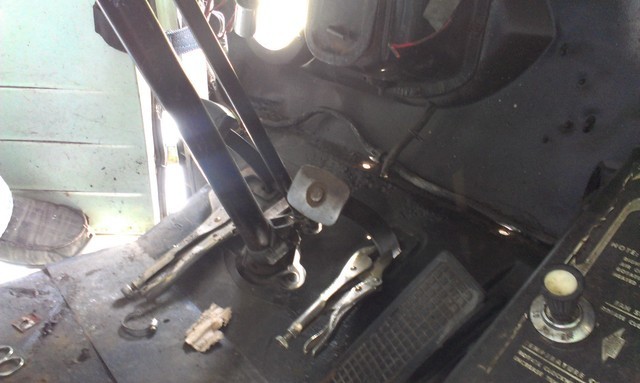
Yes I did, I'll double check it though when I get off work so I give you the correct info. One thing to keep in mind though stanyon, is that putting this booster in there makes it impossible to use the stock column shifting setup. The rod pathways are blocked. There may be a way to convert it to cable not sure, I'll probably go long floor shifter. The dual master conv kit from http://www.dddiscbrakes.com/kits.html let's you use the stock shifter setup, but no booster option. A little pricey for the bracket but you can source everything else on your own from salvage and I've read alot of good things about the products. I'm going to use his front disc kit.
Seth G- Vintage-Vans Listings Manager
- Number of posts : 2086
Location : Anacortes, WA
Age : 50
Registration date : 2013-04-24
Stanyon, looking at a picture of SDEconoTruck's setup, I've been made aware of an interference I've got with the sway bar mount, so I'm going to rework the mounting.
Seth G- Vintage-Vans Listings Manager
- Number of posts : 2086
Location : Anacortes, WA
Age : 50
Registration date : 2013-04-24
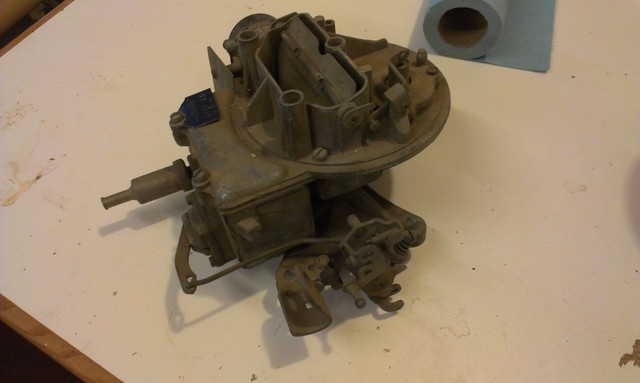
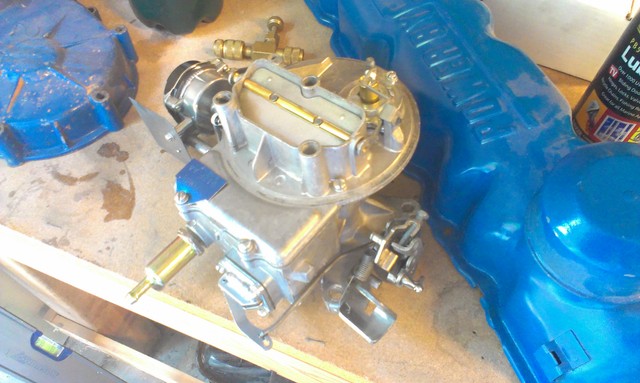
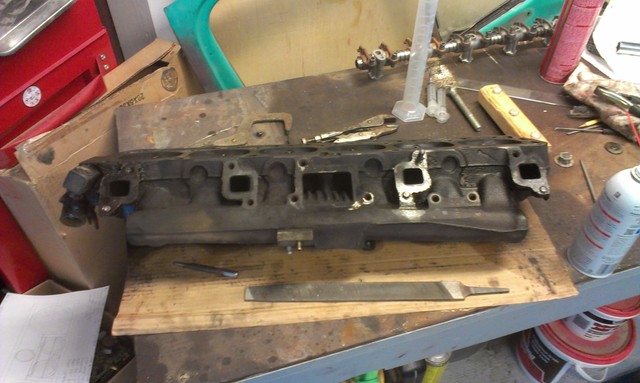
I thought I'd get a lot done last weekend but I got very little done. I did manage to get a recently acquired '71 Autolite 2100 1.08 2 barrel cleaned up and thoroughly rebuilt and converted to electric choke. I also started working on a '78 head that stanyon found for me. 5 exhaust bolts broke  So far I've gotten 1 out and another is on the verge of coming out, going to try and get them out before the weekend. I'm welding washers and nuts on them and soaking with penetrate occasionally.
I've got valve springs, 1 piece retainers, locks, carb adapter(direct), a 1" phenolic carb spacer, pushrods, and an offset crank key on their way. I went with Comp Cams 4.9 ltr springs, part #903-12. Still need to get expansion plugs for the head and some bit's and rolls to port it.
I've got valve springs, 1 piece retainers, locks, carb adapter(direct), a 1" phenolic carb spacer, pushrods, and an offset crank key on their way. I went with Comp Cams 4.9 ltr springs, part #903-12. Still need to get expansion plugs for the head and some bit's and rolls to port it.
stanyon- Number of posts : 147
Location : Spokane, WA.
Registration date : 2013-08-29
A little late on this Seth, but I had good luck on removing the studs from the heads I have worked on by using a 50/50 mixture if lacquer thinner and ATF, then the first move was to apply pressure as if to tighten the studs. From there I would go back and forth, all by feel and hoping not to break the studs. I ended up with breaking off one on each of the heads.
Most of them a complete turn before they were freed up enough to extract fully.
Most of them a complete turn before they were freed up enough to extract fully.
Seth G- Vintage-Vans Listings Manager
- Number of posts : 2086
Location : Anacortes, WA
Age : 50
Registration date : 2013-04-24
One was already broken. I used a similar method, but with pb and Kroil. I broke one before I started the tighten first then back and forth way. The other three were just damn near rusted through where they broke. All but one are broken above the surface luckily. I think the one thats just below the surface I'll be able to weld a washer to. I'll get them out!
Next time I'll try your homebrew penetrant
Next time I'll try your homebrew penetrant
Seth G- Vintage-Vans Listings Manager
- Number of posts : 2086
Location : Anacortes, WA
Age : 50
Registration date : 2013-04-24
Ok, I got all the broken bolts out of the head 
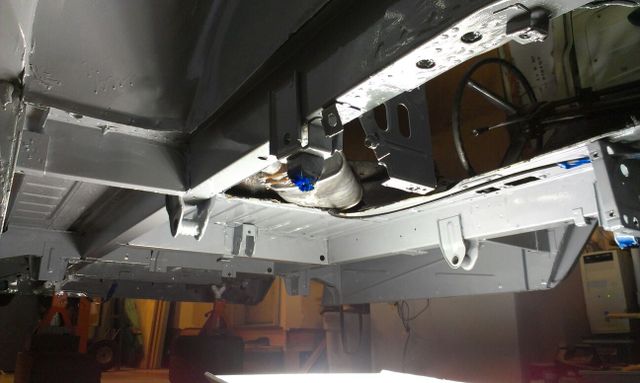
And I reworked the brake booster mount. I made the new mount 1 1/2" deep to center the pedal arm in the hole. The top mounting hole on the booster bracket had to go, I drilled a new 3rd hole between the other two in the lower part. I ran out of wire just before getting enough tacks to unclamp the arm. I'll finish that tomorrow. With the new mount, the master cylinder should *just clear the sway bar, I may have to bush it down a skoshe with a washer at the mounts. With a 7" booster the bracket could mount at the top of the frame but I had to drop it around 5/8" for the boster to clear the floor pan. I will have to grind the upper part of the arm a bit to clear the full stroke. I'll still have to move the e-brake inboard to clear the booster. The prop. valve will be aft of the sway bar.
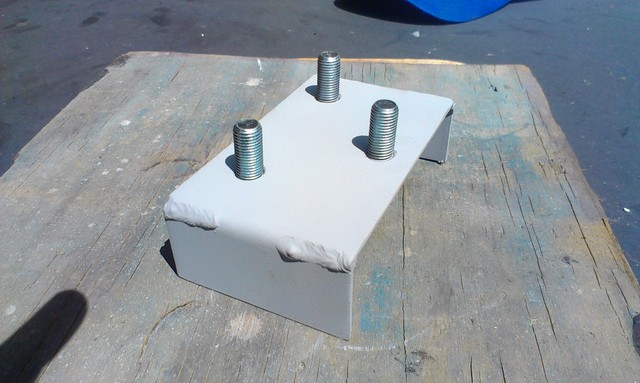
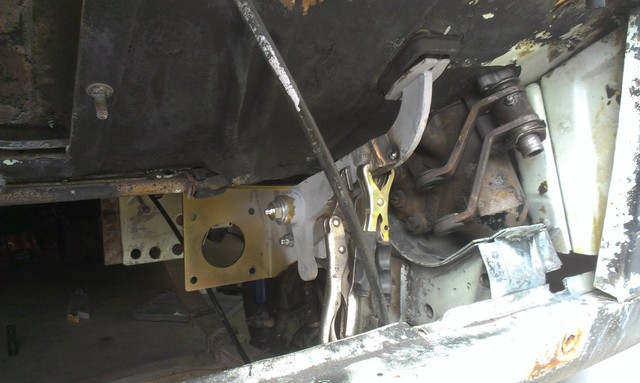
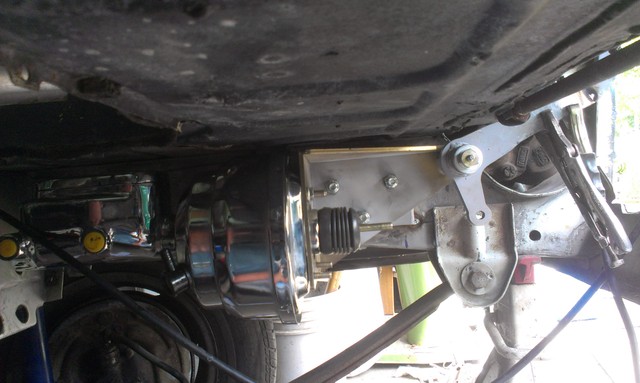
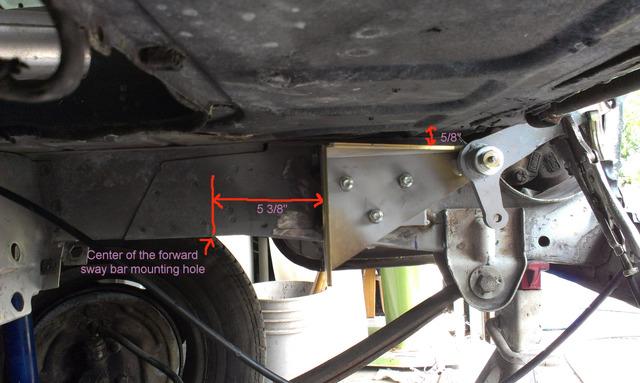
And I reworked the brake booster mount. I made the new mount 1 1/2" deep to center the pedal arm in the hole. The top mounting hole on the booster bracket had to go, I drilled a new 3rd hole between the other two in the lower part. I ran out of wire just before getting enough tacks to unclamp the arm. I'll finish that tomorrow. With the new mount, the master cylinder should *just clear the sway bar, I may have to bush it down a skoshe with a washer at the mounts. With a 7" booster the bracket could mount at the top of the frame but I had to drop it around 5/8" for the boster to clear the floor pan. I will have to grind the upper part of the arm a bit to clear the full stroke. I'll still have to move the e-brake inboard to clear the booster. The prop. valve will be aft of the sway bar.

jimthefred- Number of posts : 326
Location : Parksley VA
Registration date : 2012-01-15
looking good! 
Seth G- Vintage-Vans Listings Manager
- Number of posts : 2086
Location : Anacortes, WA
Age : 50
Registration date : 2013-04-24
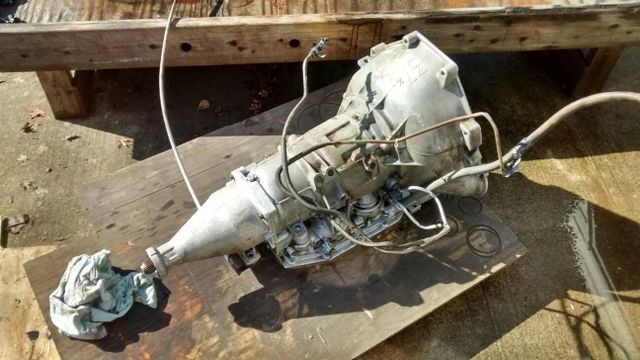
Update time. I've obtained an AOD. It's not the better later version, but it is the shorter version with the 10.1" tailstock. Ironically it's out of an 85 Econoline  , it's a runner, it was local and the price was right @ $150.
I've got the engine crossmember holes elongated and have it mounted to the motor for measuring. According to my measurements the motor can go in @ stock hieght no problem. I will probably move it forward from stock though b/c I'm not going to be using the fan and that will allow me to add an inch or 2 to the driveshaft, which is a good thing. I need to verify how much it can go forward and have the carb hat/air filter still under the hump in the lid.
I've got the shortblock completely assembled except for the water pump, which I've decided to go ahead and replace while I'm at it. I've also found that a 92 f150 starter is quite a bit smaller than the stock 200/250 starters. So I'm going with that to help with clearances with it and the header.
I'm also getting an estimate on having the 3rd member rebuilt and ring and pinion swapped to 3.7:1
Next step is weld in frame mounts for the crossmember, fab 2 more for the outside mounts and weld them in. Then paint the under chassis, drop in the motor and trans, then fit and install the tranny crossmember.

Udo- Number of posts : 247
Location : Victoria, BC Canada
Registration date : 2014-07-07
Subbed till the end 
Seth G- Vintage-Vans Listings Manager
- Number of posts : 2086
Location : Anacortes, WA
Age : 50
Registration date : 2013-04-24
I've got both axles pulled. I'm going to have some free time over the next couple of weeks and plan on finally getting the chassis painted. I'm going to take apart all the leaf packs, clean them up and reassemble them with leaf liners and install new bushings ala https://vintage-vans.forumotion.com/t13825-suspension-bushings-for-my-econo-pickup . Also going to treat the tank, paint it and get it back in. Then I can run the brake and fuel lines.
FIZGIG- Number of posts : 334
Location : Lynnwood, WA
Registration date : 2014-01-23
Funny Im having almost the same exact work done on my 61 Pickup as I type. lol I had to get a new gas tank so I went with a new falcon tank and had it customized and hell I get a couple more gallons in. Keep the pics coming cant wait to see yours when its done.
jimthefred- Number of posts : 326
Location : Parksley VA
Registration date : 2012-01-15
Whats going on? Any updates?
FIZGIG- Number of posts : 334
Location : Lynnwood, WA
Registration date : 2014-01-23
Yeah any updates I'm dying to see how far you got
Seth G- Vintage-Vans Listings Manager
- Number of posts : 2086
Location : Anacortes, WA
Age : 50
Registration date : 2013-04-24
Wow, hard to believe it's been over 3 months!!! I still haven't gotten the entire chassis painted, only about 2/3's-3/4 done  . I had a paint adhesion problem initially that had to be resolved and that slowed me down. Then the holidays and some other projects got in the way, new hobbies, so on and so forth. I'm sure you all know the drill. I'm ready to get back on this though and updates will be coming forward regularly over the coming months. Summer is on the way and I want to get this thing back on the road!
I'm going to be painting again tomorrow, need to get that wrapped up!!!! And will begin lubing the leaf spring ends in prep for pressing out the old bushings, new bushings and leaf liners are in hand I was also able to track down the block spacer for the AOD at a local yard too, $5, that was a relief. And I picked up the proper flexplate and the smaller 92 f150 starter. Along those same lines I've also decided to try and rig the old column shifter to work for the AOD myself. I figure b/c it won't be using shift rods anymore(can't b/c the route is blocked) I'll use a marine style push/pull cable and modify the shift arm mech to suit.
I'm going to be painting again tomorrow, need to get that wrapped up!!!! And will begin lubing the leaf spring ends in prep for pressing out the old bushings, new bushings and leaf liners are in hand
Seth G- Vintage-Vans Listings Manager
- Number of posts : 2086
Location : Anacortes, WA
Age : 50
Registration date : 2013-04-24
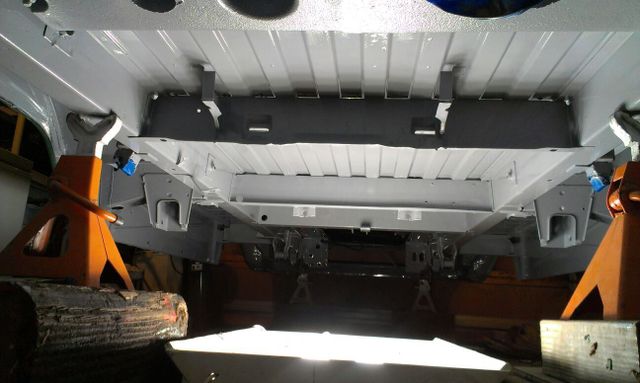
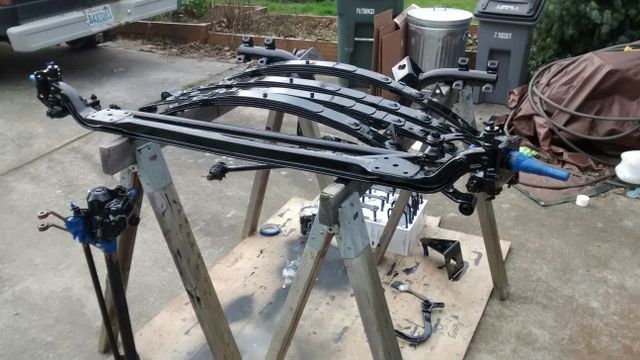
Forgot the Seahawks were playing last Sunday, so it didn't get done. But I got after it today and got it done! Chassis is painted. Tomorrow I'm going to paint the fuel tank, and start working on the leaf springs

Big W- Number of posts : 3282
Location : Saskatoon,Sask,Canada
Age : 60
Registration date : 2011-01-13
Looking good, clean and bright. Looks like new under there. Excellent work 
Seth G- Vintage-Vans Listings Manager
- Number of posts : 2086
Location : Anacortes, WA
Age : 50
Registration date : 2013-04-24
Thanks, one of the few nice things about painting these chassis's is b/c the factory dipped them, any runs you may encounter in your paint work are completely obscured by the countless huge factory paint runs like what you see in the wheel well, all factory  If one can afford it I'd highly recommend having it all sand blasted for soo many reasons. Unfortunately I'm not that guy
I ran out of paint after only geting the top of the gas tank painted But, I order and have gotten another pint of the KBS paint and the new gas tank sending unit, mine read empty after half a tank. Total will be 2 qts and 1 pint of the chassis paint btw, not including the qt of black I have for the leaf's, axles and driveshaft. The KBS paint is amazing stuff btw, it flows out brush strokes and bubbles beautifully and drys to a nice smooth hard surface. I'm going to finish up the tank this weekend and continue working on the springs. I found new oem style spring pads for $1(need 24) a piece, so I think I'm going to go ahead and apply slip-plate graphite paint to the inter leaf surfaces, install the new pads and just paint the outside of the springs with KBS instead of all and using the liners. But I'll be working on grinding wear grooves and smoothing the leafs as well this weekend. All before the Superbowl of course. Wont get them all done.
The replacement of the bushings in the springs has gone really well on the first one I did, better than I imagined. So I'm hoping to get the rest of the old ones out as well this weekend.
One thing I'm wondering is what to use to shim the top of the gas tank at it's mounts? I think there was something there but I can't remember what. I'm thinking flat rubber strips or dense wide foam rubber tape?
I ran out of paint after only geting the top of the gas tank painted
The replacement of the bushings in the springs has gone really well on the first one I did, better than I imagined. So I'm hoping to get the rest of the old ones out as well this weekend.
One thing I'm wondering is what to use to shim the top of the gas tank at it's mounts? I think there was something there but I can't remember what. I'm thinking flat rubber strips or dense wide foam rubber tape?
Seth G- Vintage-Vans Listings Manager
- Number of posts : 2086
Location : Anacortes, WA
Age : 50
Registration date : 2013-04-24
I posted this first bit in another thread about hubs, but I figure I'll post it here to b/c it's part of this thread.
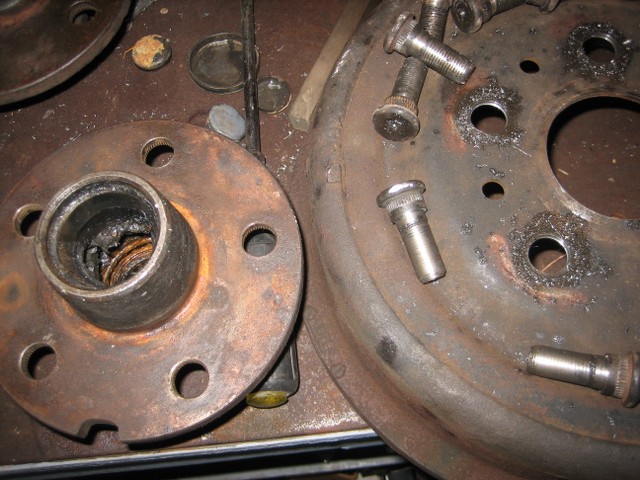
I removed the studs from my front hubs/drums this morning in prep for disc brakes. I came across a post on another forum about using a 5/8" hole saw in the drill press, so I gave it a try. It worked like a charm! The whole job took about 15-20 minutes I cut the swage's off down about 1/16-3/32" or so into the drums and then popped the drums off using a punch through the holes in the face. Then I cut the swages down to the face of the hubs and maybe a hair more. Then a BFH popped them right out sitting on an open vise @ each stud. No damage, almost too easy Ready to have new bearings, races and seals installed.
This coming Tuesday I'm taking my rear end to get the axle bearings and seals replaced, 3rd member rebuilt and ring and pinion swapped to either 3.7:1 or 3.89:1, still haven't decided which. I'll most likely go with 3.7:1
Wednesday I found a pair of almost new black Dodge Neon seats at a local yard, got the pair for $60. They look like they will fit perfect. A little funk on them from being partially exposed to the elements for a while, but looks like an easy clean up. They work perfect and are super firm still.

I've got the gas tank almost ready to install, will probably do that tomorrow. Have new 5/16" fuel/trans line coil and new 3/16" Cupro brake line to install. Waiting on some fittings and 2 lbs. residual valves.
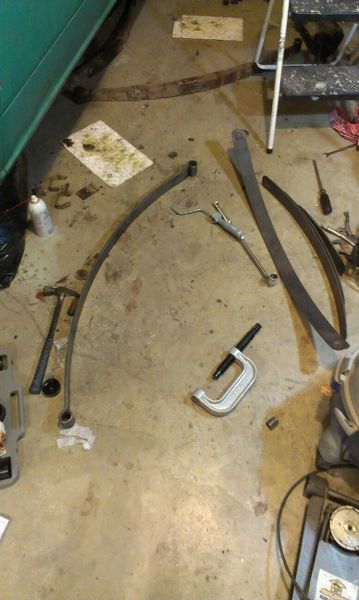
The leaf springs are almost ready to paint. The new inter-leaf isolator discs should arrive this week. Need to track down some slip plate and get ahold of McVeigh's and see if they can sell me new straps and the rubber isolators for the under the top of the straps. I thought I'd reuse mine but one strap has broken so far during dis-assembly, so why risk it.
I also dropped of my head @ the machinist to have it disassembled, hot tanked and magna fluxed. He told me he can't weld my exhaust port divider in but knew of a place that could in a nearby town. When I get it back I will do the port work to it and the 2-barrel mod then have the divider welded in. After that I'll have it machined, not sure yet if I'm going to increase the exhaust valve size or just stick to stock.
I have also ordered a radiator. I went with this one off ebay:
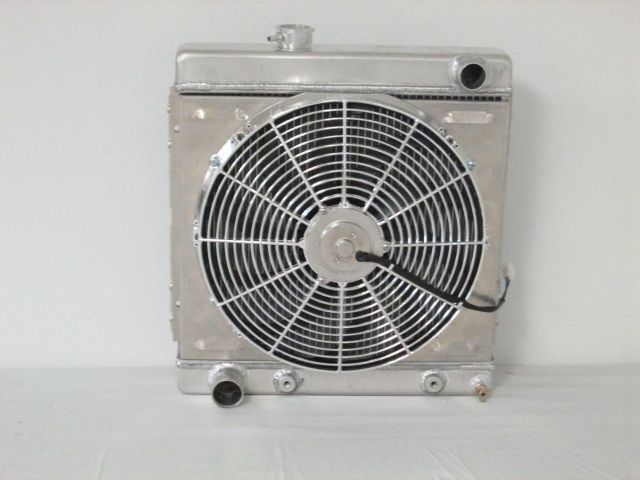
http://www.ebay.com/itm/291190586307?_trksid=p2060778.m1438.l2649&ssPageName=STRK%3AMEBIDX%3AIT
From what I understand these modern 2 row aluminum radiators with thick 1 1/8" tubes outperform regular size 3 and 4 rows. We shall see. I think it will work fine in any case. I will use spacers to mount it.
I removed the studs from my front hubs/drums this morning in prep for disc brakes. I came across a post on another forum about using a 5/8" hole saw in the drill press, so I gave it a try. It worked like a charm! The whole job took about 15-20 minutes
This coming Tuesday I'm taking my rear end to get the axle bearings and seals replaced, 3rd member rebuilt and ring and pinion swapped to either 3.7:1 or 3.89:1, still haven't decided which. I'll most likely go with 3.7:1
Wednesday I found a pair of almost new black Dodge Neon seats at a local yard, got the pair for $60. They look like they will fit perfect. A little funk on them from being partially exposed to the elements for a while, but looks like an easy clean up. They work perfect and are super firm still.
I've got the gas tank almost ready to install, will probably do that tomorrow. Have new 5/16" fuel/trans line coil and new 3/16" Cupro brake line to install. Waiting on some fittings and 2 lbs. residual valves.
The leaf springs are almost ready to paint. The new inter-leaf isolator discs should arrive this week. Need to track down some slip plate and get ahold of McVeigh's and see if they can sell me new straps and the rubber isolators for the under the top of the straps. I thought I'd reuse mine but one strap has broken so far during dis-assembly, so why risk it.
I also dropped of my head @ the machinist to have it disassembled, hot tanked and magna fluxed. He told me he can't weld my exhaust port divider in but knew of a place that could in a nearby town. When I get it back I will do the port work to it and the 2-barrel mod then have the divider welded in. After that I'll have it machined, not sure yet if I'm going to increase the exhaust valve size or just stick to stock.
I have also ordered a radiator. I went with this one off ebay:
http://www.ebay.com/itm/291190586307?_trksid=p2060778.m1438.l2649&ssPageName=STRK%3AMEBIDX%3AIT
From what I understand these modern 2 row aluminum radiators with thick 1 1/8" tubes outperform regular size 3 and 4 rows. We shall see. I think it will work fine in any case. I will use spacers to mount it.
Seth G- Vintage-Vans Listings Manager
- Number of posts : 2086
Location : Anacortes, WA
Age : 50
Registration date : 2013-04-24
Since the last update I've got the gas tank w/ new sending unit installed. Got all the springs rebuilt w/ new bushings, slip inserts, painted the inter leaf surfaces with slip plate, and intalled new spring clips. I dropped off the rear end for it's gear swap and rebuild last week. Yesterday I cleaned the front axle, steering gear box and a bunch of other stuff. Today I got it all painted. I'm hoping to get all the springs and front axle installed today if the paint drys in time. Sun keeps hiding behind clouds and it's only 50 degrees or so

jimthefred- Number of posts : 326
Location : Parksley VA
Registration date : 2012-01-15
lookin good!

Big W- Number of posts : 3282
Location : Saskatoon,Sask,Canada
Age : 60
Registration date : 2011-01-13
Love the smell of fresh paint. Looking real nice.
Seth G- Vintage-Vans Listings Manager
- Number of posts : 2086
Location : Anacortes, WA
Age : 50
Registration date : 2013-04-24
Hey guys! Thanks.
Got my front axle and all the leaf springs re-installed. I was hoping the rear end would be ready by Friday b/c the weather is awesome and I could've gotten it painted and installed and got the van off the blocks but it wasn't ready.
Today I got the transmission cleaned up. That was the last major cleaning project! Will be getting back to the fun stuff soon! In the next month I plan on getting the brakes done and wheels on it. Then I can FINALLY get to putting the motor and transmission in
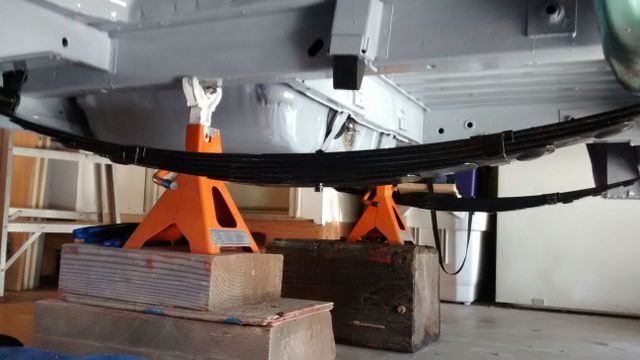
FIZGIG- Number of posts : 334
Location : Lynnwood, WA
Registration date : 2014-01-23
Your van and my truck are twinns pretty much if you look under them.lol. nice worrk

vanny- Moderator
- Number of posts : 14777
Location : Ashburnham, MA
Age : 65
Registration date : 2012-09-22
Looks fantastic under there! Nice work!
_________________
“The future will soon be a thing of the past."
http://public.fotki.com/Vintage-Vans/vintage-vans-es/ruff-diamond-1/?cmd=fs_slideshow

Similar topics

|
|
|