VintAGE-Vans

Would you like to react to this message? Create an account in a few clicks or log in to continue.

BRINGING IT ALL TOGETHER.... A's, G's & E's


+15
jrdunn96
paradiddle
WYO George
cole63
Das Boot
vanny
Udo
Big W
jimthefred
stanyon
BoneMan
FIZGIG
SDEconoTruck
Barnabas
Seth G
19 posters

    My 250 Swap

    Seth G
    Seth G
    Vintage-Vans Listings Manager
    Vintage-Vans Listings Manager


    Number of posts : 2086
    Location : Anacortes, WA
    Age : 50
    Registration date : 2013-04-24

    My 250 Swap - Page 3 Empty Re: My 250 Swap

    Post by Seth G Sat Mar 14, 2015 7:28 pm

    I picked up my 3rd member and axles from the shop Friday. Today I wire wheeled the housing and installed new axle seals, assemble them and I'm ready to paint them and hopefully get it mounted this week.

    I added a drain plug to the housing. When I was at the store today I grabbed a magnetic oil plug and then tapped the bottom of the housing for it. I bought a jam nut I was going to weld to the inside to reinforce the hold, but after drilling it I think there's enough meat there to forego the nut.

    My 250 Swap - Page 3 XByprI

    My 250 Swap - Page 3 Dp9KWK

    My 250 Swap - Page 3 C8EnNT
    Seth G
    Seth G
    Vintage-Vans Listings Manager
    Vintage-Vans Listings Manager


    Number of posts : 2086
    Location : Anacortes, WA
    Age : 50
    Registration date : 2013-04-24

    My 250 Swap - Page 3 Empty Re: My 250 Swap

    Post by Seth G Sat Mar 21, 2015 3:47 pm

    As I'm getting closer to getting the engine in I'm rethinking what I want to do with the head. I have 2 heads, one is the original C9 casting large log with 1.65/1.38 valves and a later head with the 1.75/1.38 valves.

    I think instead of putting the 2 barrel on, I want to go with a GM TBI off a 4.3 V6. I'll control it with a Megasquirt 2 system, TBI coil, and HEI 7 or 8 pin module, still using my DSII distributor. I'm really loving this idea and what it will do for performance, tunability and mileage.

    Right now the later, better head is getting cleaned and magnafluxed. I think what I'll do is take in the C9 head and have it gone over and brought up to snuff and I'll rebuild the RBS carb and use these on the engine until I can get around to sourcing all the tbi stuff and modifiing/porting the other head. Might just do a shade tree style light lap job on it or nothing and put it into service. It looks ok. Valve tips are worn pretty bad but the valves look good. I'd hate to throw much money at a temporary head.

    This will simplify the initial start up and break in on the motor and allow me to get back driving my van much sooner Very Happy and work on the head in my leisure. Then when the time comes I'll swap in the newer head, headers, tbi and so on and already know the baseline of the engine and that it is running properly before adding alot of unknown config to the mix with the tbi/ignition setup.
    Seth G
    Seth G
    Vintage-Vans Listings Manager
    Vintage-Vans Listings Manager


    Number of posts : 2086
    Location : Anacortes, WA
    Age : 50
    Registration date : 2013-04-24

    My 250 Swap - Page 3 Empty Re: My 250 Swap

    Post by Seth G Thu Mar 26, 2015 3:26 pm

    Got off a little early today and the weather is good so I was able to get the rear end painted. I'm hoping to get it installed tonight.

    My 250 Swap - Page 3 QcemWu
    Seth G
    Seth G
    Vintage-Vans Listings Manager
    Vintage-Vans Listings Manager


    Number of posts : 2086
    Location : Anacortes, WA
    Age : 50
    Registration date : 2013-04-24

    My 250 Swap - Page 3 Empty Re: My 250 Swap

    Post by Seth G Thu Mar 26, 2015 6:57 pm

    My 250 Swap - Page 3 N1V0p9
    vanny
    vanny
    Moderator


    Number of posts : 14775
    Location : Ashburnham, MA
    Age : 65
    Registration date : 2012-09-22

    My 250 Swap - Page 3 Empty Re: My 250 Swap

    Post by vanny Fri Mar 27, 2015 4:20 pm

    That's looking REALLY NICE, Seth!!! Perrrrty! Very Happy


    _________________
    “The future will soon be a thing of the past."

    http://public.fotki.com/Vintage-Vans/vintage-vans-es/ruff-diamond-1/?cmd=fs_slideshow
    stanyon
    stanyon


    Number of posts : 147
    Location : Spokane, WA.
    Registration date : 2013-08-29

    My 250 Swap - Page 3 Empty Re: My 250 Swap

    Post by stanyon Tue Mar 31, 2015 2:43 pm

    Seth; Have you run a mock up on the Aluminum radiator ? Wondering how the fit was. I was going to use my old radiator, but after I get it cleaned and any repairs needed taken care of I will be close to the price of the one you ordered.
    Seth G
    Seth G
    Vintage-Vans Listings Manager
    Vintage-Vans Listings Manager


    Number of posts : 2086
    Location : Anacortes, WA
    Age : 50
    Registration date : 2013-04-24

    My 250 Swap - Page 3 Empty Re: My 250 Swap

    Post by Seth G Tue Mar 31, 2015 11:21 pm

    I haven't much yet but it appears to be pretty straight forward comparing it to the original. I'm either going to just put some sleeves on the bolts or fab up spacer brackets. The top holes line up but the bottom holes on the oem radiator mounts are a bit lower. So not as easy as I hoped but not to bad.

    But, shortly after I bought that I found out Champion now makes a direct fit radiator for the Econolines. Model 6065LD. There's a thread in the General Discussion about it. I wish I would have known that or waited a bit longer. Definitely the best way to go for a new radiator b/c it bolts right in.

    http://www.championcooling.com/index.php?route=product/product&product_id=155

    http://www.ebay.com/itm/1961-1965-Econoline-Low-Drive-Up-Pass-All-Aluminum-3-Row-Core-Champion-Radiator-/161648611076?hash=item25a3020f04&vxp=mtr
    stanyon
    stanyon


    Number of posts : 147
    Location : Spokane, WA.
    Registration date : 2013-08-29

    My 250 Swap - Page 3 Empty Re: My 250 Swap

    Post by stanyon Wed Apr 01, 2015 8:15 am

    I am going to have to push my radiator out towards the front about 2 1/2 inches so I can squeeze the electric fan in, It would be easier if there was an optional water pump that didn't have such a long nose on it for the pulley mount. So mounting holes are going to be totally re-configured.
    Seth G
    Seth G
    Vintage-Vans Listings Manager
    Vintage-Vans Listings Manager


    Number of posts : 2086
    Location : Anacortes, WA
    Age : 50
    Registration date : 2013-04-24

    My 250 Swap - Page 3 Empty Re: My 250 Swap

    Post by Seth G Wed Apr 01, 2015 1:03 pm

    Even with loosing the engine fan? Wow. I haven't gotten that far.

    I think the radiator I got is a nice one. I can see when I mount it to the rad support there is going to be an interference with it and the bottom rad tank, esp. the drain cock, it's bigger than stock. If moving it back it won't really matter, you're going to have to fab some spacers anyway. But the flange will still be 2 1/4" further back than oem style flange. i.e. longer spacer.

    My 250 Swap - Page 3 C0TspJ

    My 250 Swap - Page 3 RFaDB5

    My 250 Swap - Page 3 Mxqwm0
    stanyon
    stanyon


    Number of posts : 147
    Location : Spokane, WA.
    Registration date : 2013-08-29

    My 250 Swap - Page 3 Empty Re: My 250 Swap

    Post by stanyon Wed Apr 01, 2015 3:47 pm

    Seth could you measure the depth of the fan you got with your radiator, looks a lot narrower then the Tarus, also is it a single or dual Speed ?
    Seth G
    Seth G
    Vintage-Vans Listings Manager
    Vintage-Vans Listings Manager


    Number of posts : 2086
    Location : Anacortes, WA
    Age : 50
    Registration date : 2013-04-24

    My 250 Swap - Page 3 Empty Re: My 250 Swap

    Post by Seth G Wed Apr 01, 2015 6:38 pm

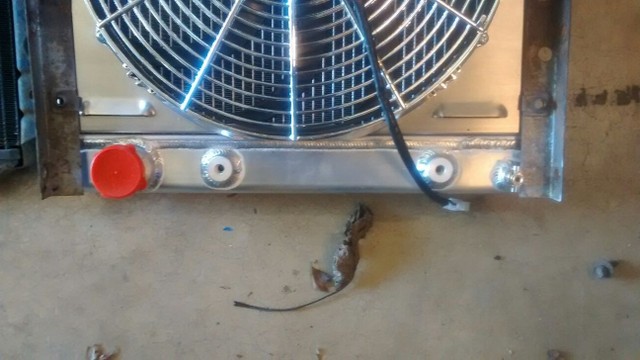
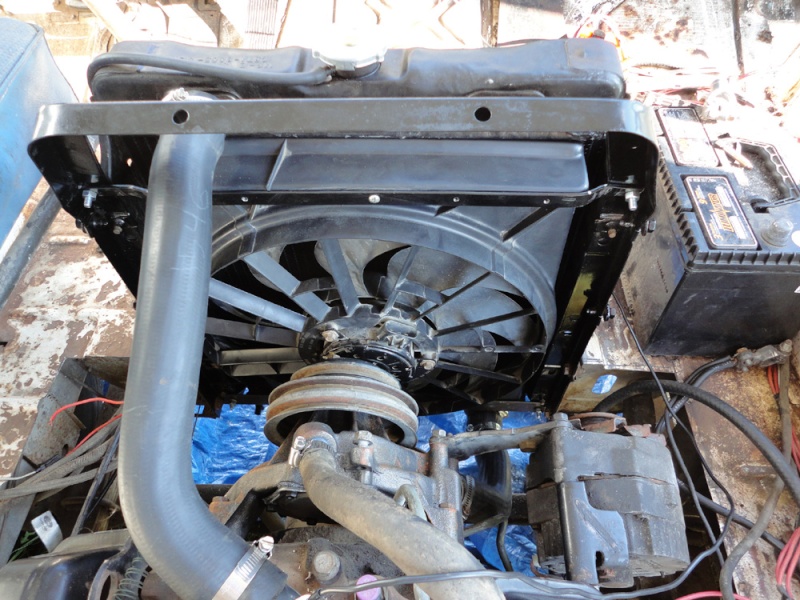
    It's 3" from the face of the shroud, which is proud ~ 1/4" beyond the edge of the tanks. It will be a ~3.25 or more clearance from it's outer thickest point past the backside(radiator side) of the radiator frame for me, to leave 1/4" clearance, b/c I will have the face of the shroud @ the back of the support give a 1/16" or so for neoprene or what have you.

    Basically, the fan will stick out 2" or less from the leading edge of the radiator frame, engine side.

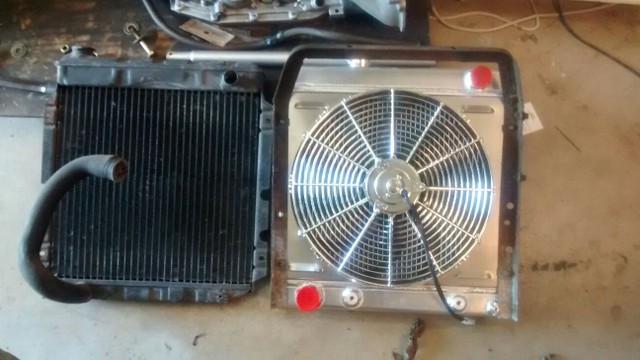
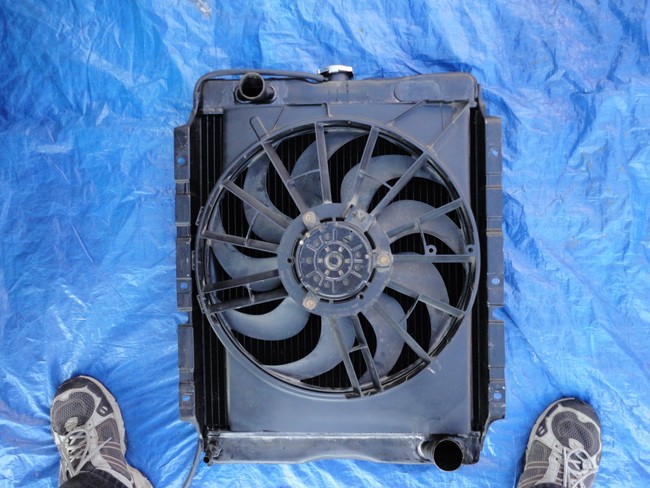
    The fan is single speed, 2600 cfm. I haven't powered it yet. I'll throw some juice @ it and see if it's balanced ok. The fan is pretty cheesy, chrome plastic grill and all Wink 
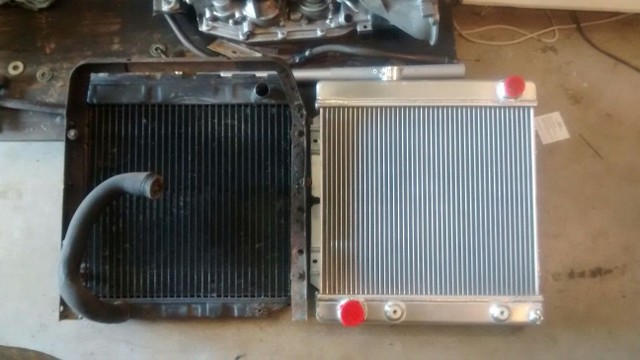
the shroud and radiator look really good though. I think it will cool 200% better than the oem. Half b/c it's new and better design and 1/2 b/c it's got a shroud Smile I'm still devising the control scheme. I'm thinking a delay on break relay @ 5 minute's. So if the fan is running when the engine is shut down it will continue until the temp opens the switch or 5 minutes has passed. But it has to be interlocked or engaged with the igintion. Don't want a 5 min delay when temp is reached under way. Still got to think the circuit through, but it's going to be pretty basic.

    The fan blade measures 15 1/8". Not sure the width of the tarus fan but maybe a retrofit with a homemade shroud? Does the oem tarus shroud fit between the radiator support frame?

    Got a lifetime warranty on the radiator for whatever that's worth. Looks good and they're proud but we all know what a lifetime warranty is worth on a POS from an unknown operator ... Smile

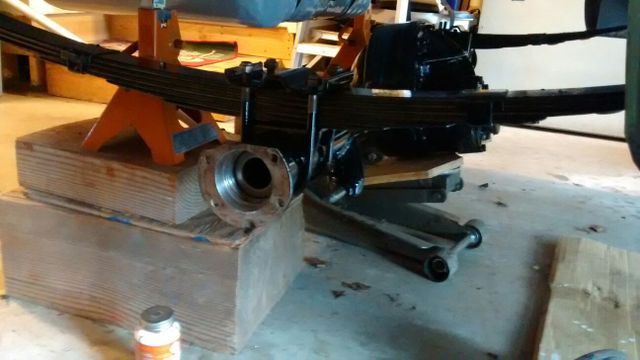
    I would like to add here as well that this van never overheated, even last summer, with the old puny radiator and being run hard with the 170. No shroud, no doghouse pan...... Rolling Eyes scratch Twisted Evil It's a beautiful place to live I guess


    Last edited by Seth G on Wed Apr 01, 2015 10:29 pm; edited 7 times in total
    Big W
    Big W


    Number of posts : 3282
    Location : Saskatoon,Sask,Canada
    Age : 60
    Registration date : 2011-01-13

    My 250 Swap - Page 3 Empty Re: My 250 Swap

    Post by Big W Wed Apr 01, 2015 7:30 pm

    Here is the Taurus fan with the shroud cut down to fit the 240 radiator. The width of the shroud is not modified and fits between the rad brackets nicely.My 250 Swap - Page 3 Best_f10
    Seth G
    Seth G
    Vintage-Vans Listings Manager
    Vintage-Vans Listings Manager


    Number of posts : 2086
    Location : Anacortes, WA
    Age : 50
    Registration date : 2013-04-24

    My 250 Swap - Page 3 Empty Re: My 250 Swap

    Post by Seth G Wed Apr 01, 2015 7:32 pm

    How far does it stick out beyond the edge of the radiator support/mounting frame?
    Big W
    Big W


    Number of posts : 3282
    Location : Saskatoon,Sask,Canada
    Age : 60
    Registration date : 2011-01-13

    My 250 Swap - Page 3 Empty Re: My 250 Swap

    Post by Big W Wed Apr 01, 2015 7:41 pm

    I'm not sure what the distance is. May be a couple inches at best. here is the closest pic of a side view with the rad leaned forward.My 250 Swap - Page 3 Copy_o11
    Seth G
    Seth G
    Vintage-Vans Listings Manager
    Vintage-Vans Listings Manager


    Number of posts : 2086
    Location : Anacortes, WA
    Age : 50
    Registration date : 2013-04-24

    My 250 Swap - Page 3 Empty Re: My 250 Swap

    Post by Seth G Wed Apr 01, 2015 10:25 pm

    Is that extension on the front of the 240 radiator's mounting flange stock? That's totally different than the oem 170 style radiator which has the flange on the engine side face of the radiator, not another 2" rearward like that pic shows.
    Seth G
    Seth G
    Vintage-Vans Listings Manager
    Vintage-Vans Listings Manager


    Number of posts : 2086
    Location : Anacortes, WA
    Age : 50
    Registration date : 2013-04-24

    My 250 Swap - Page 3 Empty Re: My 250 Swap

    Post by Seth G Wed Apr 01, 2015 10:36 pm

    And what's up with the bottom of that pic, it looks like the passengers side is floating? And what is that batttery looking thing there at the bottom? The bolts are there but the dog house is missing? Looks like 5" or more back from the aft face of the radiator to the face of the fan
    stanyon
    stanyon


    Number of posts : 147
    Location : Spokane, WA.
    Registration date : 2013-08-29

    My 250 Swap - Page 3 Empty Re: My 250 Swap

    Post by stanyon Thu Apr 02, 2015 5:46 am

    Morning Seth, I believe that BIG W has a 350 V8 in his van which leaves a lot more room towards the front. You mentioned a time delay on for the cooling fan, I've been trying to find an On Delay switch to work in for my fans also, found nothing for a 12 V. application but did find a 24 V. 2 amp one that is used on home furnaces. If you came across something that works please let me know.
    Big W
    Big W


    Number of posts : 3282
    Location : Saskatoon,Sask,Canada
    Age : 60
    Registration date : 2011-01-13

    My 250 Swap - Page 3 Empty Re: My 250 Swap

    Post by Big W Thu Apr 02, 2015 7:43 am

    Seth G wrote:And what's up with the bottom of that pic, it looks like the passengers side is floating? And what is that battery looking thing there at the bottom? The bolts are there but the dog house is missing? Looks like 5" or more back from the aft face of the radiator to the face of the fan
    ....The side brackets on my radiator are the stock 240 side brackets, that were put onto a new core. The rad looks like it's floating because my floor is cut away to allow more air to get around the V8 (Chevy 350). I leave bolts in stuff so I don't loose them, and easier to find at re assembly time. The battery is just sitting on the floor between wheel well and radiator support. The rad support bolts to the body under the floor. Everything is in stock location.....other then the v8...lol.
    Big W
    Big W


    Number of posts : 3282
    Location : Saskatoon,Sask,Canada
    Age : 60
    Registration date : 2011-01-13

    My 250 Swap - Page 3 Empty Re: My 250 Swap

    Post by Big W Thu Apr 02, 2015 7:57 am

    Here is a better shot of the brackets bolted under the floor and how the floor is cut out to make way for wider side panels that will fit under the seats. Battery will eventually be in a battery hanger under the passenger floor at side doors.Click on the pic to see the whole thing.My 250 Swap - Page 3 Copy_o12
    Seth G
    Seth G
    Vintage-Vans Listings Manager
    Vintage-Vans Listings Manager


    Number of posts : 2086
    Location : Anacortes, WA
    Age : 50
    Registration date : 2013-04-24

    My 250 Swap - Page 3 Empty Re: My 250 Swap

    Post by Seth G Thu Apr 02, 2015 8:24 am

    Thanks Big W that helps. Been so long I'm having a hard time remembering how the darn thing goes in there, lol.

    Stanyon, having been an HVAC guy for 20 years is how I'm familiar with them. Got to be some 12v DC coil ones out there. I'll let you know if/when I find them.
    Seth G
    Seth G
    Vintage-Vans Listings Manager
    Vintage-Vans Listings Manager


    Number of posts : 2086
    Location : Anacortes, WA
    Age : 50
    Registration date : 2013-04-24

    My 250 Swap - Page 3 Empty Re: My 250 Swap

    Post by Seth G Thu Apr 02, 2015 7:08 pm

    Stanyon, here's one but it will only go 3 minutes max. It's rated for 30 amps, should be enough. Especially since we are just going to be triggering the main fan relay anyway, not running fan power through this switch. I'll keep looking, would like to find one with a longer duration if possible.

    http://www.delcity.net/store/Time-Delay-Relay/p_804415.h_804416.t_1.r_IF1003?mkwid=p8K1eNNo&crid=38094426869&gclid=COuI5aqG2cQCFcRgfgodXXMAlg

    These guys have/make every kind of relay imaginable

    http://www.wolstentech.com/products/timedelayrelay/timedelayrelay.php
    Seth G
    Seth G
    Vintage-Vans Listings Manager
    Vintage-Vans Listings Manager


    Number of posts : 2086
    Location : Anacortes, WA
    Age : 50
    Registration date : 2013-04-24

    My 250 Swap - Page 3 Empty Re: My 250 Swap

    Post by Seth G Thu Apr 02, 2015 7:27 pm

    There's this little guy here, solid state. Looks like it will do exactly what I need and it's cheap. But it is fully exposed

    http://www.amazon.com/Power-Supply-Adjustable-Trigger-Module/dp/B00E1JNLTS/ref=sr_1_1?ie=UTF8&qid=1428027131&sr=8-1&keywords=time+delay+relay+12v
    Seth G
    Seth G
    Vintage-Vans Listings Manager
    Vintage-Vans Listings Manager


    Number of posts : 2086
    Location : Anacortes, WA
    Age : 50
    Registration date : 2013-04-24

    My 250 Swap - Page 3 Empty Re: My 250 Swap

    Post by Seth G Fri Apr 03, 2015 8:31 am

    Big W wrote:My 250 Swap - Page 3 Copy_o12

    I just noticed something. The 240 radiators inlet is on the wrongs side for the small sixes.
    Seth G
    Seth G
    Vintage-Vans Listings Manager
    Vintage-Vans Listings Manager


    Number of posts : 2086
    Location : Anacortes, WA
    Age : 50
    Registration date : 2013-04-24

    My 250 Swap - Page 3 Empty Re: My 250 Swap

    Post by Seth G Fri Apr 03, 2015 8:32 am

    Big W wrote:My 250 Swap - Page 3 Copy_o12

    I just noticed something. The 240 radiators ports are on the wrong sides for the small six. Did you have those swapped or is that the oem locations?
    Big W
    Big W


    Number of posts : 3282
    Location : Saskatoon,Sask,Canada
    Age : 60
    Registration date : 2011-01-13

    My 250 Swap - Page 3 Empty Re: My 250 Swap

    Post by Big W Fri Apr 03, 2015 11:06 am

    The top hose inlet was moved to the other side.My 250 Swap - Page 3 Best_f11

    Sponsored content


    My 250 Swap - Page 3 Empty Re: My 250 Swap

    Post by Sponsored content


      Current date/time is Sat May 11, 2024 12:30 pm