VintAGE-Vans

Would you like to react to this message? Create an account in a few clicks or log in to continue.

BRINGING IT ALL TOGETHER.... A's, G's & E's


+15
jrdunn96
paradiddle
WYO George
cole63
Das Boot
vanny
Udo
Big W
jimthefred
stanyon
BoneMan
FIZGIG
SDEconoTruck
Barnabas
Seth G
19 posters

    My 250 Swap

    Seth G
    Seth G
    Vintage-Vans Listings Manager
    Vintage-Vans Listings Manager


    Number of posts : 2087
    Location : Anacortes, WA
    Age : 51
    Registration date : 2013-04-24

    My 250 Swap - Page 5 Empty Re: My 250 Swap

    Post by Seth G Tue Dec 15, 2015 8:25 pm

    Thanks Brian! It's been alot of grungy work Smile

    I picked up my wheels from the powder coater today, they look fantastic! I went with black 60% gloss. I think they turned out perfect. I took them and got the rubber put on. The tire shop has tried to hoodwink me. I won't get into it right now, I have a call into their regional office but I will say they pulled a fast one on me and for $20 Wink Not to smart. I'll go into that more and give you guy's the heads up once it's resolved in the next days. For now just be very careful dealing w/ Discount Tire.

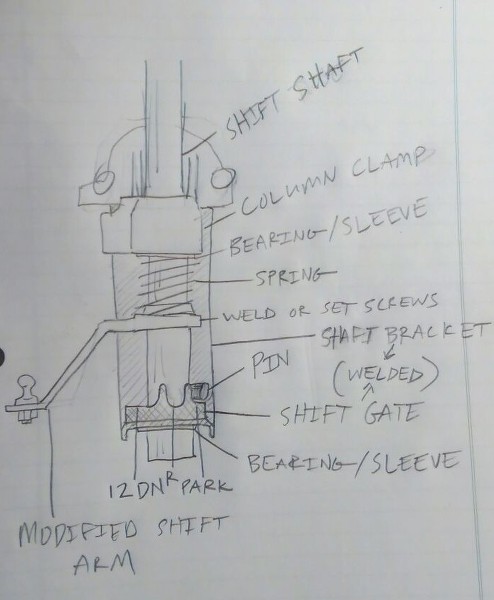
    In the mean time since the last update, I've had an issue w/ studs on the rear length wise. After going around and around with that and several other issues with the rear disc's I've decide to shit can the rear disc setup and go back to drums. I had the backing plates and stuff sand blasted, got new finned drums and all new internals for the 10x2.5" rear drums. Gonna rebuild them and call it a day. Waiting for an opportunity to paint the drums and backing plates w/ caliper paint so I can put it behind me. It's been cold and raining and the boss has one of his projects in the little finish tent we have in the heated part of the shop. FYI, I got the drums from rock auto for $29/pc, they were $89 from other auto parts stores. The finned front drums are actually cheaper than the non-finned rear only 2.5" drums anyway. The front and rear drums are the same for the 9" axle, other than the cooling fins. It cost me $140 to completely rebuild them including shipping. Solves several problems, from the parking brake setup to having to clock the calipers off b/c of the leaf springs.

    Anyway, here's the wheels. I talked w/ my machinist last week and he's going to be getting the head done soon, so that's good news.

    My 250 Swap - Page 5 LDZw51

    My 250 Swap - Page 5 KEiWSq

    My 250 Swap - Page 5 HdMs4F

    Hard to get a good shot in the garage at night.

    Btw, the wheels are 15x7's +6mm offset/4.25" backspace mounted on 5mm(~3/16") wheel spacers w/ 225/60's for tires. I was tempted to go with 235's but I would have had to jump up slightly in diameter and was pretty sure they'd rub the drag link and maybe the fenders front. I've got 5/8" clearance to the fender lips in the back. I'll stick one of the old wheels in and compare, but I think I've pulled the wheels out at least 3/4"


    Last edited by Seth G on Tue Dec 15, 2015 9:15 pm; edited 3 times in total
    Seth G
    Seth G
    Vintage-Vans Listings Manager
    Vintage-Vans Listings Manager


    Number of posts : 2087
    Location : Anacortes, WA
    Age : 51
    Registration date : 2013-04-24

    My 250 Swap - Page 5 Empty Re: My 250 Swap

    Post by Seth G Tue Dec 15, 2015 9:04 pm

    Also, I email Bruin brakes on what it would take to get new cables for the stock rear drums. I was going to have them make me cables for the disc setup. They told me it they have no info on them so it will cost $75 "engineering" fee + $15-$45 each depending on what it takes to make them. Fairly reasonable, but the 'engineering' fee kind of sticks in my crawl b/c I know they will sell them there after and I'd be paying for it... But still not to bad, whatever I guess if I really want them new. I'd need to take some pic's and measurements or mail them one. I think for now I'll just Kroil the ones I have, clean them up and put 'em in service. If it were me and I thought I might sell quite a few, I'd waive the fee.... I may run that up the ol flag pole and see what they say.

    Now b/c I went back to drums I'm going to sell the 8" dual diaphragm booster and I've got an 8" single to replace it. 8" single is equivalent to a 7" dual but shorter in length. This will help with a clearance problem I've got with the parking brake handle/assy. Still may have to rework that a bit though ... Mad maybe not we'll see.  Lack of foresight on my part. head + brick wall. I've replaced the master as well b/c an issue with the machining of the ports. Got a good deal on an aluminum 1" bore universal and 8" single booster from CPP for $112 shipped. Picked up a #10 residual to replace the #2 for the drums in the rear to.
    Das Boot
    Das Boot


    Number of posts : 76
    Location : Spartanburg, SC
    Registration date : 2013-01-29

    My 250 Swap - Page 5 Empty Re: My 250 Swap

    Post by Das Boot Wed Dec 16, 2015 11:23 am

    Seth,
    Your cylinder head is looking real good. I see you're going with the positive seals. Are you sticking with the springs you had originally posted or going with something different?
    Seth G
    Seth G
    Vintage-Vans Listings Manager
    Vintage-Vans Listings Manager


    Number of posts : 2087
    Location : Anacortes, WA
    Age : 51
    Registration date : 2013-04-24

    My 250 Swap - Page 5 Empty Re: My 250 Swap

    Post by Seth G Wed Dec 16, 2015 7:09 pm

    Actually I'm not using positive seals, I'm using felpro umbrellas. I'm looking for another head though and I may go that route with it, it will get the 2v conversion etc. With this head I'm going to just use the RBS carb, it will have the larger valves though and the porting I've done. I'm also going to be using the stock exhaust manifold with this head for now. I've gotten so deep into this I just want to get it running/broken in and keeping it simple helps me get it going sooner and cheaper.

    After talking with my machinist I have sold those springs, I think they are perfect for a little more aggressive cam but I don't need them. I've gone with the #60 comp springs, 906-12's iirc. Will be better for my application.

    On another score, I'm still bugged by that 7 thou runout/anomally on the #1 intake base circle of the Erson cam. I sent the damn thing back to them and got it back, all on their dime. But I don't think the guy's in kentucky actually did a damn thing with it or really checked. It looked exactly like it did when I packed it, covered in break in grease, no report or print out of the test..... I had to give them a call to get it back, the rep had the operations in Kentucky call me and the guy was like, "what was the problem?" and this was after waiting months.....I think they've gone downhill since moving operations from Nevada to Kentucky. Although the rep in Nevada was very responsive when I had a problem, something is getting lost in translation between there and 'tucky  Rolling Eyes  I'd have told them to keep it, but I left the damned wedding ring on there. I still had the same 'bump there when I degree'd it in. They said "it's fine", but I don't think so. I've talked with Delta Camshaft in Tacoma and they are going to check it out and give me the real scoop. They're telling me that if what I'm seeing is infact ground into the cam it's big problem and will bump the valve. Any runout on the base circle over 2-3 thou or so will do that, esp w/ a hydraulic cam. It'll be interesting to see what they find. I'll definitely be giving the Erson rep another call when I get the story and the bill from Delta to check it out and make it right if need be. We'll see.

    Seth G
    Seth G
    Vintage-Vans Listings Manager
    Vintage-Vans Listings Manager


    Number of posts : 2087
    Location : Anacortes, WA
    Age : 51
    Registration date : 2013-04-24

    My 250 Swap - Page 5 Empty Re: My 250 Swap

    Post by Seth G Wed Dec 16, 2015 7:44 pm

    I got the tire issue resolved. It worked out very well, almost worth the hassle, Ricky @ Discount Tire in Burlington made it right. I'm to tired to spell it out but I'll give you the run down tomorrow or next time. It was trip
    Seth G
    Seth G
    Vintage-Vans Listings Manager
    Vintage-Vans Listings Manager


    Number of posts : 2087
    Location : Anacortes, WA
    Age : 51
    Registration date : 2013-04-24

    My 250 Swap - Page 5 Empty Re: My 250 Swap

    Post by Seth G Wed Dec 16, 2015 7:48 pm

    What I like about these wheels, is with the hubcaps they look good, but still fit in to the nature and condition of the van. But when I do the body and paint I can throw some trim rings on and take it up to the new look. The pictures don't really do it justice, they look awesome Cool
    Das Boot
    Das Boot


    Number of posts : 76
    Location : Spartanburg, SC
    Registration date : 2013-01-29

    My 250 Swap - Page 5 Empty Re: My 250 Swap

    Post by Das Boot Tue Dec 22, 2015 8:37 am

    Seth,
    That sucks about your cam.  I've been looking around on the internet over the last day or two for something similar to what you have - maybe find something close to what you have by a different manufacturer. A lot of engine planning involves the cam.  Changing things now could change the way you intended for the engine to behave.  After all this searching I've got to say, that is one unusual cam you have.  At first I though maybe you typed a wrong number, but Erson's website shows the same.  Are the lobes fat and rounded?  Everything I've found so far has moderate to fast ramps with more lift.  I haven't been able to find anything with the duration you have with the same amount of lift.  Nothing, but I might have some hope...

    I had this nasty valve tick that emerged after breaking the engine in.  I also had a bunch of little nit-pickin' problems, but I guess it goes with the territory.  Anyways, the valve tick ended up being the rocker.  It had slid off to the side of the valve and was opening the valve by hitting the retainer.  The best I could guess is that the adjuster wasn't tightened enough and it bounced itself to the side.  Now I'm running hydraulic lifters with adjustable rockers like you're planning to.  I don't know if I would worry about .007 on the flat side of the cam.  I tightened the crap out of that adjuster - a half turn vs. a quarter turn after contact with the lifter.  It runs fine and there is no difference in performance.  This makes me believe your bump will not be an issue with your engine.  I really think your lifter is going to absorb that anomaly.  I just thought I'd share what I had happened and maybe it will help you out.

    -Brian
    Seth G
    Seth G
    Vintage-Vans Listings Manager
    Vintage-Vans Listings Manager


    Number of posts : 2087
    Location : Anacortes, WA
    Age : 51
    Registration date : 2013-04-24

    My 250 Swap - Page 5 Empty Re: My 250 Swap

    Post by Seth G Sat Jan 02, 2016 4:37 pm

    Got the rear drums done and reinstalled....

    My 250 Swap - Page 5 Fhu5bd

    Unfortunately one of the e-brake cables is siezed up and will not free up no matter how much kroil I drench it in Mad I can get it to move back and forth by beating a pair of channel locks hooked on the end but it will not free up and move freely....


    Brian, thanks for the input. I was telling myself the same thing until I did some research and talked to my machinist and called Delta Cam. They all say it's a problem and should be checked out. I don't want to pull the damned thing back out but I probably will..... They told me they will be able to fix it even if they have to regrind it. Mainly I just want a 3rd party to check it at this point b/c I'm pretty sure it's there. Btw, they all said if it were a solid lifter cam it probably wouldn't be a big deal. Which is exactly the opposite of my assumption, thinking the hydraulic lifters would absorb it...
    Seth G
    Seth G
    Vintage-Vans Listings Manager
    Vintage-Vans Listings Manager


    Number of posts : 2087
    Location : Anacortes, WA
    Age : 51
    Registration date : 2013-04-24

    My 250 Swap - Page 5 Empty Re: My 250 Swap

    Post by Seth G Sat Jan 02, 2016 4:41 pm

    I got the brake system bled, put the tires on and she rolled out of the garage for the first time in over a year Exclamation cheers

    My 250 Swap - Page 5 0JUe4R

    Next I need to rob the parking brake cables from the old rear end and get them installed. But first the garage is getting a douching!
    Big W
    Big W


    Number of posts : 3282
    Location : Saskatoon,Sask,Canada
    Age : 60
    Registration date : 2011-01-13

    My 250 Swap - Page 5 Empty Re: My 250 Swap

    Post by Big W Sat Jan 02, 2016 9:01 pm

    It's coming along nicely Seth.
    cole63
    cole63


    Number of posts : 90
    Location : GA
    Registration date : 2013-05-19

    My 250 Swap - Page 5 Empty Re: My 250 Swap

    Post by cole63 Sun Jan 03, 2016 6:07 pm

    Looking good!
    FIZGIG
    FIZGIG


    Number of posts : 334
    Location : Lynnwood, WA
    Registration date : 2014-01-23

    My 250 Swap - Page 5 Empty Re: My 250 Swap

    Post by FIZGIG Mon Jan 04, 2016 12:38 pm

    WooHoo!!!!
    Seth G
    Seth G
    Vintage-Vans Listings Manager
    Vintage-Vans Listings Manager


    Number of posts : 2087
    Location : Anacortes, WA
    Age : 51
    Registration date : 2013-04-24

    My 250 Swap - Page 5 Empty Re: My 250 Swap

    Post by Seth G Tue Feb 02, 2016 12:47 pm

    Got the head back today Smile

    My 250 Swap - Page 5 7tlmsQ

    My 250 Swap - Page 5 58Fi8D
    Das Boot
    Das Boot


    Number of posts : 76
    Location : Spartanburg, SC
    Registration date : 2013-01-29

    My 250 Swap - Page 5 Empty Re: My 250 Swap

    Post by Das Boot Wed Feb 03, 2016 9:44 am

    It's looking good! It won't be long before you're driving it.
    Seth G
    Seth G
    Vintage-Vans Listings Manager
    Vintage-Vans Listings Manager


    Number of posts : 2087
    Location : Anacortes, WA
    Age : 51
    Registration date : 2013-04-24

    My 250 Swap - Page 5 Empty Re: My 250 Swap

    Post by Seth G Fri Apr 15, 2016 8:48 pm

    I sent the cam down to Tacoma, got it back and it was deja vu all over again. In the shit can it goes, it's f*cking cursed. On the recommendation of the fordsix guys I called Schneider Cams yesterday and have a new cam for my engine coming in a couple weeks.
    vanny
    vanny
    Moderator


    Number of posts : 14778
    Location : Ashburnham, MA
    Age : 65
    Registration date : 2012-09-22

    My 250 Swap - Page 5 Empty Re: My 250 Swap

    Post by vanny Sat Apr 16, 2016 2:45 am

    I hope this one works out for you. You deserve it after that fiasco!


    _________________
    “The future will soon be a thing of the past."

    http://public.fotki.com/Vintage-Vans/vintage-vans-es/ruff-diamond-1/?cmd=fs_slideshow
    Seth G
    Seth G
    Vintage-Vans Listings Manager
    Vintage-Vans Listings Manager


    Number of posts : 2087
    Location : Anacortes, WA
    Age : 51
    Registration date : 2013-04-24

    My 250 Swap - Page 5 Empty Re: My 250 Swap

    Post by Seth G Sun Apr 17, 2016 11:44 pm

    Thanks vanny
    Seth G
    Seth G
    Vintage-Vans Listings Manager
    Vintage-Vans Listings Manager


    Number of posts : 2087
    Location : Anacortes, WA
    Age : 51
    Registration date : 2013-04-24

    My 250 Swap - Page 5 Empty Re: My 250 Swap

    Post by Seth G Sat May 21, 2016 5:11 pm

    About time for an update. I still haven't gotten my new cam from Schneider. In the mean time I've gone through the wiring harness from where it goes through the floor onward and removed the looming and tape and cleaned each wire of grease dirt etc. Figured out and labelled them. I've gotten a 3G alternator and moved my v pulley onto it. I've decided to place the temp switch for fan control in the thermostat housing. There's already a boss there for it, I just need to drill and tap it for 3/8" pipe threads.

    I went back and forth on where to mount the sender, on the engine output or in the radiator tank. After much thought I went with engine output @ the T-stat housing. I got a USA made top grade 180 thermostat and a 200F on / 185F off thermal switch for the radiator fan relay. The OEM stat is 195F, these engine run most efficient @ 180-205F. I don't want the t-stat and the fan to fight each other.  My theory is the stat opens @ 180, heater should work good, if/when the van reaches 200 fan kicks in then out before the stat closes. I figure I'll add a fan override switch to engage the fan manually for if/when the sender fails. I don't anticipate any cooling problems with the 1 1/8" x 2 row radiator. The cores are huge. It will be interesting to see how the system works in practice.

    I also took the time I've had waiting for the cam to bang some dents out of the bumpers, scratch them up and rattle can them. Also did the same for the roof racks. And while they were off I sanded, cleaned and painted the roof with a new coat of hammerite. There was some surface rust forming here and there and the spot welds were rusting here and there under the gutters. Since it's going to be back in the weather I figured I better stave that off. Put the bumpers and racks back on with all new stainless hardware. I installed new license plate lamps in the rear bumper and repainted behind the headlamp bezels up front and put new gaskets on the headlamp buckets.

    I also replace my drivers vent window which had a broken handle stud. Put a new seal in it while I was at it. I replaced my Dome lamp bezel's and lens as well. I got and installed all new cage nuts for the doghouse and finally cleaned that gunk residue from the sealing area. I found naptha worked very well at cleaning that residue off.

    I also got and installed new reflectors on the back to replace the ones added at some point by some owner. And I picked up a pack of 8 of these tiny LED's to use as back up lights. They mount through a 3/8" hole. I'm going to put 2 facing straight back in either side of the rear bumper inbetween where the bumper bracket v's out to the bumper and 1 on either end of the bumper facing down mounting in the bottom edge of the bumper. They seem plenty bright enough for the job and easy to mount with a 3/8" drill bit.

    I need to get a windshield gasket so I can put my new windshield in.

    http://www.amazon.com/HOTSYSTEM-Bumper-Motorcycle-Daytime-Running/dp/B00LC06RWM?ie=UTF8&psc=1&redirect=true&ref_=oh_aui_detailpage_o00_s01

    My 250 Swap - Page 5 QdcIrv

    My 250 Swap - Page 5 C5pLg8

    My 250 Swap - Page 5 PMIq8T
    vanny
    vanny
    Moderator


    Number of posts : 14778
    Location : Ashburnham, MA
    Age : 65
    Registration date : 2012-09-22

    My 250 Swap - Page 5 Empty Re: My 250 Swap

    Post by vanny Mon May 23, 2016 3:57 am

    Nice work, really shaping up! I love the Ford hubcaps. I bought some hubcaps similar to those but they didn't fit the 15inch rims that were on the van...nothing for them to attach to. How are those door mirrors working for you? Do they give you a good sight line? I bought a pair but haven't installed yet.


    _________________
    “The future will soon be a thing of the past."

    http://public.fotki.com/Vintage-Vans/vintage-vans-es/ruff-diamond-1/?cmd=fs_slideshow
    Seth G
    Seth G
    Vintage-Vans Listings Manager
    Vintage-Vans Listings Manager


    Number of posts : 2087
    Location : Anacortes, WA
    Age : 51
    Registration date : 2013-04-24

    My 250 Swap - Page 5 Empty Re: My 250 Swap

    Post by Seth G Mon May 23, 2016 8:09 am

    I hate them vanny. The division bar blocks line of site on the PS. I'm looking for a descent set of west coast mirrors to put back on the van. They would work fine if mounted back at the division bar but not look so good.
    vanny
    vanny
    Moderator


    Number of posts : 14778
    Location : Ashburnham, MA
    Age : 65
    Registration date : 2012-09-22

    My 250 Swap - Page 5 Empty Re: My 250 Swap

    Post by vanny Mon May 23, 2016 6:28 pm

    Thanks for the feedback Seth.


    _________________
    “The future will soon be a thing of the past."

    http://public.fotki.com/Vintage-Vans/vintage-vans-es/ruff-diamond-1/?cmd=fs_slideshow
    Seth G
    Seth G
    Vintage-Vans Listings Manager
    Vintage-Vans Listings Manager


    Number of posts : 2087
    Location : Anacortes, WA
    Age : 51
    Registration date : 2013-04-24

    My 250 Swap - Page 5 Empty Re: My 250 Swap

    Post by Seth G Mon May 23, 2016 8:21 pm

    That's why I didn't get the the ones that have the aftermarket inside moons, I wanted to be able to use any old hub caps. The original 13's used the ~9" i think, but my old 14's, the 15's and most use the ~10 1/8" dog dishes. All use the rims with the nubs on the outside. Dodge rims are very similar and interchangable.
    Seth G
    Seth G
    Vintage-Vans Listings Manager
    Vintage-Vans Listings Manager


    Number of posts : 2087
    Location : Anacortes, WA
    Age : 51
    Registration date : 2013-04-24

    My 250 Swap - Page 5 Empty Re: My 250 Swap

    Post by Seth G Wed May 25, 2016 9:03 pm

    My friend wrapped my wheel and visors in leather with some tooling and lacing for fun and i got them back today. I'm very grateful for his efforts. Built to wear and last Smile

    My 250 Swap - Page 5 In2mPQ

    My 250 Swap - Page 5 HftdD7

    My 250 Swap - Page 5 1JJzRt

    https://www.youtube.com/watch?v=ws-_syszg84

    https://www.youtube.com/watch?v=JledLYn4NBE

    https://www.youtube.com/watch?v=a7sh89iZzd4
    WYO George
    WYO George


    Number of posts : 12
    Location : Wyoming
    Registration date : 2016-02-14

    My 250 Swap - Page 5 Empty Re: My 250 Swap

    Post by WYO George Thu May 26, 2016 1:11 pm

    Very nice leather work. I have a guy who builds a lot of custom holsters for me, I may have to show him these pics and see if he'd wrap a wheel for me.
    Seth G
    Seth G
    Vintage-Vans Listings Manager
    Vintage-Vans Listings Manager


    Number of posts : 2087
    Location : Anacortes, WA
    Age : 51
    Registration date : 2013-04-24

    My 250 Swap - Page 5 Empty Re: My 250 Swap

    Post by Seth G Mon May 30, 2016 5:39 pm

    Thanks George, my advise, do it Smile It all looks right at home in the van. The possibilities are endless. Light sucks but here's a pic,

    My 250 Swap - Page 5 9sma3E

    This is what I've come up with to convert the 3 speed shifter into an automatic. I haven't been able to examine an oem auto column. I've seen Vic post a cable setup. Looks like it should work well. I'll either make an indicator or buy a generic one like the ididit Shift Indicator. I can get control cables wholesale at work so I'm going to go with a 30 series. I think it will work fine for the job. If it seems too weak I'll get a 40 series.

    My 250 Swap - Page 5 X8xVEL

    I'll use the base of this shift arm, utilizing the notches already there, to make the gate that get's welded to the support bracket. Already has a grease zerk, so I'll forego installing the bearing/sleeve in it. At least until it seems necessary.

    My 250 Swap - Page 5 KXM4Rp

    I plan on using the same spring that's used to keep the guide in the bearing under the steering wheel. I'll put the arm in the oem position on the oem pin if possible and use set screws for the arm and a cotter pin to capture the pin. I don't want to capture anything permanently if I can help it. Maybe use an allen headed machine screw and some locktite for the bottom pin...

    Sponsored content


    My 250 Swap - Page 5 Empty Re: My 250 Swap

    Post by Sponsored content


      Current date/time is Thu Oct 17, 2024 10:56 pm