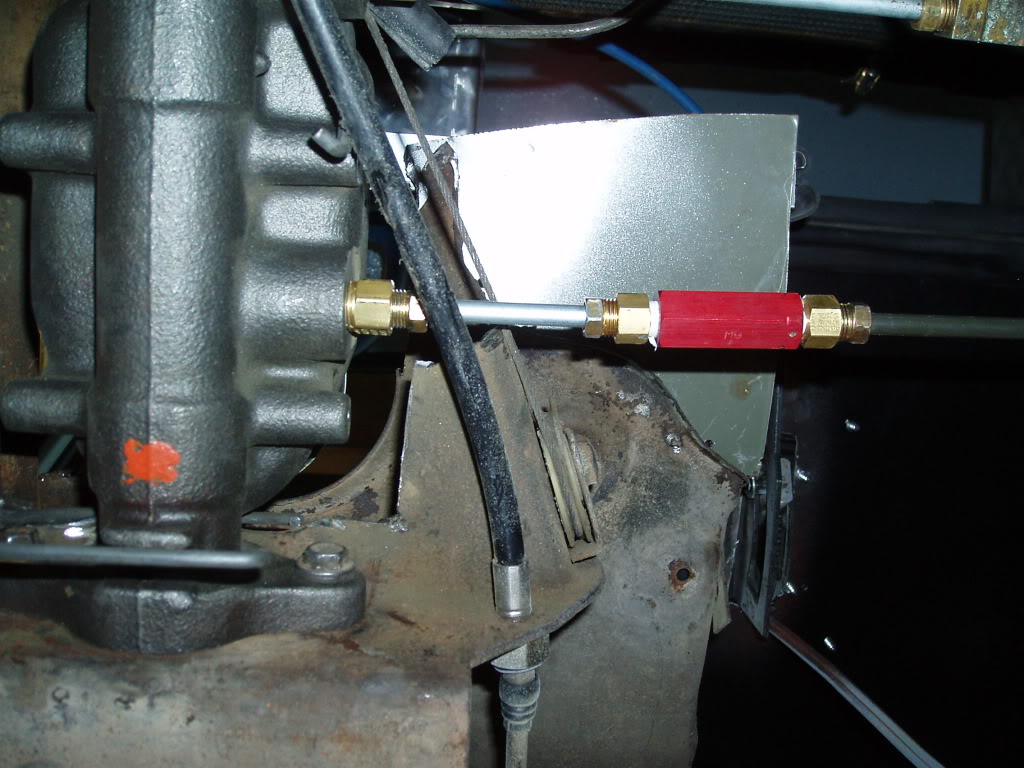
we have a Corvette master and a residual valve. What do you think??? New connection to rear
+21
wideload
Twinpilot001
Vanadian
whopman
Lyrad
panelmanrd
Sporto's 67
ChevyVanMan1
63chevyvan?
BILLS66
xjamesx
gotavan
BvrWally
m1dadio
DanTheVanMan
G-Man
mo_1040
Scott
Digz
donivan65
wdaguy
25 posters
disc brake conversion kits????????????? expert opinions?
wdaguy- Number of posts : 157
Location : tucson
Registration date : 2009-02-10
Well I am having fitts trying to bleed this puppy. Hope I did it right?
we have a Corvette master and a residual valve. What do you think??? New connection to rear
m1dadio- Chevy Guru
- Number of posts : 1778
Location : north saanich
Registration date : 2008-10-06
Wdaguy:
My guess is that red valve is a 10 pound valve going to rear drums?
What do you have on the front lines? A 2 lb valve with disc brakes?
That master looks too dry around the fittings, did you "bench bleed it"?
Are the check valve installed in the correct flow direction?
Are you still having problems bleeding?
M1D
donivan65- Governor
- Number of posts : 12245
Location : San Diego, California
Registration date : 2008-05-12
And if you were completely dry and bleeding the system by pumping the pedal,,,,you kind of get air bound when you bleed one line and get some pressure built up. The side that has pressure stops the piston from pushing the air out of the other line, so you got to bleed the good one, then the bad one at the same time until the pressure in both pistons equalize and they both start pushing the air out. So don't bleed one line completely it WILL stop the other line from having a complete stroke to force the air out.
wdaguy- Number of posts : 157
Location : tucson
Registration date : 2009-02-10
Interesting.. The Vette master was bench bled was I suppose to take something out of the master.? sounds like I need a pressure bleeder? We have been using a hand held suction type.
wdaguy- Number of posts : 157
Location : tucson
Registration date : 2009-02-10
I may be cofused fro M1 directions page? "all you would need to do is use the Corvette master and then install the inline 10 lb residual valve in the rear brake line:".[/i][/u][/b] this was a 68 Vette mc not 65?. Do you think I need to install the Blue residual valve for thr fronts? We have brakes but squishy pedal it really doesnt pump up. It will stop but not very imppressive.
donivan65- Governor
- Number of posts : 12245
Location : San Diego, California
Registration date : 2008-05-12
starting at the basics,,,,,,are the bleeder screws up at the top regardless if they are marked left or right? did you put some freeplay in the master cylinder pushrod adjustment? If you stop really hard,,,,,,do all 4 wheels skid the same??
wdaguy- Number of posts : 157
Location : tucson
Registration date : 2009-02-10
bleeders are at top. Iit has some free play. I would say it seems like the left front locks up first, but doesnt swerve or pul l because of it....??
wdaguy- Number of posts : 157
Location : tucson
Registration date : 2009-02-10
wdaguy wrote:bleeders are at top. Iit has some free play. I would say it seems like the left front locks up first, but doesnt swerve or pul l because of it....??
do you think its ok without the 2lb valve for the fronts? I am suspecting just more bleeding?
donivan65- Governor
- Number of posts : 12245
Location : San Diego, California
Registration date : 2008-05-12
More gray areas,,,,,,Residual Check Valves,,,,,M1 needs to post the rules on this one,,,,,,But basically Hot Rodders used them because the master cylinder is below their feet under the floor and the wheel cylinders are higher and the fluid drains down into the master cylinder. This surely causes the master cylinder to overflow and a real low or 2, brake pedal. But the Vans wheel cylinders are lower. And then there is the 10 psi check valve for back pressure to the rear drums and 2 psi for EACH front caliper belief to keep the fluid from draining back into the master cylinder. Then it goes to what check valve is installed in the master cylinder,,,,,(depends on what system the master cylinder was designed for). Do you rip out the check valves and start fresh by adding the aftermarket ones in the brake lines? So next question,,,,are you using a 10 in the rear line and a 2 in EACH of the front brake lines? (and installed in the right direction,) And whats in the master cylinder, if anything?
wdaguy- Number of posts : 157
Location : tucson
Registration date : 2009-02-10
well I took my friends advice who didnt run the 2lb.. his work great without it.. he loves the flat brackets set up????????
m1dadio- Chevy Guru
- Number of posts : 1778
Location : north saanich
Registration date : 2008-10-06
Many things contribute to a spongy pedal.
But first, the valve question.
Heres the rules.
Its been said that if your master had valves internally they should not be combined with other vaslve, There should be only one valve per system.
Whats not been said is only old time brake systens "That did not have an external proportioning valve" (like your 65 single line system) will have a built in valve.
Most every other master cylinder built, I dont care 65 vet, or 68 vet or what ever, If the car had an external proportioning valve, the master cylinder had no internal valves!
Reasons for valves. The most need for a residual valve on disc brakes is only when the master cylinder is gravetationaly below the calipers. You don't really need the valve for you early disc brake conversion as long as you promiss never to park your van with the front end up a steep drive way, causing the callipers to be above the master cylinder. This elevation/gravity rule also applies to the drum brakes. However the drum brakes "Require" a TEN pound valves which is intended to keep enough preasure on the sheveron style seals in the wheel cylinders to keep them sealed so air cannot get in and fluid cannot escape. The preasure must be there to keep the seals pushing tight. But not pushing the shoes against the drum too much. By the way, if you leave your drum brake vehicle in storage, be shure to pump up the brakes at least once every couple weeks or that 10 Lbs will deminish and the cylinder will seep.
I use two 2lb valves on my four wheel disc set up. one for the rear and one for the front. Best mounted at the master but definetly befor the "T" in the lines.
There should be almost NO free play in your brake pedal linkage, that equals strait up pedal loss. But you must also make sure the master is not being held slightly on. I also wrote a piece on adjusting that little cam bolt at the bottom of your pedal on the push rod. Its too much to re-write here but it is very important and can be mistakenly placed 180* out with no free play and cause about an inch pedal loss.
The number one reason for pedal loss on disc brakes is the caliper "Hanging up" on the bracket (no mater what bracket you use) I wrote about this too. You must make absolutly sure the bracket is not flexing even the slightest amount. If the bracket flexes 1/64" it will equal almost a full inch of pedal loss. The other common pedal problem is improper bleeding and incomplette bench bleading.
When bleading brakes always start with the wheel furthest away from the master. (furthest away by Line length) then the next closser and so on. First start by opening the bleader and waiting for the fluid to appear on its own at each wheel one at a time, all four wheels. Then go to pumping the pedal, again starting at the furthest away wheel. (pumping the pedal on a system that is complettly empty will often ruin the master. Vacuum bleaders are crap on drum brake systems. Remember the 10lb sheveron seal rule? Sheveron seals work in one direction only. When you try to suck the fluid to one cylinder, yes you get fluid from the master but you also suck air into the other wheel cylinder because the suction wilkl collapse the seal. You can go back and forth until you start to throw tools and cry with insanity. Presure blead is what you need. Doing it old schooll with one person at the pedal taking exact instructions from the person at the wheel, not the other way around. Make sure the drum brakes are adjusted correctly first, Improperly adjusted drum brakes steels alot of pedal.
Bleeding brakes with a factory type "differencial/proportioning valve" can have other bleeding problems caused by Lock out.
Spongy pedal. there are two basic but very different situations that people generally call"spongy pedal". Either there is air in the system OR there is a mechanical problem. (or both) You must diognose this first or you will frustrate yourself to death.
Heres how you tell, On a level parking spot with the vehicle in park, with the brakes at rest, push the pedal down ONCE! and make note of where it stops. then lift your foot and push the pedal down again right away and now make not of where it stops. Repeate this four or five times. If the pedal is stopping at a higher high each time(pumping up) then you have air in the system. If it rises on the second and/or third stroke only, then you proboly have poorly adjusted drum brakes. If the pedal always goes to the same applied (down) position then you have a mechanical problem. It is best to do this test while looking at anything except your foot or leg you can best"sence the high by feel" and re-try it several times letting the brakes rest in between trys. If you have power brakes this test should also be done with the engine off and the boster vacuum displaced by pushing the pedal two or three times to lose the boost reserve.
M1D
Ther are many mechanical problems, I discused the most commun here.
m1dadio- Chevy Guru
- Number of posts : 1778
Location : north saanich
Registration date : 2008-10-06
Another problem that will make for a spongy pedal (especialy with the absence of the residual valve) is loose or improperly adjusted wheel bearings. the hubs will flex while driving, as they do this they will push the caliper to and fro. If there is not residual valve keeping 2lb presure the flexing rotor will simple move the caliper pistom only firther into the caliper ( especialy if the caliper does not slide freely on the bracket) and you will then have to make up all that space with the brake pedal before the pads connect and tighten. That will make for a much lower pedal. If the wheel bearings are allowing for much more flexing do to poor adjustment the problem wil be compounder that much worse. This will be amplified even worse again if you did not clean up the hub to make sure the rotor is sitting down flat and true, or you over torqued the wheel nuts, either of which is known to cause the rotor to woble slightly, again pushing the pads away to making too much space.
M1D
M1D
wdaguy- Number of posts : 157
Location : tucson
Registration date : 2009-02-10
WOW!
donivan65- Governor
- Number of posts : 12245
Location : San Diego, California
Registration date : 2008-05-12
Now thats the rules,,,,,but maybe undo the front brake line and install a fitting or line in that port , kinda like a bench bleeder set up to recirc the brake fluid. We just want to take the front brakes out of the system while we check out the rear. With the fronts recirculating, you should have a good solid pedal,,,,,bleed and adjust them if necessary. Then switch over to the fronts, recirc the rears, see how the fronts treat the brake pedal,,,,,the whole idea is to see what the pedal height is for the two brake systems separately,,,and notice if there is a problem in one of the circuits. And it might cure your problem just by bleeding each circuit while the other one is recirculating the fluid from the port back up to the reservoir.
m1dadio- Chevy Guru
- Number of posts : 1778
Location : north saanich
Registration date : 2008-10-06
Thats not a half bad idea donivan65. But I think I would not disconect the rears once you know they are right there is no reason to open that circuit again. In fact the "other circuit" being open while trying to blead the next may cause a "feel" problem and make you think you have a problem with the circuit you are trying to bleed. Factory differential valves have a piston that moves over to block the circuit that "blew a line", this willl make that "useless side" of the master cylinder still build pressure so as to provide for a decent pedal hight. The thing about a "bench bleed" is you plunge the piston deeper then it moves when installed, getting the air out of every nook and crany.
I called thems the rules cuz thats what you asked for. LoL!!
One thing I discovered is alot of people, including myself in the begining(35 +years ago) have this idea that since brakes seem big, bulky, dirty and heavy duty, the tollorances of workmanship can be slopy or the "Oh thats good enough" attitude will do. But as a mater of fact nothing is further from the truth. Heres an example of how exacting the tollorances are. Most vehicles only need loose 10 thousands of an inch thickness off the rotor and there will be insuficient rotor mass to the point of about a 41% braking efficiency loss under full braking.
Each of these mechanical problems I have addressed (like wheel bearings, caliper hang up, rotor fit/woble, adjustments and so on), each one can rob 1/8" to 1" of pedal travel if not right. Think of it, you only have about 2.5" pedal travel on good brakes and another couple inches to the floor. It only takes a little bit of carelessness in workmanship on one or two items to loose that 2" of good pedal. It dosn't take much!
I say this without prejudges, I am not commenting on any persons work here. I am saying only that my own poor work habits of the past have expirienced me to the reality of how important the small details and measurment tollorances are. I can't say it enough, attention to research, detail and a high standard of craftsmanship will make the absolute difference in saved time, money and frustration. "attention to detail" especialy fit and adjustment tollorances.
Hope this helps.
M1D
m1dadio- Chevy Guru
- Number of posts : 1778
Location : north saanich
Registration date : 2008-10-06
A few more bleeding tips.
Sometimes bleeding a new system is best done first by gently pumping the pedal, useing you hand on the pedal and being sure to make full strokes.
Agressive actions on the pedal during bleeding may cause other problems.
It is best to push the pedal down with the bleeder open and hold it down untill the bleeder is closed then let the pedal up, each time, rather then "pumping" the pedal a bunch of times to try and make presure and then opening the bleader.
After all air seems to be gone. pound on the brakes a few times, and push the pedal as hard as you can. These two actions will loosen any lodged bubbles. The blead each wheel again.
If either of the master reseviours run enpty, you have to start over again.
I much prefer the clear hose on the bleeder screw into a jar of fluid so I can see when the bubbles are gone. and if the person on the pedal messis up you wont such air back in.
M1D
donivan65- Governor
- Number of posts : 12245
Location : San Diego, California
Registration date : 2008-05-12
Its good to have some rules,,,,,and its good to have some advice,,,,some people understand the rules better than others, based on their skill, experience and abilities. So keep it all coming,,,,,it keeps you thinking,,,,like why did he do or say that. So lets go back to my advice,,,I see a new type of brake bleeder for sale,,,,,it connects to the brake bleeder and PUSHES fluid back up to the master cylinder,,and you got your vacuum pumps that PULLS the fluid out of the master cylinder through the bleed screws as well as a pressure type. Those are good if you do a lot of brake work. And then there is the old faithfull, pump the brake pedal. And that leads to my advice about disconnecting each line. We did a 4 wheel disk conversion on a Chevelle and could not get the air out of the rears,,,,,by pumping the pedal. And all I could figure was that the fronts were building up good pressure, which stops the movement of the master cylinder piston and that keeps the pressure from building up in the rear section of the master cylinder which does not allow the air to be pushed out the bleeder. And basically the front section of the master cylinder vapor locks the rear. And I know taking those lines off cause air to enter again, but my point is to do each one separate,,,,,see if you get equal brake pedal height,,,,,then you know that the master cylinder is good and each system is working. Right now there are TOO MANY VARIABLES, I like to isolate each piece of equipment and check it out and move on to the next one. (I am not much of a rule or book reading guy),,,,,But its all good,,,,,,you are doing a good job M1,,,,I like seeing your take on repairs and ideas,,,,,and you sure are not shy about going outside THE BOX to try new ideas!!!!!!
m1dadio- Chevy Guru
- Number of posts : 1778
Location : north saanich
Registration date : 2008-10-06
Well your right about doing what you have to, to make it happen. When you have too many variables you sometimes have to throw out the rule book and approach the problem from a completely off the wall angle.
Just a thought here, I have not yet heard of a vapor lock type of problem before, but, I have had rear brakes un able to blead problems before. You may have had this same problem I say because what you did will fix this same problem.
I mentioned the factory style pressure differential valve (built in to most proportioning valves) that can go into "lock out". They do that when there is too much presure difference between the two brake circuits, a piston shutles to the low presure side and plugs that circuit. It is sometimes very hard to get it to unplug and re-center itself as it has no springs, it just floats. If a brake line blows under presure, or if when bleading you pump up the pedal too agressively when the fluid has not yet filled all the lines you can actually shutle that piston with so much force that it will jam to one side, especially with used valves. The circuit will be locked out and you will not be able to blead that side without re-cenering the valve. The way to re-center the valve is to open the line that is not locked and pump the pedal to get the presure happening only on the opposite side of the differential valve to push it back to center, re-opening that circuit. If you are too agressive doing this though you will likely just slam the valve to the other side and lock the other circuit out. That is the valve that also trigers the light.
M1D
donivan65- Governor
- Number of posts : 12245
Location : San Diego, California
Registration date : 2008-05-12
But I am saying for test purposes, once you got a solid pedal on one port, the piston stops and you deprive the other port from having a good stroke to push the air out. You are Gridlocked,,,,But I just post what I would do,,,,its a choice,,,,I don't care if its used or not. But I just remembered a rule from the Chevelle Kit,,,,,to cure a spongy pedal,,,,tap the caliper with a hammer while bleeding to dislodge the air bubbles that have attached themselves to the walls on the inside of the caliper. So another choice,,,,,,,
wdaguy- Number of posts : 157
Location : tucson
Registration date : 2009-02-10
Should I let the blue one go? 2lb
donivan65- Governor
- Number of posts : 12245
Location : San Diego, California
Registration date : 2008-05-12
Do you have the 10 lb in the line to the rears and a 2 lb in each of the front lines? And do you have a combination valve or an adjustable proportioning valve? On those front calipers,,,,I think another test would be to raise the front wheels, step on the brakes a few times, then spin both wheels by hand,,,,,you are looking to see if the pads moved away from the rotor,,,,,like can a feeler gauge fit in between the pads and rotors,,,,,,they should be rubbing the rotors,,,,,,,if any of what M1 said about the hanging up, loose bearings and flatness of the mating surfaces is happening, then the rotor bumps the pads, this causes the piston to push the fluid back into the master cylinder and you get a low pedal the next time you step on the brakes. And those check valves would be an advantage in that case, keeping the pistons from retracting. But you got a 100 answers now,,,,,,,and which one are you on right now?????? This is a lot of information, but its not only for you, it's reference material,,,,,I guarantee others will need it in the future,,,,,So just use what applies to your situation.
m1dadio- Chevy Guru
- Number of posts : 1778
Location : north saanich
Registration date : 2008-10-06
You should keep the blue 2lb valve. You need only one 2lb valve for both the calipers. It needs to be in the line from the master before the "T".
If you have a combonation valve that is a different story. A combonation valve is three valves in one. It has a presure differential valve, a proportioning valve, and the residual presure valve for the drums. Some combanations valves also have the 2lb residual presure valve for the discs as well. Either way you should not combine two residual presure valves onto the same circuit
If you combine two residual vales in the same circuit of different values, the valve with the higher value will dominate and the other will be useless. If you combine two of the same value, the one closest the master will function properly and the other down stream will remain dorment.
M1D
donivan65- Governor
- Number of posts : 12245
Location : San Diego, California
Registration date : 2008-05-12
So M1, if someone is running a Combination valve or the stock 2nd Gen pressure differential valve AND they install the 2 psi check valve at the master cylinder this trips the switch in the valve because of the unequal pressures in the brake lines. but the question is, in the tripped condition, does that have much of an effect on bleeding the brake lines?
wdaguy- Number of posts : 157
Location : tucson
Registration date : 2009-02-10
Ok I will put one 2lb for the fronts. So really there is nothing special about the Corvette master other than size? A stock double M/c would be the same?
I was thinking they had pressure valves internally.
m1dadio- Chevy Guru
- Number of posts : 1778
Location : north saanich
Registration date : 2008-10-06
Donivan65; you have a valid point
If someone is running a "Combonation valve" they should not have other residual presure valves in thier system.
But If the 2nd gen valve is only a "Presure differential" valve (I don,t know what it actually is) that differential valve would have to be right after the master cylinder and then the "Residual presure" valves down stream of it or it would in fact cause the problems you descride.
Usually a tripped differencial presure valve will re-set itself during bleading providing one is easy on the pedal during the bleading. But sometiimes you have to crack the line on the good circuit to get it to reset. If you pound away on the pedal trying to pump up the system you will cause the valve to trip.
The exception to this is when using an old/used valve that may have never been tripped in its past life and has some sludge in it. I have had such valves trip and jam in the triped position.
In the tripped position there will be problems bleeding, and likely unable to blead one circuit because the piston locks off the bad circuit. The system willl bleed very easily if the differential valve is kept from tripping, and that is done by using a pressure bleader at low presure or going easy with the foot and being carefull not to pump up the preasure during bleading. Bleading is all about "flow" not presure. You have to flush out the air bubbles with flow, presurization can sometimes cause intrapment of air bubbles in iregular shaped spaces.
The vet master is desired because of its lower reseviour high and the fact that the lines come off the correct side. Other then that there is nothing special about it, you could use any double master with the correct boar size.
wdaguy: what are you using for a proportioning valve?
M1D