M1D
+21
wideload
Twinpilot001
Vanadian
whopman
Lyrad
panelmanrd
Sporto's 67
ChevyVanMan1
63chevyvan?
BILLS66
xjamesx
gotavan
BvrWally
m1dadio
DanTheVanMan
G-Man
mo_1040
Scott
Digz
donivan65
wdaguy
25 posters
disc brake conversion kits????????????? expert opinions?
m1dadio- Chevy Guru
- Number of posts : 1778
Location : north saanich
Registration date : 2008-10-06
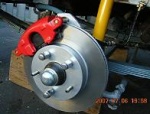
The calipers I used are NAPA PN 542-2004 and 542-2005. they fit literaly hundreds of GM vehicles . Some applications are 75-76 NoVA and 71-74 G10 Vans.
M1D
M1D

m1dadio- Chevy Guru
- Number of posts : 1778
Location : north saanich
Registration date : 2008-10-06
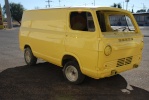
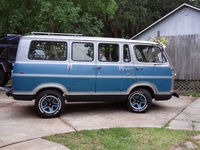
OFF topic: saw this just down the street from me. The town I'm in is not so big so seing any other van is cool. Its good to see another vanner doing it old school

M1D

M1D
wdaguy- Number of posts : 157
Location : tucson
Registration date : 2009-02-10
Well it measure out ok I thought It was the bracket but I had a bent caliper, not allowing for travel returned it ..they move in and out by handI have quite a big box to return monday.. I think I am ok try to bleed Monday.
Nice ford van,,I dont say that very often...
Nice ford van,,I dont say that very often...

m1dadio- Chevy Guru
- Number of posts : 1778
Location : north saanich
Registration date : 2008-10-06
clearification:
Its almost 3/8" at the bracket mount

So with a 3/8" offset it is almost 3/4" at the top end.

M1D
Its almost 3/8" at the bracket mount

So with a 3/8" offset it is almost 3/4" at the top end.

M1D
Digz- Number of posts : 3794
Location : United States Six Lakes MI
Registration date : 2008-05-17
From what Im seeing , all the calipers are at 3" between the ears, all of our measurments from the brackets to the rotors are "about" the same at 3/4"at the bracket ears (that eliminates the rotor/hubs or the brackets being out of position), the rotors are running about 1" thick + . so a 1/32" here and there might be adding up to the differences, The biggest player is probably the thickness of the outer pads IMO, and nothing to lose sleep over. 
The vacumn booster looks great BTW, I had an idea to keep that in front of the radiator awhile back ,but Im not far enough along to experiment , have to toss it at you sometime ,see what ya think .

The vacumn booster looks great BTW, I had an idea to keep that in front of the radiator awhile back ,but Im not far enough along to experiment , have to toss it at you sometime ,see what ya think .

m1dadio- Chevy Guru
- Number of posts : 1778
Location : north saanich
Registration date : 2008-10-06
while were at it, The inside pad "squeel clip" is suposed to be on the leading edge. In other words, the end were the rotor is entering the pad.
M1D
M1D

Digz- Number of posts : 3794
Location : United States Six Lakes MI
Registration date : 2008-05-17
Ha ,, Well I can change that okay..lol.. Im trying to remember if I ever even new that 

wdaguy- Number of posts : 157
Location : tucson
Registration date : 2009-02-10
Well I used the right on the left and so on. so that the bleeder was at high level. Are you saying I should reverse the pads so that the squeel clip is in the front? Is this major importance??
On a lighter note: I would like to change my rear end.. I would like one with discs already.. Posi-traction ..gears dont matter much ..but at least as wide as stock I believe 57 inches. The one I have now is53 inch ,,Can you reccomend anything?
On a lighter note: I would like to change my rear end.. I would like one with discs already.. Posi-traction ..gears dont matter much ..but at least as wide as stock I believe 57 inches. The one I have now is53 inch ,,Can you reccomend anything?
Scott- Number of posts : 1651
Location : Anoka, MN
Age : 54
Registration date : 2008-05-20
I just finished reading the entire thread and see that my list is going to be to little to late, but here it is as promised. Once this is posted I should be able to help along the way with a little input.
Before you digest this list you should know that even though my conversion seems to have gone without a hitch my van still hasn’t left the building. The brakes are finished, other then one more bleed in the back, but I haven’t road tested it yet. I can say that I didn’t get any of the measurement problems I’ve read about in this thread.
Here is what I used for my setup,
Combination Valve

From: Inline Tube
Address: www.inlinetube.com
Part #: DVD-02
Description: DVD-02 - Disc/Drum Proportioning Valve / Bracket Set OEM- $150.00
Applications: 71-72 Chevrolet / GMC Truck 1/2 ton Disc / Drum, and 67-70 Chevrolet / GMC Truck 1/2 ton, Conversion to Disc / Drum
Details: All 1971-72 Chevrolet / GMC trucks had the Prop. Valve mounted on this bracket off the stud of the master cylinder. This valve bracket is also perfect for 67-70 drum brake trucks that are converting to disc brakes.
They have a great free catalog too..
For some reason the bracket and tubes didn’t lineup with my Master Cylinder, I had to bend them to make it work, but the tube fitting sizes were fine.
=============================================
Master Cylinder

From: O’Reilly Auto
Part #: 10-1511
I Paid: 28.99, but received 13.86 back from the core
Description: CARDONE INDUSTRIES - Remanufactured Master Cylinder
Applications: 1971 Chevy 1/2ton Van, Front Disc
=============================================
Brake Rotors
From: Parts America
Part #: 145206
Price: 20.99 each
Description: BRAKE ROTOR BENDEX (For 1981 Pontiac Firebird Trans AM – Rear Disc)
=============================================
Bearings and Seals
From: Parts America
Part # – Seal: 17187 (Price: 4.99 each)
Part # – Inner Bearing: BR6 (Price: 12.99 each)
Part # – Outer Bearing: BR2 (Price: 12.99 each)
The bearings and seals are just the stock ones for our vans.
=============================================
Wheel Bolts / Lugs
From: NAPA
Part #: BK 641-1267
Price: 2.05 each
Description: Front – Thread Size: 7/16-24, Wheel Bolt Overall Length: 1 ¾”
=============================================
Dust Cap
From: NAPA
Part #: BK 730-2436
Price: 4.65 each
Description: Dust Cap / Wheel Bearing – Universal, 1 25/32”; Zinc
=============================================
Bolts / Locking Nuts (Used to bolt your brackets to your van)
From: McMASTER CARR / Fellow Vanner
Site Address: www.mcmaster.com
Part # - Locking Nuts: 94830A540 (7.47 each pack of 5)
Part # - Bolts: ??? (Purchased from a fellow Vanner who bought them from McMaster)
Description - Locking Nuts: Hex Thin (jam) Expanding Locknut, Cadmium-plated Steel, 7/16”-20 Screw Size, 5/8” 21/64” H, Packs of 5
=============================================
Brake Pads
From: AutoZone
Part #: MKD52S
Price: 22.99 (Covers both sides)
Description: Duralast Brake Pads (71 Chevy G10)
=============================================
Calipers
From: AutoZone
Part #s: C116, and C117
Price: 15.99 each (I had no core to return)
Description: Fenco Brake Caliper (71 Chevy G10)
To keep them from hitting on tight turns I ground off this collar. (I mounted the Calipers forward on my 68 Van)

=============================================
Brake Hoses / Fittings

From: Industrial Liquidators (Hey Donivan, hope you don’t mind my sharing.)
Site Address: www.industrialliquidators.com
Part # - Hose: 63010122 (Price: 12.85 each)
Part # - Line to Hose fitting: 989543 (Price: 5.26 each)
Part # - Banjo fitting: 997634 (Price: 8.01 each)
You can use these images to find the part numbers I bought, or pick something else. If you visit their website you will see another page of options.

>

>

These hoses are great; I wish I had listened to Donivan sooner. Only concern I had after putting them on was having to really torque down the Banjo bolt on the drivers side to keep it from leaking, but that probably had more to do with the copper washer that came with the Calipers.
=============================================
Brake Hose Lock

From: NAPA
Part #: 80742
Price: .69 each
Description: Used to attach the brake hose to the body of the van.
---------------------------------------------------------------------------------------------------
When trying to figure out all the hoses needed to connect the Combination Valve to the Brake Lines, I just took mine down to NAPA and they helped me find the sizes needed. I haven’t been able to find the receipt of the 8” and 12” lines the tie it all together, but taking it to the store made real short work of it.
I think I missed most of the discussion where measurements were needed, but ask if you need measurements that include 3rd Gen Calipers on a Second Gen. Van mounted forward. After reading the entire thread I think I got off pretty easy with the 3rd Gen Calipers.
Before you digest this list you should know that even though my conversion seems to have gone without a hitch my van still hasn’t left the building. The brakes are finished, other then one more bleed in the back, but I haven’t road tested it yet. I can say that I didn’t get any of the measurement problems I’ve read about in this thread.
Here is what I used for my setup,
Combination Valve

From: Inline Tube
Address: www.inlinetube.com
Part #: DVD-02
Description: DVD-02 - Disc/Drum Proportioning Valve / Bracket Set OEM- $150.00
Applications: 71-72 Chevrolet / GMC Truck 1/2 ton Disc / Drum, and 67-70 Chevrolet / GMC Truck 1/2 ton, Conversion to Disc / Drum
Details: All 1971-72 Chevrolet / GMC trucks had the Prop. Valve mounted on this bracket off the stud of the master cylinder. This valve bracket is also perfect for 67-70 drum brake trucks that are converting to disc brakes.
They have a great free catalog too..
For some reason the bracket and tubes didn’t lineup with my Master Cylinder, I had to bend them to make it work, but the tube fitting sizes were fine.
=============================================
Master Cylinder

From: O’Reilly Auto
Part #: 10-1511
I Paid: 28.99, but received 13.86 back from the core
Description: CARDONE INDUSTRIES - Remanufactured Master Cylinder
Applications: 1971 Chevy 1/2ton Van, Front Disc
=============================================
Brake Rotors
From: Parts America
Part #: 145206
Price: 20.99 each
Description: BRAKE ROTOR BENDEX (For 1981 Pontiac Firebird Trans AM – Rear Disc)
=============================================
Bearings and Seals
From: Parts America
Part # – Seal: 17187 (Price: 4.99 each)
Part # – Inner Bearing: BR6 (Price: 12.99 each)
Part # – Outer Bearing: BR2 (Price: 12.99 each)
The bearings and seals are just the stock ones for our vans.
=============================================
Wheel Bolts / Lugs
From: NAPA
Part #: BK 641-1267
Price: 2.05 each
Description: Front – Thread Size: 7/16-24, Wheel Bolt Overall Length: 1 ¾”
=============================================
Dust Cap
From: NAPA
Part #: BK 730-2436
Price: 4.65 each
Description: Dust Cap / Wheel Bearing – Universal, 1 25/32”; Zinc
=============================================
Bolts / Locking Nuts (Used to bolt your brackets to your van)
From: McMASTER CARR / Fellow Vanner
Site Address: www.mcmaster.com
Part # - Locking Nuts: 94830A540 (7.47 each pack of 5)
Part # - Bolts: ??? (Purchased from a fellow Vanner who bought them from McMaster)
Description - Locking Nuts: Hex Thin (jam) Expanding Locknut, Cadmium-plated Steel, 7/16”-20 Screw Size, 5/8” 21/64” H, Packs of 5
=============================================
Brake Pads
From: AutoZone
Part #: MKD52S
Price: 22.99 (Covers both sides)
Description: Duralast Brake Pads (71 Chevy G10)
=============================================
Calipers
From: AutoZone
Part #s: C116, and C117
Price: 15.99 each (I had no core to return)
Description: Fenco Brake Caliper (71 Chevy G10)
To keep them from hitting on tight turns I ground off this collar. (I mounted the Calipers forward on my 68 Van)

=============================================
Brake Hoses / Fittings

From: Industrial Liquidators (Hey Donivan, hope you don’t mind my sharing.)
Site Address: www.industrialliquidators.com
Part # - Hose: 63010122 (Price: 12.85 each)
Part # - Line to Hose fitting: 989543 (Price: 5.26 each)
Part # - Banjo fitting: 997634 (Price: 8.01 each)
You can use these images to find the part numbers I bought, or pick something else. If you visit their website you will see another page of options.

>

>

These hoses are great; I wish I had listened to Donivan sooner. Only concern I had after putting them on was having to really torque down the Banjo bolt on the drivers side to keep it from leaking, but that probably had more to do with the copper washer that came with the Calipers.
=============================================
Brake Hose Lock

From: NAPA
Part #: 80742
Price: .69 each
Description: Used to attach the brake hose to the body of the van.
---------------------------------------------------------------------------------------------------
When trying to figure out all the hoses needed to connect the Combination Valve to the Brake Lines, I just took mine down to NAPA and they helped me find the sizes needed. I haven’t been able to find the receipt of the 8” and 12” lines the tie it all together, but taking it to the store made real short work of it.
I think I missed most of the discussion where measurements were needed, but ask if you need measurements that include 3rd Gen Calipers on a Second Gen. Van mounted forward. After reading the entire thread I think I got off pretty easy with the 3rd Gen Calipers.

donivan65- Governor

- Number of posts : 12246
Location : San Diego, California
Registration date : 2008-05-12
Master Cylinder 10-1511,,,,,3rd Gen, 1 1/8" bore, for power disk brakes,,,,,2nd Gens use a 1" bore,,,,, M1, I know you have power disk brakes but bore me with the details on what they can expect, if anything, with either choice of master cylinders,,,,,,
DanTheVanMan- Commissioner

- Number of posts : 7905
Location : Escanaba, Michigan
Age : 62
Registration date : 2008-10-08
Scott wrote:I just finished reading the entire thread and see that my list is going to be to little to late, but here it is as promised. Once this is posted I should be able to help along the way with a little input.
Before you digest this list you should know that even though my conversion seems to have gone without a hitch my van still hasn’t left the building. The brakes are finished, other then one more bleed in the back, but I haven’t road tested it yet. I can say that I didn’t get any of the measurement problems I’ve read about in this thread.
Scott,
All we can say is: "THANK YOU" very much. Great to see the first actual list on components.
Hopefully with help from other members we can get together at some point a complete list and Part #'s to do a full disc conversion that is tried and true. I think this brings us one step closer. Thank you.
_________________
DanTheVanMan
1965 Chevy G10 Sportvan Custom
1984 Jeep CJ-7 Laredo, Restored
2004 Kawasaki KLR650
1997 Jeep TJ Sport
My Mini Gallery


donivan65- Governor

- Number of posts : 12246
Location : San Diego, California
Registration date : 2008-05-12

m1dadio- Chevy Guru
- Number of posts : 1778
Location : north saanich
Registration date : 2008-10-06
As far as I know you pretty much have to use those reducing adapters on the master cylinders. I have now had two master cylinders and both needed the line addapters.
Generally speaking the smaller bore cylinders are for manual brakes and larger bores are for power brakes, but drum brakes need less fluid volum and disc need more, especially 4 disc. It is a mater of mechanical advantage. It takes lesser foot effort to make enough hydralic pressure when the bore is smaller but the pedal has to travel further. (its always a trade off)
With "power assisted" brakes the bore can be larger(which would take more foot effort but it is assisted). The larger bore advantage is the pedal does not have to travel as far to make up the required presure/voluum.
The idea is to have pedal travel as less as possible and have the pedal easy to push. The feds rule is the the pedal shall not take more then 90lbs push to lock the brakes up.
Under 1" bore is for mannual brakes. 1" bore can be either. !+1/8" bore is for power disc/drum or 4 disc brakes. A 1+1/4" bore is for power 4 disc with multiple calliper pistons (because of the volum required).
I used a 1+1/8" bore (manual) on my 4 disc brake system and the pedal was high ( 3" off the floor locked) but a little hard to push. Now I have gone to a 1+1/8" bore with 7" single booster. The pedal is still high( about 3" off the floor locked) and I know its going to be easier to push.
The 2hd gen uses a 1" bore because it is Manual brakes and because drum brakes require less fluid volum so that would make for a high pedal.
A brake booster does not increase the brake pressure. It only makes the pedal easier to push.
A 1" bore willl work for the disc/drum set up but I would go with the 1+1/8" bore because the pedal will be better(higher), especially if you are going power assist and/or four wheel disc.
M1D

donivan65- Governor

- Number of posts : 12246
Location : San Diego, California
Registration date : 2008-05-12
I am using that 3rd gen 1 1/8" bore master cylinder on my van,,,,,and it probably takes more foot pressure to stop than if I used a 2nd Gen 1" bore master cylinder. But compared to the drum brakes, it stops way better now........You should of been here at the beginning when the 1st Nova kits were put on,,,,,,,using the single line master cylinder,,,,,people thought they were in Heaven,,,,,and probably by now,,,,they are.......

Digz- Number of posts : 3794
Location : United States Six Lakes MI
Registration date : 2008-05-17
Just a note, Scott was telling of having trouble getting the banjo fitting to quit leaking, When you get remanufactured calipers , double check the surface where the copper washer has to seal, they are rough handled and get the crap beat out of them before they make thier way back to the parts store. It doesnt take much of a nick or dent to mess up the washers.

DanTheVanMan- Commissioner

- Number of posts : 7905
Location : Escanaba, Michigan
Age : 62
Registration date : 2008-10-08

Don,
Are these Part #'s from Napa? I see the lines are all straight so a bender is needed. What other tools and or items were needed for this Dual Master Cylinder conversion? If someone was to go to the store with a list of everything he would need to do this conversion, what would he have to get? Is this 69 Master cylinder a 1" or 1 1/8"?
I’m looking at creating a downloadable PDF for the site. A “How to” guide with step-by-step instructions for the Single to Dual Master Cylinder, Rear and Front Drum to Disc. As well as things to watch out for and be aware of.
We have all tried many different combos when it comes parts used. And I’m trying to build a common list of readily available and known parts combinations that work to save our members time, money and a whole lot of frustration. After all, we have about a dozen members doing the Trial & Error thing and finding what does and doesn’t work and would love to get it all in print to save other and future members looking at making the conversion the frustration of each repeating that process over and over.
Everyone,
I have been taking notes on this entire thread from mounting brackets to calipers and the brake pad router thickness and flex hose issues and believe we are getting close. Keep the info coming. Every bit of information helps.
Thanks,
Dan
_________________
DanTheVanMan
1965 Chevy G10 Sportvan Custom
1984 Jeep CJ-7 Laredo, Restored
2004 Kawasaki KLR650
1997 Jeep TJ Sport
My Mini Gallery


wdaguy- Number of posts : 157
Location : tucson
Registration date : 2009-02-10
Good job I asked for help =advice and got some 60 replys from other van lovers. Thats pretty immpressive!

DanTheVanMan- Commissioner

- Number of posts : 7905
Location : Escanaba, Michigan
Age : 62
Registration date : 2008-10-08
It is and if anyone has written down the steps for any project I would love a copy to share with everyone.
Right now I working on the Basic Disc Brake Instructions trying to avoid the: If you use this part you have to...... But just the basic steps.
This is kinda what I'm looking for:
Front Disc Conversion Assembly Notes: Jack up car, place on jackstands under front frame. Remove front wheels. Disconnect front brake flex lines. Remove front hub/drum assembly. Press out studs. Have machinist turn down outer flanges to fit inside new rotors if needed, press in longer studs. Remove drum backing plate assembly by removing two lower cross bolts and upper pivot bolt. Clean off drum spindle. Place plate on spindle so that caliper nuts face inward, and rearward. Thread in new, shorter pivot bolt loosely. Install lower bolts. Tighten all to spec. Place machined hub on spindle, insert bearing, washer, and nut; tighten to spec. Place rotor on hub, run two lug nuts to hold down. Rotate assembly and check runout. If ok, install caliper and pads on rotor, lubricating slide pins with correct grease; tighten to spec. Install new brake flex hose with new copper washers. Change out proportioning valve and master cylinder for apprpriate units (i.e disc/drum or disc/disc). Make sure to bench bleed MC. Bleed system, reinstall wheels and lower car, then carefully test.
Any help would be great!
Dan
_________________
DanTheVanMan
1965 Chevy G10 Sportvan Custom
1984 Jeep CJ-7 Laredo, Restored
2004 Kawasaki KLR650
1997 Jeep TJ Sport
My Mini Gallery


donivan65- Governor

- Number of posts : 12246
Location : San Diego, California
Registration date : 2008-05-12
They are Napa part numbers,,,,and they are the spring wrapped bendable armored lines, no tools needed. And this is the very basic upgrade. A 2nd Gen has a Brake Warning Light junction block on them and disks require a Combination Valve or at least an adjustable Proportioning Valve in the system. The 1st and 2nd Gens, both use a 1" bore Master Cylinder,,,,,,,


Scott- Number of posts : 1651
Location : Anoka, MN
Age : 54
Registration date : 2008-05-20
Dan, A while back I converted the Disc Brake directions provided by Leadfoot into MS Word format, your welcome to it if it would help.
I also used,
NAPA Part #: W704C - Inexpensive Tube Bender - $3.49
NAPA Part #: 302x4 - 1/4" Tube Connector for mating two tubes - $2.20
Oreilly Part #: 13935 - Brake Hose Bolt (Banjo Bolt)
Oreilly Part #: H5002 - Disc Brake Guide Bolt / Pin
InlineTube also has the Rear T Connector, that was kind of hard to find locally because the tube feeding the T is 1/4", and the two outgoing tubes are 3/16".
It also might help if you tossed a quick note in the directions explaining the difference between Loaded, Simi-Loaded, and Unloaded Calipers. Loaded just means they come with more of the hardware your going to need for this conversion, like bolts, and pins, and sometimes the pads..
Don, I don't know if thats what I ended up with or not.
I had the tubes from the Master Cylinder to the Combo Valve because they came with the Combo valve. But going from the Combo valve to the tubes that feed the calipers and drums was my problem. Knowing the line sizes going out I just took the Combo Valve to NAPA and bought a couple of adapter tubes that had different thread sizes on each end, and bought the fittings to mate two tubes.
It sounds like you and I both used the same Combo Valve, and Master Cylinder, but I think we used different line sizes for the drums. If I remember right your tube feeding the rear T is 3/16, and I used 1/4. Since this tube is fed directly from the Combo Valve I probably had to use different adapter tubes.
I'm glad to hear you and I used the same Combo Valve and your happy with it. I wondered how the different Rear Wheel Cylinder bore size would effect the rear brakes. It's a really close bore, the 68 G10 has a 13/16" bore, and the 71 G10 has a 1" bore. So I guess using a Combo Valve from a 71, and Calipers from a 71, causes our rear brakes to engauge a split second before they would on a 71.

DanTheVanMan- Commissioner

- Number of posts : 7905
Location : Escanaba, Michigan
Age : 62
Registration date : 2008-10-08
Don,
Thanks for the reply. NAPA #'s got it and spring wrapped bendable armored lines.... Life is good! Do you have a recommendation for a Proportioning Valve. I'm planning on disc's all around but not going to power brake system.
Scott,
Thanks for the info on the Loaded, Simi-Loaded, and Unloaded Calipers. This will be good to know info for the parts section.
Scott, Don, M1, Digz and anyone else,
I would love anything you have to share. If you post it here I will copy it as I have in the past. If you have a saved list of parts, part #'s, vender/supplier lists or instuctions on just about anything pertaining to our vans.
You can email it to me at: deepwatertackle@yahoo.com
Dan
_________________
DanTheVanMan
1965 Chevy G10 Sportvan Custom
1984 Jeep CJ-7 Laredo, Restored
2004 Kawasaki KLR650
1997 Jeep TJ Sport
My Mini Gallery


donivan65- Governor

- Number of posts : 12246
Location : San Diego, California
Registration date : 2008-05-12
Now brake line size is a gray area,,,,,I used 3/16" all the way around, except for maybe one 1/4" adapter line. But initially there was a 1/4" section in my single line, but I would of thought that it was there for more of a reservoir for the brake fluid. So there is a difference in fitting sizes if you are converting a 1st Gen or a 2nd Gen. So there is a need for adapter/reducer bushing fittings and the adapter lines once you figure out what you need. And it seems that each line has a different thread size than the one that it needs to be attached to. Like that Combination Valve has 4 different sized threads on it so you cant mix up the lines. So you need to pay close attention to the fittings, the good part is that they are the same thread size as regular bolts,,,they just need to be of the inverted flare variety . But it is a good idea to get those 2 connector lines between the master cylinder and the combination valve off a vehicle because they are not common standard brake lines.

m1dadio- Chevy Guru
- Number of posts : 1778
Location : north saanich
Registration date : 2008-10-06
Brake system designers and engineers say to use the smallest lines you can get away with. In automotive that would be 3/16". If you look into the line conections on you master cyliners and differential valves you will see the port is not larger then 3/16 regardless of the nut size. Larger then nessesary lines are heavier, harded to manufacture, but most of all the fluid "movment" within them is reduced. Meaning the amount of action taking place in a larger line for any given system is less. This results in stagnation of the fluid, Since DOT 3 and simular fluids are "hydroscopic" in nature, they tend to develope sludge and cause internal corrosion in such areas. Especially if they are subject to a heat sorce, so avoid having your lines close to hot exhaust if you can, and change the brakes fluid every two years, more often in wet environments.
M1D
M1D

DanTheVanMan- Commissioner

- Number of posts : 7905
Location : Escanaba, Michigan
Age : 62
Registration date : 2008-10-08
m1dadio wrote:Brake system designers and engineers say to use the smallest lines you can get away with. In automotive that would be 3/16". If you look into the line conections on you master cyliners and differential valves you will see the port is not larger then 3/16 regardless of the nut size. Larger then nessesary lines are heavier, harded to manufacture, but most of all the fluid "movment" within them is reduced. Meaning the amount of action taking place in a larger line for any given system is less. This results in stagnation of the fluid, Since DOT 3 and simular fluids are "hydroscopic" in nature, they tend to develope sludge and cause internal corrosion in such areas. Especially if they are subject to a heat sorce, so avoid having your lines close to hot exhaust if you can, and change the brakes fluid every two years, more often in wet environments.
M1D
M1. I've never heard it explained so well. I found the brake line issue very confusing and it seem very clear now. Thank you...
_________________
DanTheVanMan
1965 Chevy G10 Sportvan Custom
1984 Jeep CJ-7 Laredo, Restored
2004 Kawasaki KLR650
1997 Jeep TJ Sport
My Mini Gallery


Scott- Number of posts : 1651
Location : Anoka, MN
Age : 54
Registration date : 2008-05-20
After reading this I think converting to all 3/16 should be part of the upgrade / rebuild recommendations.
Last edited by Scott on Mon Jun 22, 2009 10:50 am; edited 2 times in total


