


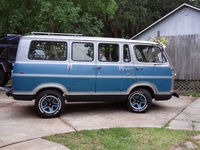
Hey, ya gotta love the half price sale at Pick Your Part! I spent most of the day out in the sunshine, walking thru the junkers, looking for things on my list. Don came along and we picked out the best-shaped coolant overflow jugs for our vans. And I finally found a set of 15" plain steel rims (I plan to go with simple Baby Moons). I don't know quite how they figured it but I ended up paying about $10 each for the rims and tires! I'll buy new tires but this gives me a chance to see how 215-70's and 220-70's will fit. Plus, I wouldn't trust the tires that came on the van to make it around the block!
+55
Vannin Ken
SportVan
chester42
NipRing
Scotts_A100
millwright71
ndjarrett
66 Surf Wagon
Joe Van
Wheelie
Jay 13
Chevboner
Gothboy
sandyvan
dix
the_surfing_guy
southern man
kookykrispy
Space Truckin
vanny
dodge man
thatcherworks
ScottyJones
pan58head
Big W
m1dadio
austinmodhouse
mbasaraba
Lazarusvan
mrclean
LiveWire64
sparky
SDEconoTruck
EconoCarl
Twinpilot001
Nightmoves
BILLS66
sasktrini
Scott
Digz
64chevy
wylee
wacko
RipVanArkie
wideload
DanTheVanMan
mo_1040
itruns
savage
BvrWally
Vanish
G-Man
Kakster
VANagain
donivan65
59 posters
Back to......VANagains NEWest 65 Chevy SportVan Deluxe

VANagain- Number of posts : 1048
Location : San Diego, CA
Age : 63
Registration date : 2008-05-16
donivan65- Governor

- Number of posts : 12247
Location : San Diego, California
Registration date : 2008-05-12
- Post n°77
 Re: Back to......VANagains NEWest 65 Chevy SportVan Deluxe
![]() by donivan65 Mon Aug 17, 2009 11:55 pm
by donivan65 Mon Aug 17, 2009 11:55 pm
,,,,,,,,,,and what were those wheels from?????
VANagain- Number of posts : 1048
Location : San Diego, CA
Age : 63
Registration date : 2008-05-16
- Post n°78
Re: Back to......VANagains NEWest 65 Chevy SportVan Deluxe
![]() by VANagain Wed Aug 19, 2009 9:28 am
by VANagain Wed Aug 19, 2009 9:28 am
It turns out that it's hard to find 15" plain steel wheels. When 15" GM rims started getting more popular in the 70s and 80s, so did fancier wheels. I called Discount Tire looking for traded in rims. They keep a database of all their used wheels in several states and could look up different vehicles, like Blazers, and tell me they had our bolt pattern. But the newer Blazers always came with those stock aluminum rims. They could only find two steel rims, and I wouldn't get to see them until they shipped them here.
So, in the salvage yard I had better luck. Managed to find four nice ones in the truck section, until Don arrived and told me I was measuring the bolt pattern wrong! I should have known that the 4.75" pattern our vans use wasn't the distance you could easily measure between two studs, it refers to the diameter of the imaginary circle the studs lie in! I should have known! I had brought a hub with me, which I then measured. SO, if you want to simply measure between two studs, the number we want to look for is 4.5".
I did manage to find a nice set of 15" rims with the smaller bolt pattern in the GM car section. First I found one on a full size Pontiac. I'm guessing that one was its spare, since the other three were stock aluminum rims. Started thinking I'd have to start looking in the trunks for more spares but then found three on a late 70s Impala. Not rusty, looked to be undamaged, with tires that held air. And as I said, I paid $10 each for them!! Not bad!
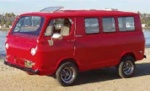
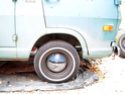
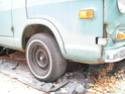
Here's a couple pictures of the 215/70R15 tire. Looks better than the puny 14" wheels. These rims are slightly more "reversed" than the originals too. I Photoshopped a Baby Moon onto one of them. (I had them on my old van in the 80s and want to go with this simple look on this van.) I'm probably the only guy who likes factory steel rims and whitewalls!
So, in the salvage yard I had better luck. Managed to find four nice ones in the truck section, until Don arrived and told me I was measuring the bolt pattern wrong! I should have known that the 4.75" pattern our vans use wasn't the distance you could easily measure between two studs, it refers to the diameter of the imaginary circle the studs lie in! I should have known! I had brought a hub with me, which I then measured. SO, if you want to simply measure between two studs, the number we want to look for is 4.5".
I did manage to find a nice set of 15" rims with the smaller bolt pattern in the GM car section. First I found one on a full size Pontiac. I'm guessing that one was its spare, since the other three were stock aluminum rims. Started thinking I'd have to start looking in the trunks for more spares but then found three on a late 70s Impala. Not rusty, looked to be undamaged, with tires that held air. And as I said, I paid $10 each for them!! Not bad!
Here's a couple pictures of the 215/70R15 tire. Looks better than the puny 14" wheels. These rims are slightly more "reversed" than the originals too. I Photoshopped a Baby Moon onto one of them. (I had them on my old van in the 80s and want to go with this simple look on this van.) I'm probably the only guy who likes factory steel rims and whitewalls!
donivan65- Governor
- Number of posts : 12247
Location : San Diego, California
Registration date : 2008-05-12
- Post n°79
Re: Back to......VANagains NEWest 65 Chevy SportVan Deluxe
![]() by donivan65 Wed Aug 19, 2009 9:13 pm
by donivan65 Wed Aug 19, 2009 9:13 pm
So how are you going to accessorize your dash,,,,,


VANagain- Number of posts : 1048
Location : San Diego, CA
Age : 63
Registration date : 2008-05-16
- Post n°80
Re: Back to......VANagains NEWest 65 Chevy SportVan Deluxe
![]() by VANagain Thu Aug 20, 2009 11:46 am
by VANagain Thu Aug 20, 2009 11:46 am
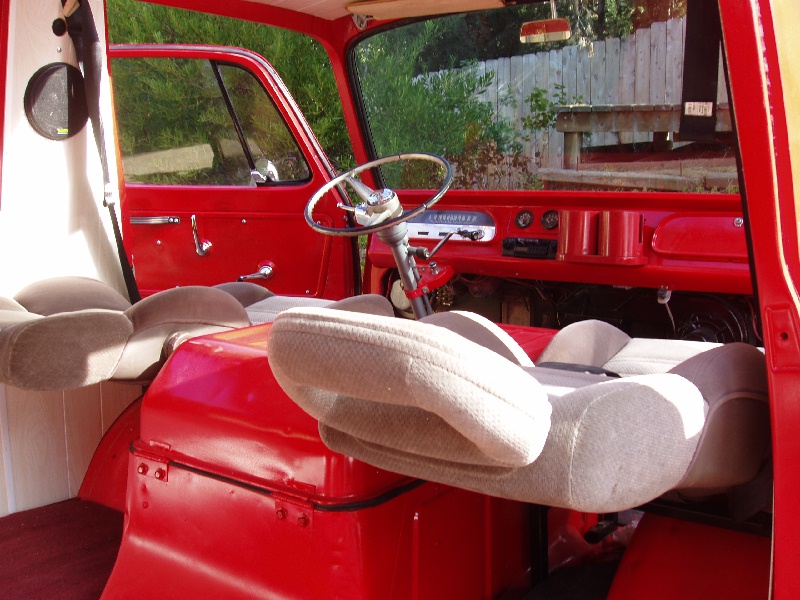
That's pretty cool, putting guages in that little panel! But I like how you put the in your ash tray plate. Have you got a photo of that handy?
On my old van I put the guages on the front of the doghouse. Makes it so much easier to route the wires and stuff. It can also be cool to mount them in the doghouse lid, depending on your cup holder setup.
We could have a whole thread just on guage placement! Or is there one already?!
On my old van I put the guages on the front of the doghouse. Makes it so much easier to route the wires and stuff. It can also be cool to mount them in the doghouse lid, depending on your cup holder setup.
We could have a whole thread just on guage placement! Or is there one already?!
donivan65- Governor
- Number of posts : 12247
Location : San Diego, California
Registration date : 2008-05-12
- Post n°81
Re: Back to......VANagains NEWest 65 Chevy SportVan Deluxe
![]() by donivan65 Thu Aug 20, 2009 12:46 pm
by donivan65 Thu Aug 20, 2009 12:46 pm
There are some dash pictures in the Show Me Your Dash post,,,,,
https://vintage-vans.forumotion.com/vintage-vans-general-discussion-f1/show-me-your-dash-t7291.htm
https://vintage-vans.forumotion.com/vintage-vans-general-discussion-f1/show-me-your-dash-t7291.htm
VANagain- Number of posts : 1048
Location : San Diego, CA
Age : 63
Registration date : 2008-05-16
I got the rear brakes put back on and installed the right axle. I was about to put the left axle in and I happened to shine a light in the tube and saw piles of rust in there! This is how much I extracted so far, using a magnet:
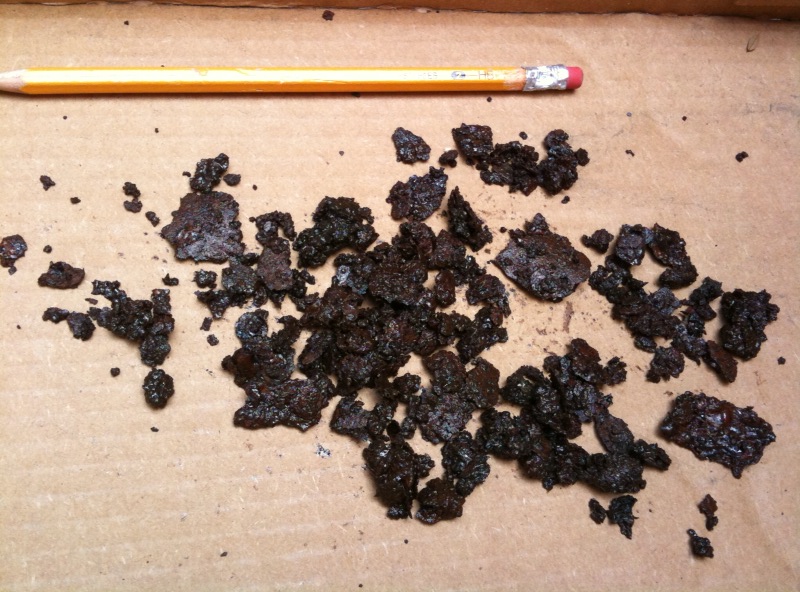
Remember I said the wheel, brakes, and backing plate were rusty on the drivers side? Maybe that side was under water or something.
I can't leave rusty chunks in there, right? The wheel bearing is on this end of the tube and there's a big bearing on the other end. The lube will be in there carrying that junk into the bearings. The tubes should have been flushed out when I had the wheel bearings out. Don suggested I remove the carrier (ring gear and everything) so I can scrape and flush the stuff from both tubes towards the center. He says it's not that tough to remove the two bearing caps and drop the whole carrier out of the way. We'll see! I'm going to do this Sunday.
donivan65- Governor
- Number of posts : 12247
Location : San Diego, California
Registration date : 2008-05-12
- Post n°83
Re: Back to......VANagains NEWest 65 Chevy SportVan Deluxe
![]() by donivan65 Sat Aug 22, 2009 11:09 pm
by donivan65 Sat Aug 22, 2009 11:09 pm
That just goes to show you,,,,,,,you buy an old vehicle,,,,,you better tear it all apart to see what you got,,,,,,,
VANagain- Number of posts : 1048
Location : San Diego, CA
Age : 63
Registration date : 2008-05-16
- Post n°84
Re: Back to......VANagains NEWest 65 Chevy SportVan Deluxe
![]() by VANagain Sat Aug 22, 2009 11:40 pm
by VANagain Sat Aug 22, 2009 11:40 pm
Oh Donivan, you always say that... And dammit, it's true!!
donivan65- Governor
- Number of posts : 12247
Location : San Diego, California
Registration date : 2008-05-12
- Post n°85
Re: Back to......VANagains NEWest 65 Chevy SportVan Deluxe
![]() by donivan65 Sun Aug 23, 2009 12:18 am
by donivan65 Sun Aug 23, 2009 12:18 am
Now when you see your wheel and axle pass you by going down the road, you'll know why without me telling you,,,,,,,
Digz- Number of posts : 3794
Location : United States Six Lakes MI
Registration date : 2008-05-17
- Post n°86
Re: Back to......VANagains NEWest 65 Chevy SportVan Deluxe
![]() by Digz Sun Aug 23, 2009 4:48 am
by Digz Sun Aug 23, 2009 4:48 am
I took the carrier out of mine after seeing all that gunk in the tube also, took a long piece of 1/2 pipe, flattened one end to drive out the races and bearings from the oposite side and then taped a gob of rags on it and used it for a giant swab to clean out the tubes. also ended up replacing the carrier bearings.
VANagain- Number of posts : 1048
Location : San Diego, CA
Age : 63
Registration date : 2008-05-16
Everything went smoothly today! The carrier was easy to remove. Kept track of which sides the bearings, shims, and caps belonged to. Sure enough, on the drivers side there was a a big pile of rust and crud on the other side of the inner bearing. And on the passenger side I found two stray outer bearings from some old bearing swap!! These before and after photos aren't very good but I was pleased to see how they cleaned up.
Before: After:
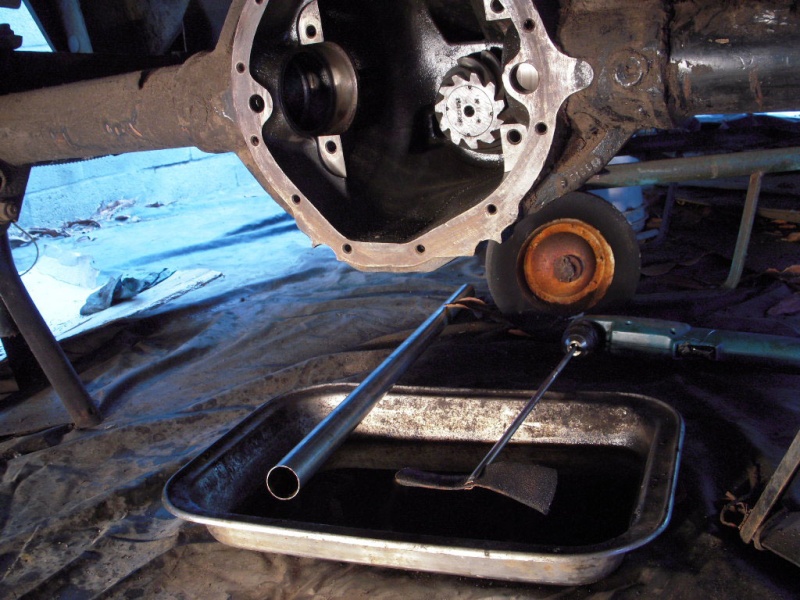
I first used this thin pipe as a round scraper to scrape the insides of the tubes. The rust got pushed to the center. The insides were better but not really clean. I got inspired by Digz' rags on a pipe. I cut a slot in a brass tube and slipped in a strip of emory cloth, then put the tube in a drill. I poured gas in the tube and then ran the emory cloth through it. Did a nice job of knocking the rest of the crud loose. Then I blew them out with compressed air. They looked real nice afterwards.
Don came by and helped make sure I put it all back together right. The inner bearings looked pretty good. Bolted the carrier back in, and after many months (over a year?) put the axles back in along with the other differential gears. Put the brake drums on and the wheels. I can finally take it down off the jackstands!! And then get this van to actually move!
The moral of this story is that everything needs to be gone thru on these old vans.
Before:
After: I first used this thin pipe as a round scraper to scrape the insides of the tubes. The rust got pushed to the center. The insides were better but not really clean. I got inspired by Digz' rags on a pipe. I cut a slot in a brass tube and slipped in a strip of emory cloth, then put the tube in a drill. I poured gas in the tube and then ran the emory cloth through it. Did a nice job of knocking the rest of the crud loose. Then I blew them out with compressed air. They looked real nice afterwards.
Don came by and helped make sure I put it all back together right. The inner bearings looked pretty good. Bolted the carrier back in, and after many months (over a year?) put the axles back in along with the other differential gears. Put the brake drums on and the wheels. I can finally take it down off the jackstands!! And then get this van to actually move!
The moral of this story is that everything needs to be gone thru on these old vans.
VANagain- Number of posts : 1048
Location : San Diego, CA
Age : 63
Registration date : 2008-05-16
This weekend I made these spacer blocks to lower my engine 1 inch. This is to level out the whole engine/tranny since there isn't room to get the 700R4's tailshaft as high as it should be. Fortunately that engine crossmember makes it real easy. (Hard to believe the whole engine is hanging on just four bolts!) I bought four longer bolts, 1/2-13 x 2.75", Grade 8 so they're strong enough. And then, since you can see these block when you look in the wheel well, I got a little carried away.

I wanted them to look like stock parts, not just square blocks. Fortunately aluminum is real easy to work with. I picked up two chunks of aluminum: 2" x 1" x 12" for $6 each. The van's frame is 2.5" wide, with 1/4" radius corners, so the 2" blocks sit real nice on the flat bottom of the frame. Then I thought they would look nicer if they were a bit longer than the crossmember width, so I cut them 8.5" long. And I gave the ends a 15 degree angle to match how the frame angles down for the spring shackles. These cuts were made easy by using my table saw. If you use a carbide tipped blade and go slow, aluminum cuts just fine! Then I change the angle of the blade from 15 to 45 degrees so I could chamfer the edges! This was a good headstart on rounding the edges, which I finished with a course file. It took a while, and I worked up quite a sweat, but I really like how they turned out!
Oh, and don't make the same mistake I did. The front of the driver's side block needs to be shorter to allow room for the parking brake "wheel" bracket. Now I have to cut that end off and do some more filing!

Vanish- Admin
- Number of posts : 5155
Location : Hesperia Cal
Registration date : 2008-05-02
- Post n°89
Re: Back to......VANagains NEWest 65 Chevy SportVan Deluxe
![]() by Vanish Tue Sep 01, 2009 8:39 pm
by Vanish Tue Sep 01, 2009 8:39 pm
The tree Van needs these spacers too !!!!! Makes for Better Drive line angles When you convert to 4x4 ........ Rich That Looks Good .......
_________________
,,,Vanish,,,
http://vintage-vans.smugmug.com/Vans/Vanishs-65-Chevy-No-Door-Van/1767214_JCoT4#88846115_B3BP3
http://public.fotki.com/Vintage-Vans/vintage-vans-es/cant-a-ford-it/
http://public.fotki.com/Vintage-Vans/
MCMLXV

Scott- Number of posts : 1651
Location : Anoka, MN
Age : 54
Registration date : 2008-05-20
- Post n°90
Re: Back to......VANagains NEWest 65 Chevy SportVan Deluxe
![]() by Scott Wed Sep 02, 2009 7:31 am
by Scott Wed Sep 02, 2009 7:31 am
VANagain wrote:This is to level out the whole engine/tranny since there isn't room to get the 700R4's tailshaft as high as it should be.
Would this also be a problem when installing a 200R4?
VANagain- Number of posts : 1048
Location : San Diego, CA
Age : 63
Registration date : 2008-05-16
- Post n°91
Re: Back to......VANagains NEWest 65 Chevy SportVan Deluxe
![]() by VANagain Wed Sep 02, 2009 11:54 pm
by VANagain Wed Sep 02, 2009 11:54 pm
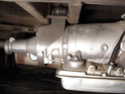
Good question. I know there are advantages to going with the 200R4, like not having to shorten the driveshaft, and I think the tailshaft splines match our driveshaft yoke. But just because the tranny is a couple inches shorter I bet it will still hit the crossmember. This is not a great photo but you can see where the front half of the crossmember gets close to the top of the tranny (upper right of photo).

I've thought about removing the tranny and taking a torch to that part of the crossmember and bending it up out of the way. But I'm okay with lowering everything. It gets the engine that much more out in the breeze, right?!
Another thing about the 200R4, its tailshaft housing is not removable. This means there are no bolts back there to use to attach a slick mount like mine.
700R4
200R4
Hey, look what I just ran across! Someone makes a shorter tailshaft housing to make a 700R4 the same length as a TH350. I wonder where you get the shorter shaft...
http://ctoff-road.com/shorty_700r4_tailshaft.htm
VANagain- Number of posts : 1048
Location : San Diego, CA
Age : 63
Registration date : 2008-05-16
- Post n°92
Re: Back to......VANagains NEWest 65 Chevy SportVan Deluxe
![]() by VANagain Wed Sep 09, 2009 12:35 am
by VANagain Wed Sep 09, 2009 12:35 am
I did a lot of fabricating over the long weekend! Well, I should say I spent a lot of time doing a little fabricating! Worked out a good way to hook up the 700R4's TV cable to the carburetor linkage. They all say the geometry of this cable and its relationship to the throttle is very important to get the shifting right. This is the diagram everyone refers to:
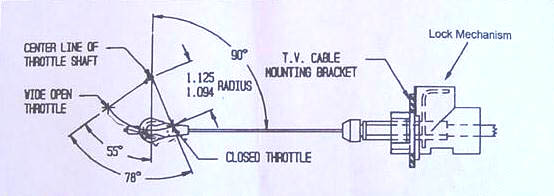
Note: They show the cable mounted below the pivot point, but I put mine above. It works the same either way.
They sell brackets for V8's with popular carbs but none for a sideways-mounted one barrel!! I've seen guys attach the cable to one of the many throttle linkage rods or bell cranks, but I think it should be right on the carb's bell crank. No sense involving all the accumulated slop in all that other linkage.
My carb is a Rochester Monojet from a 2nd Gen, I think, so the carb bell crank lever may not look like yours. But using a procedure similar to this should work for yours.
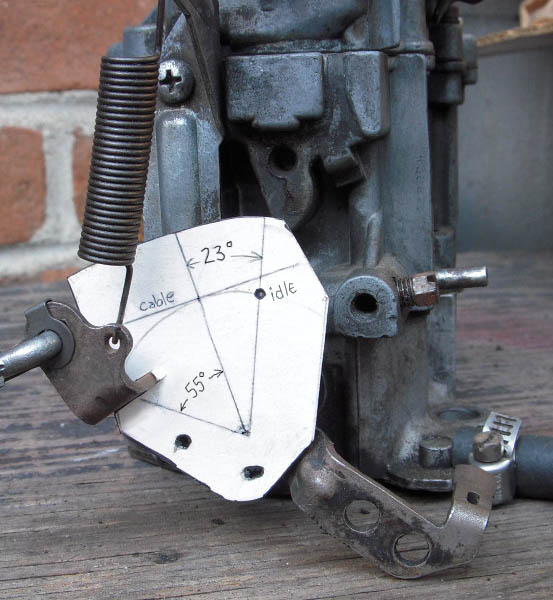
My initial plan was to attach a flat piece of metal to the bell crank and then mount the cable connector pin to this. I trimmed a piece of thin cardstock so it would hold itself onto the bellcrank. I marked the bell crank's pivot point and some holes I could use for mounting the metal plate. Then I used a compass to draw a 1.1" radius arc from the pivot point. This is the path the cable's pin will move in. (To get the right amount of travel on the cable, the cable connector pin needs to be mounted about 1.1" away from the pivot point of the carb bell crank -- in other words, with a radius of 1.094 to 1.125 inches from the throttle plate's shaft.)
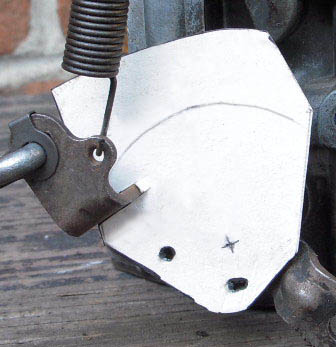
As you can see in the diagram up top, everything is based on a line perpendicular to TV cable. The idle position is 23° this side of that line, and full throttle is 55° the other way. (This Rochester did move a total of 78° like in the diagram.) So next I had to determine at which angle the TV cable would come to the carb. I found there was enough room to run it between the valve cover and the air cleaner. This put the cable coming down at a bit of an angle. Using a straight edge I drew this angle on the template, with it touching the top of the circle. And another line 90° to that, running down to the pivot point:

Then I used a protractor to draw a line 23° to the right of that line. And finally this gave me the mounting point for the connector pin! (Where it says "idle")
Now, here's where I'll save you some wasted time. I cut this same shape out of thin metal and attached it with screws to the bell crank. (Sorry, no picture.) Hooked the TV cable up to it and was feeling pretty good about myself! This had only taken a couple hours. And then I "gave it some gas", rotating the carb's bell crank and found that the cable end ran into the carb's return spring!! D'oh!
I toyed with the idea of moving the spring further out but I didn't want to do that. I tried putting the plate on the other side of the bell crank. This would move the pin in far enough to clear the spring. But the plate had to be so cut up to clear the shaft and stuff that it seemed too flimsy. Then I got an idea. I now knew exactly where this pin needed to be, so maybe I could just run some thicker steel up to that point and weld the pin to it.
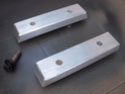
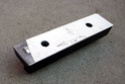
Anyhow, sometime the next day I came up with this simple little gem:
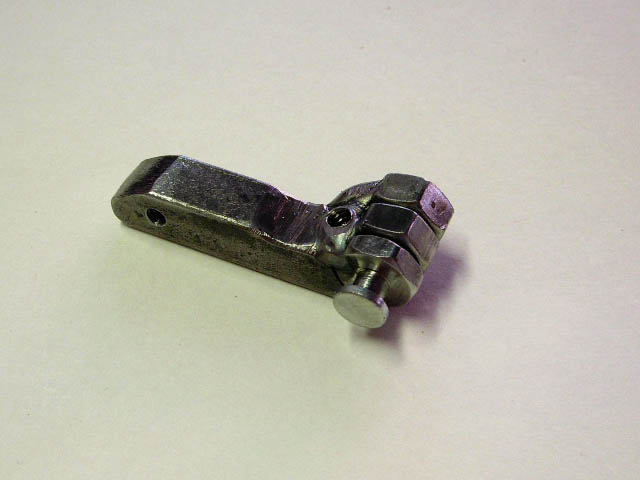
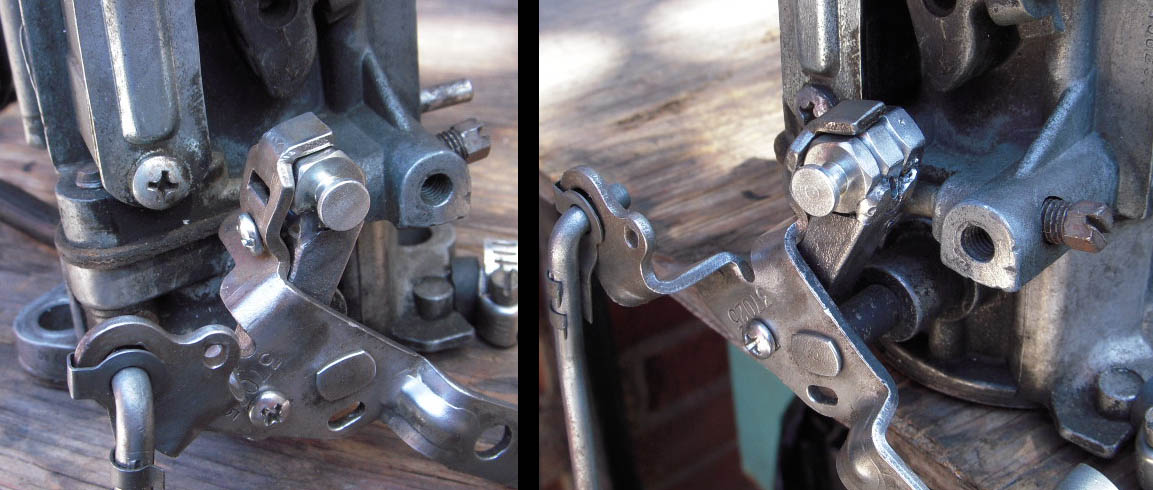
I put two nuts on the pin and welded it to a piece of 3/8" steel bar. Drilled and tapped two holes to mount it to existing holes in the bell crank. Here's how it looks in place:
Very nice. All that work done but now I had to mount the actual TV cable housing to the engine at the angle I had drawn on the template... I'll post that story tomorrow.
Note: They show the cable mounted below the pivot point, but I put mine above. It works the same either way.
They sell brackets for V8's with popular carbs but none for a sideways-mounted one barrel!! I've seen guys attach the cable to one of the many throttle linkage rods or bell cranks, but I think it should be right on the carb's bell crank. No sense involving all the accumulated slop in all that other linkage.
My carb is a Rochester Monojet from a 2nd Gen, I think, so the carb bell crank lever may not look like yours. But using a procedure similar to this should work for yours.
My initial plan was to attach a flat piece of metal to the bell crank and then mount the cable connector pin to this. I trimmed a piece of thin cardstock so it would hold itself onto the bellcrank. I marked the bell crank's pivot point and some holes I could use for mounting the metal plate. Then I used a compass to draw a 1.1" radius arc from the pivot point. This is the path the cable's pin will move in. (To get the right amount of travel on the cable, the cable connector pin needs to be mounted about 1.1" away from the pivot point of the carb bell crank -- in other words, with a radius of 1.094 to 1.125 inches from the throttle plate's shaft.)
As you can see in the diagram up top, everything is based on a line perpendicular to TV cable. The idle position is 23° this side of that line, and full throttle is 55° the other way. (This Rochester did move a total of 78° like in the diagram.) So next I had to determine at which angle the TV cable would come to the carb. I found there was enough room to run it between the valve cover and the air cleaner. This put the cable coming down at a bit of an angle. Using a straight edge I drew this angle on the template, with it touching the top of the circle. And another line 90° to that, running down to the pivot point:
Then I used a protractor to draw a line 23° to the right of that line. And finally this gave me the mounting point for the connector pin! (Where it says "idle")
Now, here's where I'll save you some wasted time. I cut this same shape out of thin metal and attached it with screws to the bell crank. (Sorry, no picture.) Hooked the TV cable up to it and was feeling pretty good about myself! This had only taken a couple hours. And then I "gave it some gas", rotating the carb's bell crank and found that the cable end ran into the carb's return spring!! D'oh!
I toyed with the idea of moving the spring further out but I didn't want to do that. I tried putting the plate on the other side of the bell crank. This would move the pin in far enough to clear the spring. But the plate had to be so cut up to clear the shaft and stuff that it seemed too flimsy. Then I got an idea. I now knew exactly where this pin needed to be, so maybe I could just run some thicker steel up to that point and weld the pin to it.
Anyhow, sometime the next day I came up with this simple little gem:
I put two nuts on the pin and welded it to a piece of 3/8" steel bar. Drilled and tapped two holes to mount it to existing holes in the bell crank. Here's how it looks in place:
Very nice. All that work done but now I had to mount the actual TV cable housing to the engine at the angle I had drawn on the template... I'll post that story tomorrow.
DanTheVanMan- Commissioner
- Number of posts : 7905
Location : Escanaba, Michigan
Age : 62
Registration date : 2008-10-08
- Post n°93
Re: Back to......VANagains NEWest 65 Chevy SportVan Deluxe
![]() by DanTheVanMan Wed Sep 09, 2009 5:38 am
by DanTheVanMan Wed Sep 09, 2009 5:38 am
Very cool and great info too.... 
_________________
DanTheVanMan
1965 Chevy G10 Sportvan Custom
1984 Jeep CJ-7 Laredo, Restored
2004 Kawasaki KLR650
1997 Jeep TJ Sport
My Mini Gallery

VANagain- Number of posts : 1048
Location : San Diego, CA
Age : 63
Registration date : 2008-05-16
In case you're wondering what the heck a TV cable is, here's a link to Bowtie Overdrive's 700R4 FAQ:
http://700r4.com/faq/whattv.shtml
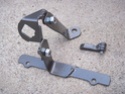
The rebuilt tranny I bought from them came with this little kit:
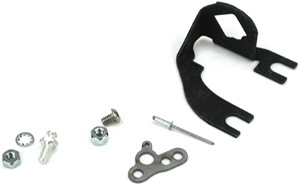
This is where I got the cable connector pin. The other part I used was the "universal" bracket. This is what the cable housing snaps into. It's got two slots so the final angle can be fine tuned. In the end I just had to relocate one of these slotted tabs.
There were several bolts I could have used to mount this bracket but I tried to keep maintenance in mind. I didn't want to block access to the throttle adjustment screw, the manifold bolts, and two vacuum lines. The first bracket mounts to two valve cover bolts, kind of like one long washer. Then I welded another piece at a right angle, angling a little bit away from the valve cover so it wouldn't rub on it. I left this piece long for a while so I could clamp the universal bracket to it and determine the perfect height. This one bracket may have been enough but I wanted to make sure it wouldn't flex at all and throw off the adjustment so I added a second bracket attached to the carb mounting stud. It needed a tricky angle to come over to reach the univ. bracket while staying clear of the vacuum line and the idle screw. That's also why I chopped the univ. bracket shorter.
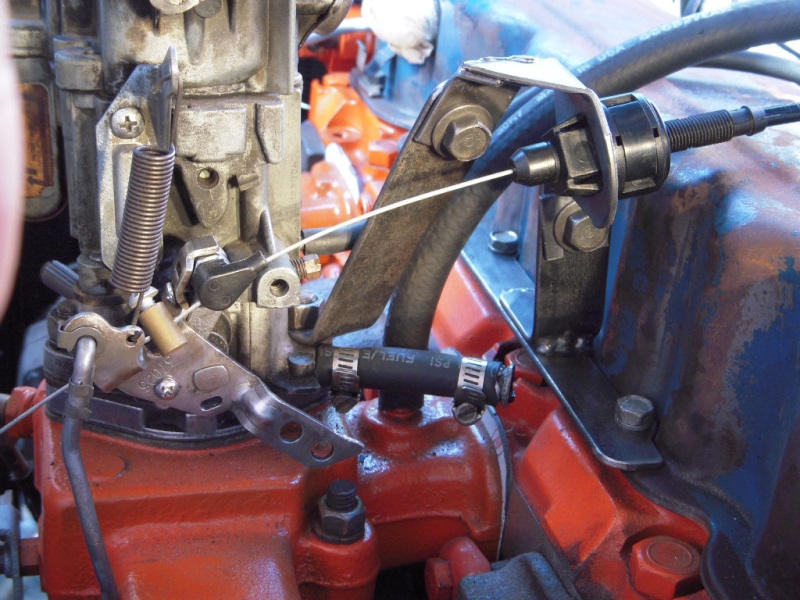
Here's a top view. You can see where the second bracket mounts to the carburetor bolt.
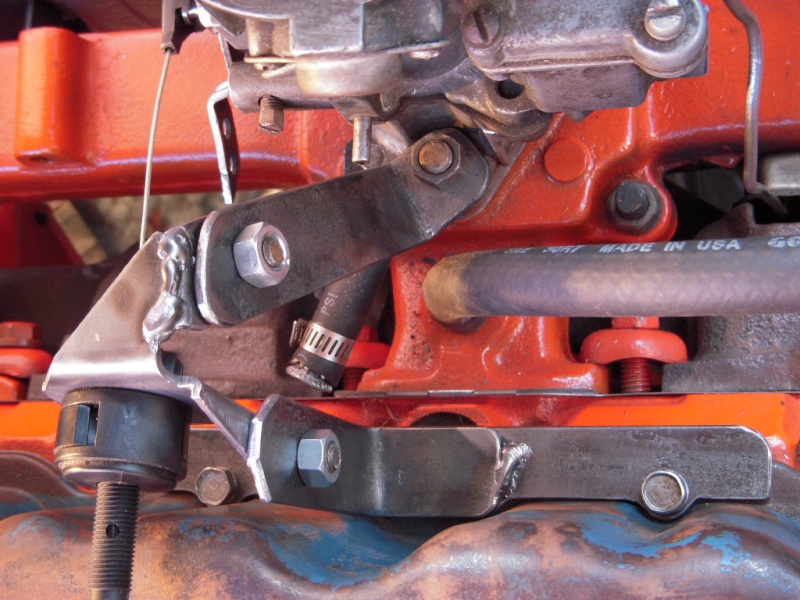
Looking at these photos now it looks so simple and straightforward. But it took a lot of time and cardboard templates to get to this point. I'm very happy with the simplicity of it!
http://700r4.com/faq/whattv.shtml
The rebuilt tranny I bought from them came with this little kit:
This is where I got the cable connector pin. The other part I used was the "universal" bracket. This is what the cable housing snaps into. It's got two slots so the final angle can be fine tuned. In the end I just had to relocate one of these slotted tabs.
There were several bolts I could have used to mount this bracket but I tried to keep maintenance in mind. I didn't want to block access to the throttle adjustment screw, the manifold bolts, and two vacuum lines. The first bracket mounts to two valve cover bolts, kind of like one long washer. Then I welded another piece at a right angle, angling a little bit away from the valve cover so it wouldn't rub on it. I left this piece long for a while so I could clamp the universal bracket to it and determine the perfect height. This one bracket may have been enough but I wanted to make sure it wouldn't flex at all and throw off the adjustment so I added a second bracket attached to the carb mounting stud. It needed a tricky angle to come over to reach the univ. bracket while staying clear of the vacuum line and the idle screw. That's also why I chopped the univ. bracket shorter.
Here's a top view. You can see where the second bracket mounts to the carburetor bolt.
Looking at these photos now it looks so simple and straightforward. But it took a lot of time and cardboard templates to get to this point. I'm very happy with the simplicity of it!

sasktrini- Number of posts : 2067
Location : Saskatoon, SK, Canada
Registration date : 2008-05-20
- Post n°95
Re: Back to......VANagains NEWest 65 Chevy SportVan Deluxe
![]() by sasktrini Wed Sep 09, 2009 12:33 pm
by sasktrini Wed Sep 09, 2009 12:33 pm
Good job! I would never say that task was simple! You might end up with a bunch of orders from people who want your templates! 
Digz- Number of posts : 3794
Location : United States Six Lakes MI
Registration date : 2008-05-17
- Post n°96
Re: Back to......VANagains NEWest 65 Chevy SportVan Deluxe
![]() by Digz Wed Sep 09, 2009 5:35 pm
by Digz Wed Sep 09, 2009 5:35 pm
Man that looks great! Isn't anything simple about reworking "Universal" stuff. should say " Ya get the general idea bracket" That carb stud for the TVC is genious as far as Im concerned. Definately may be borrowin some of that idea for the 350TH swap on the gray van.
donivan65- Governor
- Number of posts : 12247
Location : San Diego, California
Registration date : 2008-05-12
- Post n°97
Re: Back to......VANagains NEWest 65 Chevy SportVan Deluxe
![]() by donivan65 Thu Sep 10, 2009 11:31 pm
by donivan65 Thu Sep 10, 2009 11:31 pm
So what is the actual linear travel of the cable from idle to wide open throttle in case someone wants to tie into the actual linkage rods,,,,,,
VANagain- Number of posts : 1048
Location : San Diego, CA
Age : 63
Registration date : 2008-05-16
I'll measure the travel distance of the TV cable when I get back in town. I haven't done the final adjustment yet, but now that the brackets are all painted up, I can. They say to take the pan off the tranny and look to make sure the valve body plunger is all the way in both directions, like the pictures show on the Bowtie Overdrive web page. Then I can tell you the proper travel distance.
VANagain- Number of posts : 1048
Location : San Diego, CA
Age : 63
Registration date : 2008-05-16
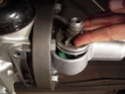
Initially I drilled a hole in my tranny mount bracket just big enough to put the long bolt thru. When I ran the bolt thru the crossmember and the bracket it held the tranny in place. Of course this was just temporary because there was no rubber in the mount. But it was good while I decided how far I wanted to drop the engine crossmember to level out the engine. It turned out this initial hole put the tranny at just the height I wanted, so I drew a big circle around that hole that was the diameter of the steel tube I had bought to fit the rubber motor mount thingies. I cut out the big hole with a plasma cutter, which made a somewhat raggedy hole that I touched it up until the tube slid though with a little slop up and down. This allowed it to find the angle it wanted to be at when I bolted the bracket to the tranny and crossmember again.
This is what was great about this part of the process. I never needed to measure or even know the actual angle where the tube met the bracket, it went to that angle when I tightened all the bolts on the tranny tail shaft and the long bolt thru the crossmember! Then I used the MIG welder to put a good solid tack weld on the portion I could reach (the shiny bare metal in this photo). Then I lowered the tranny and removed the bracket so I could finish welding all the way around the tube on the bench!
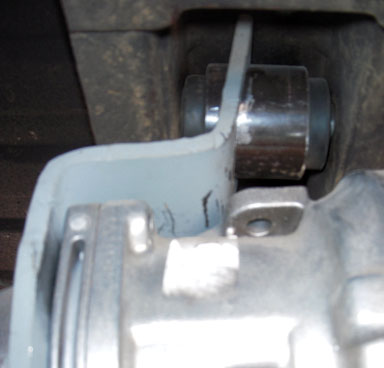

(Note: I found I didn't need to lower the tranny all the way down to get the bracket to clear the crossmember if I rotated the tailshaft along with the bracket. With the four bolts removed, the tailshaft can spin around without actually removing it. And I have no fluid in the tranny at this point.)
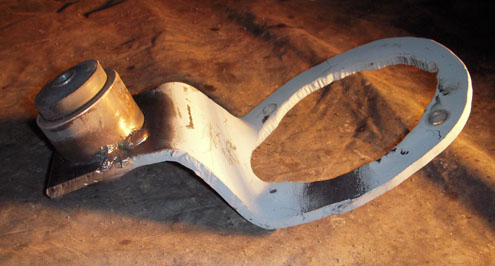
Next I need to weld some gussets on the sides to keep the metal from unbending.
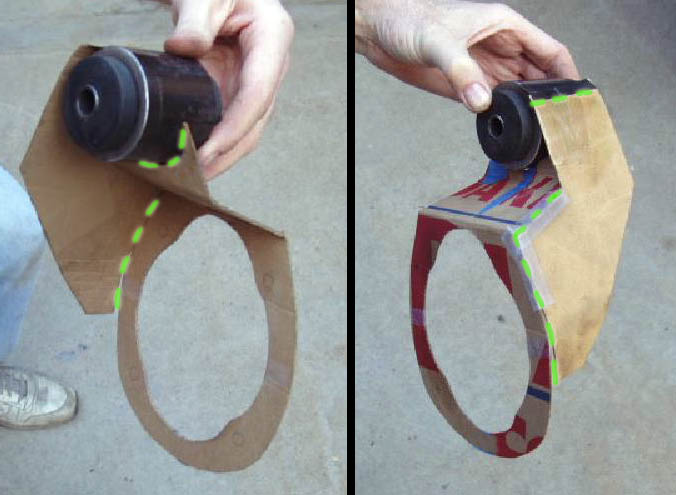
In this cardboard mockup you can see that I was going to have the tube sit in a half-round "saddle", with the bracket only connecting along the bottom of the tube. That would have looked more streamline but I ended up leaving the metal go all the way around the tube. More strength and less cutting for me!
This is what was great about this part of the process. I never needed to measure or even know the actual angle where the tube met the bracket, it went to that angle when I tightened all the bolts on the tranny tail shaft and the long bolt thru the crossmember! Then I used the MIG welder to put a good solid tack weld on the portion I could reach (the shiny bare metal in this photo). Then I lowered the tranny and removed the bracket so I could finish welding all the way around the tube on the bench!
(Note: I found I didn't need to lower the tranny all the way down to get the bracket to clear the crossmember if I rotated the tailshaft along with the bracket. With the four bolts removed, the tailshaft can spin around without actually removing it. And I have no fluid in the tranny at this point.)
Next I need to weld some gussets on the sides to keep the metal from unbending.
In this cardboard mockup you can see that I was going to have the tube sit in a half-round "saddle", with the bracket only connecting along the bottom of the tube. That would have looked more streamline but I ended up leaving the metal go all the way around the tube. More strength and less cutting for me!
VANagain- Number of posts : 1048
Location : San Diego, CA
Age : 63
Registration date : 2008-05-16
Hooray, I finished welding this tranny bracket! Here's a picture of it after some grinding and paint, next to the factory TH350 bracket:
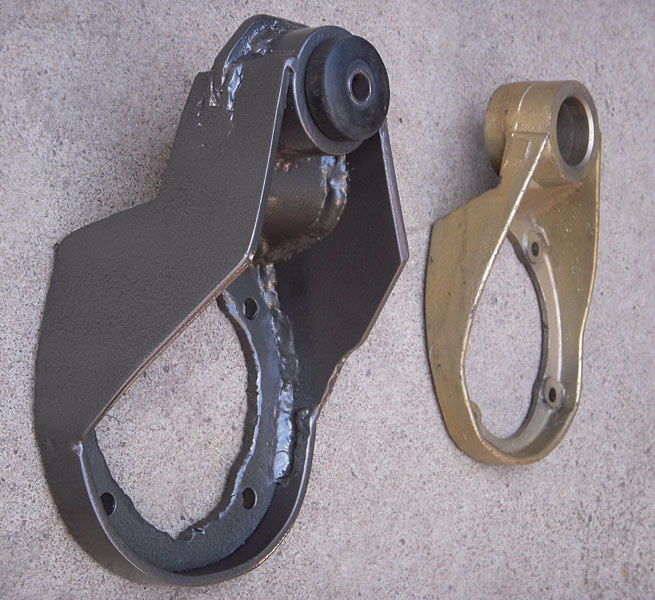
Here's how the final assembly went: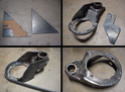
The bracket is now bulkier than before, so it was a challenge to get in place. Before it had wiggle room so I could rotate it around the tailshaft to get it up into the crossmember. But now with the side gussets, it can no longer rotate. It wouldn't be a problem if it weren't for the bulge where the speedometer gear mounts in the tail shaft (you can see the bulge in the photos below). So I had to loosen the engine crossmember bolts a lot to allow the tranny to drop far enough to get it up in there. Even then I had to use a big rubber hammer for encouragement. (The right way to do this would be to lower the engine further so the tranny bracket could go straight up into the crossmember. But I didn't want to have to drain the coolant and remove the radiator hoses.)
Looks nice when it's all bolted in place:

Because it was such a bitch to get it in place, I didn't do a test fit before painting it. Now that it's mounted I see that the output shaft is not centered vertically within the rear seal (you can see that in the left photo above). I see a few spots where the gusset "sides" are hitting the tranny, so I think that's keeping the tail shaft from drawing up tightly to the rest of the tranny. In the photo below you can see I didn't leave enough clearance for that black round thing.
Plus you'll see another problem -- that bolt head now obstructs the speedo gear cover. I drilled that hole just before painting the bracket so I never realized this problem in earlier test fits! I laid there looking at this for about 10 minutes, trying to think of a remedy. I didn't like any of the ideas that came to me. It wasn't until I went to bed that night that the simplest solution came to me: use a countersunk bolt! If I can find a metric bolt with a countersunk head (probably an allen wrench-type) then all I need to do is countersink that hole. I can do that when I remove the bracket one more time to give it more clearance at those contact points. Almost there!!
Here's how the final assembly went:
The bracket is now bulkier than before, so it was a challenge to get in place. Before it had wiggle room so I could rotate it around the tailshaft to get it up into the crossmember. But now with the side gussets, it can no longer rotate. It wouldn't be a problem if it weren't for the bulge where the speedometer gear mounts in the tail shaft (you can see the bulge in the photos below). So I had to loosen the engine crossmember bolts a lot to allow the tranny to drop far enough to get it up in there. Even then I had to use a big rubber hammer for encouragement. (The right way to do this would be to lower the engine further so the tranny bracket could go straight up into the crossmember. But I didn't want to have to drain the coolant and remove the radiator hoses.)
Looks nice when it's all bolted in place:
Because it was such a bitch to get it in place, I didn't do a test fit before painting it. Now that it's mounted I see that the output shaft is not centered vertically within the rear seal (you can see that in the left photo above). I see a few spots where the gusset "sides" are hitting the tranny, so I think that's keeping the tail shaft from drawing up tightly to the rest of the tranny. In the photo below you can see I didn't leave enough clearance for that black round thing.
Plus you'll see another problem -- that bolt head now obstructs the speedo gear cover. I drilled that hole just before painting the bracket so I never realized this problem in earlier test fits! I laid there looking at this for about 10 minutes, trying to think of a remedy. I didn't like any of the ideas that came to me. It wasn't until I went to bed that night that the simplest solution came to me: use a countersunk bolt! If I can find a metric bolt with a countersunk head (probably an allen wrench-type) then all I need to do is countersink that hole. I can do that when I remove the bracket one more time to give it more clearance at those contact points. Almost there!!
Sponsored content

