VintAGE-Vans

Would you like to react to this message? Create an account in a few clicks or log in to continue.

BRINGING IT ALL TOGETHER.... A's, G's & E's


+6
BILLS66
BvrWally
wacko
VANagain
savage
donivan65
10 posters

    Back to VanAgains New 65 Sportvan Deluxe

    donivan65
    donivan65
    Governor
    Governor


    Number of posts : 12218
    Location : San Diego, California
    Registration date : 2008-05-12

    Back to VanAgains New 65 Sportvan Deluxe Empty Back to VanAgains New 65 Sportvan Deluxe

    Post by donivan65 Sun Nov 09, 2008 10:43 pm

    So lets get back to this story,,,,,,we left off in April,,,,,

    http://vintagevans.forumup.jobs/viewtopic.php?t=8141&start=30&mforum=vintagevans


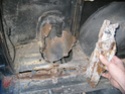
    Right here, VanAgain is going to repair the LR corner over the filler neck,,,,


    Back to VanAgains New 65 Sportvan Deluxe Vanaga12
    savage
    savage


    Number of posts : 2626
    Location : Where Rust Never Sleeps in Ft Wayne IN
    Registration date : 2008-05-15

    Back to VanAgains New 65 Sportvan Deluxe Empty Re: Back to VanAgains New 65 Sportvan Deluxe

    Post by savage Mon Nov 10, 2008 6:23 am

    That repair panel sure looks good. Still going to be a buch of work & welding. What you going to do where it welds to the inside of body. The heat from it might mess up the (nice ) paint job on outside?
    VANagain
    VANagain


    Number of posts : 1046
    Location : San Diego, CA
    Age : 62
    Registration date : 2008-05-16

    Back to VanAgains New 65 Sportvan Deluxe Empty Re: Back to VanAgains New 65 Sportvan Deluxe

    Post by VANagain Mon Nov 10, 2008 10:59 pm

    Here is a "before" photo of the floor around the filler neck, showing a chunk of bondo Don pried off the floor:

    Back to VanAgains New 65 Sportvan Deluxe Img_9710

    This shot shows all the bad floor metal cut away and a solid crossmember welded in to reinforce the old one. And there I am using the MIG welder (which is SO much nicer than gas welding, especially in these tight spaces!).

    Back to VanAgains New 65 Sportvan Deluxe Dscn0810 Back to VanAgains New 65 Sportvan Deluxe Vanaga10

    I need to take a photo showing the floor piece in place. Regarding how I attached it to the outer (painted) wall, I just put a bead of dum dum in between (that really sticky 3M product). From the factory they put a few spot welds along that flange and dum dum'd the rest. I can't do the welds because it would brun the paint, so it's just dum dum to keep the water out. Aside from the filler neck itself, there is a good amount of overlapping floor metal, welded a couple inches in from the painted wall, plus a line of dum dum.

    This is a repair job but it's not the ultimate way to do it. If you look at the old thread, you'll see I've got the whole back end from StorageVan. When the time comes to repaint this van, that whole section could be swapped out. That would be the best way to eliminate all the rust and repairs back there. I'd like to do it but I've got my other van that needs my attention right now. The buyer of this van can have all my solid spare parts. Or, if I still have this van down the line, maybe I'll take it on. I'm really digging this MIG welding!
    wacko
    wacko


    Number of posts : 423
    Location : Chilliwack, BC Canada
    Registration date : 2008-05-20

    Back to VanAgains New 65 Sportvan Deluxe Empty Re: Back to VanAgains New 65 Sportvan Deluxe

    Post by wacko Wed Nov 12, 2008 9:38 am

    I agree the mig is the best thing I have bought. I had NO welding experience and have slowly been picking away at some rust repairs. It is by no way perfect but I am amazed at the progress I have made. And I have to admit I enjoy doing it!!!
    VANagain
    VANagain


    Number of posts : 1046
    Location : San Diego, CA
    Age : 62
    Registration date : 2008-05-16

    Back to VanAgains New 65 Sportvan Deluxe Empty Re: Back to VanAgains New 65 Sportvan Deluxe

    Post by VANagain Sun Nov 23, 2008 11:29 pm

    Here's how the reinforcements to the back "frame" turned out. I trimmed my good metal to fit around the existing frame and leaf spring subframe and then welded it all together. The pictures don't do it justice. I think it turned out pretty well. Should be as strong or stronger than the old spot welds.

    Back to VanAgains New 65 Sportvan Deluxe Weldin10 Back to VanAgains New 65 Sportvan Deluxe Vanaga12 Back to VanAgains New 65 Sportvan Deluxe Weldin11


    Last edited by VANagain on Mon Nov 24, 2008 12:02 am; edited 1 time in total
    VANagain
    VANagain


    Number of posts : 1046
    Location : San Diego, CA
    Age : 62
    Registration date : 2008-05-16

    Back to VanAgains New 65 Sportvan Deluxe Empty Re: Back to VanAgains New 65 Sportvan Deluxe

    Post by VANagain Sun Nov 23, 2008 11:59 pm

    Here's the new floor piece for the driver's side welded in.

    Back to VanAgains New 65 Sportvan Deluxe Workin11 Back to VanAgains New 65 Sportvan Deluxe Vanaga11
    BvrWally
    BvrWally


    Number of posts : 946
    Location : Earlyville,Ohio
    Registration date : 2008-05-19

    Back to VanAgains New 65 Sportvan Deluxe Empty Re: Back to VanAgains New 65 Sportvan Deluxe

    Post by BvrWally Mon Nov 24, 2008 3:22 am

    Wow...great job and it came out "Swell!"
    B.W. Smile
    savage
    savage


    Number of posts : 2626
    Location : Where Rust Never Sleeps in Ft Wayne IN
    Registration date : 2008-05-15

    Back to VanAgains New 65 Sportvan Deluxe Empty Re: Back to VanAgains New 65 Sportvan Deluxe

    Post by savage Mon Nov 24, 2008 6:17 am

    Great job on your repair.
    BILLS66
    BILLS66


    Number of posts : 1383
    Location : Salem Or.
    Age : 64
    Registration date : 2008-05-17

    Back to VanAgains New 65 Sportvan Deluxe Empty Re: Back to VanAgains New 65 Sportvan Deluxe

    Post by BILLS66 Mon Nov 24, 2008 6:34 am

    The repair is real sano looking good job.
    VANagain
    VANagain


    Number of posts : 1046
    Location : San Diego, CA
    Age : 62
    Registration date : 2008-05-16

    Back to VanAgains New 65 Sportvan Deluxe Empty Re: Back to VanAgains New 65 Sportvan Deluxe

    Post by VANagain Mon Nov 24, 2008 9:26 am

    Here's how the right rear floor turned out. The rust holes were not that big on the right side but it was best to cut out a nice square opening to make sure the new piece got welded to the frame nicely.

    Back to VanAgains New 65 Sportvan Deluxe Vanaga13 Back to VanAgains New 65 Sportvan Deluxe Vanaga14 Back to VanAgains New 65 Sportvan Deluxe Weldin12
    G-Man
    G-Man
    Mayor
    Mayor


    Number of posts : 30743
    Location : Fowlerville, MI
    Age : 62
    Registration date : 2008-05-06

    Back to VanAgains New 65 Sportvan Deluxe Empty Re: Back to VanAgains New 65 Sportvan Deluxe

    Post by G-Man Mon Nov 24, 2008 12:43 pm

    Nice Job!!!
    VANagain
    VANagain


    Number of posts : 1046
    Location : San Diego, CA
    Age : 62
    Registration date : 2008-05-16

    Back to VanAgains New 65 Sportvan Deluxe Empty Front Floor

    Post by VANagain Mon Nov 24, 2008 11:26 pm

    Sunday I finished up the front floor. Here you see the typical rust along that seam. Don did a nice job of cutting it away, leaving a couple clean rectangular openings where I welded in the new metal. I've said it before, how helpful it is to have replacement metal that is already the exact right shape! Even still, I spend a lot of time trimming the metal to fit the new in with the old. And then, when welding with MIG, you gotta grind down to bare metal on all the mating edges. It's been fun but has taken a lot longer than I expected. (Though I should have known, since I'm such a perfectionist!)

    Back to VanAgains New 65 Sportvan Deluxe Weldin13 Back to VanAgains New 65 Sportvan Deluxe Weldin14 Back to VanAgains New 65 Sportvan Deluxe Weldin15 Back to VanAgains New 65 Sportvan Deluxe Weldin16
    wacko
    wacko


    Number of posts : 423
    Location : Chilliwack, BC Canada
    Registration date : 2008-05-20

    Back to VanAgains New 65 Sportvan Deluxe Empty Re: Back to VanAgains New 65 Sportvan Deluxe

    Post by wacko Tue Nov 25, 2008 9:47 am

    No kidding on how long everything takes. I work in half of my two car garage. And I spend half my time getting all my tools out and putting them away.
    sasktrini
    sasktrini


    Number of posts : 2067
    Location : Saskatoon, SK, Canada
    Registration date : 2008-05-20

    Back to VanAgains New 65 Sportvan Deluxe Empty Re: Back to VanAgains New 65 Sportvan Deluxe

    Post by sasktrini Tue Nov 25, 2008 11:15 am

    You're rocking this rust repair! You got a lot done yesterday! Cheers!
    VANagain
    VANagain


    Number of posts : 1046
    Location : San Diego, CA
    Age : 62
    Registration date : 2008-05-16

    Back to VanAgains New 65 Sportvan Deluxe Empty Re: Back to VanAgains New 65 Sportvan Deluxe

    Post by VANagain Sat Nov 29, 2008 11:41 am

    All this welding has been fun but it is time for me to get back to working on my other Sportvan! I just posted this one for sale on Craigslist:

    http://sandiego.craigslist.org/csd/cto/938096734.html
    donivan65
    donivan65
    Governor
    Governor


    Number of posts : 12218
    Location : San Diego, California
    Registration date : 2008-05-12

    Back to VanAgains New 65 Sportvan Deluxe Empty Re: Back to VanAgains New 65 Sportvan Deluxe

    Post by donivan65 Sat Jan 10, 2009 10:31 pm

    Too late now,,,,,,I cut the bad floor section out today,,,,,,,now Rich can figure out how to fix it,,,,,,

    Back to VanAgains New 65 Sportvan Deluxe Vanaga14

    Back to VanAgains New 65 Sportvan Deluxe Vanaga15
    VANagain
    VANagain


    Number of posts : 1046
    Location : San Diego, CA
    Age : 62
    Registration date : 2008-05-16

    Back to VanAgains New 65 Sportvan Deluxe Empty Re: Back to VanAgains New 65 Sportvan Deluxe

    Post by VANagain Mon Jan 12, 2009 12:43 am

    Yup, thanks Don for making sure I get back to work on this van!!

    Back to VanAgains New 65 Sportvan Deluxe Dscn1410 Back to VanAgains New 65 Sportvan Deluxe Dscn1411

    I cut out another small area in front of the battery box area. I had only part of the metal for this spot and spent a lot of time piecing together other floor parts to fit. And as usual, prepping the metal took way longer than the actual welding will take! MIG is nice but it gets to be a pain grinding off all the paint for the welds. And I can't just grind the edges, I get carried away and grind the rust and paint off the entire pieces going in.
    donivan65
    donivan65
    Governor
    Governor


    Number of posts : 12218
    Location : San Diego, California
    Registration date : 2008-05-12

    Back to VanAgains New 65 Sportvan Deluxe Empty Re: Back to VanAgains New 65 Sportvan Deluxe

    Post by donivan65 Thu Jan 22, 2009 9:58 am

    You better be working while I am here in Arizona,,,,,Back to VanAgains New 65 Sportvan Deluxe Qz200910
    VANagain
    VANagain


    Number of posts : 1046
    Location : San Diego, CA
    Age : 62
    Registration date : 2008-05-16

    Back to VanAgains New 65 Sportvan Deluxe Empty Re: Back to VanAgains New 65 Sportvan Deluxe

    Post by VANagain Fri Jan 23, 2009 12:00 am

    Yes, Governor, I am keeping busy. Mostly at Sony though! Well, I spent a lot of time on the blue van over the three day weekend. Finished welding up the big hole in the floor. You can see where it was welded but it is very solid. Now the only bit of floor left to fix is along the back edge of the doghouse.

    Back to VanAgains New 65 Sportvan Deluxe 01230910

    I bought the peanut plugs for the new engine, as well as coolant, brake line for the fuel pump, and the big fuel hose for the gas tank filler. No work actually took place on that poor neglected van though...

    Are you having fun, Guvna?!


    Last edited by VANagain on Sat Jan 24, 2009 7:45 pm; edited 1 time in total (Reason for editing : added photo)
    donivan65
    donivan65
    Governor
    Governor


    Number of posts : 12218
    Location : San Diego, California
    Registration date : 2008-05-12

    Back to VanAgains New 65 Sportvan Deluxe Empty Re: Back to VanAgains New 65 Sportvan Deluxe

    Post by donivan65 Sat Jan 24, 2009 12:03 pm

    Hey,,,,,,I took your manifolds and carb home and cleaned them up for a reason,,,,,,

    Back to VanAgains New 65 Sportvan Deluxe Vanaga16


    Back to VanAgains New 65 Sportvan Deluxe Nodoor23
    savage
    savage


    Number of posts : 2626
    Location : Where Rust Never Sleeps in Ft Wayne IN
    Registration date : 2008-05-15

    Back to VanAgains New 65 Sportvan Deluxe Empty Re: Back to VanAgains New 65 Sportvan Deluxe

    Post by savage Sat Jan 24, 2009 8:01 pm

    Don, What kind of carb it that??? My two 65's & 66 have Carters, but not like that one???
    donivan65
    donivan65
    Governor
    Governor


    Number of posts : 12218
    Location : San Diego, California
    Registration date : 2008-05-12

    Back to VanAgains New 65 Sportvan Deluxe Empty Re: Back to VanAgains New 65 Sportvan Deluxe

    Post by donivan65 Sat Jan 24, 2009 8:48 pm

    That is a Rochester MonoJet,,,,on all the 6 cylinders from 1968-70,,,,,,,,before that the Carter YF's and the Rochester B were the ones on there. But ,,,,,I guess technology says that MonoJet must be better since GM replaced the other 2 types with it,,,,,
    VANagain
    VANagain


    Number of posts : 1046
    Location : San Diego, CA
    Age : 62
    Registration date : 2008-05-16

    Back to VanAgains New 65 Sportvan Deluxe Empty Re: Back to VanAgains New 65 Sportvan Deluxe

    Post by VANagain Sat Jan 24, 2009 9:56 pm

    A couple nice things about this Rochester carb:

    • The fuel line inlet points forward, rather than to the right. This makes it easier to route the fuel line so it doesn't cross over the valve cover. I prefer it going around the front of the valve cover so you can take the cover off without removing the fuel line.
    • The choke lever is also on the front of the carb so you can hook up the automatic choke linkage that comes up from the exhaust manifold.


    Back to VanAgains New 65 Sportvan Deluxe Carb_r10

    And thanks for cleaning up these manifolds, Don! Did you paint that linkage silver too?! What a guy!!

    Oh, Don advises against painting the exhaust manifold, and I've had bad luck with "high temp" spray paint in the past. But I've seen some really nice looking gray ones in photos of restored cars. I did a little searching online. Some guys swear by Eastwood paint, good up to 1200°. Others used POR-15 manifold paint (1400°) and got good results. Anyone out there tried these?
    wideload
    wideload
    Moderator 1st Class
    Moderator 1st Class


    Number of posts : 1388
    Location : Kevil, Kentucky
    Age : 70
    Registration date : 2008-05-11

    Back to VanAgains New 65 Sportvan Deluxe Empty Re: Back to VanAgains New 65 Sportvan Deluxe

    Post by wideload Sun Jan 25, 2009 5:52 am

    Will powder coating hold up under that kind of heat?

    DanTheVanMan
    DanTheVanMan
    Commissioner
    Commissioner


    Number of posts : 7900
    Location : Escanaba, Michigan
    Age : 62
    Registration date : 2008-10-08

    Back to VanAgains New 65 Sportvan Deluxe Empty Re: Back to VanAgains New 65 Sportvan Deluxe

    Post by DanTheVanMan Sun Jan 25, 2009 6:17 am

    VANagain, I used POR-15 manifold pain on mine and it works great. Went on glossy and after running for an hour turn dull but kept it's color really good. POR wikk save your manifolds from rust as well.


    _________________
    DanTheVanMan    
    1965 Chevy G10 Sportvan Custom
    1984 Jeep CJ-7 Laredo, Restored
    2004 Kawasaki KLR650
    1997 Jeep TJ Sport

    My Mini Gallery

    Back to VanAgains New 65 Sportvan Deluxe Qr_cod10

    <-<-<- Cruising is not a "Point A to Point B" thing, but an "Everything in between thing!  <-<-<-

    Sponsored content


    Back to VanAgains New 65 Sportvan Deluxe Empty Re: Back to VanAgains New 65 Sportvan Deluxe

    Post by Sponsored content


      Current date/time is Fri Apr 19, 2024 11:01 am