+55
Vannin Ken
SportVan
chester42
NipRing
Scotts_A100
millwright71
ndjarrett
66 Surf Wagon
Joe Van
Wheelie
Jay 13
Chevboner
Gothboy
sandyvan
dix
the_surfing_guy
southern man
kookykrispy
Space Truckin
vanny
dodge man
thatcherworks
ScottyJones
pan58head
Big W
m1dadio
austinmodhouse
mbasaraba
Lazarusvan
mrclean
LiveWire64
sparky
SDEconoTruck
EconoCarl
Twinpilot001
Nightmoves
BILLS66
sasktrini
Scott
Digz
64chevy
wylee
wacko
RipVanArkie
wideload
DanTheVanMan
mo_1040
itruns
savage
BvrWally
Vanish
G-Man
Kakster
VANagain
donivan65
59 posters
Back to......VANagains NEWest 65 Chevy SportVan Deluxe

donivan65- Governor

- Number of posts : 12247
Location : San Diego, California
Registration date : 2008-05-12

wideload- Moderator 1st Class

- Number of posts : 1389
Location : Kevil, Kentucky
Age : 71
Registration date : 2008-05-11
Don check out the pic of the trans mount in the 66 I'm getting tomorrow . I think that's what is in it for a mount but it's a three speed auto, I think probably a th350.
https://vintage-vans.forumotion.com/g-vans-for-sale-f21/66-sportvan-t2363.htm
wideload
https://vintage-vans.forumotion.com/g-vans-for-sale-f21/66-sportvan-t2363.htm
wideload

VANagain- Number of posts : 1048
Location : San Diego, CA
Age : 63
Registration date : 2008-05-16
This photo shows how the side "gussets" will attach to the sides of the mount to strengthen the bends and catch the tube on the top. The green lines show where I'll weld.
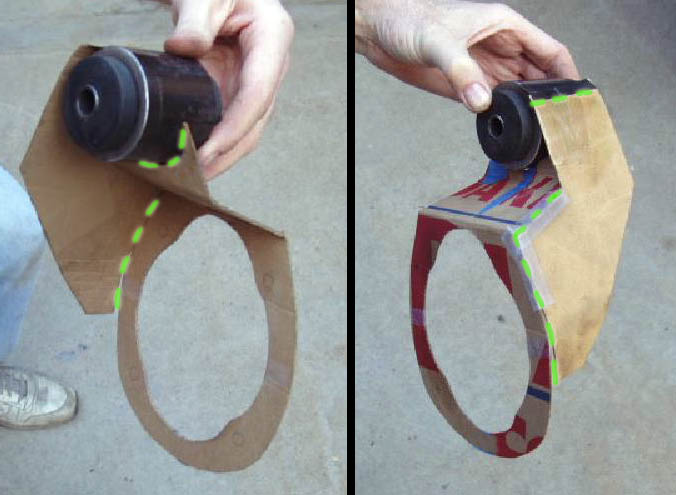
That 200R4 is interesting. I figured they all had removable tailshaft housings. Well, I could still see a similar hanger that hangs the same way from the crossmember but loops around under the tranny. Shoot, it would be very similar to what's pictured here but the side gusset would wrap around the bottom so we'd end up with a horizontal surface for those two bolts.

That 200R4 is interesting. I figured they all had removable tailshaft housings. Well, I could still see a similar hanger that hangs the same way from the crossmember but loops around under the tranny. Shoot, it would be very similar to what's pictured here but the side gusset would wrap around the bottom so we'd end up with a horizontal surface for those two bolts.

wideload- Moderator 1st Class

- Number of posts : 1389
Location : Kevil, Kentucky
Age : 71
Registration date : 2008-05-11
Vanagain that's supposed to be a 2004r but I haven't ran any numbers or anything to make sure. I got it from a good friend and that's what he said it was. His son got about 15 of them from a transmission shop that was repoed on by the bank. Have you ever seen one to compare the pic's to?
wideload
wideload

donivan65- Governor

- Number of posts : 12247
Location : San Diego, California
Registration date : 2008-05-12

wacko- Number of posts : 423
Location : Chilliwack, BC Canada
Registration date : 2008-05-20
Sooo funny

VANagain- Number of posts : 1048
Location : San Diego, CA
Age : 63
Registration date : 2008-05-16
Oh Donivan, I don't think so!! That Sportvan Mystery Machine is so wrong... Painting over the windows, Scooby Doo... My proof? No bids:
http://cgi.ebay.com/ebaymotors/ws/eBayISAPI.dll?ViewItem&item=180309352955
http://cgi.ebay.com/ebaymotors/ws/eBayISAPI.dll?ViewItem&item=180309352955

donivan65- Governor

- Number of posts : 12247
Location : San Diego, California
Registration date : 2008-05-12

VANagain- Number of posts : 1048
Location : San Diego, CA
Age : 63
Registration date : 2008-05-16
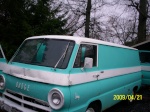
A long time has passed since my last post about this Sportvan I picked up from Oregon. I have managed to squeeze in some work on this van over the last few months despite a multitude of real life interruptions! I tried to only work on stuff necessary to start up the rebuilt engine I bought well over a year ago! I was afraid the block would just turn into an inert block of steel if I didn't get it running soon. Finally I realized I could actually fire it up over the long Fourth of July weekend!

I primed the oil system again, and did a bunch of fun, easy stuff: hooked up hoses, added coolant, filled the carb bowl, hooked up the battery and just enough wiring to make the starter and the electronic ignition work. Don came by today for the big event. We got the engine at TDC and put the plug wires in firing order. Don had the video camera rolling when I hit the switch: Check it out!
(Pardon the rusty valve cover. I'm holding out for one that says "Chevrolet" on the top! Anyone got a spare?)
Last edited by VANagain on Mon Jul 06, 2009 2:08 pm; edited 1 time in total
wylee- Number of posts : 922
Location : middletown,ny
Registration date : 2009-04-03
theres nothing like the 1st fire up, like he said in the video- its alive! good going...

wacko- Number of posts : 423
Location : Chilliwack, BC Canada
Registration date : 2008-05-20
good job guys, love the video.

64chevy- Number of posts : 364
Location : Rocket Ranch Lompoc, CA
Registration date : 2008-05-18
Today Rich put on the oil filter and some non detergent oil then powered up the oil pump to prime the system.
Non detergent oil...??? What's up with that Don? I didn't know they even made that stuff anymore.
Non detergent oil...??? What's up with that Don? I didn't know they even made that stuff anymore.

donivan65- Governor

- Number of posts : 12247
Location : San Diego, California
Registration date : 2008-05-12
Yeah, he put the oil filter on the engine in January,,,,,,and Non detergent oil,,,,,,,thats the rule,,,you don't use detergent oil to seat the rings,,,,,,and now you have to special order it,,,,,,So the van is alive,,,,,here it is in Feb 2008 arriving in its new home in Southern California,,,,
I thought Rich and his van would be kicked out before I ever seen that Van run,,,,,,,but it did,,,,,,,now the 3:73 rear end needs to be taken care of,,,,they use special wheel cylinders on it and we can't find any anywhere. So he needs to change out the backing plates and wheel cylinders from a 3:36 rear end to get brakes on it.

I thought Rich and his van would be kicked out before I ever seen that Van run,,,,,,,but it did,,,,,,,now the 3:73 rear end needs to be taken care of,,,,they use special wheel cylinders on it and we can't find any anywhere. So he needs to change out the backing plates and wheel cylinders from a 3:36 rear end to get brakes on it.


VANagain- Number of posts : 1048
Location : San Diego, CA
Age : 63
Registration date : 2008-05-16
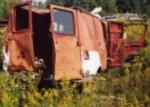
The next thing I focused on was getting the cleaned-up gas tank installed. But first, I need to finish cleaning the tank's sending unit. Looks pretty good now on the outside but I fear there is junk inside the screen (sock). It is pretty hard to suck air through the line. Anyone know if that screen thing can be removevd and reattached? What holds it on (besides rust)?
savage- Number of posts : 2632
Location : Where Rust Never Sleeps in Ft Wayne IN
Registration date : 2008-05-15
I usually find them rolling around in the tank  I Think there just pressed on?? You can get new ones

VANagain- Number of posts : 1048
Location : San Diego, CA
Age : 63
Registration date : 2008-05-16
After a lot of soaking, scraping and cleaning, the old sending unit looked pretty good. However, here's a word to the wise: Before you spend all the time to clean something, make sure it works first! I hooked it up to a multimeter and got no signal, no mater where I moved the float. Same thing when I tested a new unit!
Here's another thing to know: Make sure your ohm meter is set to the proper range. I had it on 200K and it should have been 200. Big difference!!
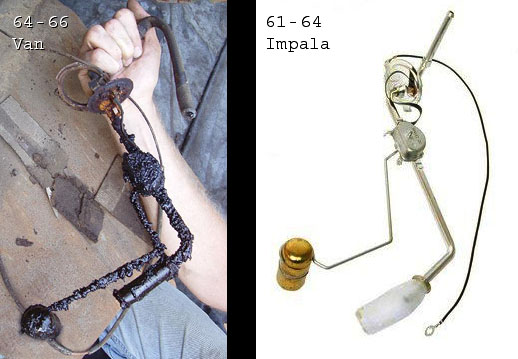
Of course no one remanufactures a gas tank sending unit for our vans. But I had been told that Impalas used 30 Ohm units like ours. The tubing and stuff was a different shape but you could remove the rheostat from the new one and put it on ours. So I ordered a stainless steel unit for a I61-64 Impalz vfom CarPartsDiscount.com for $34 (3/8" line, like ours). I took it apart and noticed it had a lot fewer windings than my van one, but it tested out with the right resistance: 0 to 30 Ohms.
But then I noticed an important difference. The Impala rheostat had a longer "throw" than the van's. This allows the float arm to travel a lot further, maybe twice as far as ours. Their gas tanks must be deeper. If I just used the Impala one as-is, my guage would only travel from 1/4 to 3/4. So I came up with a plan to shorten the float arm to compensate. Look at the pictures below. The top one shows the stock van unit. I marked how far the float went at each extreme (full and empty). If I shortened the arm, that would cause it to rotate more degrees to go the same distance.
Then, the more I looked at that shiny, stainless steel Impala unit, the less I wanted to put my old one back in. So, I spent a couple hours carefully bending the tubing in my vice with rubber jaws on it. First I had to bend the top 90 degrees, since the Impala's mount to the back side of the tank and ours go in the top. That one was not easy to bend and I had to be careful not to kink it. I couldn't really undo their tight 90 degree bend but then I realized I didn't need to totally. It was okay if the tube still had curves in it, as long as the top ended up perpendicular to the tube. Next, the bottom tube was way too long, so I cut off the bent part they had and added my own bend using a tubing bender (not nearly as easy as fuel line, that stainless is tough). I'm pretty sure I got the it to where it will pick up the last bit of gas in the bottom of the tank.
Bending the float arm was a lot easier. And it has to follow the shape of the pickup tube or else you can't install the thing through the hole in the gas tank!
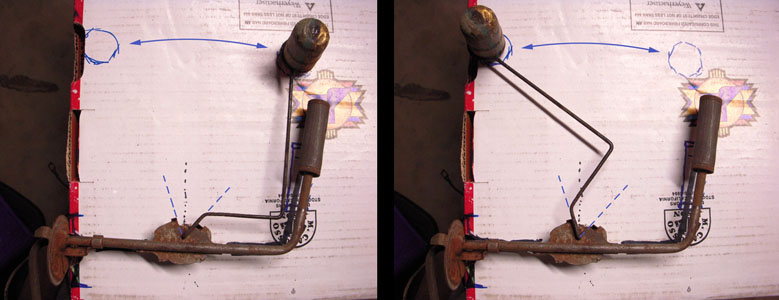

It may be that the 62-65 Nova sending unit would be a better match, because it is a lot shorter, but I figured I could shorten the Impala one, but it's hard to lengthen the Nova, if it needs it.

This weekend I should get this in the tank and the tank in the van. Then we'll know if it really worked. Hmm, maybe I'll just set the tank on the ground, hook up the wires, and test it by filling it and emptying it with water first...
Here's another thing to know: Make sure your ohm meter is set to the proper range. I had it on 200K and it should have been 200. Big difference!!

Of course no one remanufactures a gas tank sending unit for our vans. But I had been told that Impalas used 30 Ohm units like ours. The tubing and stuff was a different shape but you could remove the rheostat from the new one and put it on ours. So I ordered a stainless steel unit for a I61-64 Impalz vfom CarPartsDiscount.com for $34 (3/8" line, like ours). I took it apart and noticed it had a lot fewer windings than my van one, but it tested out with the right resistance: 0 to 30 Ohms.
But then I noticed an important difference. The Impala rheostat had a longer "throw" than the van's. This allows the float arm to travel a lot further, maybe twice as far as ours. Their gas tanks must be deeper. If I just used the Impala one as-is, my guage would only travel from 1/4 to 3/4. So I came up with a plan to shorten the float arm to compensate. Look at the pictures below. The top one shows the stock van unit. I marked how far the float went at each extreme (full and empty). If I shortened the arm, that would cause it to rotate more degrees to go the same distance.
Then, the more I looked at that shiny, stainless steel Impala unit, the less I wanted to put my old one back in. So, I spent a couple hours carefully bending the tubing in my vice with rubber jaws on it. First I had to bend the top 90 degrees, since the Impala's mount to the back side of the tank and ours go in the top. That one was not easy to bend and I had to be careful not to kink it. I couldn't really undo their tight 90 degree bend but then I realized I didn't need to totally. It was okay if the tube still had curves in it, as long as the top ended up perpendicular to the tube. Next, the bottom tube was way too long, so I cut off the bent part they had and added my own bend using a tubing bender (not nearly as easy as fuel line, that stainless is tough). I'm pretty sure I got the it to where it will pick up the last bit of gas in the bottom of the tank.
Bending the float arm was a lot easier. And it has to follow the shape of the pickup tube or else you can't install the thing through the hole in the gas tank!


It may be that the 62-65 Nova sending unit would be a better match, because it is a lot shorter, but I figured I could shorten the Impala one, but it's hard to lengthen the Nova, if it needs it.

This weekend I should get this in the tank and the tank in the van. Then we'll know if it really worked. Hmm, maybe I'll just set the tank on the ground, hook up the wires, and test it by filling it and emptying it with water first...

G-Man- Mayor

- Number of posts : 30743
Location : Fowlerville, MI
Age : 63
Registration date : 2008-05-06
Vanagain, very interested in this topic, haven't even taken my sender out yet, but know after all these years I should rebuilt it. The nova sender does look like a better match so far

Digz- Number of posts : 3794
Location : United States Six Lakes MI
Registration date : 2008-05-17

G-Man- Mayor

- Number of posts : 30743
Location : Fowlerville, MI
Age : 63
Registration date : 2008-05-06
question I will be going with aftermarket gauges for my 64. Can a sender be changed from 30 to 90ohm's????

donivan65- Governor

- Number of posts : 12247
Location : San Diego, California
Registration date : 2008-05-12
Just as long as they are a matched set,,,,,Hot Rods use a 200 ohm system,,,,,but you need to get a fuel pick up tube that fits the tank and seals,,,,,,some are held on by screws. Ours use a locking ring,,,,,,

donivan65- Governor

- Number of posts : 12247
Location : San Diego, California
Registration date : 2008-05-12

VANagain- Number of posts : 1048
Location : San Diego, CA
Age : 63
Registration date : 2008-05-16
Oh c'mon, Donivan, there was a little more to it than that! On my other van we had trouble with the rear axle seals leaking after putting in the repair bearing on one side. Since repair bearings put the bearing and the seal further out, we had to pound the axle in a bit to get the C clips to go on. We think now that this compromised the seal. So on this van I'm grinding off the rough edge where they didn't machine it. I used a poor man's lathe (Dremel tool). I put the hose clamp on to keep me from hitting the important surface if I slipped. We hope this will keep the seals intact.


The backing plates cleaned up pretty good when I hit them with some rust neutralizer. Still took some time to grind off all of the surface rust. But I was just thrilled it was possible to get them this clean. So last weekend I got them painted up purty. I'll be putting them on tomorrow, along with the new brake pads and cylinders.


The backing plates cleaned up pretty good when I hit them with some rust neutralizer. Still took some time to grind off all of the surface rust. But I was just thrilled it was possible to get them this clean. So last weekend I got them painted up purty. I'll be putting them on tomorrow, along with the new brake pads and cylinders.


donivan65- Governor

- Number of posts : 12247
Location : San Diego, California
Registration date : 2008-05-12
And why was I sanding 3:36 backing plates while you put on 3:73 clips on the axles ??

VANagain- Number of posts : 1048
Location : San Diego, CA
Age : 63
Registration date : 2008-05-16
- Post n°74
 Backing Plates
This van came with a 12-bolt 3.73 rear end. Even though I'll probably put in a 3.36 for better gas mileage, I figured I'd try this one out since it's in there already. I'm sure I'll like the extra power in the low end. However, the first problem was that I couldn't find the proper brake cylinders for it. They have the diagonal bolt pattern and the larger bore. I could find front ones that would fit but then they got the large inlet for the rubber hose, and I couldn't find an adapter anywhere.
Then, Don and I noticed one of the backing plates for this "heavy duty" rear end had a major crack in it! I think this might have been the last straw for this van, because this same wheel was missing its brake drum! All the brake parts were all rusty from sitting exposed for who knows how long.

Today I got my nice backing plates bolted onto the rear axle, along with a set of parking brake cables. These parts are off the orange parts van that we cut up. I grabbed the whole rear end because it was a 3.36. But that van also had a 327 V8 and its axle gears were pretty worn out inside. So for now I'm just using its brake parts to get this van rolling. I'll keep my eyes open for another 3.36 rear end.
Then, Don and I noticed one of the backing plates for this "heavy duty" rear end had a major crack in it! I think this might have been the last straw for this van, because this same wheel was missing its brake drum! All the brake parts were all rusty from sitting exposed for who knows how long.

Today I got my nice backing plates bolted onto the rear axle, along with a set of parking brake cables. These parts are off the orange parts van that we cut up. I grabbed the whole rear end because it was a 3.36. But that van also had a 327 V8 and its axle gears were pretty worn out inside. So for now I'm just using its brake parts to get this van rolling. I'll keep my eyes open for another 3.36 rear end.

donivan65- Governor

- Number of posts : 12247
Location : San Diego, California
Registration date : 2008-05-12


