+7
Otto
demondog
chrlsful
jrdunn96
Seth G
lear0
13-ball
11 posters
1961 Rust-O-Mod Pickup Build thread

13-ball- Number of posts : 87
Location : moab, ut
Registration date : 2020-07-23
- Post n°26
 Re: 1961 Rust-O-Mod Pickup Build thread
Seth G likes this post

13-ball- Number of posts : 87
Location : moab, ut
Registration date : 2020-07-23
- Post n°27
 Cutting the doglegs
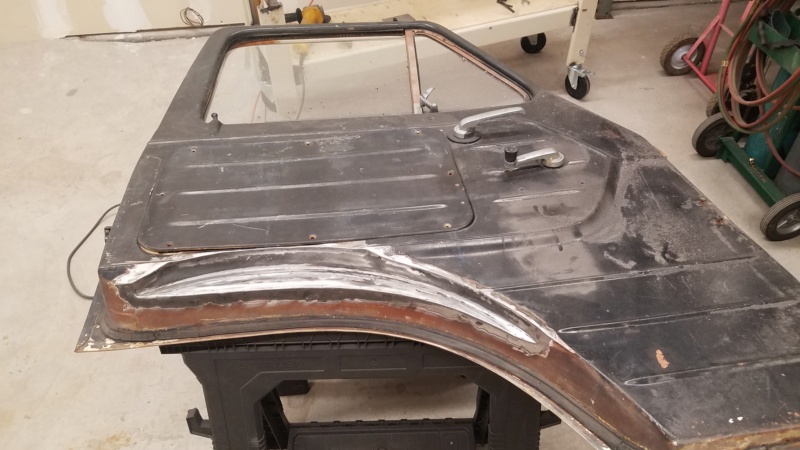
I took out the wheel well on the passenger side to mock up the spacing and see how the drop is going to work out. Quickly learned that the tire would violently hit the dog let in any turn that wasn't overly gentle. Kept trimming it away 'til it was a good compromise between steering function and structural integrity.

I read elsewhere that others had to modify the door to accommodate the raised wheel tubs. Yep - it's true.
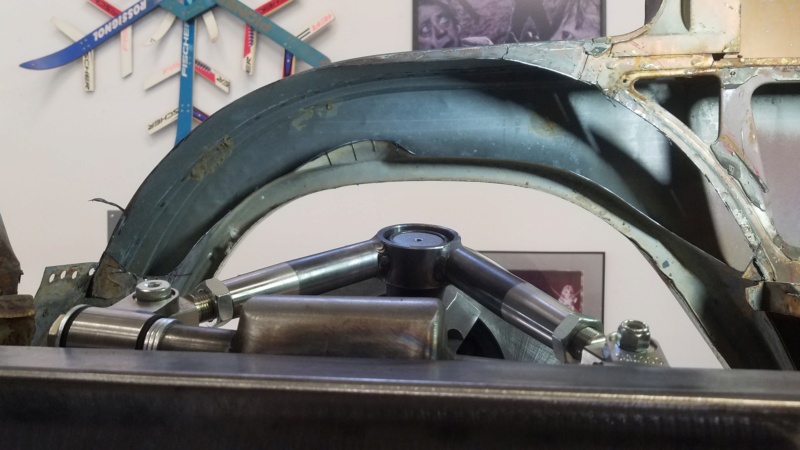
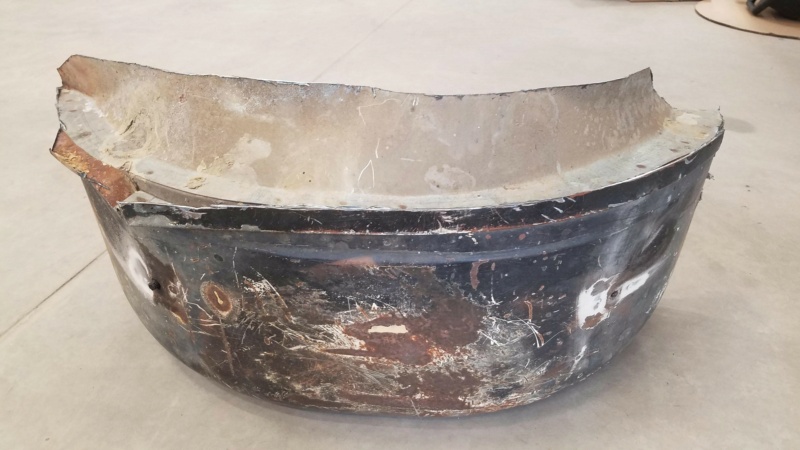
Once I got the one side to where I liked it OK I cut out the other side just like it all in one piece. Much quicker the 2nd time around!
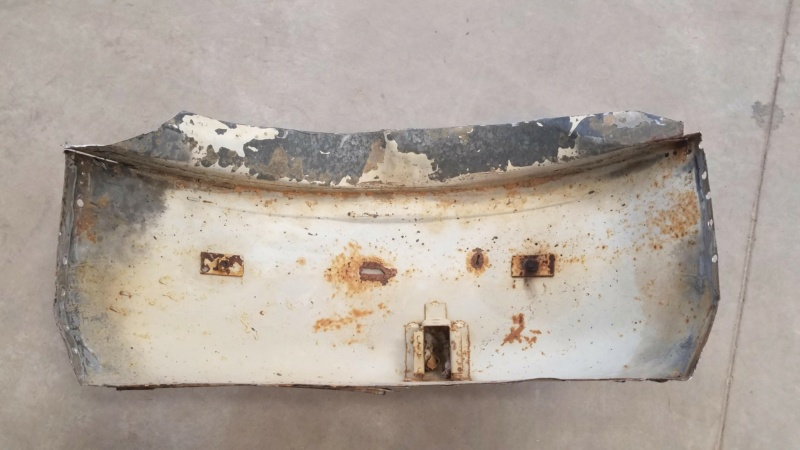

I read elsewhere that others had to modify the door to accommodate the raised wheel tubs. Yep - it's true.


Once I got the one side to where I liked it OK I cut out the other side just like it all in one piece. Much quicker the 2nd time around!

savage and dix like this post

13-ball- Number of posts : 87
Location : moab, ut
Registration date : 2020-07-23
- Post n°28
 Starting to rebuild the wheelwells
Here are a few photos of where I started to rebuild the wheel wells.

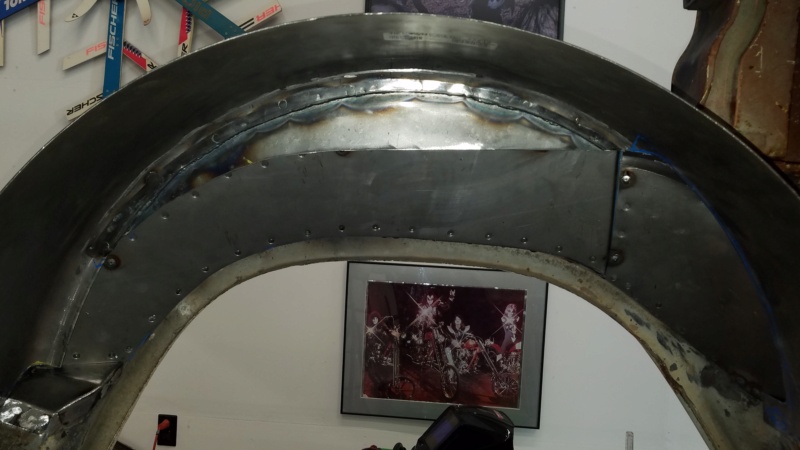
That bump out in the middle of the wheel arch was the worst offender in stopping the wheel from turning when dropped low. But, widening the whole thing did wonders for making it able to steer more.
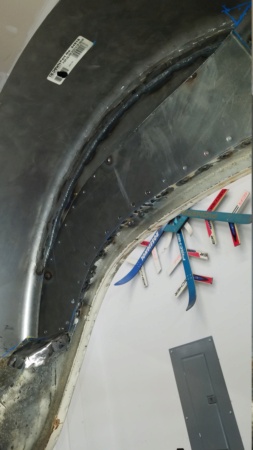
The top of the new tub is about 2 1/2 inches higher than the door sill.
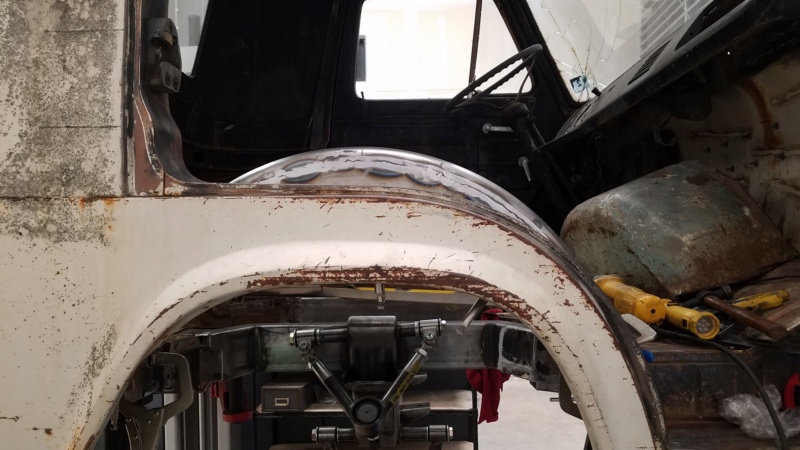


That bump out in the middle of the wheel arch was the worst offender in stopping the wheel from turning when dropped low. But, widening the whole thing did wonders for making it able to steer more.

The top of the new tub is about 2 1/2 inches higher than the door sill.

savage, dix and gsnyder67 like this post

13-ball- Number of posts : 87
Location : moab, ut
Registration date : 2020-07-23
- Post n°29
 Front wheel wells
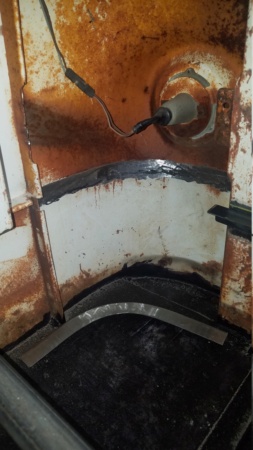
These did not need to be so wide (inward) but figured it was easier to just follow the frame contour. Also, it only robs floor space from under the seats so no big loss.

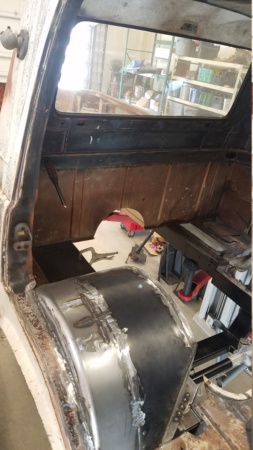
The floor behind this wheelwell was pretty much gone so went on and replaced everything with holes in it.
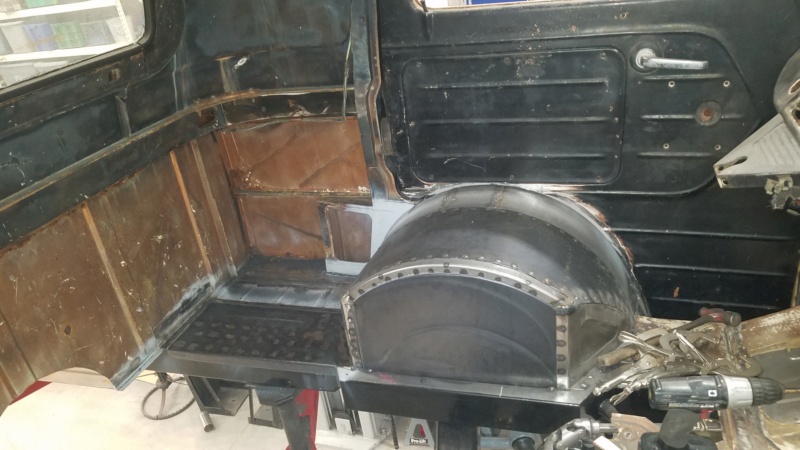
This one only had a couple small holes but replaced the whole panel anyway.
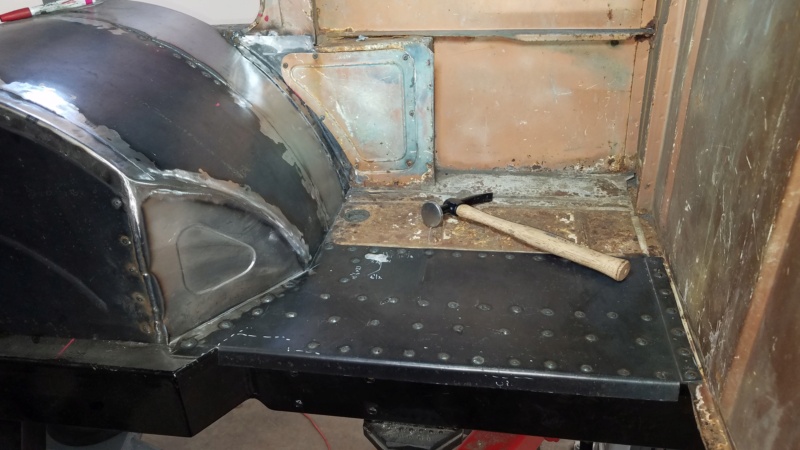


The floor behind this wheelwell was pretty much gone so went on and replaced everything with holes in it.

This one only had a couple small holes but replaced the whole panel anyway.

savage and dix like this post

Seth G- Vintage-Vans Listings Manager

- Number of posts : 2087
Location : Anacortes, WA
Age : 51
Registration date : 2013-04-24
- Post n°30
 Re: 1961 Rust-O-Mod Pickup Build thread
Looking good. You're making great progress!

13-ball- Number of posts : 87
Location : moab, ut
Registration date : 2020-07-23
- Post n°31
 Re: 1961 Rust-O-Mod Pickup Build thread
Thanks! It has been fun but a lot of work too. These pics I've been posting are of old progress - I'm a little ahead of that point now. Won't be too long 'til up up to present day work.
savage likes this post

13-ball- Number of posts : 87
Location : moab, ut
Registration date : 2020-07-23
- Post n°32
 Floor sheet metal
The floor had some pin holes - mostly on the passenger side. Figured that while I'm messing with floor pans should keep on going.

At first I was going to just patch the small spots. Then decided it's pretty much easier much to replace the whole pan. Ordered one of these thinking I'd save myself some time.
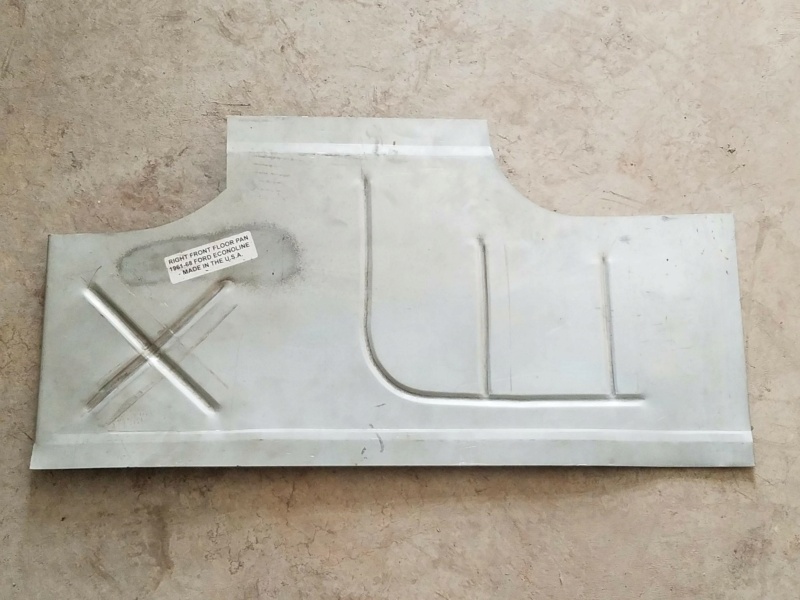
Well, I was super disappointed with the quality of the floor pan I bought. It was kind of expensive but was really thin and didn't fit well and the embossing was weak.
So I scrapped it and built new ones. They're not too pretty but man are they stout.
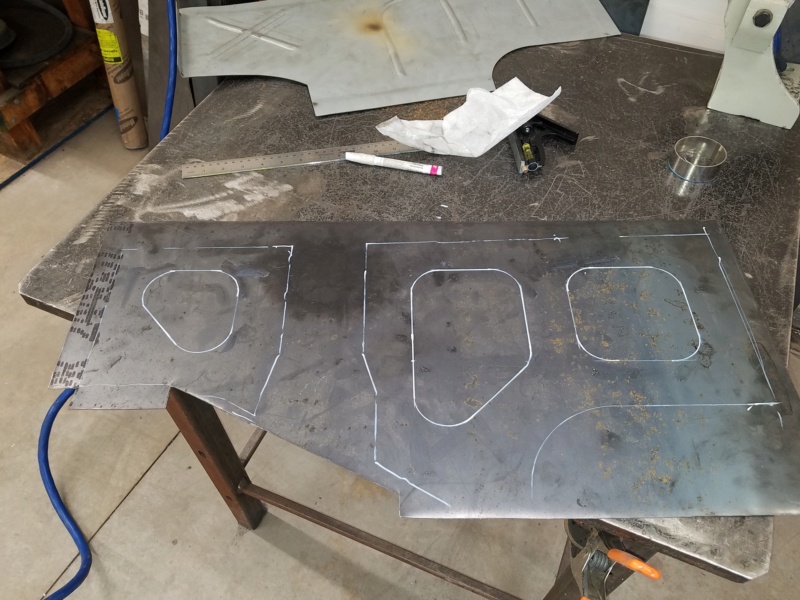
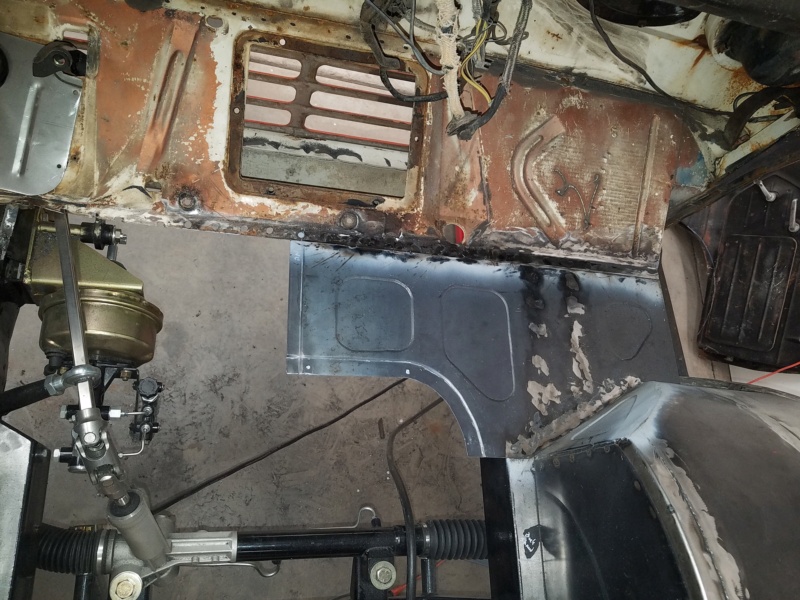

At first I was going to just patch the small spots. Then decided it's pretty much easier much to replace the whole pan. Ordered one of these thinking I'd save myself some time.

Well, I was super disappointed with the quality of the floor pan I bought. It was kind of expensive but was really thin and didn't fit well and the embossing was weak.
So I scrapped it and built new ones. They're not too pretty but man are they stout.


savage, gsnyder67, Russell and jrdunn96 like this post
Russell- Number of posts : 698
Location : Chula Vista, Ca.
Age : 64
Registration date : 2015-12-08
- Post n°33
 Re: 1961 Rust-O-Mod Pickup Build thread
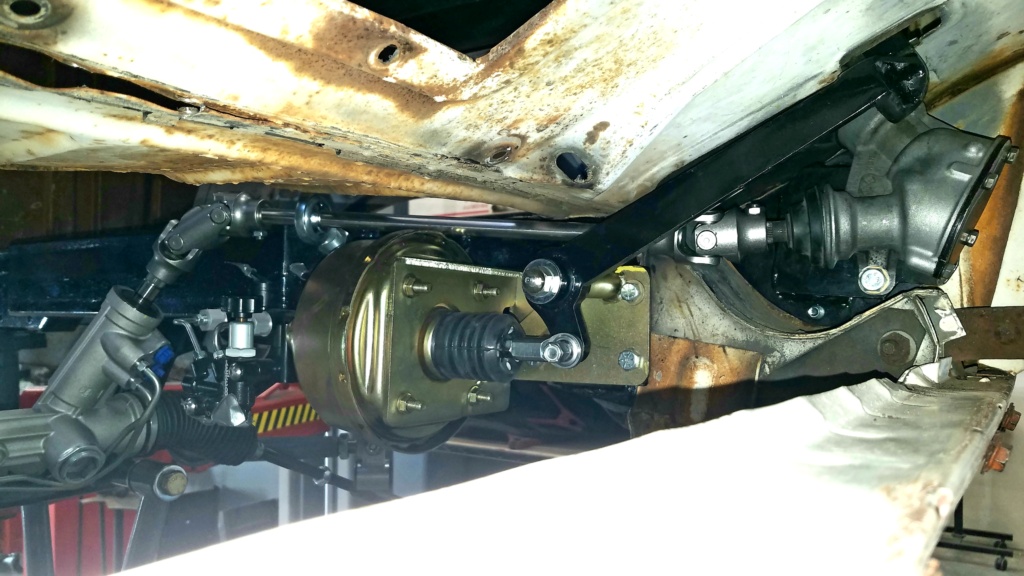
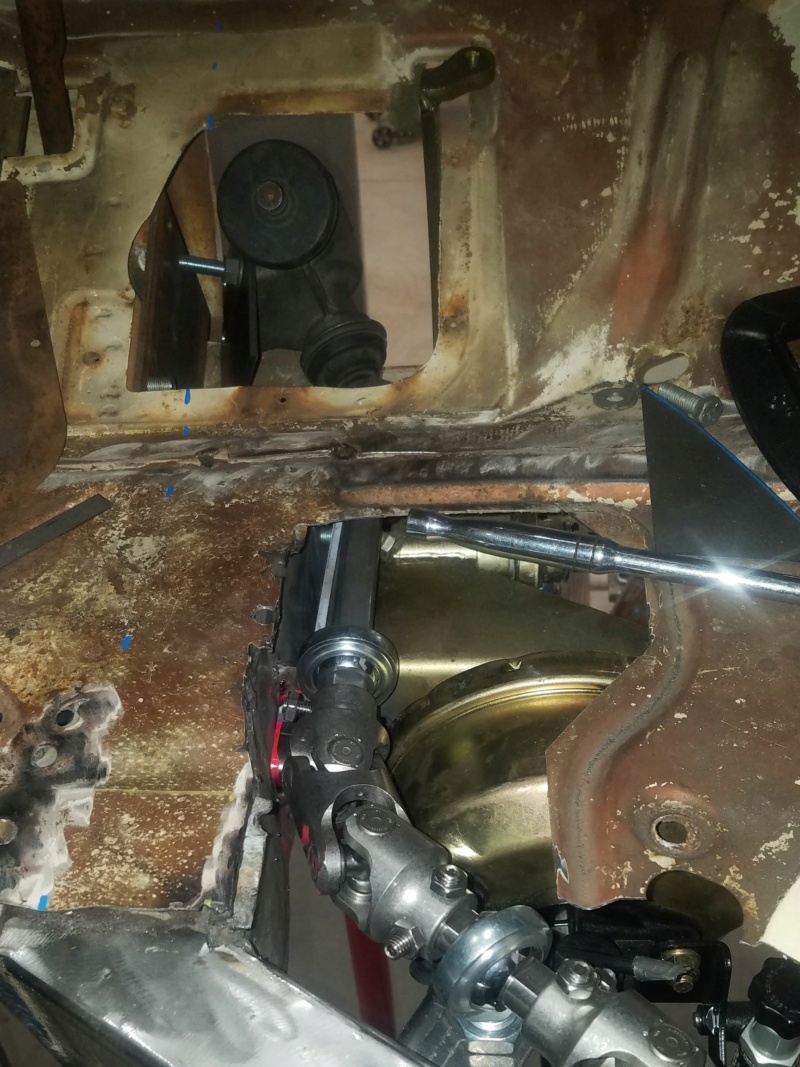
How does that steering shaft turn back under the floor? More info and pics of that set up please.

13-ball- Number of posts : 87
Location : moab, ut
Registration date : 2020-07-23
- Post n°34
 Re: 1961 Rust-O-Mod Pickup Build thread
To turn the steering shaft rearward I used the Isuzu Rodeo intermediate box. I don't remember if I got that idea here or somewhere else but a number of people have done it that way.
A VW Vanagon box is another option. I liked the mount flange on the Rodeo one more so I just grabbed one of those off Ebay.
Tip: the spline on these are 3/4-36 Chrysler. Not the normal 3/4-36 spline. Guess how I figured that out.....
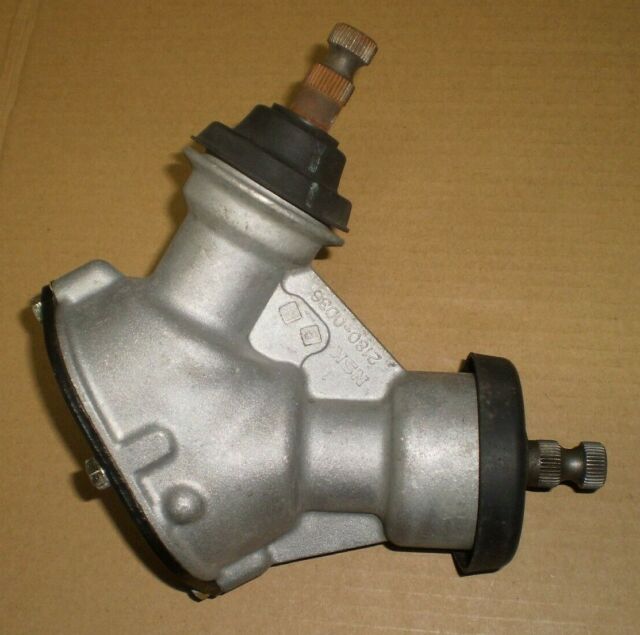
I cannot find the photos of making the mounting bracket. Bummer. Basically it bolts to the Econo body in the stock 3 holes, is spaced over to put the top shaft in line with the steering column. And, has another flange that the Isuzu 3 bolt holes go to.
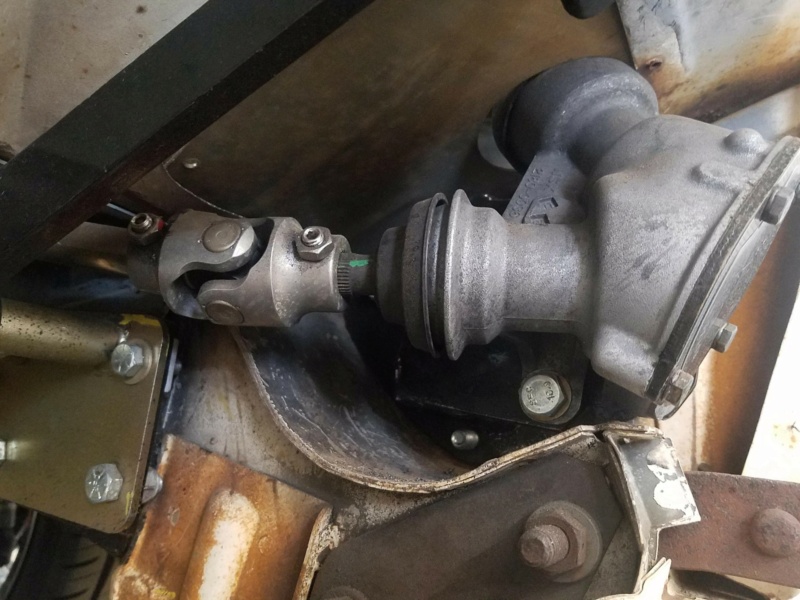

A VW Vanagon box is another option. I liked the mount flange on the Rodeo one more so I just grabbed one of those off Ebay.
Tip: the spline on these are 3/4-36 Chrysler. Not the normal 3/4-36 spline. Guess how I figured that out.....

I cannot find the photos of making the mounting bracket. Bummer. Basically it bolts to the Econo body in the stock 3 holes, is spaced over to put the top shaft in line with the steering column. And, has another flange that the Isuzu 3 bolt holes go to.


savage, gsnyder67, Russell and jrdunn96 like this post

13-ball- Number of posts : 87
Location : moab, ut
Registration date : 2020-07-23
- Post n°35
 More of Floor
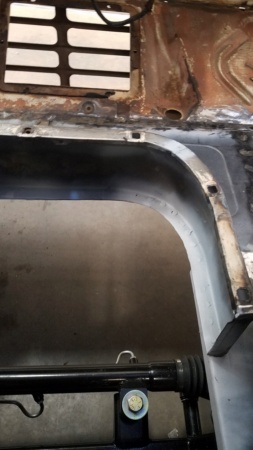
The doghouse lid is gonna need to be a lot higher to fit the motor under it.
I raised the front at the floor so I could use the stock front cover.
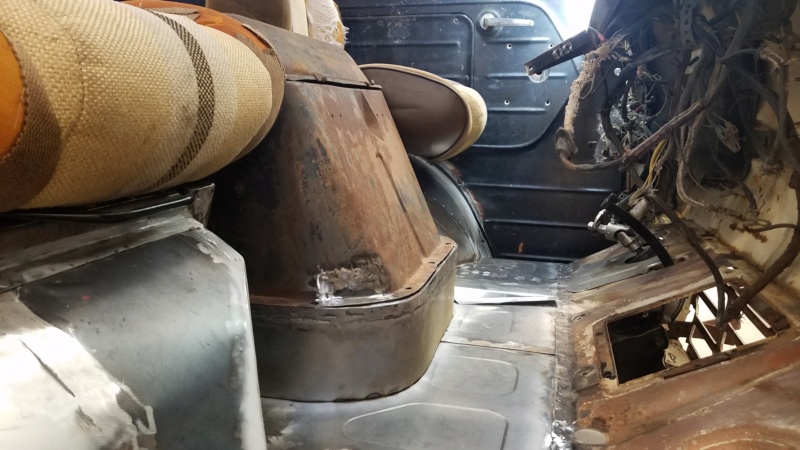
Also, I reused the original bolt flange so the stamped VIN number is still there.

I'll need to make sides for it later once I get the engine in it's final place. It was missing one doghouse side when I got it and the other one is really bent up. I'll probably use the cab back wall as the back of the doghouse.
Russell likes this post

13-ball- Number of posts : 87
Location : moab, ut
Registration date : 2020-07-23
- Post n°36
 Explorer 8.8 rear end
savage likes this post
Otto- Number of posts : 129
Location : Portland, Oregon
Registration date : 2020-09-02
- Post n°37
 Re: 1961 Rust-O-Mod Pickup Build thread
I've been looking at the Explorer rear axle also. How is it width-wise compared to the original?

13-ball- Number of posts : 87
Location : moab, ut
Registration date : 2020-07-23
- Post n°38
 Re: 1961 Rust-O-Mod Pickup Build thread
If I recall it's very close to original width. My pickup had some other rear end in it so I can't say for sure how it compares to the original one.
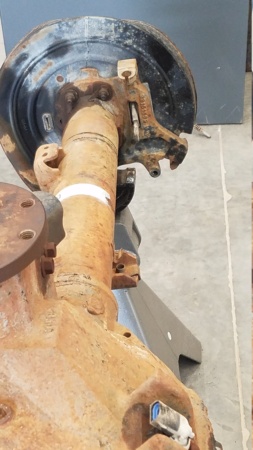
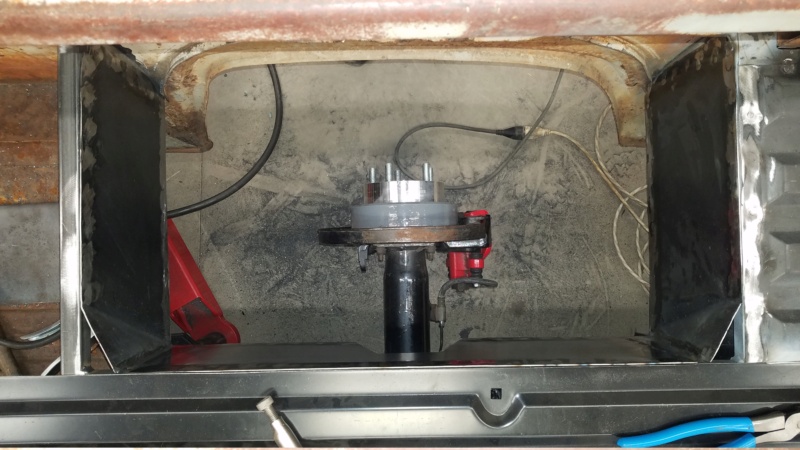
It's around 59 1/2" between the wheel flanges. Also, it can be narrowed 3" very easily by only cutting one side and getting another stock short side axle shaft.
In my book it's ideal. Good width, right bolt pattern, disk brakes, good parking brakes, etc. There's some great info on this page.... Ford 8.8 Explorer Axle - The Fabricator Series
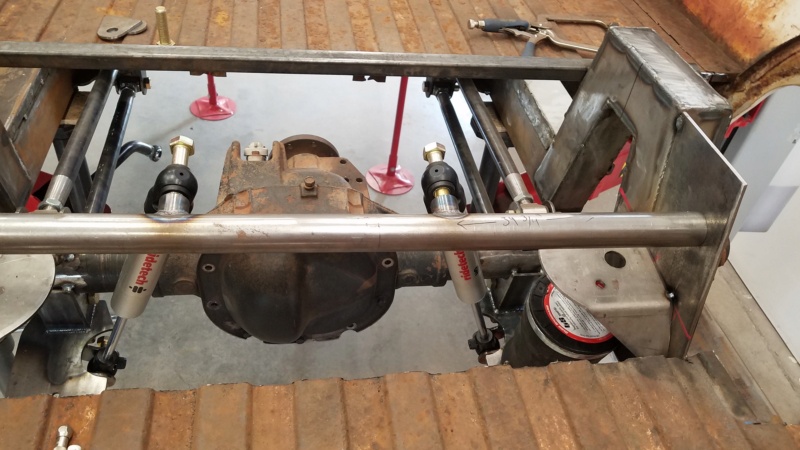
I narrowed mine before I settled on wheels. I was thinking of a normal kind of offset and some really fat tires. Meaning the flanges would benefit from being inboard more. Turns out the wheels I got have a more modern (positive) offset. It would not have been necessary to do the narrowing...
Here's looking at it from above with the wheelwell removed.


13-ball- Number of posts : 87
Location : moab, ut
Registration date : 2020-07-23
- Post n°39
 Rear end bracketry
Here's cutting out the 3" section of the long side of the axle.
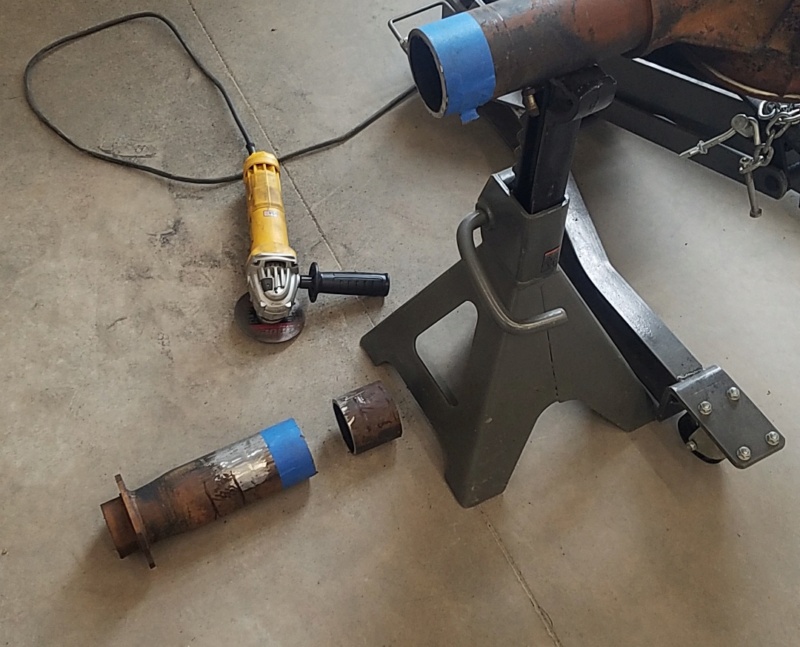
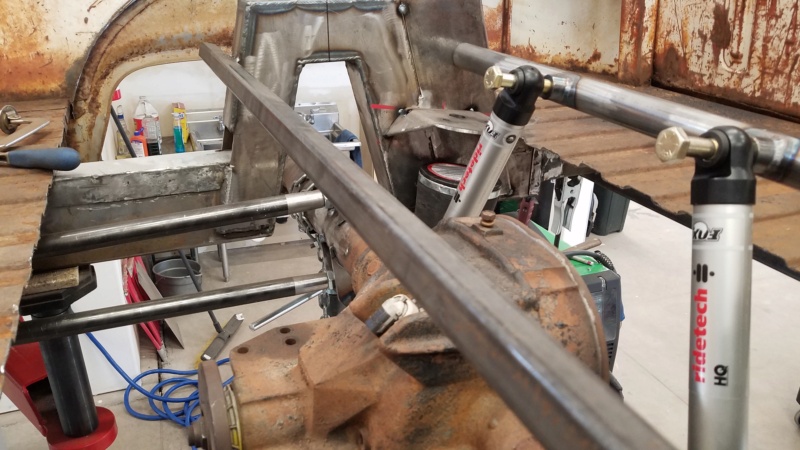
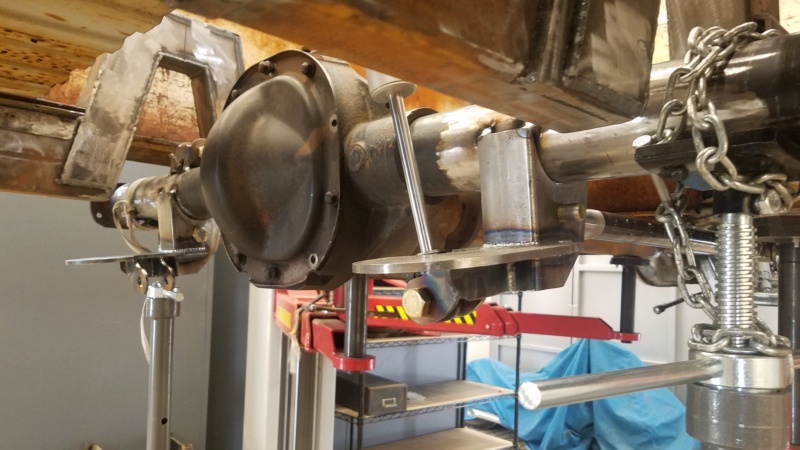
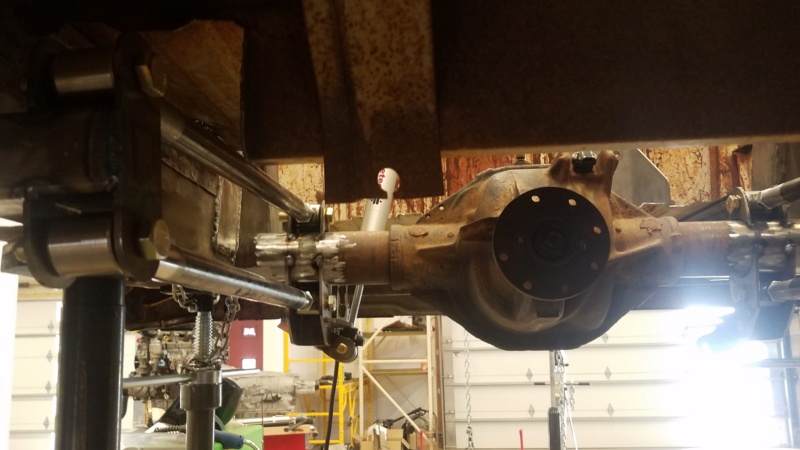
The kit I got had the 4 bars all under the axle. When I mocked it up, I did not like how the frame bracket hung down so low when the links were set level at ride height. I thought it'd all be likely to scrape.
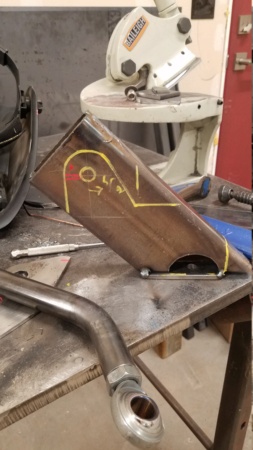
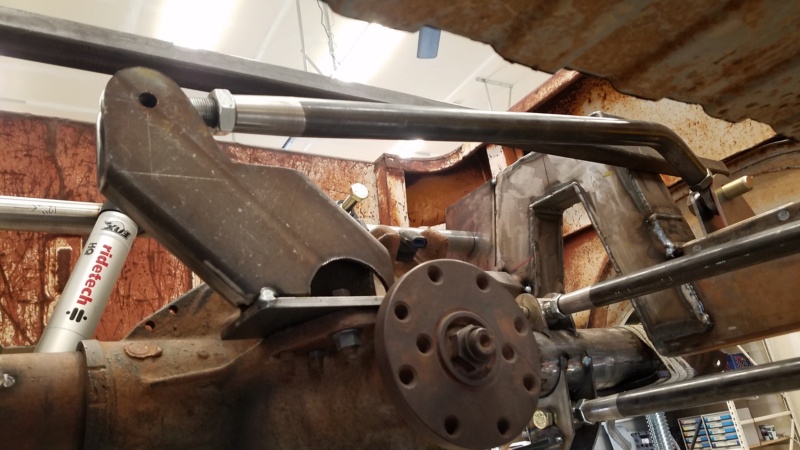
I ended up splitting the axle bracket so one bar is above and one bar is below the axle tube. That allowed the frame bracket to go upward some.
The original bracket is on the right, the frame bracket in the middle and the modified bracket on the left.


savage, gsnyder67 and Russell like this post

13-ball- Number of posts : 87
Location : moab, ut
Registration date : 2020-07-23
- Post n°40
 Re: 1961 Rust-O-Mod Pickup Build thread
savage and gsnyder67 like this post

hammerinhank- Number of posts : 14
Location : Charlevoix, Michigan
Registration date : 2018-12-11
- Post n°41
 Re: 1961 Rust-O-Mod Pickup Build thread
Really nice work!
I just ordered a Scott's IFS and a 4 link back half. Had a similar idea to run rectangular tubing inside of the original frame.
I also have an Isuzu steering box -- where did you get the steering shaft u joints?
I just ordered a Scott's IFS and a 4 link back half. Had a similar idea to run rectangular tubing inside of the original frame.
I also have an Isuzu steering box -- where did you get the steering shaft u joints?

13-ball- Number of posts : 87
Location : moab, ut
Registration date : 2020-07-23
- Post n°42
 Re: 1961 Rust-O-Mod Pickup Build thread
Great! I'm looking forward to hearing/watching how it goes for you. It's a ton of work but really satisfying to see the changes happen.
I got the steering shaft and ujoints from either Summit or Speedway. It took a few iterations and a few orders to get the final arrangement. I still feel like I should have rotated the rack so the input shaft doesn't run directly into the floorboard.
My biggest issue with the Scott's "kit" was the discrepancy between the front travel and the rear travel. The front has a really long range because the bag itself is longer and it mounts between the pivot and the tire. The rear has less travel because the bag is shorter and it mounts behind the axle. If the bags for the rear were in front of the axle you could achieve a lot more travel. It's one reason the low rider guys like the bag on bar method - lots of overall travel relative to the length of the bag itself.
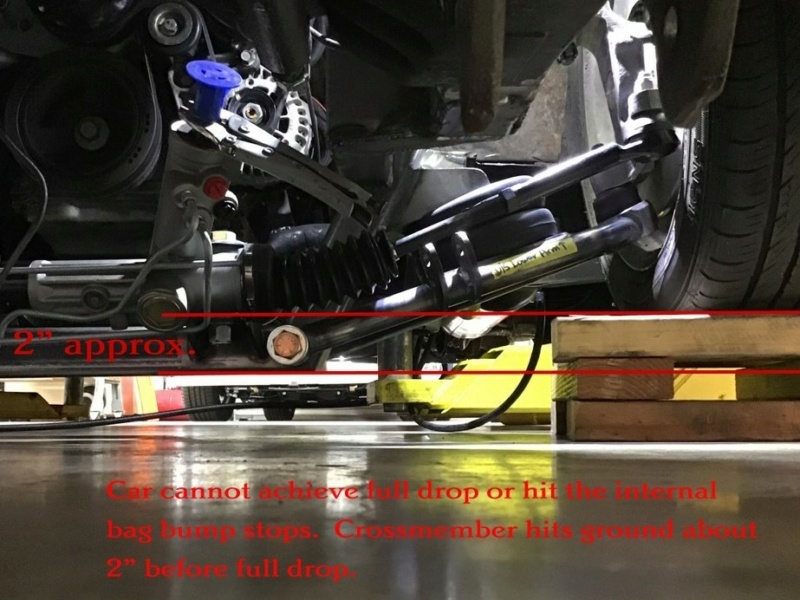
Another peeve I have is that I could not figure out how to get the front end to hit the bump stops (internal) before the crossmember hits the ground. If you lose air while driving, the crossmember will drag. I guess on other vehicles you could size the tire diameter so the crossmember is up higher when aired down, But, with the wheels under the seats, it's a tough one.
I did not get much good input from Scott's after the purchase.
I talked to a really helpful guy at Slam Specialties who gave me some advice about the rear end. Being that I had already cut up the Scott's bracketry and had all the spacing and angles worked out, I didn't use his good advice. He suggested that I do not use telescoping bags in the rear but instead put a larger diameter (7") convoluted bag back there. It would have meant taking it all apart and starting over. I ended up getting longer telescoping Firestone bags and longer shocks from RideTech which bolt directly to the Scott's bracketry. Front and back are now pretty close for overall travel.
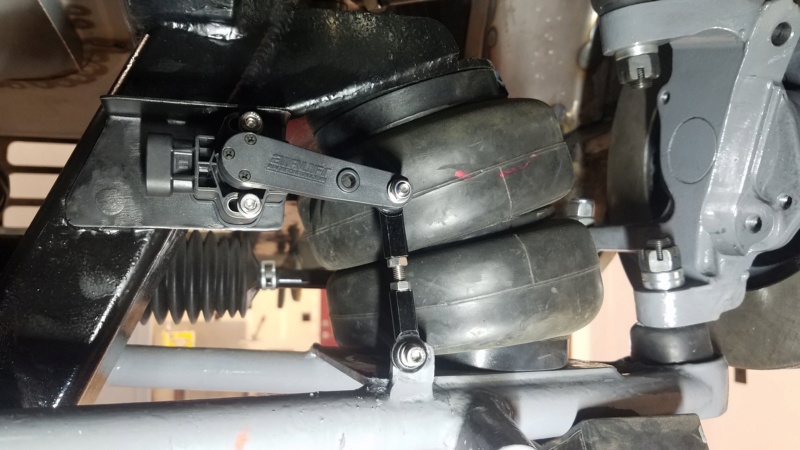
Front bag and ride height sensor.
Not my truck. This photo is of another install provided by the vendor and the comments in red are mine.
I got the steering shaft and ujoints from either Summit or Speedway. It took a few iterations and a few orders to get the final arrangement. I still feel like I should have rotated the rack so the input shaft doesn't run directly into the floorboard.
My biggest issue with the Scott's "kit" was the discrepancy between the front travel and the rear travel. The front has a really long range because the bag itself is longer and it mounts between the pivot and the tire. The rear has less travel because the bag is shorter and it mounts behind the axle. If the bags for the rear were in front of the axle you could achieve a lot more travel. It's one reason the low rider guys like the bag on bar method - lots of overall travel relative to the length of the bag itself.
Another peeve I have is that I could not figure out how to get the front end to hit the bump stops (internal) before the crossmember hits the ground. If you lose air while driving, the crossmember will drag. I guess on other vehicles you could size the tire diameter so the crossmember is up higher when aired down, But, with the wheels under the seats, it's a tough one.
I did not get much good input from Scott's after the purchase.
I talked to a really helpful guy at Slam Specialties who gave me some advice about the rear end. Being that I had already cut up the Scott's bracketry and had all the spacing and angles worked out, I didn't use his good advice. He suggested that I do not use telescoping bags in the rear but instead put a larger diameter (7") convoluted bag back there. It would have meant taking it all apart and starting over. I ended up getting longer telescoping Firestone bags and longer shocks from RideTech which bolt directly to the Scott's bracketry. Front and back are now pretty close for overall travel.
Front bag and ride height sensor.

Not my truck. This photo is of another install provided by the vendor and the comments in red are mine.


hammerinhank- Number of posts : 14
Location : Charlevoix, Michigan
Registration date : 2018-12-11
- Post n°43
 Re: 1961 Rust-O-Mod Pickup Build thread
I decided to go with coil overs on mine vs bags -- I know I'm already over my head so I wanted to keep it a little simpler. One of the thing I noticed on your build is you fabbed the front wheel tubs without getting into the doors -- outstanding!

13-ball- Number of posts : 87
Location : moab, ut
Registration date : 2020-07-23
- Post n°44
 Re: 1961 Rust-O-Mod Pickup Build thread
savage and gsnyder67 like this post

13-ball- Number of posts : 87
Location : moab, ut
Registration date : 2020-07-23
- Post n°45
 Checking suspension travel
savage, gsnyder67 and greggk like this post

13-ball- Number of posts : 87
Location : moab, ut
Registration date : 2020-07-23
- Post n°46
 Finally off the lift!
We've been calling this truck "Bill's TV" or "Bill" because there are some faint remnants of the logo for Bill's TV Repair still on the sides. If you look close you can see "motorola" and some other faint writing in various spots.
BILL'S TV IS OFFICIALLY ON THE AIR!
(I could not resist that pun - sorry)
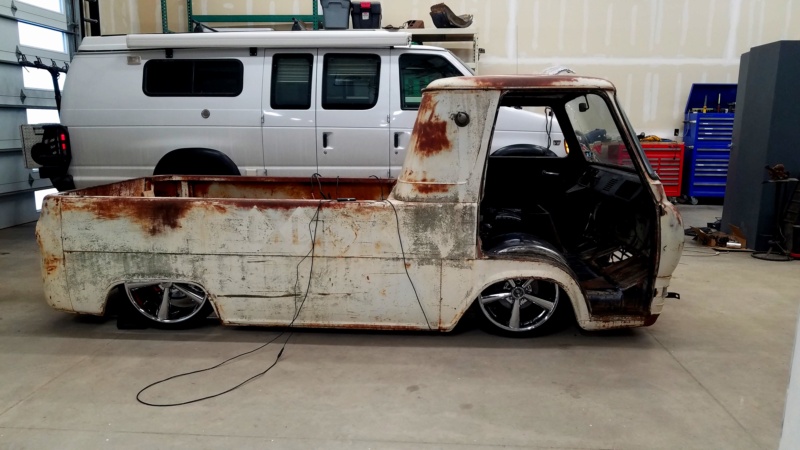
Sometimes it's good to have a look back... That was a lot of work to shorten it up a few inches!

BILL'S TV IS OFFICIALLY ON THE AIR!
(I could not resist that pun - sorry)

Sometimes it's good to have a look back... That was a lot of work to shorten it up a few inches!

savage likes this post

13-ball- Number of posts : 87
Location : moab, ut
Registration date : 2020-07-23
- Post n°47
 Raised Pickup Bed
After hacking away most of the bed surface it's time to rebuild.
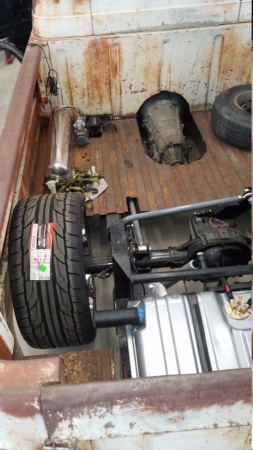
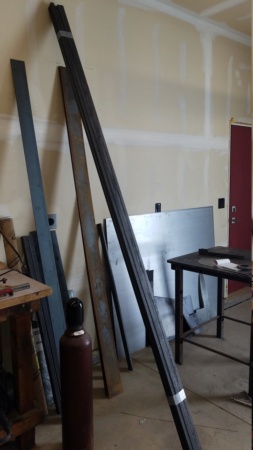
Got a bunch of 1x1 steel tubing for the framework.
Going to use these new bed halves to make the surface.
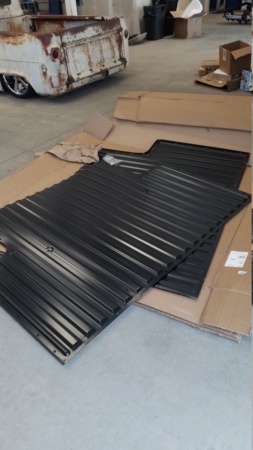
I couldn't find anything off the shelf that had enough distance between the cab and the wheelwell. It seems abnormally long - and the distance between the wheelwell and the tailgate is really short.

Got a bunch of 1x1 steel tubing for the framework.

Going to use these new bed halves to make the surface.

I couldn't find anything off the shelf that had enough distance between the cab and the wheelwell. It seems abnormally long - and the distance between the wheelwell and the tailgate is really short.
savage and gsnyder67 like this post

13-ball- Number of posts : 87
Location : moab, ut
Registration date : 2020-07-23
- Post n°48
 Framework for the Raised Bed
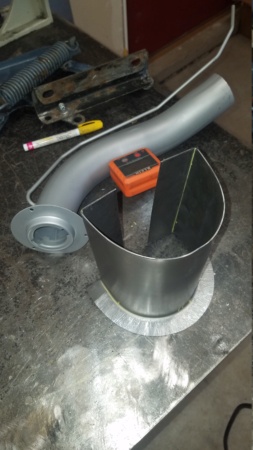
Here's the gas tank. My pickup had no tank when it came to me. I was kind of worried about a stock one hitting the ground so I decided to put it between the old and new bed surface.
It was for a '62 Chevy II - just picked it because the width and height worked out well. It also has an internal fuel pump.

Mocking it all up to be sure it'll work out OK.
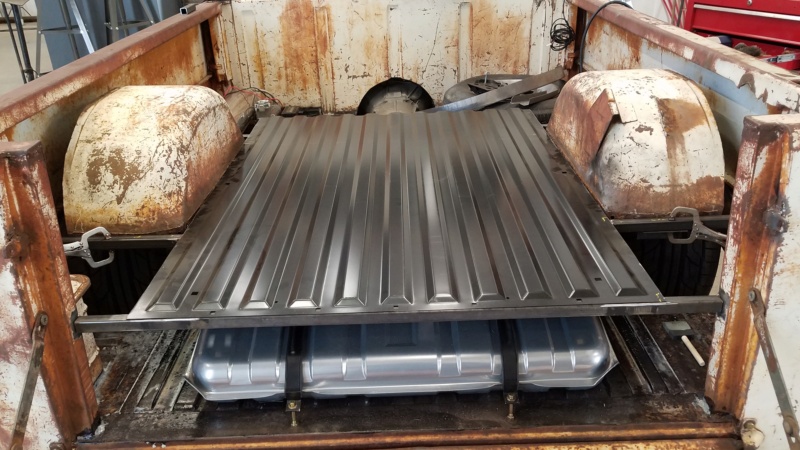
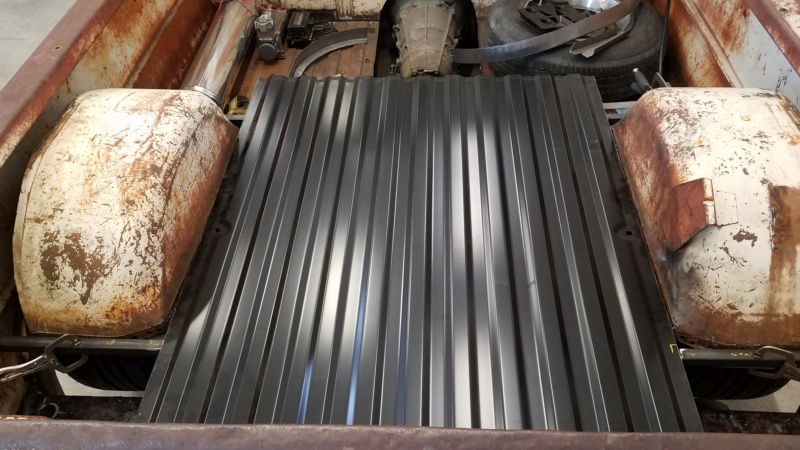
Going to move the wheel wells inboard about 4 inches.
It was for a '62 Chevy II - just picked it because the width and height worked out well. It also has an internal fuel pump.

Mocking it all up to be sure it'll work out OK.

Going to move the wheel wells inboard about 4 inches.

savage likes this post

13-ball- Number of posts : 87
Location : moab, ut
Registration date : 2020-07-23
- Post n°49
 Re: 1961 Rust-O-Mod Pickup Build thread
savage and gsnyder67 like this post

vanny- Moderator
- Number of posts : 14778
Location : Ashburnham, MA
Age : 65
Registration date : 2012-09-22
- Post n°50
 Re: 1961 Rust-O-Mod Pickup Build thread
You're really going to town on this pickup! Nice to see someone with mad metal skills save another gem from the crusher. Thanks for keeping the pics coming. Great Work!!!
_________________
“The future will soon be a thing of the past."
http://public.fotki.com/Vintage-Vans/vintage-vans-es/ruff-diamond-1/?cmd=fs_slideshow


