Last edited by samsvan on Sun Jan 21, 2018 4:58 pm; edited 1 time in total
+7
Russell
kaz
m1dadio
JackeFriend
jrinaman
vanny
samsvan
11 posters
It's Bed Time
samsvan- Number of posts : 672
Location : Sarasota, Fl.
Age : 61
Registration date : 2014-09-04
- Post n°1
It's Bed Time
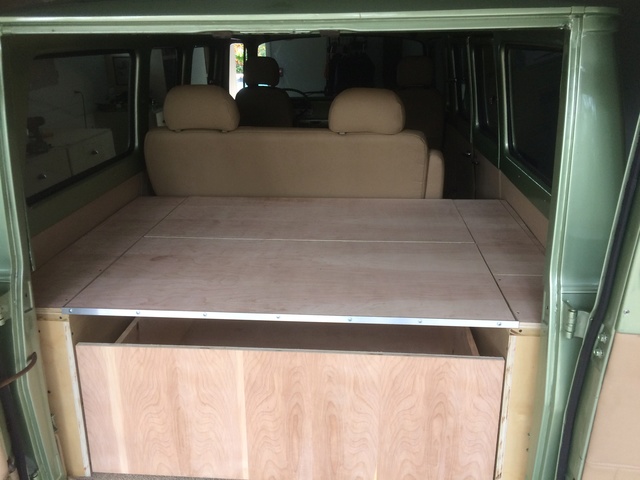
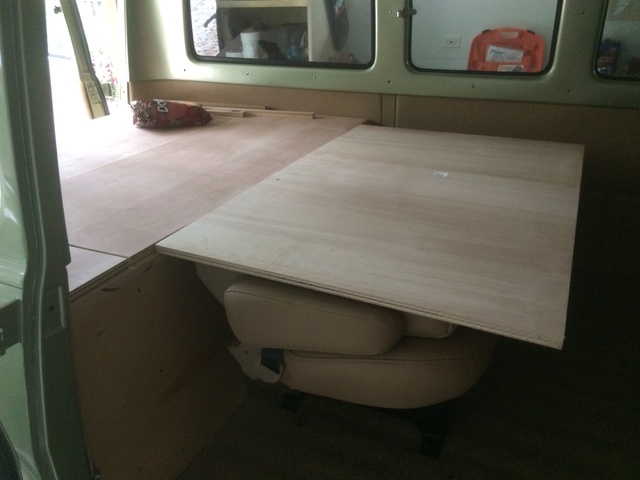
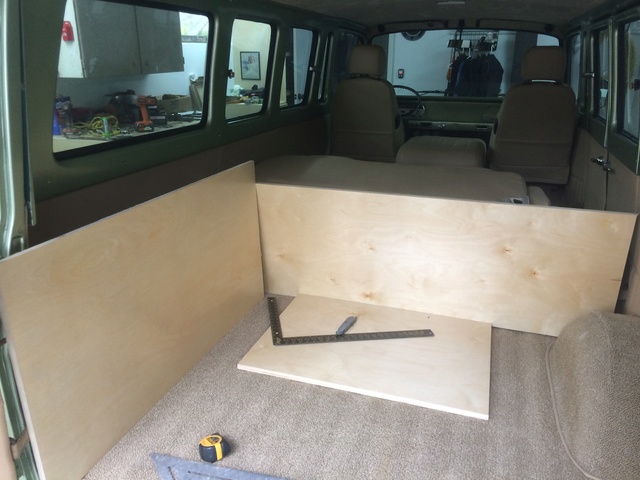
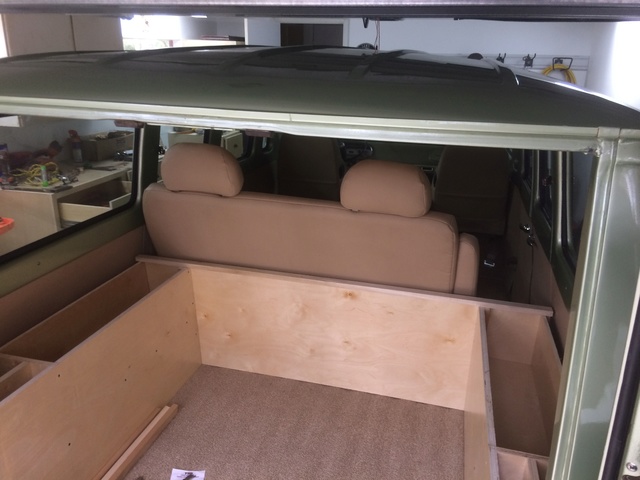
Alright boys and girls, this is my world so pay attention! I had some leftover plywood from my garage cabinets so I got started on my back platform/bed project. I've had a basic plan in my head for some time now. I bought the Astro Van back seat I have because of the way it folds down flat. I knew I wanted to be able to have a platform behind the seat with storage underneath that would flush up with the top of the seat with the back down. I have to get some more materials tomorrow but here's what it looks like so far.
Last edited by samsvan on Sun Jan 21, 2018 4:58 pm; edited 1 time in total
vanny- Moderator
- Number of posts : 14778
Location : Ashburnham, MA
Age : 65
Registration date : 2012-09-22
- Post n°2
Re: It's Bed Time
So what you’re saying is that with the seat folded down and flush, you will have a much longer sleeping surface? I like that plan...
_________________
“The future will soon be a thing of the past."
http://public.fotki.com/Vintage-Vans/vintage-vans-es/ruff-diamond-1/?cmd=fs_slideshow
jrinaman- Number of posts : 890
Location : zelienople,pa.
Age : 60
Registration date : 2011-03-10
- Post n°3
Re: It's Bed Time
I have a similar plan for mine. it will be 2 pieces, stacked for storage behind the seat and extending over the folded seat when used.
samsvan- Number of posts : 672
Location : Sarasota, Fl.
Age : 61
Registration date : 2014-09-04
- Post n°4
Re: It's Bed Time
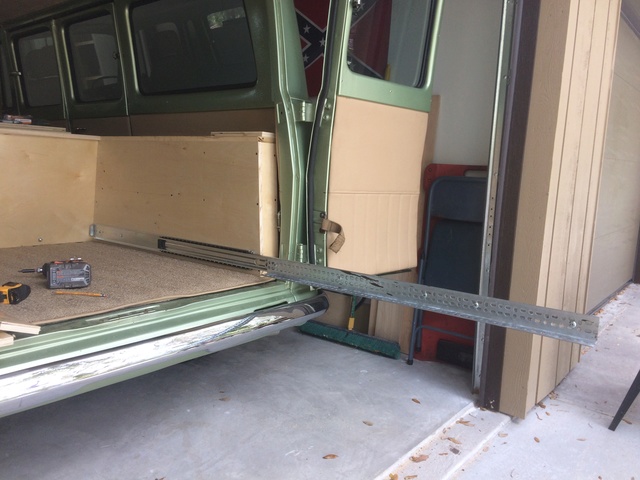
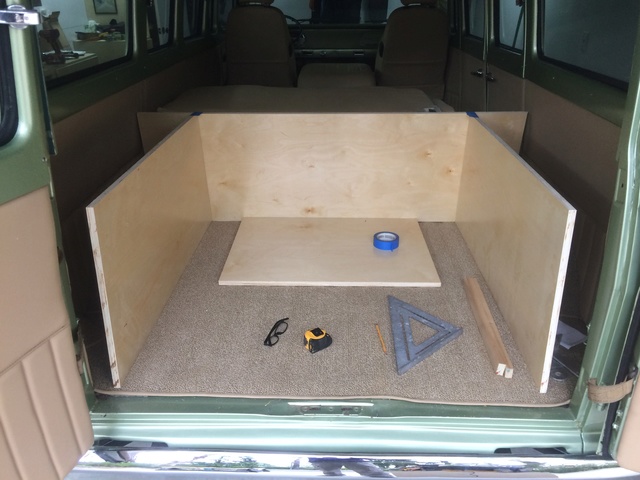
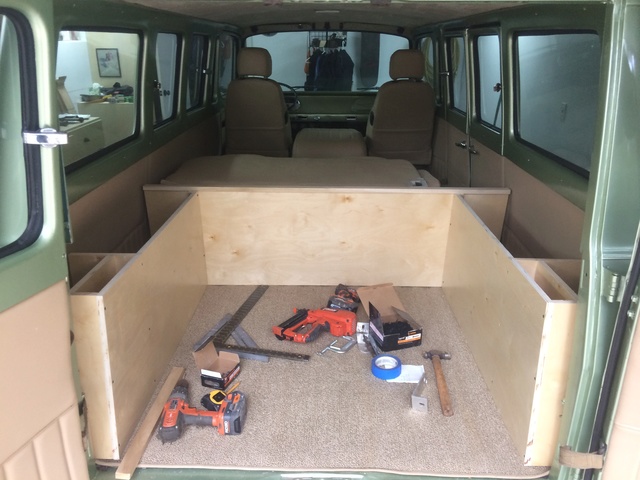
I didn't get a whole lot done today. I did a Home Depot run for the rest of the materials and did some fine tuning on what I did yesterday. Vanny, you are correct - my platform will extend over the seat when I'm done. I bought some heavy duty, big ol' drawer slides online so I'll have easy access to whatever's under the bed too. Here's a couple of pic's.
I'm trying to make the whole thing easily removable just in case??? The drawer slides are the tricky part because they can be kind of finicky. Most slides are made so the drawer can be removed but these slides don't have that option. I have a plan though. Things should start taking shape this week.
JackeFriend- Number of posts : 940
Location : Soap Lake WA
Age : 66
Registration date : 2016-05-06
- Post n°5
Re: It's Bed Time
Looks very spacious for storage. Nice build!
samsvan- Number of posts : 672
Location : Sarasota, Fl.
Age : 61
Registration date : 2014-09-04
- Post n°6
Re: It's Bed Time
Thanks Jacke,
I edited my opening sentence to say boys and girls... Oops!!
samsvan- Number of posts : 672
Location : Sarasota, Fl.
Age : 61
Registration date : 2014-09-04
- Post n°7
Re: It's Bed Time
I got a little more done this week and today. Here's some of the things I got done...
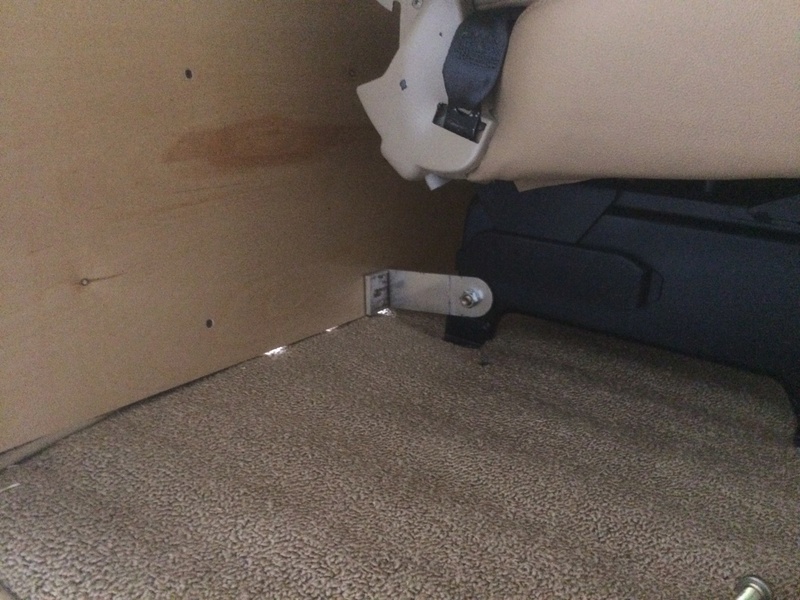
The brackets are from a roof rack I had. They're to keep the platform from lifting up when the drawer is pulled all the way out. To make the drawer removable, I riveted some 1x2 angle to the drawer side of my slides.
Now I just put the drawer on those angles and fasten it from the holes in the bottom with a couple of screws.
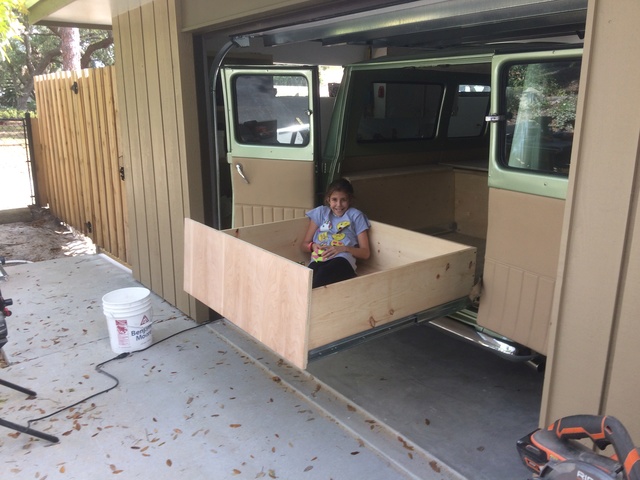
And finally the weight test. The slides are supposed to hold up to 500 pounds but I figured I'd start with my daughter. She weighs about 60.
I still have to figure out how I'm going to support the front part of the platform. It's about 38" x 52" so I want to cut it in two to make it easier to store when I want the seat up.
vanny- Moderator
- Number of posts : 14778
Location : Ashburnham, MA
Age : 65
Registration date : 2012-09-22
- Post n°8
Re: It's Bed Time
Looks nice an solid...Good work, Sam!
_________________
“The future will soon be a thing of the past."
http://public.fotki.com/Vintage-Vans/vintage-vans-es/ruff-diamond-1/?cmd=fs_slideshow
m1dadio- Chevy Guru
- Number of posts : 1778
Location : north saanich
Registration date : 2008-10-06
- Post n°9
Re: It's Bed Time
a lot of great work happening there with cool ideas.
samsvan- Number of posts : 672
Location : Sarasota, Fl.
Age : 61
Registration date : 2014-09-04
- Post n°10
Re: It's Bed Time
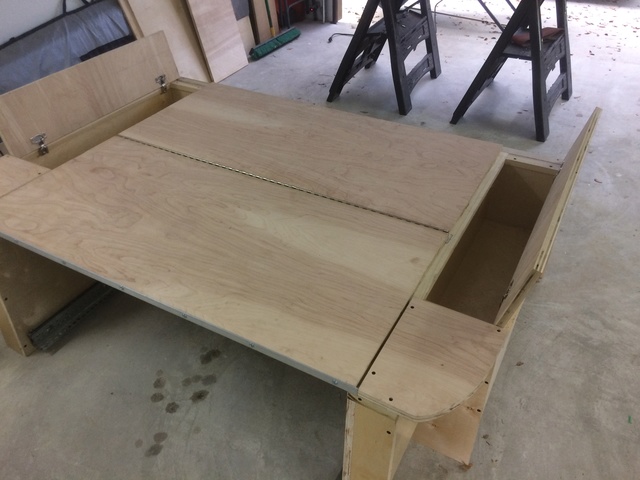
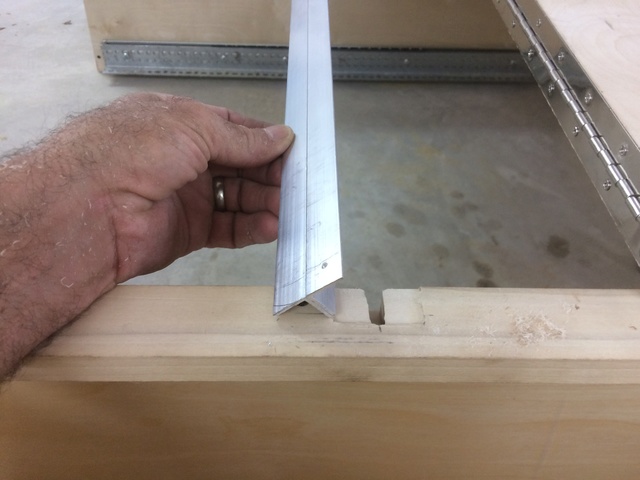
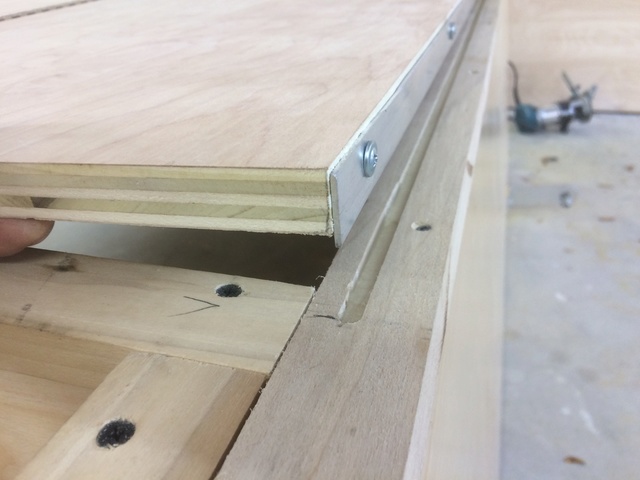
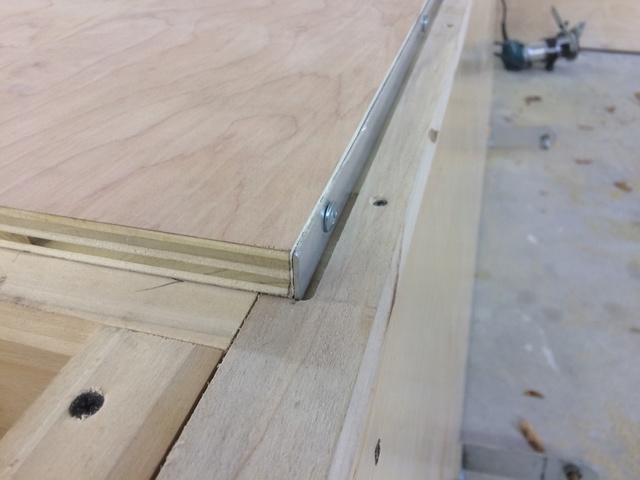
Thanks Dadio! I got off work a little early today so I did a little more detailing. I put cabinet hinges on the side storage box lids. I added a piano hinge between the two platform panels and added a brace underneath. They didn't have any T shaped aluminum at Home Depot so I riveted two pieces of angle together and notched the wood frame to accept it. I also added a flat piece of aluminum to the front of the front panel that keeps the whole platform in place. I routered a slot in the top of the frame that the aluminum drops into. I hope all that makes sense but here's some pic's anyway...
I think I have the front platform extension figured out so I should be able to get it knocked out tomorrow.
samsvan- Number of posts : 672
Location : Sarasota, Fl.
Age : 61
Registration date : 2014-09-04
- Post n°11
Re: It's Bed Time
Success! I finished up the front platform extension today. I hinged it to make it easier to handle so then I had to add another leg to the middle. I used furniture legs and brackets that screw together so it stores easily. I also did the same aluminum strip on the back as I did on the other platform to keep it in place. Both platforms share the channel I routed out in the bulkhead.
Of course this doesn't mean I'm done... I'll be taking it all to the upholstery shop on Monday.
vanny- Moderator
- Number of posts : 14778
Location : Ashburnham, MA
Age : 65
Registration date : 2012-09-22
- Post n°12
Re: It's Bed Time
Well thought out, Sam! Can't wait to see it upholstered. You're doing a real nice job with that van! Thanks for sending the updates. Look forward to seeing your progress.
_________________
“The future will soon be a thing of the past."
http://public.fotki.com/Vintage-Vans/vintage-vans-es/ruff-diamond-1/?cmd=fs_slideshow
samsvan- Number of posts : 672
Location : Sarasota, Fl.
Age : 61
Registration date : 2014-09-04
- Post n°13
Re: It's Bed Time
Vanny, I'm sending you a "e-hug". You always have something positive to say and show such a great appreciation for other peoples work.
As far as the interior project, I figure I can start hauling hooch if the construction market tanks again!
vanny- Moderator
- Number of posts : 14778
Location : Ashburnham, MA
Age : 65
Registration date : 2012-09-22
- Post n°14
Re: It's Bed Time
Funny you say that about hooch haulin...my uncle was working construction in North Carolina in the early 80's and told me about a 66 Chevy van he saw down there for sale that had a container of oil above the exhaust pipe that had a release button on the dashboard that would spray oil on the exhaust if being pursued while running moonshine to create a cloud of smoke...hee, hee hee!!!
_________________
“The future will soon be a thing of the past."
http://public.fotki.com/Vintage-Vans/vintage-vans-es/ruff-diamond-1/?cmd=fs_slideshow
kaz- Number of posts : 114
Location : Gilbert ,Arizona
Age : 65
Registration date : 2012-07-28
- Post n°15
Re: It's Bed Time
OMG,THAT IS SO WELL PUT TOGETHER WOW ,THE TALENT SKILLS YOU HAVE, AND THX, FOR SHARING YOUR ARTISTIC SKILL,S WITH US ,CAN'T WAIT TO C IT DONE.
samsvan- Number of posts : 672
Location : Sarasota, Fl.
Age : 61
Registration date : 2014-09-04
- Post n°16
Re: It's Bed Time
Thank you Kaz. My upholstery guy measured and ordered everything and then sent me home do do a few finishing touches. I wanted him to see it so he could tell me if my gaps were right for him. They were so all I had to do was round over all the sharp corners. Carpet should be in by the end of the week.
I was hoping that anyone with a window van could give me some drapery ideas. I asked my daughter to tie dye me some material for fathers day but I need some ideas on rods or hooks or whatever.
Russell- Number of posts : 698
Location : Chula Vista, Ca.
Age : 64
Registration date : 2015-12-08
- Post n°17
Re: It's Bed Time
When I had my VW van I used rods for curtains, awkward to use and rods got bent. I changed it up with snaps screwed to the walls and attached to the curtains. Those worked well, easy to put on and take off and easy to store. I found black snaps at a local upholstery supply which blended with the background I had and with them attached top and bottom they sealed up tight. I could also undo the top snaps and let them hang from the bottom so I could see out of the windows while driving. I plan on doing the same with my Sportvan sometime. (It's on the "to do" list)
AZ SuperVan- Number of posts : 219
Location : Cave Creek AZ
Registration date : 2013-09-12
- Post n°18
Re: It's Bed Time
Just an idea. What if you put a false bottom in the drawer. Then you could put a shallow drawer under the false bottom that was fitted for the extension pieces. That way you access them without having to unload everything on top of them. Just thinking out loud...
samsvan- Number of posts : 672
Location : Sarasota, Fl.
Age : 61
Registration date : 2014-09-04
- Post n°19
Re: It's Bed Time
That's two great ideas. Thanks guys. I think using snaps is probably the easiest way to make the drapes work. I don't know why I didn't think of that! I can even use the original mounting holes for the trim pieces to screw the snaps on through. I'm going to run a curtain across behind the front seats too. I'm going to try to make a rod that follows the curve of the roof and hooks in above the trim panels.
I had a similar thought for storing the extension panels. I looked at just installing the drawer slides high enough to store the panels under it but I needed all the depth available for some of my tools. I figured I only need the extension for camping so otherwise I can leave it at home.
I appreciate the input - Thanks again.
Russell- Number of posts : 698
Location : Chula Vista, Ca.
Age : 64
Registration date : 2015-12-08
- Post n°20
Re: It's Bed Time
Check a RV supply for a channel with hooks for your curtain behind the seat.
Admin- Admin
- Number of posts : 1731
Location : San Diego, California
Registration date : 2008-05-01
- Post n°21
Re: It's Bed Time
WOW! I love it!
Jay 13- Number of posts : 155
Location : clayton n.c.
Age : 53
Registration date : 2011-02-01
- Post n°22
Re: It's Bed Time
That looks awesome, great work
samsvan- Number of posts : 672
Location : Sarasota, Fl.
Age : 61
Registration date : 2014-09-04
- Post n°23
Re: It's Bed Time
https://www.curtain-tracks.com/recmar-3292-8-aluminum-curtain-track-8-ft.html
Here's a curtain track I might try. You think I can bend it enough to fit the ceiling?
Thanks Chebby and Jay. I took all the parts to my upholstery guy Friday. I'm going to try to get him to get it done by next weekend because it's our anniversary. I thought I'd drag the wife in there to celebrate. Yeah, she's a lucky lady!
retrogeek- Number of posts : 17
Location : San Jose, CA
Registration date : 2018-05-08
- Post n°24
Re: It's Bed Time
Impressive work.
JackeFriend- Number of posts : 940
Location : Soap Lake WA
Age : 66
Registration date : 2016-05-06
- Post n°25
Re: It's Bed Time
samsvan wrote:https://www.curtain-tracks.com/recmar-3292-8-aluminum-curtain-track-8-ft.html
Here's a curtain track I might try. You think I can bend it enough to fit the ceiling?
Thanks Chebby and Jay. I took all the parts to my upholstery guy Friday. I'm going to try to get him to get it done by next weekend because it's our anniversary. I thought I'd drag the wife in there to celebrate. Yeah, she's a lucky lady!
I used the track system in Goldie... works great. The aluminum is a nice touch. Mine are just a plastic track from the RV store. Very beautiful work. I am so happy you are getting the upholsterer involved! Wow maybe $ 37,000 is a good starting price
|
|