VintAGE-Vans

Would you like to react to this message? Create an account in a few clicks or log in to continue.

BRINGING IT ALL TOGETHER.... A's, G's & E's


+18
69
Kma4444
dix
Russell
68bigblock
whalemstr
OutofSight
JariV
gary h
vanny
benwah
wirepuller
Wadehawkins
bananappeal
Seth G
Digz
Big W
66e100pu
22 posters

    A-100 Project

    wirepuller
    wirepuller


    Number of posts : 176
    Location : Edmonton, AB, Canada
    Registration date : 2011-01-28

    A-100 Project - Page 3 Empty Re: A-100 Project

    Post by wirepuller Tue Jan 19, 2016 8:16 am

    Cool project, great work so far!!  

    I am wondering if you have any binding with the steering shaft that has a u-joint on either end.  I 've been doing some research for mine, and what I'm being told is to have a heim joint or stabilizer bearing on the shaft to prevent any binding of the shaft.  

    A-100 Project - Page 3 Pic213

    Did you put anything like that into your design or does it even bind?

    Thanks,

    WP
    66e100pu
    66e100pu


    Number of posts : 199
    Location : So-Cal
    Registration date : 2011-04-02

    A-100 Project - Page 3 Empty Re: A-100 Project

    Post by 66e100pu Tue Jan 19, 2016 9:34 am

    wirepuller wrote:Cool project, great work so far!!  

    I am wondering if you have any binding with the steering shaft that has a u-joint on either end.  I 've been doing some research for mine, and what I'm being told is to have a heim joint or stabilizer bearing on the shaft to prevent any binding of the shaft.  

    A-100 Project - Page 3 Pic213

    Did you put anything like that into your design or does it even bind?

    Thanks,

    WP

    The 1st iteration with the Boston Gearbox Adapter (shown in the pic above you included) used a single shaft and two u-joints.  The revised plan that uses the Isuzu box requires 2 shafts and three u-joints with a center support (see pic.).  The general rule of thumb is a single shaft with 2 joints should not require a support – more than 2 always need a support.  The key to avoiding binding is to lay-out the path of the shaft carefully to avoid any extreme u-joint angles.

    A-100 Project - Page 3 Pa130010
    wirepuller
    wirepuller


    Number of posts : 176
    Location : Edmonton, AB, Canada
    Registration date : 2011-01-28

    A-100 Project - Page 3 Empty Re: A-100 Project

    Post by wirepuller Wed Jan 20, 2016 6:47 am

    Perfect, thanks for the tip!!

    I'm using a Vanagon steering box for mine.

    WP
    66e100pu
    66e100pu


    Number of posts : 199
    Location : So-Cal
    Registration date : 2011-04-02

    A-100 Project - Page 3 Empty Re: A-100 Project

    Post by 66e100pu Fri Feb 05, 2016 9:12 am

    In between some of the more tedious work I’ve been shooting some 6” x 6” test patterns to see if I could land on a color that might work.  I’ve experimented with gasser green metallic, Ford Calypso Poly, some special PT Cruiser color that is Seafoam or Seamist Metallic that all look good, but don’t scream that’s the one.  The two that do pop are Prowler Flame Orange Pearlcoat and Cadillac Cinnamon Metallic.  I’m leaning toward the pearlcoat – it changes from a deep red to copper to orange depending how the light hits it.  Not looking to do a two-tone, so at least I only need to find 1 color instead of 2!  Still not 100% sure which way to go, but I’m getting closer.

    A-100 Project - Page 3 Imag0310

    A-100 Project - Page 3 Kgrhqz10
    whalemstr
    whalemstr


    Number of posts : 248
    Location : Corning, California
    Registration date : 2012-06-27

    A-100 Project - Page 3 Empty Re: A-100 Project

    Post by whalemstr Fri Feb 05, 2016 10:52 am

    I know from a friend back in the early 80's that had his pickup pearl painted - two tone - green and white... his brother owned a bodyshop (still paints now and then too!)... anyway, it looked especially good at night when you saw it...
    vanny
    vanny
    Moderator


    Number of posts : 14778
    Location : Ashburnham, MA
    Age : 65
    Registration date : 2012-09-22

    A-100 Project - Page 3 Empty Re: A-100 Project

    Post by vanny Fri Feb 05, 2016 3:56 pm

    That Prowler Flame Orange Pearlcoat looks really Sharp!!! Twisted Evil


    _________________
    “The future will soon be a thing of the past."

    http://public.fotki.com/Vintage-Vans/vintage-vans-es/ruff-diamond-1/?cmd=fs_slideshow
    OutofSight
    OutofSight


    Number of posts : 1564
    Location : Lake Oroville, Ca.
    Registration date : 2015-11-19

    A-100 Project - Page 3 Empty Re: A-100 Project

    Post by OutofSight Sat Feb 06, 2016 8:22 am

    I agree!
    66e100pu
    66e100pu


    Number of posts : 199
    Location : So-Cal
    Registration date : 2011-04-02

    A-100 Project - Page 3 Empty Re: A-100 Project

    Post by 66e100pu Sat Feb 06, 2016 8:35 am

    The more I look at the pearlcoat, the more I agree too .... but at $900 per gallon ..... affraid
    whalemstr
    whalemstr


    Number of posts : 248
    Location : Corning, California
    Registration date : 2012-06-27

    A-100 Project - Page 3 Empty Re: A-100 Project

    Post by whalemstr Sat Feb 06, 2016 11:35 am

    hahaha - there in lies the rub...
    ridiculous prices for something that's been around forever...
    JariV
    JariV


    Number of posts : 117
    Location : San Jose, California
    Registration date : 2013-04-25

    A-100 Project - Page 3 Empty Re: A-100 Project

    Post by JariV Wed Feb 10, 2016 10:17 am

    I really like the Cadillac Cinnamon. Maybe additional accents in matte black for a muscle car look. But hey, that's only me.

    If you don't use that color then I will Very Happy for something...
    66e100pu
    66e100pu


    Number of posts : 199
    Location : So-Cal
    Registration date : 2011-04-02

    A-100 Project - Page 3 Empty Re: A-100 Project

    Post by 66e100pu Sat Apr 09, 2016 7:15 pm

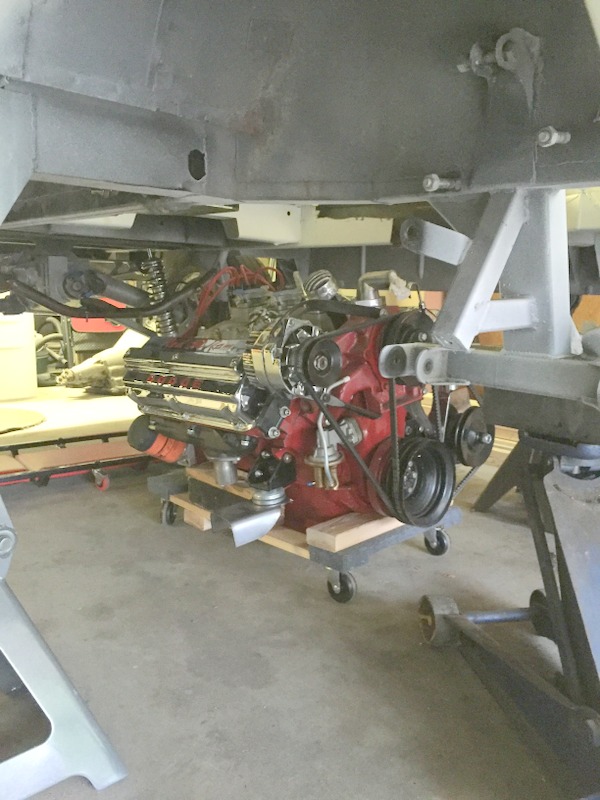
    Need to bolt this beast in at some point, but I have been sidelined trying to figure out how to avoid 2 flatbed trips to the shop to use the lift.  The project is always in some state of disassembly so it's a major pain to move it.  I thought about building some cribbing, but they take a half a day to build and a ridiculous number of 2/4s.  Finally found something that actually works - 12 ton jack stands.  These things could hold your house up!  Top position puts the bottom of  the body 30" off the ground.  It was enough to roll it under and get it ready to position and finalize the mounts.  I'll lower it down quite a bit tomorrow and then use the cherry picker to support if from the top and the floor jack from the bottom.  Only downside is I'll have to mate the block to the bell housing under the truck - probably a small price to pay rather than suffer the aggravation of moving this back and forth.

    A-100 Project - Page 3 Img_0110

    A-100 Project - Page 3 Img_0111
    OutofSight
    OutofSight


    Number of posts : 1564
    Location : Lake Oroville, Ca.
    Registration date : 2015-11-19

    A-100 Project - Page 3 Empty Re: A-100 Project

    Post by OutofSight Sat Apr 09, 2016 7:30 pm

    Coming along nicely!
    vanny
    vanny
    Moderator


    Number of posts : 14778
    Location : Ashburnham, MA
    Age : 65
    Registration date : 2012-09-22

    A-100 Project - Page 3 Empty Re: A-100 Project

    Post by vanny Sun Apr 10, 2016 1:33 pm

    Nice work!!! Very Happy


    _________________
    “The future will soon be a thing of the past."

    http://public.fotki.com/Vintage-Vans/vintage-vans-es/ruff-diamond-1/?cmd=fs_slideshow
    66e100pu
    66e100pu


    Number of posts : 199
    Location : So-Cal
    Registration date : 2011-04-02

    A-100 Project - Page 3 Empty Re: A-100 Project

    Post by 66e100pu Sun Apr 10, 2016 3:07 pm

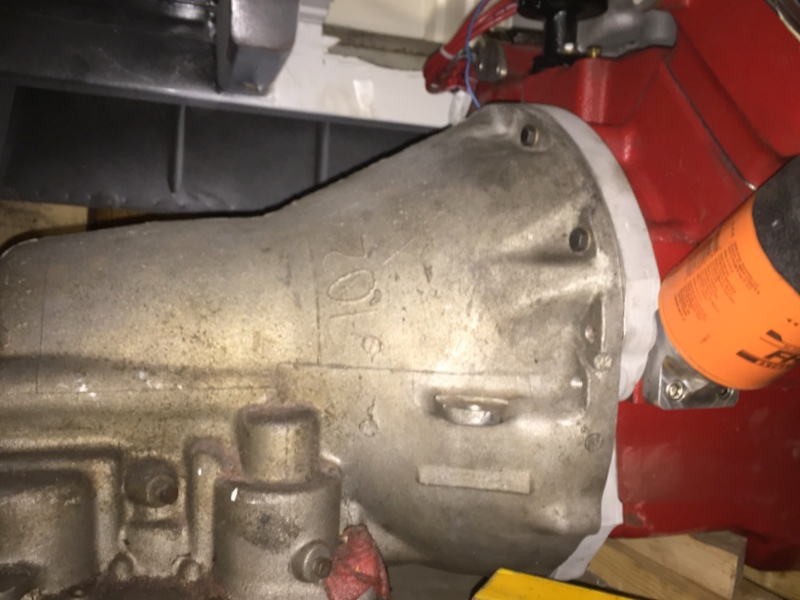
    Thanks, Guys!  Got as far as bolting up the Wilcap trans adapter.  Started to try and mate the engine/tranny, but the pilot is fighting me so I'll walk away from it and give it a fresh look next weekend.

    A-100 Project - Page 3 Img_0113

    A-100 Project - Page 3 Img_0114
    66e100pu
    66e100pu


    Number of posts : 199
    Location : So-Cal
    Registration date : 2011-04-02

    A-100 Project - Page 3 Empty Re: A-100 Project

    Post by 66e100pu Mon Apr 11, 2016 8:34 pm

    Fought mating these up for several hours yesterday.  Learned long ago sometimes it's better to just walk away, rather than find a bigger hammer.  Took a look tonight and adjusted my angle of attack - slipped together in about 15 minutes!

    A-100 Project - Page 3 Img_0115
    vanny
    vanny
    Moderator


    Number of posts : 14778
    Location : Ashburnham, MA
    Age : 65
    Registration date : 2012-09-22

    A-100 Project - Page 3 Empty Re: A-100 Project

    Post by vanny Tue Apr 12, 2016 4:06 am

    Nice and you're right, don't want to end up forcing stuff when you get riled up...ask me how I know! Once you calm down and think about it, usually the light dawns on Marblehead and you come up with a better solution that doesn't break things!!! Very Happy cheers


    _________________
    “The future will soon be a thing of the past."

    http://public.fotki.com/Vintage-Vans/vintage-vans-es/ruff-diamond-1/?cmd=fs_slideshow
    66e100pu
    66e100pu


    Number of posts : 199
    Location : So-Cal
    Registration date : 2011-04-02

    A-100 Project - Page 3 Empty Re: A-100 Project

    Post by 66e100pu Sun Apr 17, 2016 11:50 am

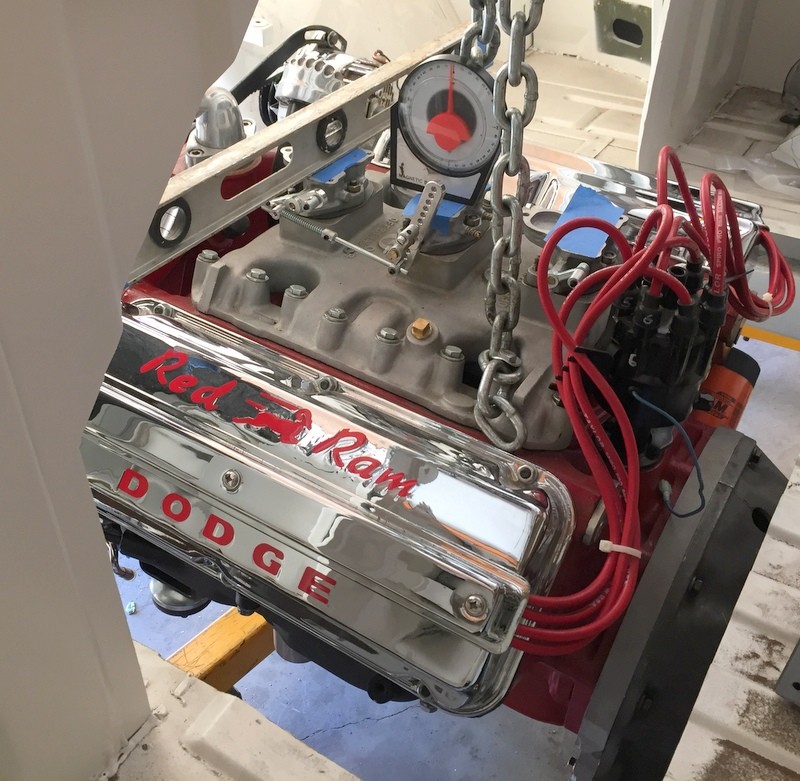
    It only took 1 cherry picker, 2 floor jacks, 12 jack stands, levels, and an angle gauge!  I tacked the mounts together and will drop them off to the welder tomorrow.  Should get them back, paint them up, and finish the install by the end of the week.

    A-100 Project - Page 3 Img_0120

    A-100 Project - Page 3 Img_0121

    A-100 Project - Page 3 Img_0122

    A-100 Project - Page 3 Img_0123
    vanny
    vanny
    Moderator


    Number of posts : 14778
    Location : Ashburnham, MA
    Age : 65
    Registration date : 2012-09-22

    A-100 Project - Page 3 Empty Re: A-100 Project

    Post by vanny Mon Apr 18, 2016 5:35 am

    Man that engine looks Fantastic! Congrats...can't wait to see it all done!


    _________________
    “The future will soon be a thing of the past."

    http://public.fotki.com/Vintage-Vans/vintage-vans-es/ruff-diamond-1/?cmd=fs_slideshow
    66e100pu
    66e100pu


    Number of posts : 199
    Location : So-Cal
    Registration date : 2011-04-02

    A-100 Project - Page 3 Empty Re: A-100 Project

    Post by 66e100pu Wed Apr 20, 2016 8:38 pm

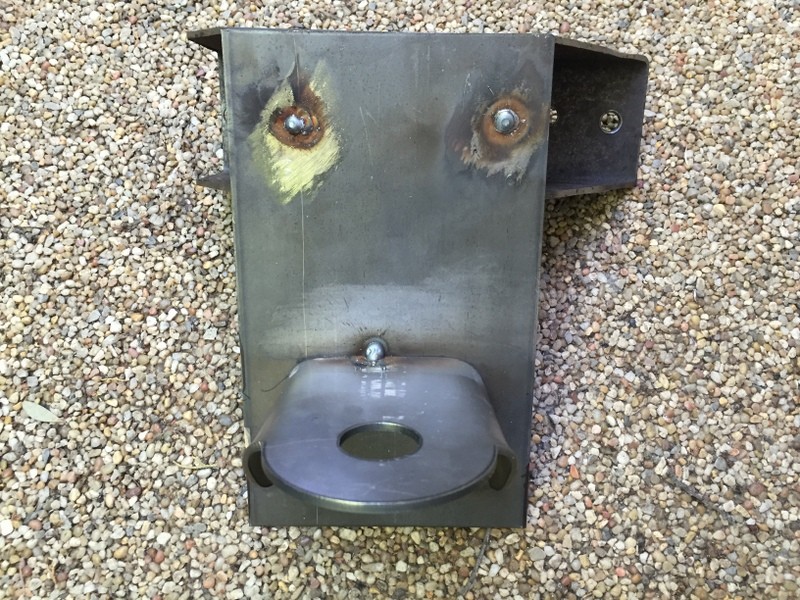
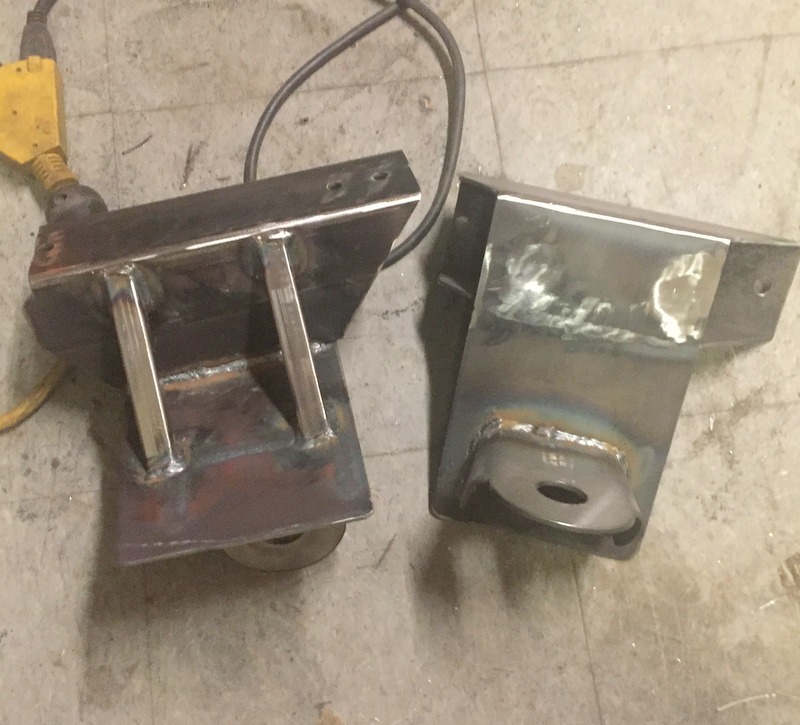
    Got 'em back from the welder today.  May not be elegant, but strong as bull!

    A-100 Project - Page 3 Img_0124
    68bigblock
    68bigblock


    Number of posts : 44
    Location : Alberta
    Registration date : 2016-03-19

    A-100 Project - Page 3 Empty Re: A-100 Project

    Post by 68bigblock Fri Apr 22, 2016 8:23 pm

    Being a guy getting ready to start his project this is a great thread cheers
    gary h
    gary h


    Number of posts : 497
    Location : tn.
    Registration date : 2012-10-19

    A-100 Project - Page 3 Empty Re: A-100 Project

    Post by gary h Fri Apr 22, 2016 8:57 pm

    I Agree! affraid
    66e100pu
    66e100pu


    Number of posts : 199
    Location : So-Cal
    Registration date : 2011-04-02

    A-100 Project - Page 3 Empty Re: A-100 Project

    Post by 66e100pu Sat Apr 23, 2016 9:12 am

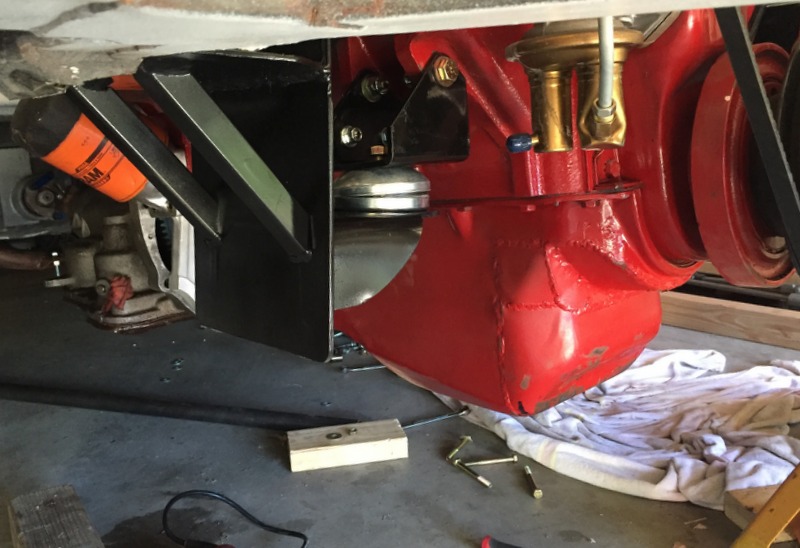
    Thanks for the encouragement guys!  I think the only reason that anyone posts build threads is in the hope that somebody picks up a tip or two for their build ( I know I've picked up more than a few) which is what makes this site so great.

    It's always a good day when a plan comes together.  Even though you do your measurements 10 times, you're still holding your breath when it's all cut and welded that somehow it's actually going to fit as planned.  This time it was smooth sailing - look Ma, no cherry picker!

    A-100 Project - Page 3 Img_0125

    A-100 Project - Page 3 Img_0126
    Russell
    Russell


    Number of posts : 698
    Location : Chula Vista, Ca.
    Age : 64
    Registration date : 2015-12-08

    A-100 Project - Page 3 Empty Re: A-100 Project

    Post by Russell Sun Apr 24, 2016 6:57 am

    66e100pu wrote:Thanks for the encouragement guys!  I think the only reason that anyone posts build threads is in the hope that somebody picks up a tip or two for their build ( I know I've picked up more than a few) which is what makes this site so great.

    It's always a good day when a plan comes together.  Even though you do your measurements 10 times, you're still holding your breath when it's all cut and welded that somehow it's actually going to fit as planned.  This time it was smooth sailing - look Ma, no cherry picker!

    A-100 Project - Page 3 Img_0125

    A-100 Project - Page 3 Img_0126
    What's up with the welds on the oil pan? Did you have to modify that ?
    66e100pu
    66e100pu


    Number of posts : 199
    Location : So-Cal
    Registration date : 2011-04-02

    A-100 Project - Page 3 Empty Re: A-100 Project

    Post by 66e100pu Sun Apr 24, 2016 7:03 am

    Russell wrote:
    66e100pu wrote:Thanks for the encouragement guys!  I think the only reason that anyone posts build threads is in the hope that somebody picks up a tip or two for their build ( I know I've picked up more than a few) which is what makes this site so great.

    It's always a good day when a plan comes together.  Even though you do your measurements 10 times, you're still holding your breath when it's all cut and welded that somehow it's actually going to fit as planned.  This time it was smooth sailing - look Ma, no cherry picker!

    A-100 Project - Page 3 Img_0125

    A-100 Project - Page 3 Img_0126
    What's up with the welds on the oil pan? Did you have to modify that ?

    The guy that built the engine was putting it in a 32 duce coupe and needed to clear a crossmember, so he modified it.  I have a stock pan that will replace it.
    66e100pu
    66e100pu


    Number of posts : 199
    Location : So-Cal
    Registration date : 2011-04-02

    A-100 Project - Page 3 Empty Re: A-100 Project

    Post by 66e100pu Sat May 07, 2016 4:29 pm

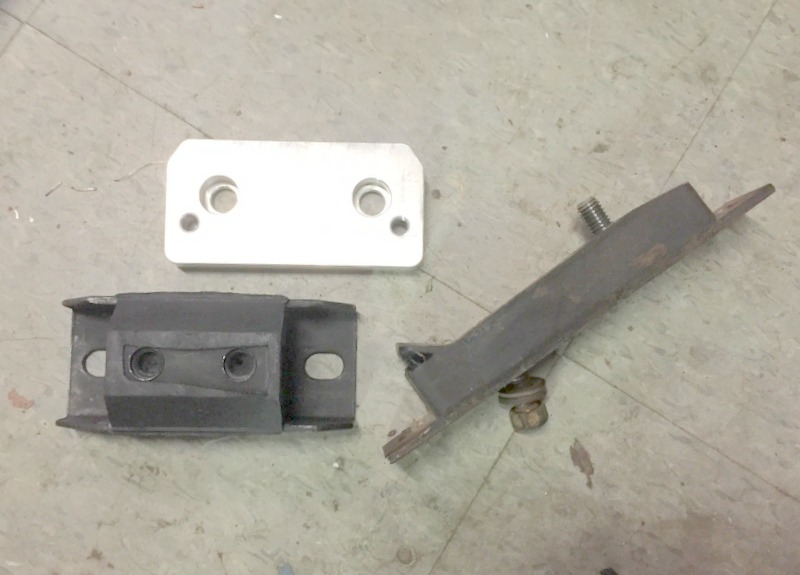
    I was fooling with the trans mount.  The Mopar mount is kind of an oddball, so I used an adapter to fit a Chevy unit.  Seemed simple, but like everything else it needed some mods to the cross member to deal with the increase height.  Decided to clean out the bed - its amazing all the stuff that finds it's way in there.  While I had the floor clear, I took a shot showing where the flip top fuel fillers are located - the spun aluminum tanks are mount directly below under the bed floor.  Put all the suspension parts back in the bed (organized a little better this time!) and hopefully they will get installed shortly.


    A-100 Project - Page 3 Img_0130

    A-100 Project - Page 3 Img_0132

    A-100 Project - Page 3 Img_0131

    A-100 Project - Page 3 Img_0133

    Sponsored content


    A-100 Project - Page 3 Empty Re: A-100 Project

    Post by Sponsored content


      Current date/time is Mon Nov 18, 2024 6:50 am