VintAGE-Vans

Would you like to react to this message? Create an account in a few clicks or log in to continue.

BRINGING IT ALL TOGETHER.... A's, G's & E's


+18
69
Kma4444
dix
Russell
68bigblock
whalemstr
OutofSight
JariV
gary h
vanny
benwah
wirepuller
Wadehawkins
bananappeal
Seth G
Digz
Big W
66e100pu
22 posters

    A-100 Project

    66e100pu
    66e100pu


    Number of posts : 199
    Location : So-Cal
    Registration date : 2011-04-02

    A-100 Project - Page 5 Empty Re: A-100 Project

    Post by 66e100pu Mon Jun 03, 2019 6:53 pm

    OutofSight wrote:They look like E.T. Wheels, I have some on my ‘Cuda

    They are knock offs of ETs or American Racing T70s. They are made by US Mag and have aftermarket flat aluminum centers.
    OutofSight
    OutofSight


    Number of posts : 1564
    Location : Lake Oroville, Ca.
    Registration date : 2015-11-19

    A-100 Project - Page 5 Empty Re: A-100 Project

    Post by OutofSight Mon Jun 03, 2019 6:59 pm

    Very similar A-100 Project - Page 5 A53f4c10
    66e100pu
    66e100pu


    Number of posts : 199
    Location : So-Cal
    Registration date : 2011-04-02

    A-100 Project - Page 5 Empty Re: A-100 Project

    Post by 66e100pu Sat Jun 08, 2019 9:54 am

    Working on finalizing the steering and brake system this weekend.  The power brake booster/master cylinder resides inside the front of the doghouse.  It is mounted transversely and requires quite the combination of bell cranks, pillow block, and heim joints to make it all work.  I'll post more when I finish it up.

    A-100 Project - Page 5 Img_2016
    66e100pu
    66e100pu


    Number of posts : 199
    Location : So-Cal
    Registration date : 2011-04-02

    A-100 Project - Page 5 Empty Re: A-100 Project

    Post by 66e100pu Sat Jun 08, 2019 12:53 pm

    It's getting there...

    A-100 Project - Page 5 Img_2017

    A-100 Project - Page 5 Img_2019

    A-100 Project - Page 5 Img_2018

    A-100 Project - Page 5 Img_2020

    A-100 Project - Page 5 Img_2021
    vanny
    vanny
    Moderator


    Number of posts : 14778
    Location : Ashburnham, MA
    Age : 65
    Registration date : 2012-09-22

    A-100 Project - Page 5 Empty Re: A-100 Project

    Post by vanny Sat Jun 08, 2019 2:36 pm

    Nice work and great looking undercarriage!


    _________________
    “The future will soon be a thing of the past."

    http://public.fotki.com/Vintage-Vans/vintage-vans-es/ruff-diamond-1/?cmd=fs_slideshow
    OutofSight
    OutofSight


    Number of posts : 1564
    Location : Lake Oroville, Ca.
    Registration date : 2015-11-19

    A-100 Project - Page 5 Empty Re: A-100 Project

    Post by OutofSight Mon Jun 10, 2019 7:06 am

    Truly outstanding work!
    66e100pu
    66e100pu


    Number of posts : 199
    Location : So-Cal
    Registration date : 2011-04-02

    A-100 Project - Page 5 Empty Re: A-100 Project

    Post by 66e100pu Tue Apr 14, 2020 5:11 pm

    Only silver lining to the current lock down is plenty of time to get stuff done.  Installed the rest of the mechanical sub-systems and wired-up a temp control panel.  Finally fired it up, and fixed all the little niggling leaks and usual screw-ups.  Now moving under it's own power and yes, there is nothing like the rumble of an old school hemi!A-100 Project - Page 5 Img_2310A-100 Project - Page 5 Img_2311A-100 Project - Page 5 Img_2312
    A-100 Project - Page 5 Img_2313
    A-100 Project - Page 5 Img_2314
    vanny
    vanny
    Moderator


    Number of posts : 14778
    Location : Ashburnham, MA
    Age : 65
    Registration date : 2012-09-22

    A-100 Project - Page 5 Empty Re: A-100 Project

    Post by vanny Wed Apr 15, 2020 4:22 am

    Congrats!!! Making the best use of down time! cheers cheers cheers


    _________________
    “The future will soon be a thing of the past."

    http://public.fotki.com/Vintage-Vans/vintage-vans-es/ruff-diamond-1/?cmd=fs_slideshow
    66e100pu
    66e100pu


    Number of posts : 199
    Location : So-Cal
    Registration date : 2011-04-02

    A-100 Project - Page 5 Empty Re: A-100 Project

    Post by 66e100pu Wed Apr 15, 2020 8:41 pm

    Thanks, Vanny! This one is a never ending project for at least the past 8 years. I restored somewhere around 10 other projects during that time, but this one is tough to finish. I think its because NOTHING is stock. Every bracket, hanger, or whatever needs to be fabricated, and most times it can take a half a day or longer to noodle it through and actually make and install whatever comes up. A stock restoration - unbolt, refinish or replace, bolt back together goes quick compared to this. The upside is Covid-19 moved my retirement date up a couple of months so I can get to these projects before I'm wearing Depends and drooling on myself!
    vanny
    vanny
    Moderator


    Number of posts : 14778
    Location : Ashburnham, MA
    Age : 65
    Registration date : 2012-09-22

    A-100 Project - Page 5 Empty Re: A-100 Project

    Post by vanny Thu Apr 16, 2020 3:50 am

    You’re too Funny...some good needs to come out of this mess...I’m Happy to see that you’re sticking with it...Your patience will pay off in the end! cheers cheers Very Happy


    _________________
    “The future will soon be a thing of the past."

    http://public.fotki.com/Vintage-Vans/vintage-vans-es/ruff-diamond-1/?cmd=fs_slideshow
    66e100pu
    66e100pu


    Number of posts : 199
    Location : So-Cal
    Registration date : 2011-04-02

    A-100 Project - Page 5 Empty Re: A-100 Project

    Post by 66e100pu Mon Apr 20, 2020 3:06 pm

    First start!  Without pictures it really never happened right?

    vanny
    vanny
    Moderator


    Number of posts : 14778
    Location : Ashburnham, MA
    Age : 65
    Registration date : 2012-09-22

    A-100 Project - Page 5 Empty Re: A-100 Project

    Post by vanny Mon Apr 20, 2020 6:06 pm

    Nice job! Triple Carb? Is that difficult to get everything working in synch? Sounds strong!!! Twisted Evil


    _________________
    “The future will soon be a thing of the past."

    http://public.fotki.com/Vintage-Vans/vintage-vans-es/ruff-diamond-1/?cmd=fs_slideshow
    66e100pu
    66e100pu


    Number of posts : 199
    Location : So-Cal
    Registration date : 2011-04-02

    A-100 Project - Page 5 Empty Re: A-100 Project

    Post by 66e100pu Mon Apr 20, 2020 9:18 pm

    All 3 carbs have custom bases.  The center carb has a normal idle circuit with mixture adjustment screws.  The 2 outer carbs have no idle circuit at all (but do have accelerator pumps) and are in effect, non-operational.  The progressive linkage runs the center carb to approximately 1/2 throttle.  Past 1/2 throttle the two outer carbs kick in from there to wide open throttle.  Because the outers come in later (higher rpm) the throttle response is crisp from idle to WOT, and yes, it does pull very strong.  This hemi is a fairly mild build, but is still putting out somewhere between 300 - 325 hp which is way more than enough for a street application.  Can't wait to actually get it road ready to put it through it's paces.  I will say that the power steering and brakes are an unbelievable improvement over the OEM set-up that it was born with.  So far I am very happy with how it's turning out, but as I've said before, it's only an A-100 in spirit (read that body) only.  With this level of modification comparisons to anything stock is meaningless.
    vanny
    vanny
    Moderator


    Number of posts : 14778
    Location : Ashburnham, MA
    Age : 65
    Registration date : 2012-09-22

    A-100 Project - Page 5 Empty Re: A-100 Project

    Post by vanny Tue Apr 21, 2020 3:27 am

    Fantastic work! I love seeing your progress...please keep the updates coming as you continue...this is a Great build to watch! Thanks for taking us along for the ride! cheers cheers cheers


    _________________
    “The future will soon be a thing of the past."

    http://public.fotki.com/Vintage-Vans/vintage-vans-es/ruff-diamond-1/?cmd=fs_slideshow
    66e100pu
    66e100pu


    Number of posts : 199
    Location : So-Cal
    Registration date : 2011-04-02

    A-100 Project - Page 5 Empty Re: A-100 Project

    Post by 66e100pu Fri Apr 24, 2020 3:06 pm

    A little wiring progress.......

    A-100 Project - Page 5 Img_2315
    66e100pu
    66e100pu


    Number of posts : 199
    Location : So-Cal
    Registration date : 2011-04-02

    A-100 Project - Page 5 Empty Re: A-100 Project

    Post by 66e100pu Sat Apr 25, 2020 8:29 am

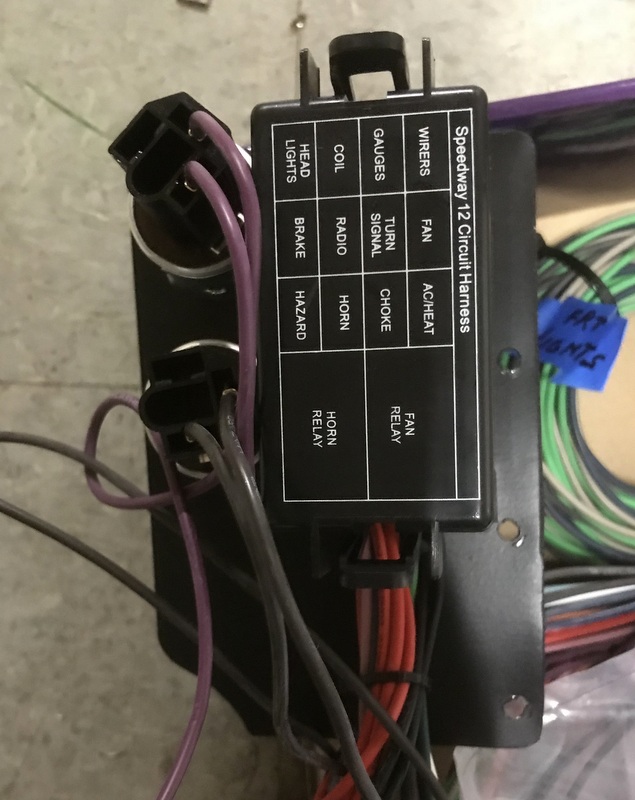
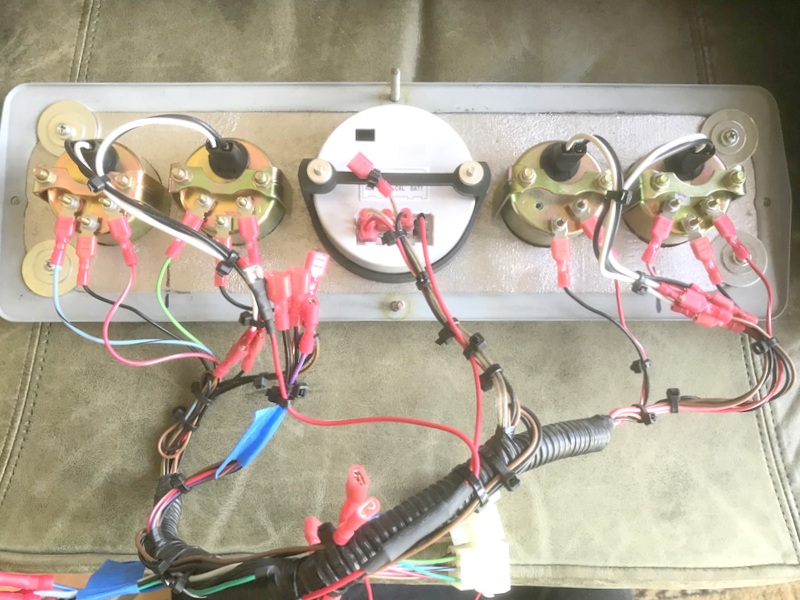
    Having rewired more than a few projects over the years, I've had the opportunity to use harnesses from EZ Wire, Painless, QuickWire, and Rebel.  All have had their pros and cons.  All will work depending on your comfort level with wiring.  I have a friend that ordered a Speedway 12 circuit harness for a project that was sold before completion and I took it off his hands for my project.  The quality is very good, the price is very reasonable, but the instructions are written for an absolute novice which may be helpful to those that want to tackle rewiring, but are worried about getting in over their head.  This is the link:  https://www.speedwaymotors.com/12-Circuit-Mini-Fuse-Universal-Hot-Rod-Wiring-Harness-Kit,2352.html
    If you scroll to the bottom of the listing, you'll find the instructions in a PDF.  They are the best I've run across and are as close to plug-n-play as you are going to get.

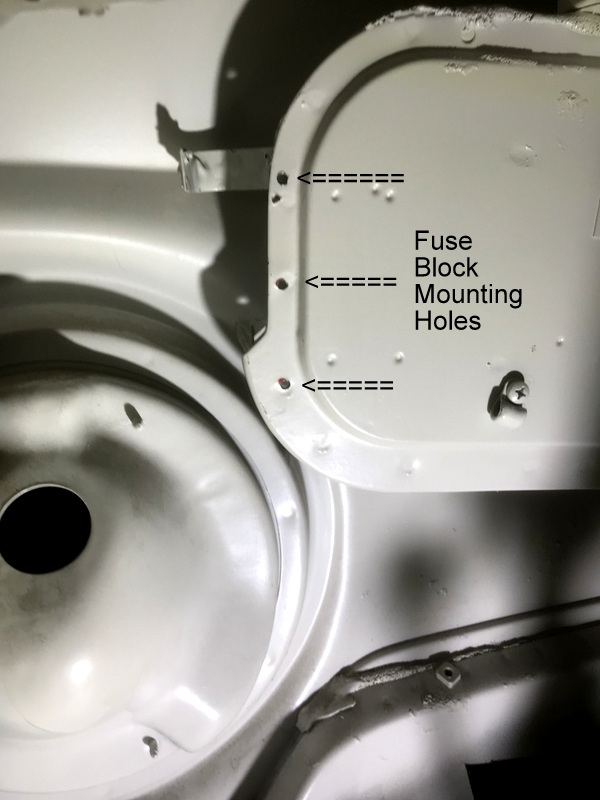
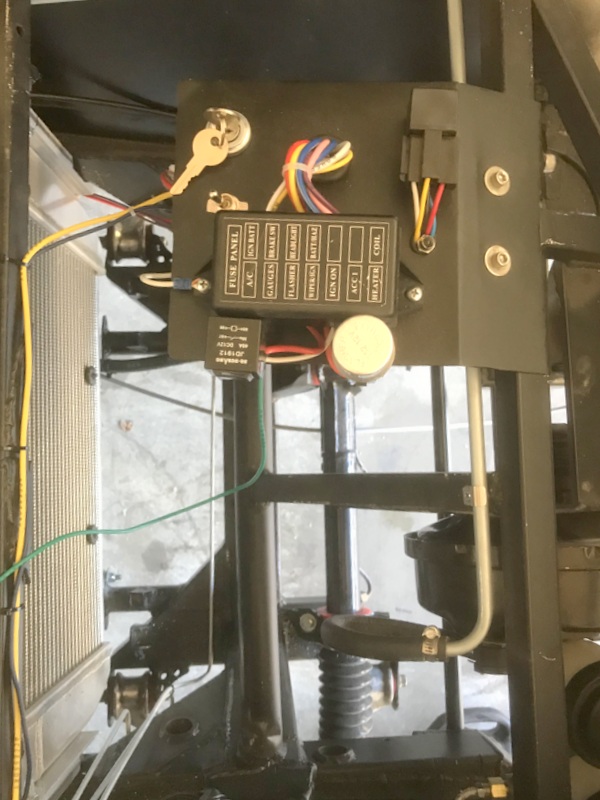
    I played around with several fuse block mounting locations, but in the end, the easiest place for mounting and access to the block was under the left side of the dash.  The fresh air/vent plenum is constructed with a fairly wide flange.  The flange provides a solid mounting and allows you to tuck the fuse block out of sight but easily accessible.  I just fashioned a mounting plate out of 18ga. steel and drilled the mounting holes.  Fast, easy, and functional.  I'll have to provide the actual install photos later.  I need to paint the interior before the harness gets installed.

    A-100 Project - Page 5 Img_2316

    A-100 Project - Page 5 Img_2317
    thebronc4019
    thebronc4019


    Number of posts : 25
    Location : Middletown, N.J.
    Registration date : 2019-06-17

    A-100 Project - Page 5 Empty Re: A-100 Project

    Post by thebronc4019 Sat Apr 25, 2020 9:46 am

    Your project is very nice. I am new to owning a van and to this site but not new to building cars. I recently started my ambitious project which will include bagging, tubbing, IFS front end and hidden hinges. I like the shots of the master cylinder and steering linkage and may ask for additional info when I get to that point. Nice Job!
    66e100pu
    66e100pu


    Number of posts : 199
    Location : So-Cal
    Registration date : 2011-04-02

    A-100 Project - Page 5 Empty Re: A-100 Project

    Post by 66e100pu Sat Apr 25, 2020 12:25 pm

    thebronc4019 wrote:Your project is very nice. I am new to owning a van and to this site but not new to building cars. I recently started my ambitious project which will include bagging, tubbing, IFS front end and hidden hinges. I like the shots of the master cylinder and steering linkage and may ask for additional info when I get to that point. Nice Job!

    Thank you for the kind words. Any hiccups along the way and I'll try to answer the questions that might come up the best I can. Reach out anytime!
    66e100pu
    66e100pu


    Number of posts : 199
    Location : So-Cal
    Registration date : 2011-04-02

    A-100 Project - Page 5 Empty Re: A-100 Project

    Post by 66e100pu Thu May 14, 2020 8:26 pm

    Been working on trying to put the tailgate back together from scratch!  Somebody thought it was a good idea to cut the original tailgate mounting structure out to install cut down "barn doors" from a van.  Not a look I was going for so tons of work ensue.  The replacement structure for the hinges is "L" channel 1/8'' thick with 3" legs.  With nothing to go by for reference except the hinge openings in a spare roll pan, lots of minor adjustments (with more to go) and frankly a good dose of luck have gotten it this far.  In the end it will work out fine, but this has eaten up about the most hours of any single modification to date - and that's saying something....


    A-100 Project - Page 5 A100bu10

    A-100 Project - Page 5 A100me10

    A-100 Project - Page 5 A100va10

    A-100 Project - Page 5 A100ta10
    savage
    savage


    Number of posts : 2632
    Location : Where Rust Never Sleeps in Ft Wayne IN
    Registration date : 2008-05-15

    A-100 Project - Page 5 Empty Re: A-100 Project

    Post by savage Fri May 15, 2020 4:46 am

    Wow bet that was a Lot of work . Looking Good
    66e100pu
    66e100pu


    Number of posts : 199
    Location : So-Cal
    Registration date : 2011-04-02

    A-100 Project - Page 5 Empty Re: A-100 Project

    Post by 66e100pu Sat May 16, 2020 9:57 am

    Finally got the panel gaps and body lines as close as they'll ever get.  Moving on to the hidden tailgate latches, fitting the support cables, and finishing up the bodywork to hopefully bring this very long chapter to a close.

    A-100 Project - Page 5 Img_2415
    66e100pu
    66e100pu


    Number of posts : 199
    Location : So-Cal
    Registration date : 2011-04-02

    A-100 Project - Page 5 Empty Re: A-100 Project

    Post by 66e100pu Mon Aug 17, 2020 5:27 pm

    It's time to start focusing on the smaller sub-assemblies as this project starts heading into body, paint, and final assembly.  I like to try and have all the sub-assemblies refurbished, bagged, and ready to go when it comes back from paint.  I'm usually a little burned out by then and the last thing I want to do is have all these minor items holding up putting it all back together.  Final assembly takes very little time if everything has been sourced new or refurbished, and trial fitted.

    I'm working on the doors and wanted to get the vent windows refinished so they are ready to go.  I used the seal kit offered by Steele and I can say, without a doubt, it is the best vent window seal kit I've ever used and I've done more than a few of all makes and models over the years.  The seals fit as they should.  The window opens and closes as it should.  Can't ask for much more than that.

    Disassembly is fairly self explanatory.  I just had to do some clean-up and light sanding before shooting the frames in semi-gloss black.  Before installing the main seal, the division bar seal needs to be riveted to the frame because the edges of the main seal overlap the division bar seal.  The only real trick to the seal installation is to start at the large "bend" at the bottom.  The seal needs to be fully seated in the bend or the two remaining "tails" of the seal will be too long to fit properly.  After fitting the large "bend" go to the top and fit the small "bend" so it is fully seated.  The rest of the install just presses in easily.  Any stubborn areas can be handled with a Popsicle stick - not a screwdriver.

    A-100 Project - Page 5 A100pi10

    A-100 Project - Page 5 A100pi11

    A-100 Project - Page 5 A100pi12
    66e100pu
    66e100pu


    Number of posts : 199
    Location : So-Cal
    Registration date : 2011-04-02

    A-100 Project - Page 5 Empty Re: A-100 Project

    Post by 66e100pu Mon Aug 17, 2020 5:31 pm

    A-100 Project - Page 5 A100pi13

    A-100 Project - Page 5 A100pi14

    A-100 Project - Page 5 A100pi15

    Reimported your pics at 640 pixels so that they wouldn't get cut off...Vanny

    gary h likes this post

    66e100pu
    66e100pu


    Number of posts : 199
    Location : So-Cal
    Registration date : 2011-04-02

    A-100 Project - Page 5 Empty Re: A-100 Project

    Post by 66e100pu Sun Dec 06, 2020 8:34 pm

    Had to do a slight modification to get rid of the fuel filler hole.....

    A-100 Project - Page 5 Img_2721

    A-100 Project - Page 5 Img_2722

    A-100 Project - Page 5 Img_2720
    66e100pu
    66e100pu


    Number of posts : 199
    Location : So-Cal
    Registration date : 2011-04-02

    A-100 Project - Page 5 Empty Re: A-100 Project

    Post by 66e100pu Sun Dec 06, 2020 8:49 pm

    The brakes were driving me nuts.  Used the stock booster from an '88 Corvette with a new, not rebuilt master cylinder.  Always had fluid leaking from the seals between the reservoirs and the body of the master.  Also could never get a rock hard pedal and it had too much travel.  Bought another new master and the same result.  Finally gave up and went with an 'ol skool Corvette style 1" bore master.  No leak, hard pedal, and full lock-up at half pedal travel....go figure?  New Corvette master is about $250, old style is $89.  Sometimes you don't get what you pay for!

    A-100 Project - Page 5 Img_2319

    A-100 Project - Page 5 Img_2910

    dix likes this post


    Sponsored content


    A-100 Project - Page 5 Empty Re: A-100 Project

    Post by Sponsored content


      Current date/time is Fri Oct 18, 2024 4:27 am