


Looking good Matt!!!! What are you going to do for the doghouse,modify the original or put a second gen in? Have you welded the battery cover floor in yet?
+19
Lyrad
pan58head
whopman
organ grinder
Digz
dix
sandyvan
ScottyJones
uncle ron
austinmodhouse
dodge man
wideload
Admin
Nightmoves
HandiVanMan
Camaro Addict
maybee
Big W
mbasaraba
23 posters
Welcoming a new member to our home...

wideload- Moderator 1st Class

- Number of posts : 1388
Location : Kevil, Kentucky
Age : 70
Registration date : 2008-05-11
_________________
Mike
WIDELOAD
https://vintage-vans.smugmug.com/Chevy-GMC-Vans/Wideloads-65-66-67-68/i-CK5s29s

mbasaraba- Number of posts : 823
Location : North Central Alabama
Registration date : 2009-01-08
Going to be a completely custom dog house. I am waiting on the battery box since I am going to build a tray for 2 batteries.

dodge man- Number of posts : 2036
Location : ohio
Registration date : 2012-08-08
very nice, looks like fuel injections going on top the intake.
mbasaraba- Number of posts : 823
Location : North Central Alabama
Registration date : 2009-01-08
Yep it is TBI. Cant wait.
We got the motor and tranny set in the van but we need to spacer the cross member for the motor and tranny down about 2 inches for the 700 to fit properly.
So far so good. Hopefully tomorrow when I get home from work we can get it mounted in.
We got the motor and tranny set in the van but we need to spacer the cross member for the motor and tranny down about 2 inches for the 700 to fit properly.
So far so good. Hopefully tomorrow when I get home from work we can get it mounted in.
dodge man- Number of posts : 2036
Location : ohio
Registration date : 2012-08-08
really nice, cant wait to see more pictures
sandyvan- Number of posts : 526
Location : San Diego, CA
Registration date : 2011-03-13
Man, you've been busy!! It looks like someone already cut in an air tunnel for the doghouse. Or is that part of your custom doghouse?
Watch out for that e brake post!
Watch out for that e brake post!
mbasaraba- Number of posts : 823
Location : North Central Alabama
Registration date : 2009-01-08
There was a tunnel already in the van but I am going to be redoing it some. The new heater / AC will be installed over the tunnel but under the new counsel that will run to the bottom of the dash.
I am sure it will be a lot clearer after I get this motor mounted and can start framing it out.
We had a bit of a struggle mounting the motor to the crossmember. Cant use the original I6 towers to connect and the towers from the 3rd Gen are too tall also.
I bought new motor mounts, $8 each at Advanced. We lined up the mount to the cross member and drilled a hole to act as a pivot. We then changed out the tranny mount from the TH350 to the 700R4 and mounted the tranny mount to the bottom of the 700. This should give us proper alignment of the tranny to the rear end at that point and then we can square the motor mounts to the original bolting holes from the I6.
It was very interesting to see how much weight shifted BACK on this motor. On the I6 there was almost 16 inches from the motor mount to the balancer on the crank. On the 350 that was reduced to 7.5 inches. It is nice to know the center of that weight will be moved back some.
Still need to figure something out for the Radiator. The I6 will be too small I think and the 3rd Gen is much too wide. I am able to gain about 3 inches towards the passenger side so that I can move it forward past the master cylinder. I am going to get some measurements for height and width after I get the motor placement finalized.

dix- Moderator 1st Class
- Number of posts : 8731
Location : pittsburgh pa
Age : 66
Registration date : 2008-05-29
Matt i hope you paint the calipers and roror centers to show off the work. 
_________________
still vannin since 1974
mbasaraba- Number of posts : 823
Location : North Central Alabama
Registration date : 2009-01-08
I havent since I dont have the paint for the body yet. When we get it I plan on shooting the calipers also. The will be the same Burnt Orange color as the two tone color.
I got some exciting news last night. Found out that my Dad has a set of ET Mag rims from the late 60s that will fit our Sporty. They have some big MEATS on them, they used to be on my brothers 65 Dodge Cornet 440 2 door hardtop. I didnt think they would fit but he said they are the kind that were universal with all the bolt patterns made into them. They are 1500 miles away but they are going to bring them down in May when they come for JR's graduation. We are PUMPED!
I got some exciting news last night. Found out that my Dad has a set of ET Mag rims from the late 60s that will fit our Sporty. They have some big MEATS on them, they used to be on my brothers 65 Dodge Cornet 440 2 door hardtop. I didnt think they would fit but he said they are the kind that were universal with all the bolt patterns made into them. They are 1500 miles away but they are going to bring them down in May when they come for JR's graduation. We are PUMPED!
mbasaraba- Number of posts : 823
Location : North Central Alabama
Registration date : 2009-01-08
Motor is in and wired! I have to get a new temperature sensor for the front of the intake since I broke it and accidently broke some kind of vacume port right behind the distributor.
Started working on trying to work on the steering column but it is a bear and after 10 hours in the shop today I needed a serious break.
Took some pictures but they are on the phone. Will get them posted tomorrow.
Started working on trying to work on the steering column but it is a bear and after 10 hours in the shop today I needed a serious break.
Took some pictures but they are on the phone. Will get them posted tomorrow.
mbasaraba- Number of posts : 823
Location : North Central Alabama
Registration date : 2009-01-08

I worry the alternator and AC pump will be too high and wide. The mounting bracket for both is a HUGE chunk of steel but not sure how else to do it.
I left the power steering pump on and just looped the hose so that it will recycle fluid. I left this on so that it uses the standard serp belt that came on the van.
Would it be a good idea to try finding a way to mount the AC and Alternator like an older 350 version?
dodge man- Number of posts : 2036
Location : ohio
Registration date : 2012-08-08
check out march performance pullys, they have all kinds of brackets to clean up the front of the engine,
mbasaraba- Number of posts : 823
Location : North Central Alabama
Registration date : 2009-01-08
I checked out their site but there are no prices (which is scarey) and no ordering online.
dodge man- Number of posts : 2036
Location : ohio
Registration date : 2012-08-08
they are pricey, you would need to call them, everything is billit aluminum and you would need a sanyo compressor, you might want to make up your own brackets, but that would be a job to get everything straight,

Digz- Number of posts : 3794
Location : United States Six Lakes MI
Registration date : 2008-05-17
Most of the March and several others have listings in Summit or Jegs for $$$ references
mbasaraba- Number of posts : 823
Location : North Central Alabama
Registration date : 2009-01-08
Someone recommended I test fit the 1st Gen DH over to compare the width. Jr and I put it over and while it wouldnt even come close to clearing the exhaust manifolds (which I knew it wouldnt) it just BARELY rubbed on the alternator and AC pump hose.
Think I will leave it AS IS and build my DH around it. Going to start framing it out with 1" angle iron and tubing.
Think I will leave it AS IS and build my DH around it. Going to start framing it out with 1" angle iron and tubing.
mbasaraba- Number of posts : 823
Location : North Central Alabama
Registration date : 2009-01-08
Ok so today I am trying to work on the brakes. I did the front disc conversion and dual master upgrade. I got all the steel lines that Don had listed.
The Armored lines are great, they are made to be able to bend/form by hand. I have a bender but this will make it easier to get them exactly where I want them as I put them on.
I got THIS Proportioning Valve but not exactly sure how this is supposed to work.
I got the short line on the MC. Does the valve go on the end of that line then put the 2lbs residual valve next then the lines to the front?
The back lines run run straight off the MC?
Does it matter what port of the MC goes to front and which to back?
mbasaraba- Number of posts : 823
Location : North Central Alabama
Registration date : 2009-01-08
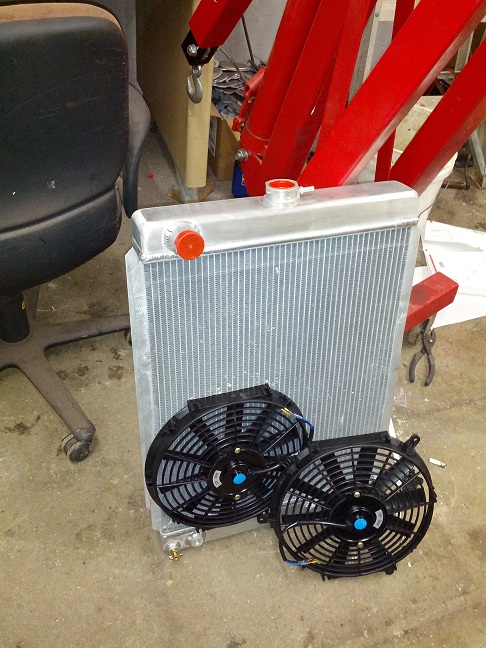
Got my radiator and 2 -12" fans today. Crappy the fans didnt come with the mounting cables to go through the radiator.

organ grinder- Number of posts : 149
Location : Wisconsin
Registration date : 2008-10-11
That cooling system looks SWEET! Might want to reconsider mounting the fans with the cables as they tend to loosen up under vibration and can puncture a hole in the cooling tubes. I'm sure with your skills you could fab up a mounting bracket which would be stronger and act as a shroud. This pic is for 12 inch fans.
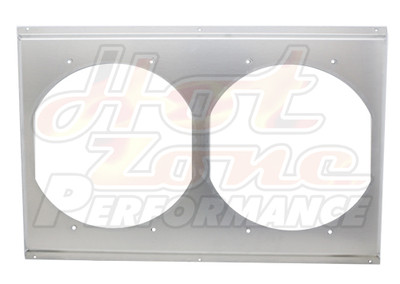
OG
OG
mbasaraba- Number of posts : 823
Location : North Central Alabama
Registration date : 2009-01-08
Yeah it is times like this I wish I hadnt sold my CNC Plasma. I could have designed and cut something in a couple of minutes, now it has become an ordeal to do anything.
I plan on getting another torch and I could draw it on and cut it by hand, I just worry how good it would look.
I plan on getting another torch and I could draw it on and cut it by hand, I just worry how good it would look.
mbasaraba- Number of posts : 823
Location : North Central Alabama
Registration date : 2009-01-08
Something like this? Threw this together today...

mbasaraba- Number of posts : 823
Location : North Central Alabama
Registration date : 2009-01-08
I should mention that is bolted to the radiator not welded to it. 
wideload- Moderator 1st Class
- Number of posts : 1388
Location : Kevil, Kentucky
Age : 70
Registration date : 2008-05-11
Looking good Matt!!!!! That should work good.
_________________
Mike
WIDELOAD
https://vintage-vans.smugmug.com/Chevy-GMC-Vans/Wideloads-65-66-67-68/i-CK5s29s
mbasaraba- Number of posts : 823
Location : North Central Alabama
Registration date : 2009-01-08
Thanks Mike.
I went out and got the radiator mounted on the bottom. The top will mount to the tunnel frame.

I went out and got the radiator mounted on the bottom. The top will mount to the tunnel frame.
mbasaraba- Number of posts : 823
Location : North Central Alabama
Registration date : 2009-01-08
Need some advice. I got the radiator mounted where it will go but now have to think about connecting water pump to the outlet on the radiator. It will be a bit of an odd angle but I do have plenty of room to put a hose in.
Anyone used a kit like this or comparable?
Flexible Radiator Hose
Anyone used a kit like this or comparable?
Flexible Radiator Hose


|
|
|