VintAGE-Vans

Would you like to react to this message? Create an account in a few clicks or log in to continue.

BRINGING IT ALL TOGETHER.... A's, G's & E's


5 posters

    V8 Engine Swap, by Hellfish

    EconoCarl
    EconoCarl


    Number of posts : 1109
    Location : Beaumont, TX
    Registration date : 2008-05-19

    V8 Engine Swap, by Hellfish  Empty V8 Engine Swap, by Hellfish

    Post by EconoCarl Wed Jan 26, 2011 12:58 pm

    Ran across this on the H.A.M.B.
    It's all the stuff we've been hearing about, in one place: Hellfish's V8 Engine Swap

    avatar
    gmp


    Number of posts : 18
    Location : Thornton,CO
    Registration date : 2011-01-06

    V8 Engine Swap, by Hellfish  Empty Re: V8 Engine Swap, by Hellfish

    Post by gmp Wed Jan 26, 2011 9:46 pm

    this is great give's me lots of ideas for my own frankenstien econo
    Casimier
    Casimier


    Number of posts : 864
    Location : Jackson,NJ
    Registration date : 2010-07-26

    V8 Engine Swap, by Hellfish  Empty Re: V8 Engine Swap, by Hellfish

    Post by Casimier Fri Jan 28, 2011 1:33 pm

    Hey Carl
    Thanks for posting this article. Thanks Hellfish.
    I'm about to plop in a 300 six out of an old F150 into my 66 vanup.
    Dropping the motor to a dolly and rolling it out from underneath, while the vanup is raised sounds very easy. Question though....when you install the new motor... do you do this process in reverse?....Using the engine crane to lift and then hold up the engine while you get under the vehicle to bolt up the cross member?
    avatar
    Old Skool
    Econoline Guru


    Number of posts : 1306
    Location : North Hills, CA
    Age : 72
    Registration date : 2009-06-13

    V8 Engine Swap, by Hellfish  Empty Re: V8 Engine Swap, by Hellfish

    Post by Old Skool Fri Jan 28, 2011 10:16 pm

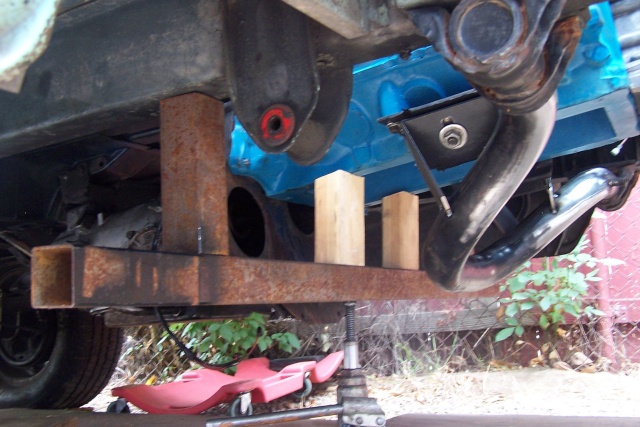
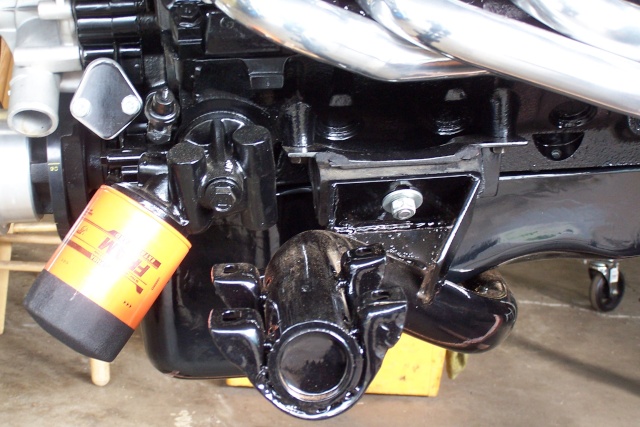
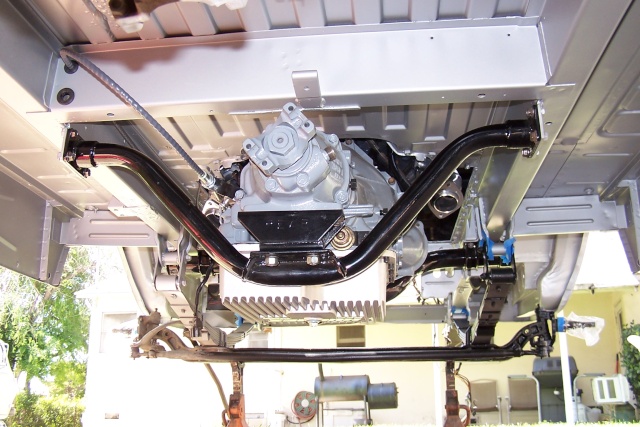
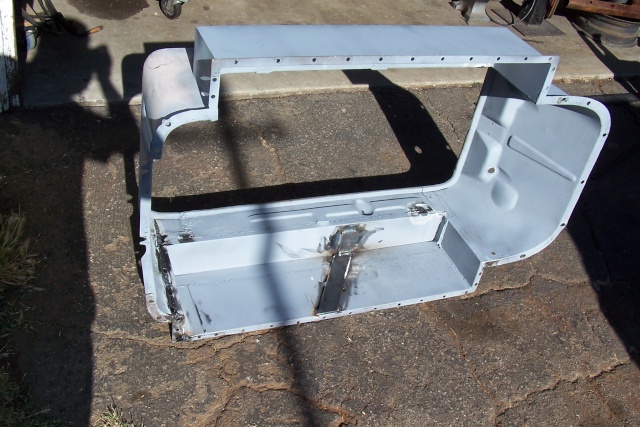
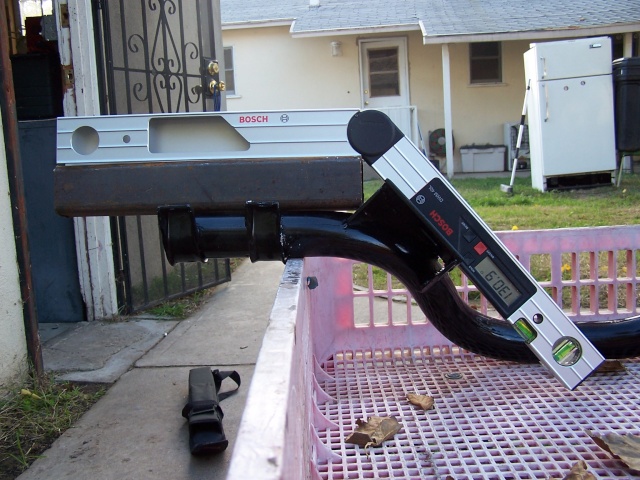
    The pics of the cross members were my pictures,,,, and the short cross over bar is the big six one, the longer of the two the small six. Personally, I found the stock 240 towers too high and not the exact same angle as the small block V8's, and also found the 351W mounts to be larger than the 302's but still bolt in, so I make the engine pads on my cross members to fit the larger mounts. (pictures of the mounts a also) Also, found by using two different yr mounts with lefts and rights, I can then get the studs in line with each other, which makes the towers sit like each other and better. The engine cylinder pattern puts one mounting location for the mounts in a different position on the engine, when you measure from bell housing to engine mount holes on the block itself, same strong points of the block itself. I have detailed pictures of the differences if anyone would like them??? Also, a showing a digital measuring angle finder showing the correct mount angles.
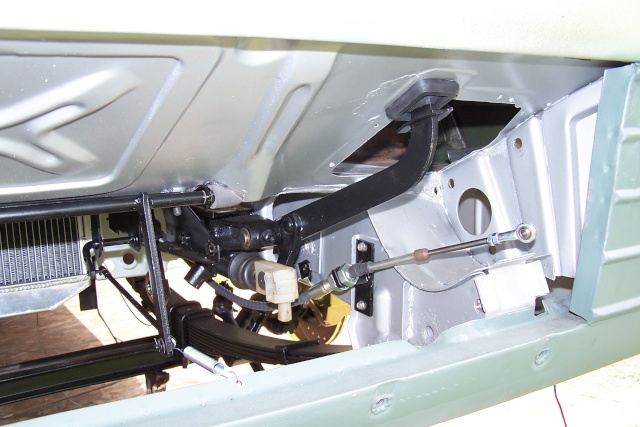
    Also, have been using for years what I think is an easier way to pull engines in the pickups. Very easy to make one out of scraps. It assembles inside the truck in pcs, made out of pipe and angle iron. The angle iron pads can slide back and forth on the floor board for fine tuning back and forth, its easy. The support pcs are nothing more than a two short vertical pc of water pipe, (one for each side of course,, LOL) with a short (6") pc of larger diameter pipe welded on top at a right angle to the floor sliders. You simply slide a cut pc of pipe inside each of the two (6") pcs on each of the two vertical supports. I welded nuts into mine to put a bolt into to tighten them down,, (NEVER USE THEM) A Welded tab in the center and on the bottom (LOL),,,, of the cross pipe. You don't have to worry about scratching anything with a cherry picker or having to re install the right front door and realigning it. ( I also used it to find and hold the perfect front position of the engine when making the new V8 towers).
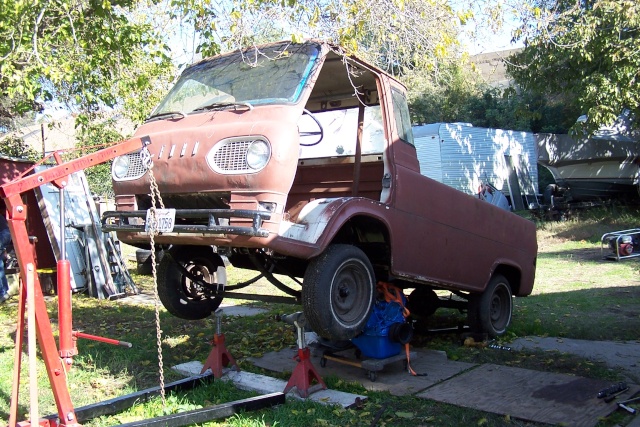
    For the sixes in and out, its too easy on a pc of plywood with the engine on its side, slide it out or in under the truck, lift it up or down. Easy up and in, hold in position Once it gets past the side of the truck its home free. Way too easy, way too inexpensive,,, works like a charm. Again, detailed pictures for those who would like them??? On either, I simply use the cherry picker to lift the front of the truck in the air, too easy,,, pics of that one also, on a 351W I put in a 62 five wndw with an AOD.
    I also, put together for the people who want to make their own cross cross members, detailed pictures of how I do it.
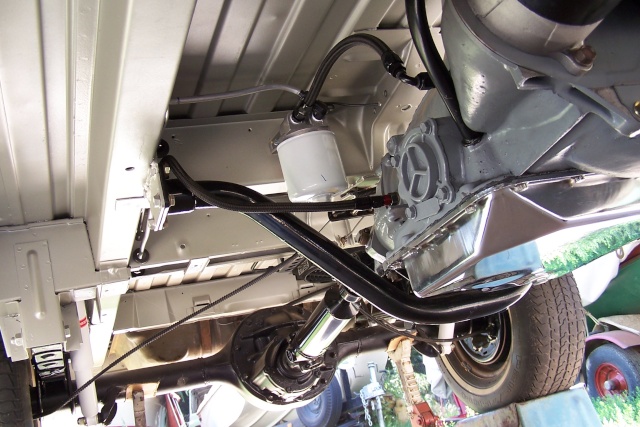
    TO ME, its ALL ABOUT CRANK SHAFT CENTER LINE to measure your drive shaft angles, center of the front of the truck and the trans end of the truck, it all runs off of the center line. Using it, you cant miss getting any engine to sit EXACTLY where it needs to be.
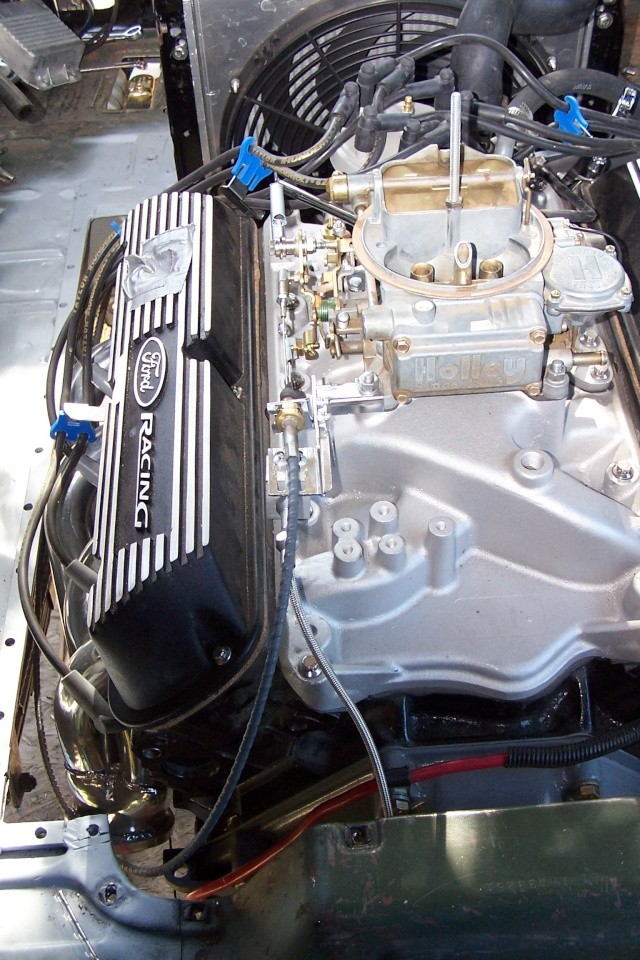
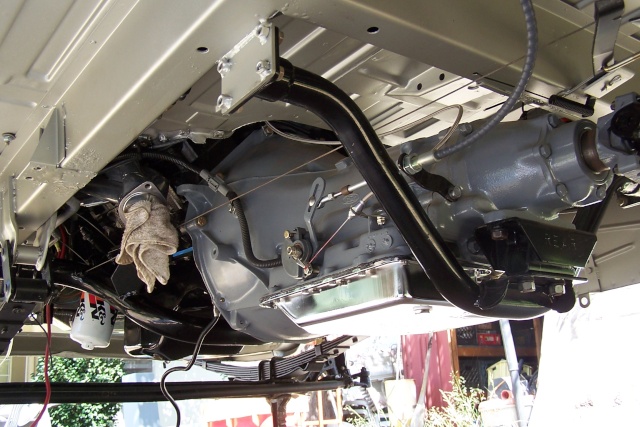
    MOST all intakes have an angle built into them to set the floats in the carbs from flooding , if you look at either of our six cylinders, you will see an angle in them so the carb will sit correctly, same with V8 intakes, its built in on purpose to allow the engine to be mounted at an angle. So when I set them up in ours, I copy the factory drive line angle using the center line again to copy it on the new tower height. When the center line of the crank is extended out the tail stock of the tranny and that drive shaft angle is correct, it AUTOMATICALLY gives you the front engine height when you pivot off of the transmission mount. If using my tranny cross member, it is still the same because you have set the trans height as well as the drive line angle, which only leaves ONE position for the front of the motor. if you set that angle correctly, the front height can only be in one point. I feel using it to set the intake angle AVOIDS any problems with how accurately I set the level of the truck floor, even if it is setting on the frame and NOT on the axles as the springs then would be involved in the settings. This way, it is EXACTLY as the factory set ours up as.
    If anyone would like pics in detail of how to set up your own cross member, I can send them no problem to your mail address, would love to post them here, but still not working for me,,,,,sorry.....
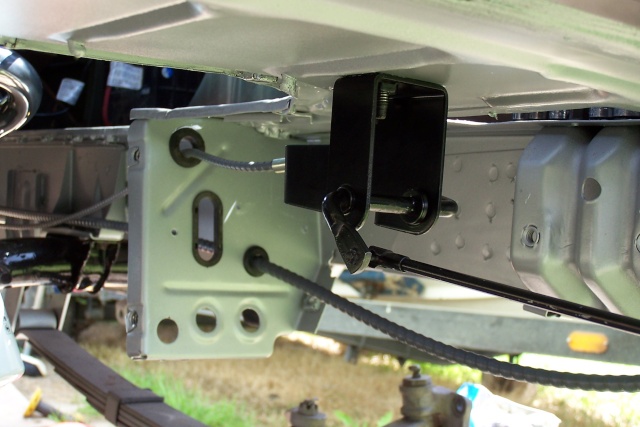
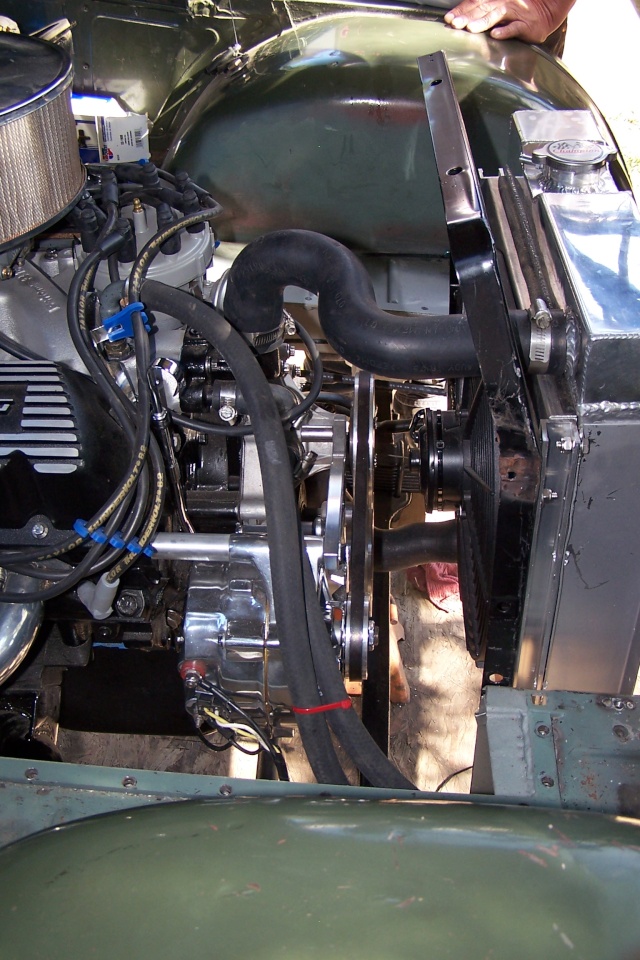
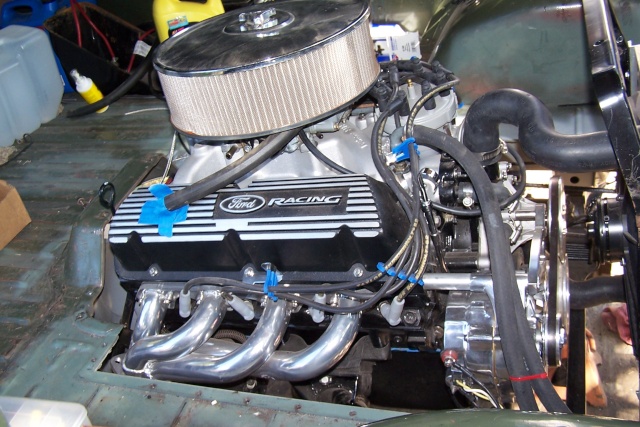
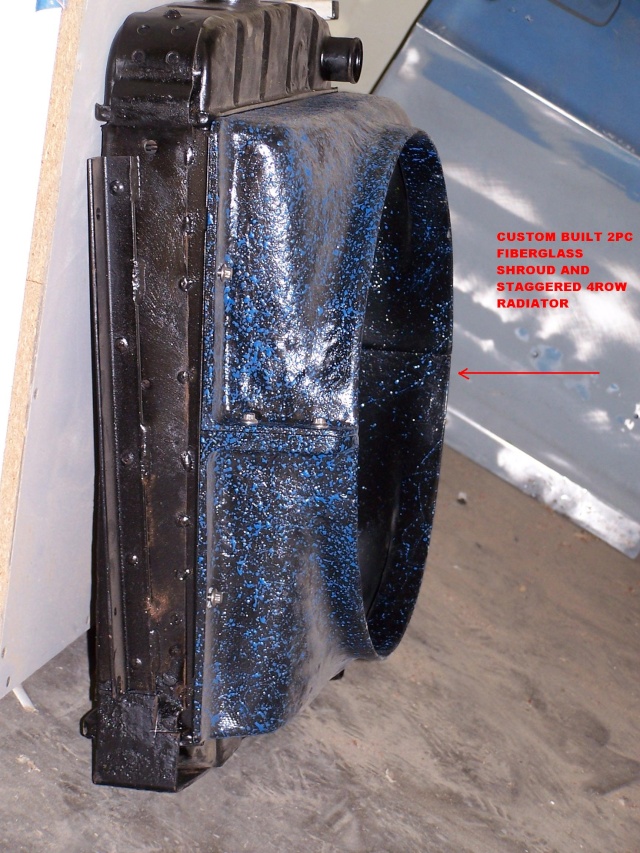
    I forgot how or where, but there were some pics posted for me that show my latest 351W setup using a C6 and the short tail stock I put on it...
    vic
    EconoCarl
    EconoCarl


    Number of posts : 1109
    Location : Beaumont, TX
    Registration date : 2008-05-19

    V8 Engine Swap, by Hellfish  Empty Re: V8 Engine Swap, by Hellfish

    Post by EconoCarl Sat Jan 29, 2011 4:16 pm

    V8 Engine Swap, by Hellfish  Thread11

    avatar
    Hellfish


    Number of posts : 146
    Location : Chicago, IL
    Registration date : 2011-03-01

    V8 Engine Swap, by Hellfish  Empty Re: V8 Engine Swap, by Hellfish

    Post by Hellfish Tue Mar 01, 2011 7:22 am

    Hi! I just found this forum. That was my article posted on the HAMB, so feel free to ask questions. I can re-post it here so you don't have to link to another site to read it, if you want.

    Joe
    EconoCarl
    EconoCarl


    Number of posts : 1109
    Location : Beaumont, TX
    Registration date : 2008-05-19

    V8 Engine Swap, by Hellfish  Empty Re: V8 Engine Swap, by Hellfish

    Post by EconoCarl Tue Mar 01, 2011 8:08 am

    Welcome to this site Joe!

    Please do post your article on this site. There are a number of headings you can post it to (E Vans General Discussion, Between the seats E, This is how it's done, or even attach it to ths thread). Just choose a place and have at it!
    avatar
    Old Skool
    Econoline Guru


    Number of posts : 1306
    Location : North Hills, CA
    Age : 72
    Registration date : 2009-06-13

    V8 Engine Swap, by Hellfish  Empty Re: V8 Engine Swap, by Hellfish

    Post by Old Skool Tue Mar 01, 2011 10:10 am

    Joe,,, VERY nice article and well detailed. I also make the cross members and yours look very close to what I use. Fred, Sean and Eugene all friends. In mine I use the crank shaft center line to set the drive line angle as well as to set the motor exactly straight, front to back. Using the persons cross member and or supplying a core here. I have been able to get the powder coating down to $75. Also, by using a combo of motor mounts, I was able to get the studs parallel with each other, and I designed the slotting to set the motor exactly in the center of the truck automatically when it sets down, as well as slotted high enough for them to just set in place without juggling the engine. In the picture you can see the angle that the engine mounts are at.
    In addition to the engine cross members I make transmission cross members also, as I found the after market ones to not have enough drop.
    I sell an extended length throttle cable that bolts up to the 240 gas pedal and makes it really easy, as well as a shift rod to cable conversion for the automatics and the angled oil filter adapters. A note on the adapters, as Ford does not list a replacement o ring for it and they are usually trashed, in I supply a new one that I finally located, as well as use a copper seal for the bolt.
    In this conversion, he is using the Champion aluminum radiator, and so far I have my doubts, as I would have preferred it to be the full length that the 240 radiators have and the find their fan very weak, although the shroud fit very nicely. Also, by using the Motor-sports short water pump, it really gained a lot of room for whatever fan combo. In the other conversion I am doing also, I had a 4 row 240 radiator built, as I preferred the longer dimension and more cooling, as well as it can be serviced and or repaired. I just threw away an aluminum, as it was knicked and not leaking, but no good to run in the long run.
    When I mounted the dog house, I used 1" by 1/4" metal to bring the floor height back up to flush for a nice fit and welded 5/16th nuts under neath for the bolts to go into. Also, welded in a metal strap from the seat mount back and down to the floor for added strength in case of an accident, so that it cant pull the mount out of the doghouse. Same idea as a seat belt setup.
    Also, in the pics see a lift that I threw together out of scrap pipe for lifting the engine in a pickup, as I found it a hassle to re set the front door, and or avoid hitting and scratching anything by putting the engine in that way, have been using it for years. It assembles inside and easy to use.
    vic


    V8 Engine Swap, by Hellfish  100_1213

    V8 Engine Swap, by Hellfish  100_1313

    V8 Engine Swap, by Hellfish  100_0915
    V8 Engine Swap, by Hellfish  100_0916

    V8 Engine Swap, by Hellfish  100_1127
    V8 Engine Swap, by Hellfish  100_1128

    V8 Engine Swap, by Hellfish  100_1129

    V8 Engine Swap, by Hellfish  100_1131

    V8 Engine Swap, by Hellfish  100_1214
    V8 Engine Swap, by Hellfish  100_1215
    V8 Engine Swap, by Hellfish  100_1216

    V8 Engine Swap, by Hellfish  100_1217

    V8 Engine Swap, by Hellfish  100_1218
    V8 Engine Swap, by Hellfish  100_1219

    V8 Engine Swap, by Hellfish  100_1220

    V8 Engine Swap, by Hellfish  100_0610

    V8 Engine Swap, by Hellfish  000_0410

    avatar
    Old Skool
    Econoline Guru


    Number of posts : 1306
    Location : North Hills, CA
    Age : 72
    Registration date : 2009-06-13

    V8 Engine Swap, by Hellfish  Empty Re: V8 Engine Swap, by Hellfish

    Post by Old Skool Tue Mar 01, 2011 10:20 am

    Joe,,, Not a big deal however,, the pictures of the cross members in the wheel barrow are mine that you are using.
    vic
    avatar
    Hellfish


    Number of posts : 146
    Location : Chicago, IL
    Registration date : 2011-03-01

    V8 Engine Swap, by Hellfish  Empty Re: V8 Engine Swap, by Hellfish

    Post by Hellfish Tue Mar 01, 2011 11:04 am

    Sorry, Vic. I couldn't remember where I got them from. I had been compiling notes and photos for years on doing the conversion befroe I ever completed it. I can go back and edit it, if you like. You certainly deserve credit. I learned a lot from you on the Yahoo group.

    As for the aluminum radiator in mine, I don't know what the brand is, but it seems to be doing well. It's the size of the 170/Mustang radiator, I think. I drove it around with temps in the upper 80s and so far no problem. It never got above 180. I don't have a shroud, but the fan takes up nearly the entire surface area. I'm running a PO fabricated air dam/belly pan and I extended the dog house sides and am using ceramic coated headers, which should all help (a little) to keep temps down. I'll have to let you know how it does this summer.
    avatar
    Old Skool
    Econoline Guru


    Number of posts : 1306
    Location : North Hills, CA
    Age : 72
    Registration date : 2009-06-13

    V8 Engine Swap, by Hellfish  Empty Re: V8 Engine Swap, by Hellfish

    Post by Old Skool Tue Mar 01, 2011 11:30 am

    Joe,, THANK YOU,, its no big deal at all, and you're detail is great!! like someone else I know?? LOL.. The radiator is the one on Ebay, and if the customer had not already purchased it, I would not have used it. It is a four row, however, and reversing the mounting was easy using a u channeled pc of aluminum. That way there are bolts on each side, and not going through the channel as it would tend to squash it and come loose in the long run.
    Its a personal opinion I guess, but, the four row 240 is about 6" longer, which will add a lot more surface area over the shorter four row aluminum.
    Recently, I had talked to the Champion reps at the Mopar meet, and when I mentioned the fan CFM seemed very little or none!!!! they agreed and also said they had been having a few other complaints about it also. This one has not overheated in the shop, but I also install a remote fan cooled transmission cooler to help the load factor anyways.,
    In my thinking and in my opinion only,, the belly pan is a band aid to try and solve a radiator problem, so I do all of my work not using it. It only adds cooling when the truck is moving, and does nothing while in stop and go in the heat of Summer. If I can get it to cool correctly before hand, then when its installed it can only be better,,,, just my thinking on it.
    Here is a pic of the four row I have for sale right now, its shorter in height than the 240, and I hand made a two piece shroud for it. I made the blank out of some foam and glassed over it to make it.
    Thnx for the compliments, and no sweat on the pics. More if you need them. credit appreciated if you can.
    vic

    V8 Engine Swap, by Hellfish  100_0010
    avatar
    Hellfish


    Number of posts : 146
    Location : Chicago, IL
    Registration date : 2011-03-01

    V8 Engine Swap, by Hellfish  Empty Re: V8 Engine Swap, by Hellfish

    Post by Hellfish Tue Mar 01, 2011 12:28 pm

    here's my radiator

    V8 Engine Swap, by Hellfish  IMG_1158

    Sponsored content


    V8 Engine Swap, by Hellfish  Empty Re: V8 Engine Swap, by Hellfish

    Post by Sponsored content


      Current date/time is Sun May 19, 2024 5:29 pm