


A lot of people would call us crazy for even attempting to keep these vans running...but then again, they've probably never experienced the joy of driving these earlies and all the fun they're missing out on. Keep picking away at it and be Happy that you've got access to Don and all the other knowledgeable people on this site who are more than willing to lend a hand or provide valuable information!!! EARLY'S RULE 
+32
Space Truckin
gfleduc
dutchman101
sweetvan
retrogeek
SteelyVan
OutofSight
divisionbrewing
66BC
GMman
whalemstr
uncle ron
richie61
busman78
kaz
BILLS66
jrdunn96
Zuffen
Seth G
Denton
Rick's 66 Chevy Van
savage
samsvan
Russell
Vantasia
VANagain
vanny
JackeFriend
uante
Digz
Big W
donivan65
36 posters
GMC Jacke's van

vanny- Moderator
- Number of posts : 14775
Location : Ashburnham, MA
Age : 65
Registration date : 2012-09-22
_________________
“The future will soon be a thing of the past."
http://public.fotki.com/Vintage-Vans/vintage-vans-es/ruff-diamond-1/?cmd=fs_slideshow

JackeFriend- Number of posts : 940
Location : Soap Lake WA
Age : 65
Registration date : 2016-05-06
vanny wrote:A lot of people would call us crazy for even attempting to keep these vans running...but then again, they've probably never experienced the joy of driving these earlies and all the fun they're missing out on. Keep picking away at it and be Happy that you've got access to Don and all the other knowledgeable people on this site who are more than willing to lend a hand or provide valuable information!!! EARLY'S RULE

I hope I look this good when finished!~
donivan65- Governor

- Number of posts : 12220
Location : San Diego, California
Registration date : 2008-05-12
one step at a time,,,,,,,like on the connectors on the new turn signal switch,,,,,,,to unplug the wires so you can run them into the steering column you stick the tool, or a paper clip on top of them to push down that finger that holds them in,,,then the wire slides out of the connector,,,you bend the finger back up to snap the wire back into the connector,,,,,,,however,,,,pulling out all those wires and remembering where each slot the wire has to go to aint gonna do you any good,,,,,they cut the other connectors off under the dash,,,,,,I think you will probably just have to cut those connectors off leaving 2 inches of wire on them so you, or someone else can use them,,,,,,,,

JackeFriend- Number of posts : 940
Location : Soap Lake WA
Age : 65
Registration date : 2016-05-06
donivan65 wrote:one step at a time,,,,,,,like on the connectors on the new turn signal switch,,,,,,,to unplug the wires so you can run them into the steering column you stick the tool, or a paper clip on top of them to push down that finger that holds them in,,,then the wire slides out of the connector,,,you bend the finger back up to snap the wire back into the connector,,,,,,,however,,,,pulling out all those wires and remembering where each slot the wire has to go to aint gonna do you any good,,,,,they cut the other connectors off under the dash,,,,,,I think you will probably just have to cut those connectors off leaving 2 inches of wire on them so you, or someone else can use them,,,,,,,,
Yes, I see your point. I will do so, and work toward the connecting of the cut wires that exist from the previous turn signal change. In the meanwhile the placement of the turn signal will hold the wheel in place, so I do not have the play. Until I get the wires connected I can still use the turn signals in there now! Like you said "one step at a time". I guess I am learning to Slow down and work smarter... Thank very much for your wisdom and labor!
donivan65- Governor
- Number of posts : 12220
Location : San Diego, California
Registration date : 2008-05-12
,,,,well lady,,,,,,,if you can survive getting your face almost burnt off from pouring gas down the carburetor while trying to start the van, hooking up wires is surely safer,,,,,but you need to hold that bearing down with a stock steering wheel or put some kind of bushing or washers on the shaft so that the small steering wheel presses down on it,,,,,,,here is a REAL turn signal connector,,, the 2 from the switch go into a dual connector under the dash,,,,,how about pull that wiring down that is above the clutch and see how they connected your switch into the wiring loom,,,,,,soldered,,,,butt, spade, bullet connectors,,,,,,wire nuts,,,,just twisted?????

JackeFriend- Number of posts : 940
Location : Soap Lake WA
Age : 65
Registration date : 2016-05-06
Okay, I can do that! I know that bunch of wires... Rich and I pulled them down to research colors...
I have the original steering wheel, but need some fixin' to use it... kinda like yours LOL
I have the original steering wheel, but need some fixin' to use it... kinda like yours LOL
donivan65- Governor
- Number of posts : 12220
Location : San Diego, California
Registration date : 2008-05-12
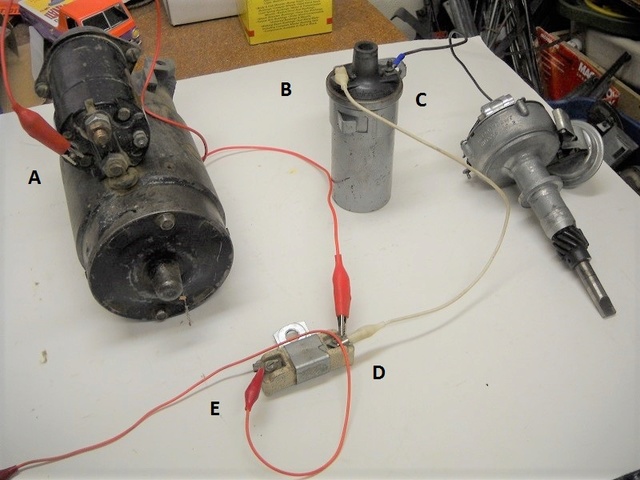
so,,,,,,let me refresh your memory Ms Friend,,,,,,,,,bolt the ballast resistor to the wall,,,,,,take the wire off B,,,,,put a spade connector on it and put it on E,,,,,,,put that green Tach wire on C,,,,,there aint no boost wire on A,,,,find a nut and run a wire to B,,,,,,but,,,since you also need to build a wire from D to B,,,,,run that A wire to the yellow spade terminal on that D B wire ,,,let it do all the work,,,,,,,less wiring to look at and deal with,,,,,,,,if it runs after this,,,,,,put your pretty red coil back on and see if its still good,,,,,,,
JackeFriend- Number of posts : 940
Location : Soap Lake WA
Age : 65
Registration date : 2016-05-06
I will be completing the wiring on Thursday! I printed your diagram for guidance, Thanks!
Then the steering wheel project begins. Rich said he will come over when I am ready as he has done this whole project a "few" times it seems. Good cause I have never done nuttin' except drive with the wheel on...
I can't wait to see the difference in the turning with the full size wheel... should be better. An extra two inches of circumference. next week maybe test drive the old baby!
I won't have to carry that gallon gas can, to pour down the carb!! Don gave me his little baby tank w/ line and connector, for Emergencies. But, I believe nothing will be a problem . It was a points and voltage issue... Don thought that from the beginning. We will see on the long road to knowledge. Pictures soon of the wheel and wiring projects!
Then the steering wheel project begins. Rich said he will come over when I am ready as he has done this whole project a "few" times it seems. Good cause I have never done nuttin' except drive with the wheel on...
I can't wait to see the difference in the turning with the full size wheel... should be better. An extra two inches of circumference. next week maybe test drive the old baby!
I won't have to carry that gallon gas can, to pour down the carb!! Don gave me his little baby tank w/ line and connector, for Emergencies. But, I believe nothing will be a problem

Vantasia- Number of posts : 1412
Location : New Jersey
Age : 69
Registration date : 2013-08-18
Factory wheels can be restored pretty well. I've done several by filling cracks, usually at the hub and on the rim, with epoxy like JB Weld. Sand the entire wheel smooth down to the black rubber-like core and then prime a few coats from a spray can with sandable primer, re-sand a few times and prime again. Finish off with Krylon enamels, your choice of color, but the Almond gives a nice aged 50's-60's Ivory vintage look. Finally clear coat with Krylon or any other clear in several coats, lightly compound it and wax it and you will be amazed how easy it is....
JackeFriend- Number of posts : 940
Location : Soap Lake WA
Age : 65
Registration date : 2016-05-06
Vantasia wrote:Factory wheels can be restored pretty well. I've done several by filling cracks, usually at the hub and on the rim, with epoxy like JB Weld. Sand the entire wheel smooth down to the black rubber-like core and then prime a few coats from a spray can with sandable primer, re-sand a few times and prime again. Finish off with Krylon enamels, your choice of color, but the Almond gives a nice aged 50's-60's Ivory vintage look. Finally clear coat with Krylon or any other clear in several coats, lightly compound it and wax it and you will be amazed how easy it is....
Thanks for the tips! I started sanding last night, got down to mostly black, still have some areas in the grip that go from brown to green to black! The wheel muct have had other lives!
My plan is to finish up the sanding, priming tonight. Then start Friday doing crack fills and final prime and sanding x 4, then paint & finish with clear coats
final coat. Hope it looks good... we will see. I will post them pics soon as I finish!
Vantasia- Number of posts : 1412
Location : New Jersey
Age : 69
Registration date : 2013-08-18
JackeFriend wrote:Vantasia wrote:Factory wheels can be restored pretty well. I've done several by filling cracks, usually at the hub and on the rim, with epoxy like JB Weld. Sand the entire wheel smooth down to the black rubber-like core and then prime a few coats from a spray can with sandable primer, re-sand a few times and prime again. Finish off with Krylon enamels, your choice of color, but the Almond gives a nice aged 50's-60's Ivory vintage look. Finally clear coat with Krylon or any other clear in several coats, lightly compound it and wax it and you will be amazed how easy it is....
Thanks for the tips! I started sanding last night, got down to mostly black, still have some areas in the grip that go from brown to green to black! The wheel muct have had other lives!
My plan is to finish up the sanding, priming tonight. Then start Friday doing crack fills and final prime and sanding x 4, then paint & finish with clear coats. Since my interior is Satin Black, I am going with a Semi-gloss black to give a little shine to the wheel.
final coat. Hope it looks good... we will see. I will post them pics soon as I finish!
Cool, I did a few old Ford one's that way and they looked great and the cracks never re-appeared. mount the wheel on an old broom handle for painting so you can turn it in all directions...
JackeFriend- Number of posts : 940
Location : Soap Lake WA
Age : 65
Registration date : 2016-05-06
That is a great trick. As an old witch I happen to have an old broom... 
Thanks again!
I got the wiring completed... starts right up first turn. However, the coil I had purchased does not work with a Ballast resistor. So, I re-installed the old black coil which works with one. I guess I can get another pretty red one! One that accepts a ballast resistor...
Now, I have to say I only bought the coil without a ballast resistor because there was not one on there when I bought it? Big mistake, they were not thinking past the first six pack.
I get it now! I am good with doing things correctly, at least as close as possible.
Back to sanding the steering wheel!
vanny- Moderator
- Number of posts : 14775
Location : Ashburnham, MA
Age : 65
Registration date : 2012-09-22
Congrats on getting her up and running again! Can't wait to see how the steering wheel turns out...that's on my project list as well.
_________________
“The future will soon be a thing of the past."
http://public.fotki.com/Vintage-Vans/vintage-vans-es/ruff-diamond-1/?cmd=fs_slideshow

VANagain- Number of posts : 1046
Location : San Diego, CA
Age : 62
Registration date : 2008-05-16
Alright Jacke! Glad they hear you got that ignition wiring worked out! That's a relief. I'm sure that picture from Don was helpful. Where did you mount the ballast resistor?
Keep up the good work! Let me know when the steering wheel is done and I'll lend a hand with the horn and turn signal switch.
Keep up the good work! Let me know when the steering wheel is done and I'll lend a hand with the horn and turn signal switch.
JackeFriend- Number of posts : 940
Location : Soap Lake WA
Age : 65
Registration date : 2016-05-06
VANagain wrote:Alright Jacke! Glad they hear you got that ignition wiring worked out! That's a relief. I'm sure that picture from Don was helpful. Where did you mount the ballast resistor?
Keep up the good work! Let me know when the steering wheel is done and I'll lend a hand with the horn and turn signal switch.
I put the resistor at the back of the doghouse just behind the distributor. I got started on the wheel I will be done this week. Maybe this weekend, if your not busy? I received the guts for the wheel so when I finish the restoration, I believe I have what will be needed.
The engine starts right up VRRROOM... But have not got the wheel on for the test drive. It always started, just would die after a few blocks. But, I really think those points caused the problem.
JackeFriend- Number of posts : 940
Location : Soap Lake WA
Age : 65
Registration date : 2016-05-06
So, I have been looking for pop out original back windows for my van. I bought two sets that were WRONG size. Money down the drain, but wisdom gained! LOL
I just bought a very nice set... these I will wager are correct size/year. Third times a charm!
I just bought a very nice set... these I will wager are correct size/year. Third times a charm!
vanny- Moderator
- Number of posts : 14775
Location : Ashburnham, MA
Age : 65
Registration date : 2012-09-22
Congrats Jacke, I hope they fit for you...maybe you'll be able to sell or trade the others if you find out what vehicle they do fit! Let us know how it turns out for you.
_________________
“The future will soon be a thing of the past."
http://public.fotki.com/Vintage-Vans/vintage-vans-es/ruff-diamond-1/?cmd=fs_slideshow
JackeFriend- Number of posts : 940
Location : Soap Lake WA
Age : 65
Registration date : 2016-05-06

These windows will fit 3rd Gen 72-85' Very nice...
vanny wrote:Congrats Jacke, I hope they fit for you...maybe you'll be able to sell or trade the others if you find out what vehicle they do fit! Let us know how it turns out for you.
JackeFriend- Number of posts : 940
Location : Soap Lake WA
Age : 65
Registration date : 2016-05-06
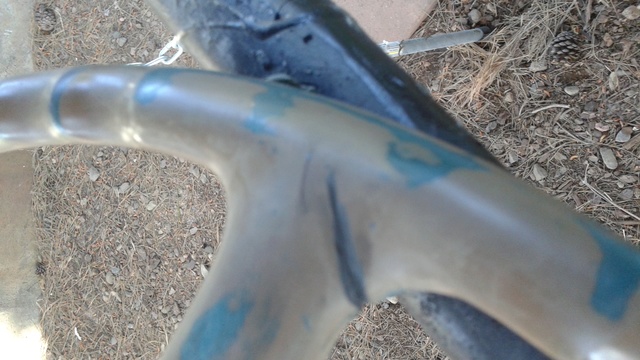
So started the process of using a file and cutting deeper into the cracks in the steering wheel.


JackeFriend- Number of posts : 940
Location : Soap Lake WA
Age : 65
Registration date : 2016-05-06


[url=https://servimg.com/view/19493458/130][img]
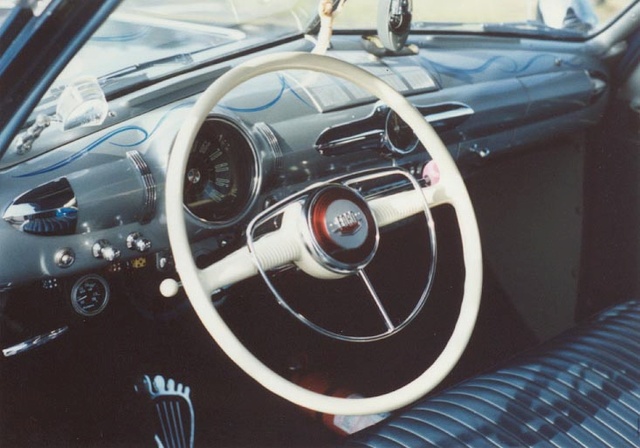
Finished the steering wheel project yesterday. Here are some pictures.
JackeFriend- Number of posts : 940
Location : Soap Lake WA
Age : 65
Registration date : 2016-05-06

JackeFriend- Number of posts : 940
Location : Soap Lake WA
Age : 65
Registration date : 2016-05-06
The wheel was a little bit of work. I am glad to be done with yet another project. I have help coming for the major changes to my steering area. I will be learning about installing the turn signal and the wheel. Currently I have an after market turn signal in my van. I will be replacing the after market turn signal with the original turn signal lever. It is a big project for me, as a beginner, but with the great "in person" resources I am lucky to have here! I could never have gotten as far as I have without the real help and work done with me and for my projects on the van. THANK ALL OF YOU!
I am almost near finishing what I had hoped to accomplish with the van. It has been a long journey with a huge learning curve for me to scale!
Now this weekend, once the steering wheel and turn signals are installed... I will be "on the road again".... watch out! 

I am almost near finishing what I had hoped to accomplish with the van. It has been a long journey with a huge learning curve for me to scale!
Now this weekend, once the steering wheel and turn signals are installed... I will be "on the road again".... watch out!
vanny- Moderator
- Number of posts : 14775
Location : Ashburnham, MA
Age : 65
Registration date : 2012-09-22
Congrats Jacke, turned out Great! Glad to hear you'll be on the road again and I'm 3000 miles away 
You've got a Heck of a Support System out there on the Left Coast. Congrats Again!!!
You've got a Heck of a Support System out there on the Left Coast. Congrats Again!!!
_________________
“The future will soon be a thing of the past."
http://public.fotki.com/Vintage-Vans/vintage-vans-es/ruff-diamond-1/?cmd=fs_slideshow
Vantasia- Number of posts : 1412
Location : New Jersey
Age : 69
Registration date : 2013-08-18
JackeFriend wrote:The wheel was a little bit of work. I am glad to be done with yet another project. I have help coming for the major changes to my steering area. I will be learning about installing the turn signal and the wheel. Currently I have an after market turn signal in my van. I will be replacing the after market turn signal with the original turn signal lever. It is a big project for me, as a beginner, but with the great "in person" resources I am lucky to have here! I could never have gotten as far as I have without the real help and work done with me and for my projects on the van. THANK ALL OF YOU!
I am almost near finishing what I had hoped to accomplish with the van. It has been a long journey with a huge learning curve for me to scale!
Now this weekend, once the steering wheel and turn signals are installed... I will be "on the road again".... watch out!
The wheel looks great, the epoxy should hold in the cracks for years. The old Ford one I did like that never re-cracked after 5-years of use and the cracks were much worse than yours at the hub and ends of the spokes. Ya like that broom handle trick to spin it while painting! I used an old steering shaft I had, same effect. The switch will be easy if you get the wires they probably cut and spliced to the aftermarket switch matched back up to the replacement switch plug. Just follow the wiring diagram from the archives on this forum. Its a curved double row connector, I think Doni posted a picture of one for you back on March 29 in this thread, you need the left side, the right side pair come with the new switch, if you are lucky, like Doni said, if they left the connector in place and used spade connectors to attach the aftermarket switch to the harness and didn't cut off the connector that would be great. But if the connector isn't there, it would be best to ask around for a factory connector to put back on the your cutoff wires. Some one will have one from a parts van, find one with the spades still inside and a few inches of the wires still sticking out and then just match up the colors and splice them back with double female crimp connectors...As for the new switch in the column, I think it was mentioned the trick is to remove the wires from the new connector plug first with a small screwdriver (this is even the procedure stated in the shop manual) so you can get the wires, one at a time, inside of the column and through the small oval shaped hole below the collar, then you put them back into the connector. If you didn't live 3000 miles away, I'd be glad to help you....Let us know what you find under the dash, another trick, you will find that the new replacement GM turn signal levers are a tad wider than the plastic seat on the aftermarket switches, if that's the case, do not force the lever into the saddle, simply narrow it with a small file on the sides until it sits flat and then put the screw in! and don't over tighten the screw, the plastic strips REAL easy, I had to tap mine out and use a larger screw after I stripped mine the first time LOL...Here is the wheel I did with spray bombs 30 years ago...
This was done with Krylon Almond with gloss clear coat over it.
JackeFriend- Number of posts : 940
Location : Soap Lake WA
Age : 65
Registration date : 2016-05-06
Thanks. I think it matches perfectly with my interior dash and column & doghouse color. A girl likes to be matching, LOL.
That broom trick was a life saver. I used an outside chair to prop the broom up while the wheel dried too. I used a flash light because under the wheel black looks black , until the light hits the surface. That way I did not miss any spots.
Thankfully I will have a great teacher guiding my shaky hands when fixing the wheel and signal switch, Don had a correct year lever, I do need the spring that fits over the shaft inside. I wish you could just stop over as well! I am almost ready to drive. More to come
|
|
|