+18
69
Kma4444
dix
Russell
68bigblock
whalemstr
OutofSight
JariV
gary h
vanny
benwah
wirepuller
Wadehawkins
bananappeal
Seth G
Digz
Big W
66e100pu
22 posters
A-100 Project
66e100pu- Number of posts : 199
Location : So-Cal
Registration date : 2011-04-02
- Post n°31
Re: A-100 Project
I had to drag out the table saw to finish framing in some French doors this weekend, so I couldn’t pass up the opportunity to at least get something done on the truck. I cut some 1/8” ply for the headliner base. Have some 1/8” closed cell foam and black perforated vinyl on the way, so I’ll measure out the sunroof opening, get it all assembled and put it away ‘til I need it – one less thing on the checklist.
66e100pu- Number of posts : 199
Location : So-Cal
Registration date : 2011-04-02
- Post n°32
Re: A-100 Project
66e100pu- Number of posts : 199
Location : So-Cal
Registration date : 2011-04-02
- Post n°33
Re: A-100 Project
I’m going to try and get the front sway bar mounted over the weekend. With the C4 suspension, there is a lot of sub frame stuff going on. Couple that with the reversed steering shaft and under floor brake pedal and free space is at a real premium. The rear end has all the space in the world, so the stock Corvette bar fits without issue. In the front, two pads are welded to frame rails and a straight sway bar is required to clear everything. Only place that offers a high quality kit that won’t break the bank that I found is Paul Horton’s Welder Series in Canada. It took about a week or so to arrive, but the stuff is nice and should make for a sanitary install. I’ll try to get a few pics along the way.
OutofSight- Number of posts : 1558
Location : Lake Oroville, Ca.
Registration date : 2015-11-19
- Post n°34
Re: A-100 Project
[quote="66e100pu"]I was excited to get a set of repop visors, so I figured I’d take a couple of minutes and see how they look. Ever try to insert the support rod into a new set of visors? I’ve pressed on axle bearings that take less effort. After about an hour I got one of them done!
[/quot
What's the trick with the install? I am ready to order a set.
[/quot
What's the trick with the install? I am ready to order a set.
66e100pu- Number of posts : 199
Location : So-Cal
Registration date : 2011-04-02
- Post n°35
Re: A-100 Project
OutofSight wrote:66e100pu wrote:I was excited to get a set of repop visors, so I figured I’d take a couple of minutes and see how they look. Ever try to insert the support rod into a new set of visors? I’ve pressed on axle bearings that take less effort. After about an hour I got one of them done!
[/quot
What's the trick with the install? I am ready to order a set.
One side was a bear, the other side was easier. What I did was find the right sized Phillips screwdriver and used it to open the channel up the best I could by twisting and pushing. Next I inserted the rod about 1-2" in the visor (forced it as far as I could get it). Then I positioned the swivel end so the edge of it could be placed on the carpet; held the visor vertically straight and pounded the rod fully home by striking the pivot end against the floor. It sounds brutal, but it goes in at about an inch at time. The trick is hit it straight and square and use both hands to support each edge of the visor (it's like a slide hammer in reverse). There is one shot to get it right because trying to get it out again once you've started driving it in would be a nightmare. On the other side of the visor, I found somebody on ebay that makes the tips for a Mopar B body out of Derlin. These are bulletproof, unlike the plastic tubes that came stock. I used the Phillips to open up the other side and beveled the ends of the tips slightly on a grinding wheel. Once started in the channel, these pound in the same way but with far less effort. I had no center supports for the tips, so I used 94-01 Dodge Ram pickup units. I had to hit the backs on a grinding wheel to level out some protrusions that they have, but the curvature works perfectly with 2 minutes of work.
OutofSight- Number of posts : 1558
Location : Lake Oroville, Ca.
Registration date : 2015-11-19
- Post n°36
Re: A-100 Project
Do you have any pics of the other end, and info on the tips?
66e100pu- Number of posts : 199
Location : So-Cal
Registration date : 2011-04-02
- Post n°37
Re: A-100 Project
OutofSight wrote:Do you have any pics of the other end, and info on the tips?
I'll get some pics over the weekend. In the mean time, these are the tip supports:
http://www.ebay.com/itm/171983220237?_trksid=p2060353.m2749.l2649&ssPageName=STRK%3AMEBIDX%3AIT
These are also much stronger than the originals.
These are the tips:
http://www.ebay.com/itm/291407321734?_trksid=p2060353.m2749.l2649&ssPageName=STRK%3AMEBIDX%3AIT
66e100pu- Number of posts : 199
Location : So-Cal
Registration date : 2011-04-02
- Post n°38
Re: A-100 Project
Guest- Guest
- Post n°39
Re: A-100 Project
Looks great! What kind of intermediate steering box is that?
Thanks
Thanks
OutofSight- Number of posts : 1558
Location : Lake Oroville, Ca.
Registration date : 2015-11-19
- Post n°40
Re: A-100 Project
Thank you very much for th pic, it helps a lot!
66e100pu- Number of posts : 199
Location : So-Cal
Registration date : 2011-04-02
- Post n°41
Re: A-100 Project
BillWelter wrote:Looks great! What kind of intermediate steering box is that?
Thanks
It's a 1998-2002 Isuzu Rodeo intermediate steering gear.
66e100pu- Number of posts : 199
Location : So-Cal
Registration date : 2011-04-02
- Post n°42
Re: A-100 Project
I find it amazing that the simplest job on a typical build almost always turns into a major project somehow! I was tackling the front sway bar when I realized that the lower control arm shock mounting plates are made from aluminum too. Not going to have any luck welding the steel mounting tabs to aluminum, so I had to fab some steel plates to act as a mounting base. My mig is not up to the task of handling 1/4 “ and 3/8” steel, so I’ve got it all set-up for the welder – now we’ll see how long it sits in the shop. I’m sure I can find some other ‘simple’ things to do while I’m waiting….
66e100pu- Number of posts : 199
Location : So-Cal
Registration date : 2011-04-02
- Post n°43
Re: A-100 Project
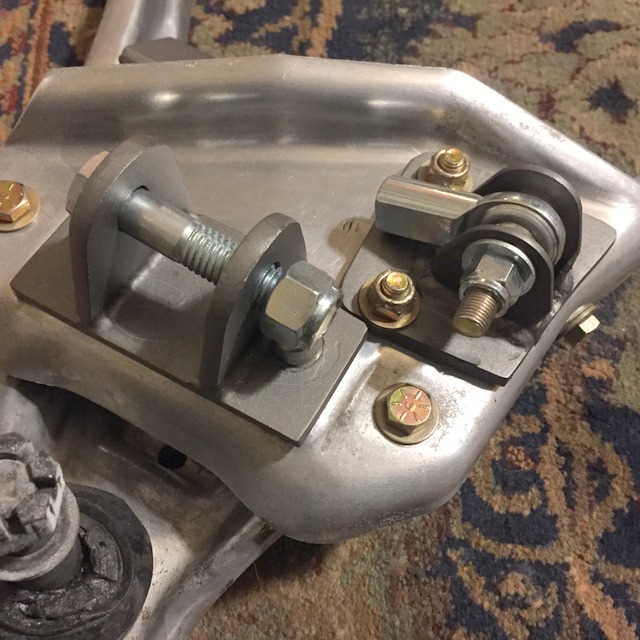
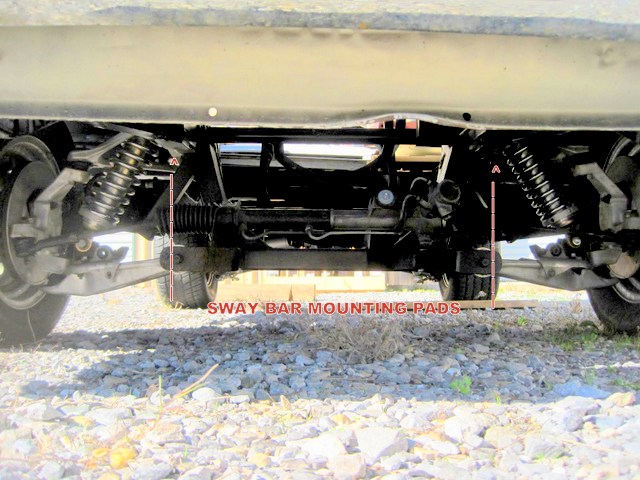
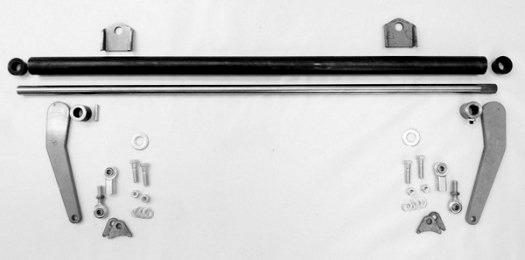
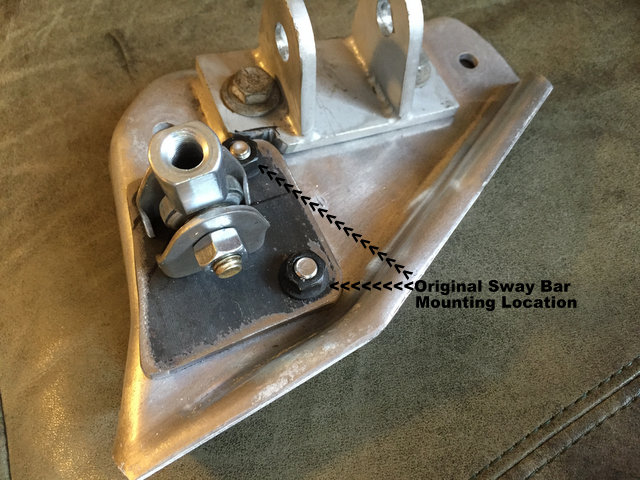
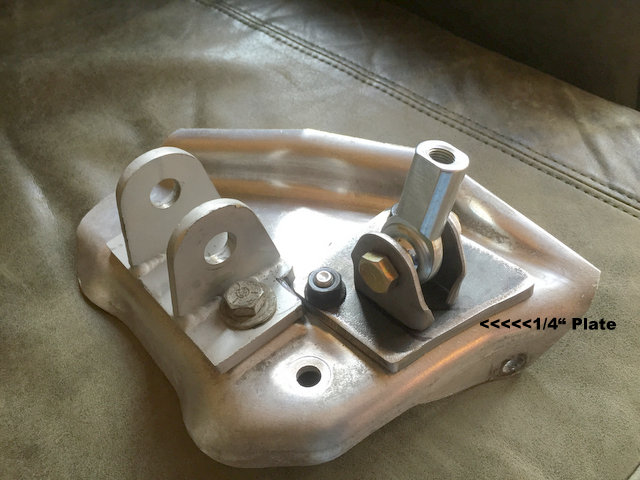
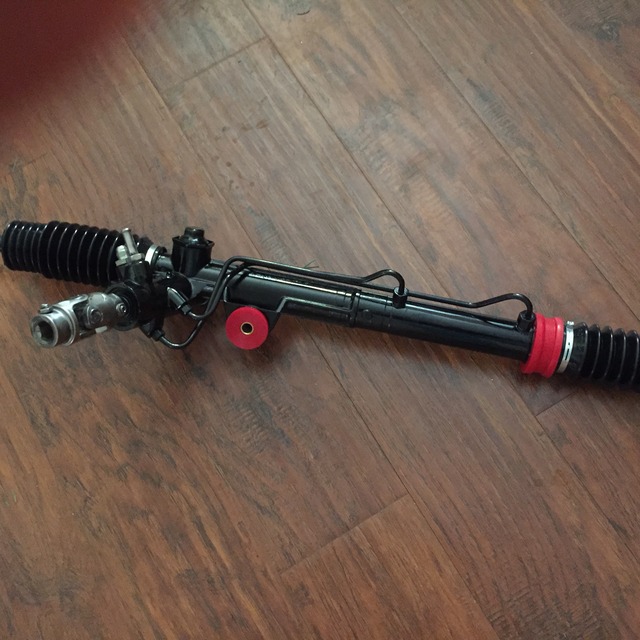
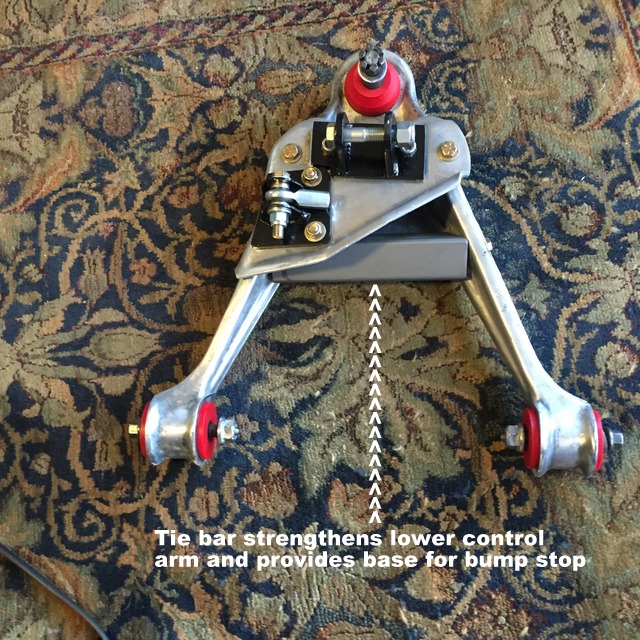
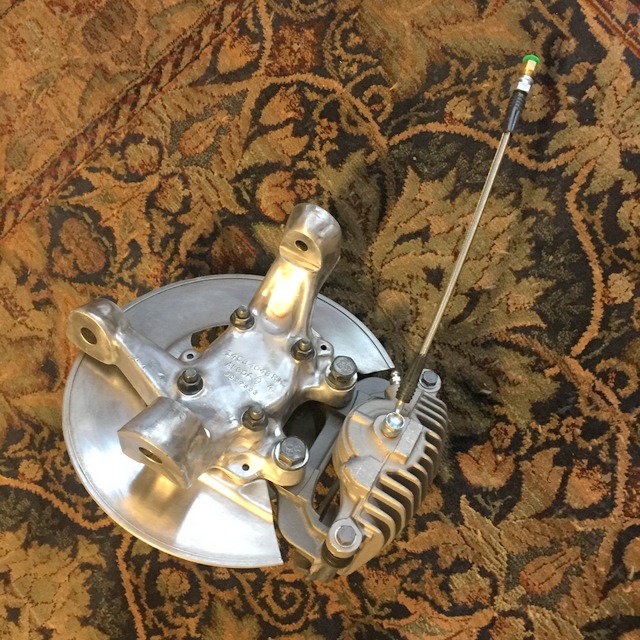
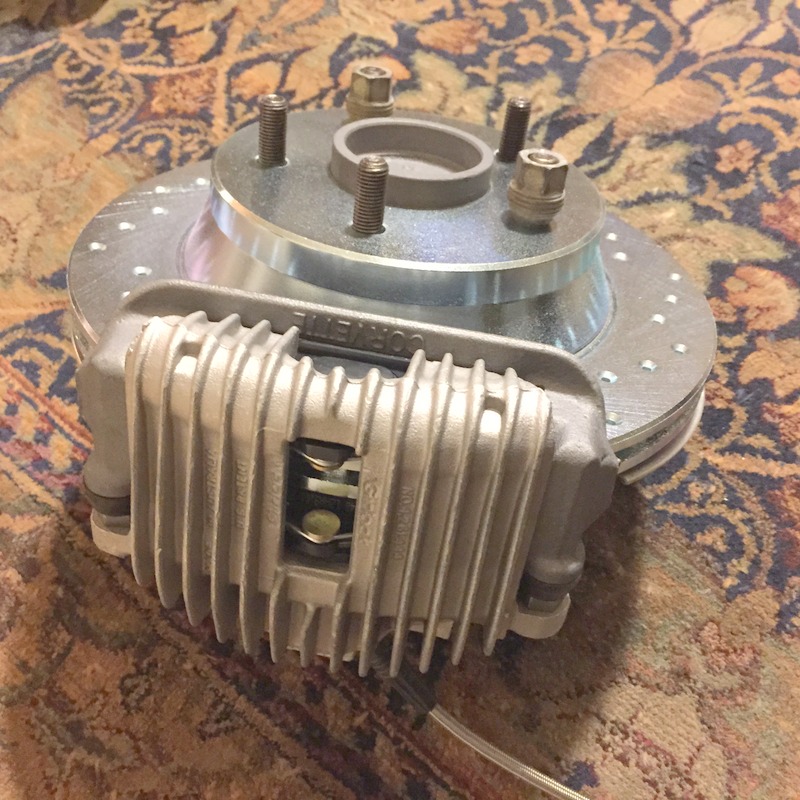
Got my stuff back from the welder in no time, so I mocked up the sway bar to make sure everything works without contacting the coilovers, subframe, etc. I always think that I’m setting up modern suspension in a 50 year old truck, until I remember that the suspension is 30 years old too. That requires that everything be disassembled, cleaned, and new bushings everywhere. There are no factory bushings available for the 84-87 Corvette, so Prothane is the only option left. They can be pretty stiff and squeak in the cold, but it is what it is. Waiting for the new ball joints and tie rod ends to finish it all up. When the truck was primed after media blasting, the overspray hit the front-end pretty good. The clean-up is a major PITA, but the aluminum components really are a work of art. I have to resist the urge to polish everything. The truck is being built as a driver, not some trailer queen that you have to clean with Q-Tips. With everything removed, I’ll prep the underside and shoot it in chassis black so when it all goes back in it’s done. Also mounted the dual spun aluminum fuel tanks – they sit tucked up between the chassis rail and sheet metal ahead of the rear wheel on each side. I used flip top fillers that are mounted to the bed floor. There is really no room for a rear mounted tank with the IRS taking up as much room as it does. I’ll get some pictures of the tank installation eventually.
66e100pu- Number of posts : 199
Location : So-Cal
Registration date : 2011-04-02
- Post n°44
Re: A-100 Project
66e100pu- Number of posts : 199
Location : So-Cal
Registration date : 2011-04-02
- Post n°45
Re: A-100 Project
vanny- Moderator
- Number of posts : 14775
Location : Ashburnham, MA
Age : 65
Registration date : 2012-09-22
- Post n°46
Re: A-100 Project
Very NICE work!!!
_________________
“The future will soon be a thing of the past."
http://public.fotki.com/Vintage-Vans/vintage-vans-es/ruff-diamond-1/?cmd=fs_slideshow
66e100pu- Number of posts : 199
Location : So-Cal
Registration date : 2011-04-02
- Post n°47
Re: A-100 Project
vanny wrote:Very NICE work!!!
Thanks, vanny. Most is just fun, but some really is work!
66e100pu- Number of posts : 199
Location : So-Cal
Registration date : 2011-04-02
- Post n°48
Re: A-100 Project
OutofSight- Number of posts : 1558
Location : Lake Oroville, Ca.
Registration date : 2015-11-19
- Post n°49
Re: A-100 Project
I finally got my visors installed, man what a chore, but I'm glad it's done!
Thanks for your help!
66e100pu- Number of posts : 199
Location : So-Cal
Registration date : 2011-04-02
- Post n°50
Re: A-100 Project
OutofSight wrote:I finally got my visors installed, man what a chore, but I'm glad it's done!
Thanks for your help!
Glad to hear you got that behind you. It’s unbelievable how something that should be relatively simple is such a bear!
wirepuller- Number of posts : 176
Location : Edmonton, AB, Canada
Registration date : 2011-01-28
- Post n°51
Re: A-100 Project
Cool project, great work so far!!
I am wondering if you have any binding with the steering shaft that has a u-joint on either end. I 've been doing some research for mine, and what I'm being told is to have a heim joint or stabilizer bearing on the shaft to prevent any binding of the shaft.
Did you put anything like that into your design or does it even bind?
Thanks,
WP
66e100pu- Number of posts : 199
Location : So-Cal
Registration date : 2011-04-02
- Post n°52
Re: A-100 Project
wirepuller wrote:Cool project, great work so far!!
I am wondering if you have any binding with the steering shaft that has a u-joint on either end. I 've been doing some research for mine, and what I'm being told is to have a heim joint or stabilizer bearing on the shaft to prevent any binding of the shaft.
Did you put anything like that into your design or does it even bind?
Thanks,
WP
The 1st iteration with the Boston Gearbox Adapter (shown in the pic above you included) used a single shaft and two u-joints. The revised plan that uses the Isuzu box requires 2 shafts and three u-joints with a center support (see pic.). The general rule of thumb is a single shaft with 2 joints should not require a support – more than 2 always need a support. The key to avoiding binding is to lay-out the path of the shaft carefully to avoid any extreme u-joint angles.
wirepuller- Number of posts : 176
Location : Edmonton, AB, Canada
Registration date : 2011-01-28
- Post n°53
Re: A-100 Project
Perfect, thanks for the tip!!
I'm using a Vanagon steering box for mine.
WP
I'm using a Vanagon steering box for mine.
WP
66e100pu- Number of posts : 199
Location : So-Cal
Registration date : 2011-04-02
- Post n°54
Re: A-100 Project
In between some of the more tedious work I’ve been shooting some 6” x 6” test patterns to see if I could land on a color that might work. I’ve experimented with gasser green metallic, Ford Calypso Poly, some special PT Cruiser color that is Seafoam or Seamist Metallic that all look good, but don’t scream that’s the one. The two that do pop are Prowler Flame Orange Pearlcoat and Cadillac Cinnamon Metallic. I’m leaning toward the pearlcoat – it changes from a deep red to copper to orange depending how the light hits it. Not looking to do a two-tone, so at least I only need to find 1 color instead of 2! Still not 100% sure which way to go, but I’m getting closer.
whalemstr- Number of posts : 248
Location : Corning, California
Registration date : 2012-06-27
- Post n°55
Re: A-100 Project
I know from a friend back in the early 80's that had his pickup pearl painted - two tone - green and white... his brother owned a bodyshop (still paints now and then too!)... anyway, it looked especially good at night when you saw it...
|
|