


so did the wife's tools make it thru the project.????
+49
sundanceuk
jimthefred
66mnecotruck
vanny
RipVanArkie
BlueSteel
Scotts_A100
RodStRace
campin'fool 2
jkr
Gothboy
dodge man
1040imp
transam400
Vanner63
dan nachel
sidspop
Vanadian
kykayaker37
white-lightning
Rayallen
southern man
whopman
Scott
VanninBlaino
Stoopid john
Zuffen
bumpbug
DanTheVanMan
Big W
Nightmoves
kgdb
wylee
EconoUSAparts
sasktrini
Vantastic
toad
Oldsmobubble
Twinpilot001
SDEconoTruck
econopoor
bugeye bob
Sy Hollinshead
dix
austinmodhouse
67a 100 pickup
G-Man
Van Halen
kevbarlas
53 posters
1959 Ford Thames camper van restoration

dix- Moderator 1st Class

- Number of posts : 8735
Location : pittsburgh pa
Age : 67
Registration date : 2008-05-29
_________________
still vannin since 1974

kevbarlas- Number of posts : 60
Location : Edinburgh, Scotland
Registration date : 2010-12-09
Thanks for all the comments everyone, i still feel really glad that i have the main body done and ive started on the suspension already with a new buzz.
July 2013
I have another bit of good news, more at the end.
I got the front suspension dug out from under the bench and gave it a quick look over.


I also wanted to create a level floor to build up from. That way i can get the ride height sorted and measure up for the 4 link brackets i need to make. I borrowed 2 lenghts of 100x50x5 box section from work.

Bolted the front suspension on. It went on fairly easy. I'll be cleaning it all up much later.


 .
.
Using a laser level and packers I leveled the wheel base of the van up.

Then welded some angle to the sides so i could bolt the box section down and know it wont move.

Next up was to remove the brackets from the axle. Easiest way was to take the axle to my work and using the plasma cutter, slice them off.

Then back at the garage i ground what was remaining off.

And position the axle back under the rear. I also went and bought 20 bags of sand to act as ballast untill i get the engine in place. The engine and gearbox is about 220kg. Each bag is about 22.5kg so 10 bags act as the engine and i added another 6 to act as the doors, radiator, seat, glass. Its all a bit guess work right now.


I took a lot of measurements which i will use to make the 4 link brackets and watts linkage. I am going to be off work for a week soon so i will get some 6mm plate to make the brackets.
Now on to the big news. If you remember a few months ago i mentioned that i was compiling what i have done so far into a book to make a wee bit extra cash for the project.. Well, i thought seeing as the whole bodywork was done, now would be a good time to complete the book and create the first volume. For the past month i have spent 2-3 hours a night putting every update i have done into one file. The good thing about this is its a hardcopy of all the photos and text. you dont need to wait on images downloading or, should anything happen to tinypic that i upload the photos too, pictures being missing or deleated.
The book is 590 pages and roughly 2 pictures per page so theres about 1125 photos in all plus all the text. I have the van, childs digger, pedal trike, wheelie bar, plus two new sections, tools and a tips and techniques section.
I was a bit stuck on how much to charge, when i asked before i was getting various prices, generally between £5-£10. I'd rather everyone had the chance to buy the book so i have made two files. The first is a smaller version (99MB), optimized for smart phones/small tablets priced at £5 ($7.55 USD) and the larger version (165MB) for pc/larger tablets is £6 ($9.06 USD).
If you have enjoyed my project so far i would appreciate it if you would buy the book. The money i hope to make from this will really help me keep the project going and the updates coming on a regular basis.
Here are a few sample pictures, they are saved in .jpg so obviously the .pdf e-book will look better.


Oh, and dont worry, i will always continue to update the forums no matter what. This is just to help me pay for a few parts for the van. I wont be starting to charge for updates.
For the mobile (99MB) £5 version, please follow this link. https://sellfy.com/p/A7vH
For the larger version (165MB) £6 version, please follow this link. https://sellfy.com/p/zFxy
July 2013
I have another bit of good news, more at the end.
I got the front suspension dug out from under the bench and gave it a quick look over.
I also wanted to create a level floor to build up from. That way i can get the ride height sorted and measure up for the 4 link brackets i need to make. I borrowed 2 lenghts of 100x50x5 box section from work.
Bolted the front suspension on. It went on fairly easy. I'll be cleaning it all up much later.
.Using a laser level and packers I leveled the wheel base of the van up.
Then welded some angle to the sides so i could bolt the box section down and know it wont move.
Next up was to remove the brackets from the axle. Easiest way was to take the axle to my work and using the plasma cutter, slice them off.
Then back at the garage i ground what was remaining off.
And position the axle back under the rear. I also went and bought 20 bags of sand to act as ballast untill i get the engine in place. The engine and gearbox is about 220kg. Each bag is about 22.5kg so 10 bags act as the engine and i added another 6 to act as the doors, radiator, seat, glass. Its all a bit guess work right now.
I took a lot of measurements which i will use to make the 4 link brackets and watts linkage. I am going to be off work for a week soon so i will get some 6mm plate to make the brackets.
Now on to the big news. If you remember a few months ago i mentioned that i was compiling what i have done so far into a book to make a wee bit extra cash for the project.. Well, i thought seeing as the whole bodywork was done, now would be a good time to complete the book and create the first volume. For the past month i have spent 2-3 hours a night putting every update i have done into one file. The good thing about this is its a hardcopy of all the photos and text. you dont need to wait on images downloading or, should anything happen to tinypic that i upload the photos too, pictures being missing or deleated.
The book is 590 pages and roughly 2 pictures per page so theres about 1125 photos in all plus all the text. I have the van, childs digger, pedal trike, wheelie bar, plus two new sections, tools and a tips and techniques section.
I was a bit stuck on how much to charge, when i asked before i was getting various prices, generally between £5-£10. I'd rather everyone had the chance to buy the book so i have made two files. The first is a smaller version (99MB), optimized for smart phones/small tablets priced at £5 ($7.55 USD) and the larger version (165MB) for pc/larger tablets is £6 ($9.06 USD).
If you have enjoyed my project so far i would appreciate it if you would buy the book. The money i hope to make from this will really help me keep the project going and the updates coming on a regular basis.
Here are a few sample pictures, they are saved in .jpg so obviously the .pdf e-book will look better.
Oh, and dont worry, i will always continue to update the forums no matter what. This is just to help me pay for a few parts for the van. I wont be starting to charge for updates.
For the mobile (99MB) £5 version, please follow this link. https://sellfy.com/p/A7vH
For the larger version (165MB) £6 version, please follow this link. https://sellfy.com/p/zFxy

Van Halen- Number of posts : 1785
Location : charlotte
Age : 49
Registration date : 2010-04-30
Such a pro!!
kevbarlas- Number of posts : 60
Location : Edinburgh, Scotland
Registration date : 2010-12-09
August 2013
About 80 photos for this huge update so it may take a bit of time to load, sorry.
First of, I want to say thankyou to everyone that bought the book. It has helped me out a lot with this update as it paid for the metal and other bits and bobs and has kept everything up to date, really appreciate it.
I done a lot of research on setting up a vehicle to take 4 link suspension. I needed to get my finished ride height sorted. To do that I had to work out roughly how much weight to add and where. The engine will be sitting over the front axle and checking Google I found out the 1uz-fe weighs around 220kg , add a portly driver at 85 kg and a passenger of the same weight. That brings it upto 390kg, the rest of the weight I wasn't sure about so I bought 18 bags of sand weighing 25kg each, giving me a total of 450kg. I laid these bags over the front half of the van which lowered the front by about an inch and a half. I then raised the rear of the body up to just over level and welded the rear lower dodecagon to the improvised level floor to stop it from moving.

Giving me my ride height.

I had a little bit of spare time on my hands so I took a few quick measurements as it was and mocked up how I would like the brackets to look.

The next time I went down to the garage I decided to get the axle in the exact location. I must have spent about 6-8 hours measuring and double measuring, then triple measuring to make sure the axle wasn't skewed and in the place I wanted it to be. Using my axle stands with shims to get the right height and measuring down from where the old bumps stops were I got the wheelbase sorted. Then measuring from the wheel hubs to the chassis rails got it centered.

I used the vans screw jack to get the pinion angle at 2° ( with a 4 link for street you want the axle rotated between 1-3°). Really I should have the engine in first to make sure 2° is suitable so my plan is to just have really strong tack welds on the axle brackets until I have the engine in, just incase I need to adjust it.

When I was happy with where it should be I welded in a couple bit of box between the chassis and axle to make sure it never moved.

Then it was time to take real measurements for the brackets. I got my notebook out and started scribbling like a maniac. Coming up with a slightly different design from my mock-up.


Then when I was settled with my sketches I drew up the plans.


I bought a length of xx and 50x6 to make up the brackets. I know the thickness is maybe a bit overkill but I don't want these brackets to move at all, plus chunky looks cool. I scribed my plan onto the 100x6 then cut out with the plasma cutter. I cleaned the edges up individually then tacked all 4 plates together, drilled out the holes and then went over them again with the grinder so they were all the same size and shape.

Using the 50x6 I joined it all together. The good thing with how I worked it out was that I'd get a really good strong fillet weld when welding.

To give me a little bit more clearance for the upper arm I used 3mm flat bar here.

Then the front of the bracket got its bracer.

Lather, rinse and repeat.


One thing I couldn't do was the shock mount. I got my local engineer shop to make me up 2 47x30x80 blocks with a 13mm hole down the centre.

Then tacked them to the brackets.

Next came the chassis mounts, bit of scribing.

To make sure I made a left and a right I thought it would be wise to mark them up.

Same as before, cut the plates out, tack them together, mark the holes and grind them all the same.

Once I had drilled the holes I placed the plates over the axle brackets with bolts sticking out to confirm the holes were in the right place.

Then building them up.


Quick little pre-assembly to see how it all looks, cool.


All tacked up and ready to weld.

I decided to use my Arc welded for welding the brackets. My arc has a higher amperage and I hadn't used it in a while so I thought it would be good.

All welded up, I took my time and had lots of tacks on the brackets to minimize distortion. They were quite solid so remained warp free. Left them to the side to cool down.

Grinder out and time to clean them up.

Nice and smooth. The other good thing about the fillet weld is it gave me enough to put a nice curved shape around the edges without losing strength.

Another mock-up of the finished brackets.


Time to get attaching them to the van. Some of the more astute of you out there will have noticed the axle brackets are made as a whole unit, how am I going to slide them onto the axle tubes. Well, its all part of the plan. I cut the axle brackets in half, like so.

Then placed them over the axle tube and tacked them back together. Here is where my photos begin to lose detail. I was so pre-occupied with getting all my measurements right I neglected to take more photos as I went. Once the axle bracket was leveled up and tacked into place I attached the arms and raised the chassis bracket to the right place. I determined the right place by having a 2.5° rake in the arms. You want the parallel bars to be between 0°-3° raked upwards from the axle. I decided to go with a 2.5° rake on the basis that if the back end of the van is heavier than I think then the angle should only go down 1°-2° keeping everything OK.

Once I had attached the other side and was happy with the bracket positions I measured up for the rear shock mounts. To be honest, this was a bit of a hit and miss. For convenience I am re-using the scimitar shocks just now. The springs are 200lb/s standard I believe so may just be upto the job. I wont really know until I am driving it around. I guess-timated how much the coil-overs will drop when supporting the van. The coil-overs have enough room to stand upright, allowing me to use the shocks to there best abilities.

I made up a set of mounts for the top of the coil-overs. I thought id make them look nice just incase I had magically found the right position.

With a piece of box section, I drilled the holes the length I thought the shock would compress by under load and used them to mount the upper brackets.

I took the rear part of the dodecagon away and lowered the van to the ground, would my tacks hold?
Yep, they did. Although the van was a bit too high. Even with weight added it wouldn't go down as far as I needed.


I had 4 more bags of sand that I added to the back of the van but it only moved down an inch. I worked out that the bracket was 30mm too short and that I needed to make different shock mounts, so , take 2.

Before,

After,

Now, it sat nearer to my ride height. I made a .GIF of how it is unladen, then with about 200kg on the rear.

Much better. Now the 4 link bars were all in place. I added a few extra strengthening plates.


Then 2 more braces between the chassis rails using the 100x50x5 I used for the flooring with yet more bracing for the brackets.


I was going to do the watts linkage at this point but I settled on re-drilling the scimitar hubs to ford pattern. The Scimitar PCD was 4 x 4.5" and I needed 5 x 4.5" to use the Ford wheels. First of all I had to get the hubs off. These hubs are notoriously difficult to remove.

I tried using one of my granddads old pullers, didn't quite work as I couldn't get it to seat right on the studs so it started to bend them.

Next up I made a crappy puller using an old brake drum and some scrap box section. I welded a M20 nut and used some M20 threaded rod to make a basic puller. This also never worked, infact, the hubs were so well attached I actually sheared the M20 threaded rod as you can see in the photo, bugger.

After a bit of thinking I thought id use the studs to my benefit. I got a piece of 12mm plate, drilled 4 holes and created a dished part that would press up against the end of the axle. The principal being that as I tightened the stud nuts up, the plate hits the end of the axle and the force pulls it off.

Good bit of heat also helps.

I put the castle nut nut back on the end of the axle to protect the threads then put my plate over and tightened up the studs, half turn at a time. They were so tightly on there that I was literally jumping on the 2 foot breaker bar to get the force it needed to pop them off.

But I won!

Time to re-drill the hubs. As im really keeping the distance between the studs the same and just adding an extra stud it wasn't as bad as you would think. I knocked out all but one of the studs then placed the old Thames brake drum upside down and over the hub.

It would be great if I had access to a lathe and make up a spacer ring to fit snugly in here but I had to improvise. I found if I used a 5.5mm drill bit it wouldn't fit in this gap, but a 5mm drill bit did, and could wiggle ever so slightly. I used that to locate the drum to the hub centrally and added a nut to the stud, tightened it up and added a few tacks underneath to stop the drum and hub from moving apart.


The holes in the old drum are 1/2. I found a piece of brass plated tubing at work which was a really good tight fit in the brake drum. The inner diameter was also a really good tight fit with a 10mm drill bit. I used the 10mm drill bit to just mark my new holes.

Then I removed the drum.

I placed the hub back on the axle and made up a little stand with a punch to act as my marker and rotated the hub to make sure my holes were on the same place.

With good clear marks and happy they are int he right place I set up the hub level and true with the drill press and drilled my pilot holes.

Then I done the same as before and checked my pilot holes were in the correct place, I made a quick little youtube video here.
https://www.youtube.com/watch?v=8QQwsQTDIVc
I wanted to fill the old stud holes so with a piece of copper I blanked off the end and filled with my mig.

And cleaned it all up, ready to get drilled out for the new studs I have on order.

I also used the hub to drill out the Scimitar brake drum.

That's all for now. I should be getting my new studs next week sometime and that will allow me to get my Ford wheels back on there.
On the 1st of September I will be taking the van along to the Scottish ford day. If anyone here is going, feel free to come over and check the van out. It will be on the Pre67Ford club stand.
Thanks again everyone who bought my book.
Shameless plug : -
For the £6 version, please follow this link. https://sellfy.com/p/zFxy
About 80 photos for this huge update so it may take a bit of time to load, sorry.
First of, I want to say thankyou to everyone that bought the book. It has helped me out a lot with this update as it paid for the metal and other bits and bobs and has kept everything up to date, really appreciate it.
I done a lot of research on setting up a vehicle to take 4 link suspension. I needed to get my finished ride height sorted. To do that I had to work out roughly how much weight to add and where. The engine will be sitting over the front axle and checking Google I found out the 1uz-fe weighs around 220kg , add a portly driver at 85 kg and a passenger of the same weight. That brings it upto 390kg, the rest of the weight I wasn't sure about so I bought 18 bags of sand weighing 25kg each, giving me a total of 450kg. I laid these bags over the front half of the van which lowered the front by about an inch and a half. I then raised the rear of the body up to just over level and welded the rear lower dodecagon to the improvised level floor to stop it from moving.
Giving me my ride height.
I had a little bit of spare time on my hands so I took a few quick measurements as it was and mocked up how I would like the brackets to look.
The next time I went down to the garage I decided to get the axle in the exact location. I must have spent about 6-8 hours measuring and double measuring, then triple measuring to make sure the axle wasn't skewed and in the place I wanted it to be. Using my axle stands with shims to get the right height and measuring down from where the old bumps stops were I got the wheelbase sorted. Then measuring from the wheel hubs to the chassis rails got it centered.
I used the vans screw jack to get the pinion angle at 2° ( with a 4 link for street you want the axle rotated between 1-3°). Really I should have the engine in first to make sure 2° is suitable so my plan is to just have really strong tack welds on the axle brackets until I have the engine in, just incase I need to adjust it.
When I was happy with where it should be I welded in a couple bit of box between the chassis and axle to make sure it never moved.
Then it was time to take real measurements for the brackets. I got my notebook out and started scribbling like a maniac. Coming up with a slightly different design from my mock-up.
Then when I was settled with my sketches I drew up the plans.
I bought a length of xx and 50x6 to make up the brackets. I know the thickness is maybe a bit overkill but I don't want these brackets to move at all, plus chunky looks cool. I scribed my plan onto the 100x6 then cut out with the plasma cutter. I cleaned the edges up individually then tacked all 4 plates together, drilled out the holes and then went over them again with the grinder so they were all the same size and shape.
Using the 50x6 I joined it all together. The good thing with how I worked it out was that I'd get a really good strong fillet weld when welding.
To give me a little bit more clearance for the upper arm I used 3mm flat bar here.
Then the front of the bracket got its bracer.
Lather, rinse and repeat.
One thing I couldn't do was the shock mount. I got my local engineer shop to make me up 2 47x30x80 blocks with a 13mm hole down the centre.
Then tacked them to the brackets.
Next came the chassis mounts, bit of scribing.
To make sure I made a left and a right I thought it would be wise to mark them up.
Same as before, cut the plates out, tack them together, mark the holes and grind them all the same.
Once I had drilled the holes I placed the plates over the axle brackets with bolts sticking out to confirm the holes were in the right place.
Then building them up.
Quick little pre-assembly to see how it all looks, cool.
All tacked up and ready to weld.
I decided to use my Arc welded for welding the brackets. My arc has a higher amperage and I hadn't used it in a while so I thought it would be good.
All welded up, I took my time and had lots of tacks on the brackets to minimize distortion. They were quite solid so remained warp free. Left them to the side to cool down.
Grinder out and time to clean them up.
Nice and smooth. The other good thing about the fillet weld is it gave me enough to put a nice curved shape around the edges without losing strength.
Another mock-up of the finished brackets.
Time to get attaching them to the van. Some of the more astute of you out there will have noticed the axle brackets are made as a whole unit, how am I going to slide them onto the axle tubes. Well, its all part of the plan. I cut the axle brackets in half, like so.
Then placed them over the axle tube and tacked them back together. Here is where my photos begin to lose detail. I was so pre-occupied with getting all my measurements right I neglected to take more photos as I went. Once the axle bracket was leveled up and tacked into place I attached the arms and raised the chassis bracket to the right place. I determined the right place by having a 2.5° rake in the arms. You want the parallel bars to be between 0°-3° raked upwards from the axle. I decided to go with a 2.5° rake on the basis that if the back end of the van is heavier than I think then the angle should only go down 1°-2° keeping everything OK.
Once I had attached the other side and was happy with the bracket positions I measured up for the rear shock mounts. To be honest, this was a bit of a hit and miss. For convenience I am re-using the scimitar shocks just now. The springs are 200lb/s standard I believe so may just be upto the job. I wont really know until I am driving it around. I guess-timated how much the coil-overs will drop when supporting the van. The coil-overs have enough room to stand upright, allowing me to use the shocks to there best abilities.
I made up a set of mounts for the top of the coil-overs. I thought id make them look nice just incase I had magically found the right position.
With a piece of box section, I drilled the holes the length I thought the shock would compress by under load and used them to mount the upper brackets.
I took the rear part of the dodecagon away and lowered the van to the ground, would my tacks hold?
Yep, they did. Although the van was a bit too high. Even with weight added it wouldn't go down as far as I needed.
I had 4 more bags of sand that I added to the back of the van but it only moved down an inch. I worked out that the bracket was 30mm too short and that I needed to make different shock mounts, so , take 2.
Before,
After,
Now, it sat nearer to my ride height. I made a .GIF of how it is unladen, then with about 200kg on the rear.
Much better. Now the 4 link bars were all in place. I added a few extra strengthening plates.
Then 2 more braces between the chassis rails using the 100x50x5 I used for the flooring with yet more bracing for the brackets.
I was going to do the watts linkage at this point but I settled on re-drilling the scimitar hubs to ford pattern. The Scimitar PCD was 4 x 4.5" and I needed 5 x 4.5" to use the Ford wheels. First of all I had to get the hubs off. These hubs are notoriously difficult to remove.
I tried using one of my granddads old pullers, didn't quite work as I couldn't get it to seat right on the studs so it started to bend them.
Next up I made a crappy puller using an old brake drum and some scrap box section. I welded a M20 nut and used some M20 threaded rod to make a basic puller. This also never worked, infact, the hubs were so well attached I actually sheared the M20 threaded rod as you can see in the photo, bugger.
After a bit of thinking I thought id use the studs to my benefit. I got a piece of 12mm plate, drilled 4 holes and created a dished part that would press up against the end of the axle. The principal being that as I tightened the stud nuts up, the plate hits the end of the axle and the force pulls it off.
Good bit of heat also helps.
I put the castle nut nut back on the end of the axle to protect the threads then put my plate over and tightened up the studs, half turn at a time. They were so tightly on there that I was literally jumping on the 2 foot breaker bar to get the force it needed to pop them off.
But I won!
Time to re-drill the hubs. As im really keeping the distance between the studs the same and just adding an extra stud it wasn't as bad as you would think. I knocked out all but one of the studs then placed the old Thames brake drum upside down and over the hub.
It would be great if I had access to a lathe and make up a spacer ring to fit snugly in here but I had to improvise. I found if I used a 5.5mm drill bit it wouldn't fit in this gap, but a 5mm drill bit did, and could wiggle ever so slightly. I used that to locate the drum to the hub centrally and added a nut to the stud, tightened it up and added a few tacks underneath to stop the drum and hub from moving apart.
The holes in the old drum are 1/2. I found a piece of brass plated tubing at work which was a really good tight fit in the brake drum. The inner diameter was also a really good tight fit with a 10mm drill bit. I used the 10mm drill bit to just mark my new holes.
Then I removed the drum.
I placed the hub back on the axle and made up a little stand with a punch to act as my marker and rotated the hub to make sure my holes were on the same place.
With good clear marks and happy they are int he right place I set up the hub level and true with the drill press and drilled my pilot holes.
Then I done the same as before and checked my pilot holes were in the correct place, I made a quick little youtube video here.
https://www.youtube.com/watch?v=8QQwsQTDIVc
I wanted to fill the old stud holes so with a piece of copper I blanked off the end and filled with my mig.
And cleaned it all up, ready to get drilled out for the new studs I have on order.
I also used the hub to drill out the Scimitar brake drum.
That's all for now. I should be getting my new studs next week sometime and that will allow me to get my Ford wheels back on there.
On the 1st of September I will be taking the van along to the Scottish ford day. If anyone here is going, feel free to come over and check the van out. It will be on the Pre67Ford club stand.
Thanks again everyone who bought my book.
Shameless plug : -
For the £6 version, please follow this link. https://sellfy.com/p/zFxy

Zuffen- Number of posts : 165
Location : Sydney Australia
Registration date : 2011-07-28
I like your approach to problems.
Drilling wheel stud holes isn't rocket science but some people make it so complex you'd think it was.
Keep it up I look forward to your posts.
Drilling wheel stud holes isn't rocket science but some people make it so complex you'd think it was.
Keep it up I look forward to your posts.
kevbarlas- Number of posts : 60
Location : Edinburgh, Scotland
Registration date : 2010-12-09
Thanks man, i was a bit nervous at first with the wheels hubs but i just took my time and it worked out pretty well. I got the wheel studs put in and done another video to make sure the wheel was wobble free when in place. https://www.youtube.com/watch?v=3TdCo7GIToY&feature=youtu.beZuffen wrote:I like your approach to problems.
Drilling wheel stud holes isn't rocket science but some people make it so complex you'd think it was.
Keep it up I look forward to your posts.

RipVanArkie- Moderator
- Number of posts : 987
Location : Central Arkansas
Registration date : 2008-05-13
Awesome build! Keep us posted!
_________________
Later,
Rip
2013 MidSouth Econoline Meet
Host of the MidSouth Econoline Meet, Petit Jean State Park, AR
1967 Econoline Pickup
1966 Econoline Supervan
1967 Econoline 8-door regular van
1965 ChevyVan, Cargo, 250/3speed
1964 Econoline 8-door Window Van, 4spd
1966 Falcon SuperVan, Automatic
Zuffen- Number of posts : 165
Location : Sydney Australia
Registration date : 2011-07-28
Gotta be happy with the lack of run-out.
Well done.
Well done.
kevbarlas- Number of posts : 60
Location : Edinburgh, Scotland
Registration date : 2010-12-09
September update
I got an email shortly after my last update saying the wheel studs i ordered were out of stock and wouldn't be in for a few weeks. This was about 4 days after i placed my order on eBay, uuugh, why sell something you don't actually have. Anyway, I thought before ordering of the net again I'd see if there was anywhere local i could get them. I found the trailer company "indespension" sold the ones i needed at the correct length. Went to my local depot and got a set. Nice one.
So with the new wheels studs in hand i set about pressing them in. I done a stupid thing and thought i could use the vice to press them in. Turns out they say not to use a vice as a press for a reason. I managed to break the vice. Its not even my vice, its the guy i share the garage with so i had to give him some money to replace it, thats me down another £60, bugger. I was going to wait and use my dads press at home but i looked at my hydraulic pipe bender and figured out a way to use that to press the studs in. Then bolted the wheel on. I set up a stand next to the wheel and spun it to make sure it was true, which it was, bonus!.

Good to see the van on the same wheels all round.


The wheels are centralized by the wheel studs but i will be getting some spigot rings machined up for the road to take the strain off the nuts later.
I wanted to get the watts linkage setup finished for the Scottish ford day show. I added some bags of sand to act as ballast to the back off the van. Somewhere close to what the weight will be when finished to get the parallel bars level. The axle already has the watts linkage bracket on the back. I decided to use the scimitar linkage bars aswell. I leveled the bars and took some measurements. Then i drew up and cut out some plates.

I wanted the brackets to look similar to the 4 link brackets so i took a few design cues from them. I then tacked it all up.

Then welded and cleaned.

I went back under the van and tacked them into place and connected the linkage bars up.

Looks good, i jumped up and down on the van and swayed it side to side. Axle stays in place and the bars move as expected, yey.


The next weekend was the big Ford day show. I was happy with the progress i had made for the show. I had a bit of planning to do before the show though. My dad managed to get a loan of the trailer again from his friend. Which meant i had to sort out the wiring for the towbar. I really should have done it earlier but ive been so busy. I done it on the Saturday morning and couldn't really test it before i left. everything worked with the multimeter but i couldn't do a proper test with a light board, oh well, fingers crossed.
In the afternoon, my dad, brother and I went on a little trip to collect the trailer. The guy that owns the trailer has his own haulage company and he showed us all around his toys. He is into pre war Humbers, he even owns one from 1908. I think he had about 10-12 classics in total. Anyway, we got the trailed hitched up, tested the lights, they worked! and went on our merry way. Took a little bit of extra care driving back with the trailer to the garage and prepared the Thames.
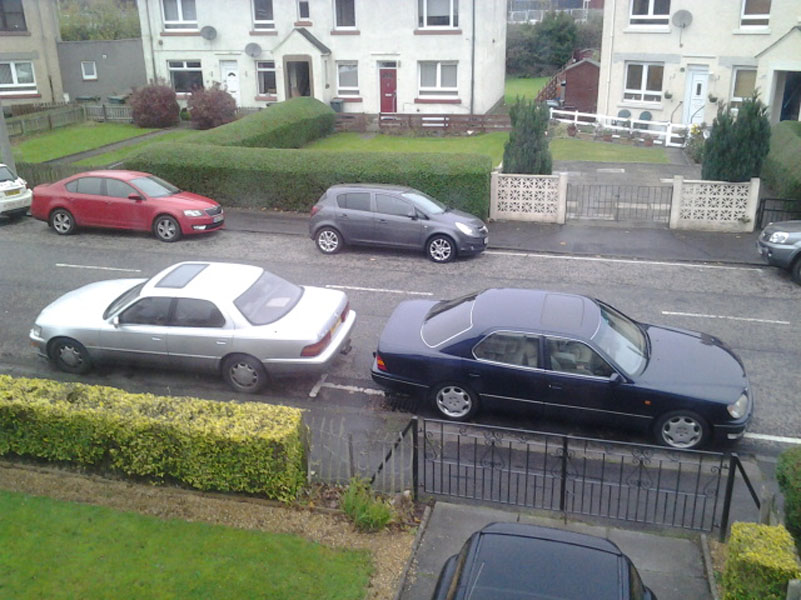
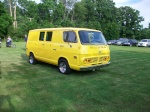
First time it has been wheeled outside in 3 years!

Testing the suspension

Then loaded up.

From there we drove to my brothers to put it on his drive for the night. Having the Lexus compared to the Punto as a tow vehicle was a completely different experience. I felt a lot more in control, especially when braking. I always felt like the trailer was pushing the Punto when braking.
On Sunday we got up early, went to my brothers then headed to the show. Nice drive up there but the wind was staring to pick up. Once there we got the van unloaded.

Pushing it into place.


Ta-daa!, i even brought my nephews trike as he was coming along aswell.


It was good meeting and chatting with the other guys there. The van got a few looks as-well. I had brought a big bucket of the old rusty pieces i had cut off but forgot to take them out the boot, doh. Later on my nephews turned up. Broden got a quick shot of the van.

And Ruaridh had fun on the trike, i also had fun on the trike.

There was a lot of cool looking cars there, heres a few of my favourite.


The wind started picking up in thew afternoon and knowing i had to take the van back to the garage then return the tailer we left around 3:30-4pm. I had a really enjoyable day with the van and my family.
Ok, so now that the axle is all tacked into place (not fully welding until the engine is in, just incase) I can begin on the engine swap. Unfortunately, i need to wait until i can buy another second hand car. So, whilst im saving up for that im going to keep myself busy with the doors and side skirts.
I went back to the garage yesterday and looked over the front doors. The passenger side i worse than the drivers so I'll start with the drivers and that will give me a good one to copy for the passengers.
Some of the worst areas.


I stripped all the paint off so i wouldn't get any more surprises later.

A nice easy bit to get me back into the swing of metalwork. This is the top hinge area a wee bit rusted out.

Patched and tacked.


Then tidied up.

Little area around the window frame.


The rear edge of the window frame was a bit worse. The channel was rusted out but i could also see the door itself was rusted underneath.


I knew i was going to cut the frame away so i braced it before hand to keep it in place.

Then i cut out the frame section.


Then the door section.


Using a bit of guesswork and measuring i fabbed up a repair section.

Tacked/welded it in.


The frame section has 5 folds in it to make up the profile. 3 of which are turned over into them selfs. A bit too tricky to make in one go so i done it in 2 sections. First is the outside section.


Then the inner.

I forgot to take a pic of it afterwards, oops. The only bits left to do to the door is the bottom edge. It is a bit deteriorated so i wanted to get the door on the van so i can visualize and draw a template for it. I also wanted to check the door gaps as i haven't fitted the door since doing the guttering or whole A-post.


Not bad, atleast it fits snugly.
Now i can measure up for the lower part. Looks like i wont need to be re-skinning a lot, mostly build up door edge and patch the skin.


I really enjoyed today. I like the mechanical stuff but i found myself really enjoying the metalwork again. Im going to keep going with the doors and sideskirts until i get another car. Then take a week off work and get the engine out the Lexus.

vanny- Moderator
- Number of posts : 14776
Location : Ashburnham, MA
Age : 65
Registration date : 2012-09-22
Great work once again, thank you so much for keeping us up to date. Every time I see your thread come up under "View Posts Since Last Visit", it's like Christmas morning all over again! 
_________________
“The future will soon be a thing of the past."
http://public.fotki.com/Vintage-Vans/vintage-vans-es/ruff-diamond-1/?cmd=fs_slideshow
kevbarlas- Number of posts : 60
Location : Edinburgh, Scotland
Registration date : 2010-12-09
November update
Whew, its been a couple of months since I last updated. Trying to save some money for a new car so not a lot has been happening to the van. Whilst I was looking for extra work I got a little bit more of the door done.
Starting of with this.
I laid the door on a work bench that I had placed 2 bags of sand on to support the panel. Little bit of a closer up shot.

And on the inside.

I had thought about re-skinning the whole lower half of the door but settled on patching the bad bits instead. So I cut out the corner to gain access inside.

Then the other side.

Which let me see the strengthening piece inside the door which also needs replaced. Best to do this first. I used a bit of guesswork to imagine how the panel would have originally looked and made up a template.

Cut it out.

Few folds and shaping.

Then attached it to the old piece that was save-able.

I flipped it over and coiled up a strip of sheet to make a spacer for when the door hinges bolt back on.

New tabs welded in place to hold the hinge plate in with a bit of adjustment. I then welded that piece back on to the door.

The next piece was the inside door panel. Its a bit of an awkward panel and took me a while to figure a way to do it. I made up the flat pieces first then tapped the edge over a round former to give me a nice radius to match the original door.

I drilled a few holes so I could attach this panel to the previous inner repair piece and tacked it to the door.

Then the next piece was templated and cut out. I forgot to mention, the reason its so awkward to do is this part of the door is a compound curve, so it curves in both axis, like a sphere.

Drilled 3 holes for the hinge bolts and tacked it on.

The door now had enough strength in it to bolt back on to make sure the hinge would be in the right place.


Which it did, yippee. So, door back off and finish off the corner. Before I put the last piece in I had extended the inner panel inside and spot welded it to the bottom of the door for extra rigidity. Welded it all up.

Then the door went back on again ( I think I put it on and off about 50 times over the whole time of repairing it) so I could template for the outer door skin. I used some thin cardboard to make the template and some corrugated to mark the curve off the panel in both plains.

This was a bit tricky to do, I used the same technique as I used for dishing out the rear panel. I pretty much used a sandbag and a round headed hammer to knock a bit of shape into it then bent it over my knee, tubing etc.. Anything round to try and stretch a light compound curve into it. After a lot of dicking about I had it tacked in then welded and cleaned up.


Now all I need to do is the rear of the door, which can wait, because....
Shortly after that I got an email from a guy in the pre67 club. He was asking if I could copy a set of ramps he had found on the Internet for a cheaper price. The ramps he was talking about are made by www.restorationramps.co.uk and they look like this.

I managed to get their measurements from the website, each ramp is 16" wide, 12 foot long and 26" tall. They didn't look very difficult to make, just time consuming so I agreed. I'd rather make these than gates and railings.
I started by getting all the metal I would need and cut them all to the right size.

Then making up the front box sections first. These also unbolt from the angled apart for ease of storage.

I drew on the floor how much of an angle I would need, then placed them on a chair to visualize it standing up.

Then I made up the other side.

Once I had completed the angled section I used that as my template to make another.


The next part was to cut 98 bits of angle for the treads. Very time consuming when I only have a chop-saw.

Halfway through my Mig welder decided it had had enough and conked out. My mig has been pretty good so far for the thinner sheet work I've been doing but I think something was up with it as thicker stuff just bamboozled it. I decided to splash out on a nice new Mig so I ordered a R-Tech mig180. I have been impressed by their Tig/Arc that I bought a few years ago so I had no qualms in ordering a Mig from them.

Whilst I was waiting on it I used my Arc to weld one of the ramps up. I also made up 4 posts to support the rear when its in the level position and a brace that acts as an adjustable jacking beam.


Once I got my new welder I finished the welding off, cleaned them up and gave them a coat of primer.
Then the next stage was to test them out. The restoration ramps say theirs can hold 2000Kg so I tried it with my 1900Kg Lexus. I was a bit nervous as there was no one else in he garage to guide me so I was being very cautious, I did record it on my tablet just in case something happened and I could send it to "you've been framed" to make some money out of it. Fortunately it went well.


The guy who got them was really happy and said they will be used to help restore his mk2 Zodiac, so we were both happy.
It had been about 6 weeks since I had done anything tot he van, I really want to get on with the engine swap so I had been looking on Ebay pretty much every day for a LS400 with LPG. I missed out on a couple and was thinking about something else when about 2 weeks ago I saw a nice, honest looking 1999 LS400, 105,000 miles, wee bit tatty bodywork but most importantly, it had LPG. The bad thing was its 300 miles away from me in Birmingham. Not something I could just pop over and have a look at. I contacted the seller and asked a few questions and I was pretty set on it. It was a bit over my budget but would be worth it on fuel savings alone. I asked one of my relatives if I could borrow a bit of cash off them and they agreed, so, I had the money. Now the gamble was how honest the seller had been.
Which brings me up to yesterday morning at 5:20am . I bought a plane ticket from Edinburgh to Birmingham, then 2 train tickets and the seller met me in the Lexus at the train station car park around 10:30am. We took it for a test drive and I checked everything over. I was really happy with it, it does have a few dings but over all its a great car. I bought it from the guy and drove the 300miles back home. Using LPG and sitting just slightly over the legal speed limit on the motorway it cost me £45. Compared to my original Lexus that would probably have cost me atleast £100
The drive was ok, there's a slight wobble in the steering between 50-65 mph which I'm hoping is just the wheels needing balanced and the tracking done. It needs a good clean, inside and out. New drivers side indicator lens and a good service for the engine and LPG. It has a service history upto the previous owner, fortunately he only put 10,000 miles on it as he has never had the engine oil changed since he bough it 2 1/2 years ago.


Older and younger brother, 5 years apart.
I can now plan the engine swap. I'm going to have to wait another month I think. I cant take any holidays from work right now as winter is our busiest time of the year but were going to be closed over Christmas so I may ask for an extra week at the same time. Atleast it gives me a few weeks to plan it out and maybe get the rest of the drivers door finished.
Whew, its been a couple of months since I last updated. Trying to save some money for a new car so not a lot has been happening to the van. Whilst I was looking for extra work I got a little bit more of the door done.
Starting of with this.
I laid the door on a work bench that I had placed 2 bags of sand on to support the panel. Little bit of a closer up shot.
And on the inside.
I had thought about re-skinning the whole lower half of the door but settled on patching the bad bits instead. So I cut out the corner to gain access inside.
Then the other side.
Which let me see the strengthening piece inside the door which also needs replaced. Best to do this first. I used a bit of guesswork to imagine how the panel would have originally looked and made up a template.
Cut it out.
Few folds and shaping.
Then attached it to the old piece that was save-able.
I flipped it over and coiled up a strip of sheet to make a spacer for when the door hinges bolt back on.
New tabs welded in place to hold the hinge plate in with a bit of adjustment. I then welded that piece back on to the door.
The next piece was the inside door panel. Its a bit of an awkward panel and took me a while to figure a way to do it. I made up the flat pieces first then tapped the edge over a round former to give me a nice radius to match the original door.
I drilled a few holes so I could attach this panel to the previous inner repair piece and tacked it to the door.
Then the next piece was templated and cut out. I forgot to mention, the reason its so awkward to do is this part of the door is a compound curve, so it curves in both axis, like a sphere.
Drilled 3 holes for the hinge bolts and tacked it on.
The door now had enough strength in it to bolt back on to make sure the hinge would be in the right place.
Which it did, yippee. So, door back off and finish off the corner. Before I put the last piece in I had extended the inner panel inside and spot welded it to the bottom of the door for extra rigidity. Welded it all up.
Then the door went back on again ( I think I put it on and off about 50 times over the whole time of repairing it) so I could template for the outer door skin. I used some thin cardboard to make the template and some corrugated to mark the curve off the panel in both plains.
This was a bit tricky to do, I used the same technique as I used for dishing out the rear panel. I pretty much used a sandbag and a round headed hammer to knock a bit of shape into it then bent it over my knee, tubing etc.. Anything round to try and stretch a light compound curve into it. After a lot of dicking about I had it tacked in then welded and cleaned up.
Now all I need to do is the rear of the door, which can wait, because....
Shortly after that I got an email from a guy in the pre67 club. He was asking if I could copy a set of ramps he had found on the Internet for a cheaper price. The ramps he was talking about are made by www.restorationramps.co.uk and they look like this.
I managed to get their measurements from the website, each ramp is 16" wide, 12 foot long and 26" tall. They didn't look very difficult to make, just time consuming so I agreed. I'd rather make these than gates and railings.
I started by getting all the metal I would need and cut them all to the right size.
Then making up the front box sections first. These also unbolt from the angled apart for ease of storage.
I drew on the floor how much of an angle I would need, then placed them on a chair to visualize it standing up.
Then I made up the other side.
Once I had completed the angled section I used that as my template to make another.
The next part was to cut 98 bits of angle for the treads. Very time consuming when I only have a chop-saw.
Halfway through my Mig welder decided it had had enough and conked out. My mig has been pretty good so far for the thinner sheet work I've been doing but I think something was up with it as thicker stuff just bamboozled it. I decided to splash out on a nice new Mig so I ordered a R-Tech mig180. I have been impressed by their Tig/Arc that I bought a few years ago so I had no qualms in ordering a Mig from them.
Whilst I was waiting on it I used my Arc to weld one of the ramps up. I also made up 4 posts to support the rear when its in the level position and a brace that acts as an adjustable jacking beam.
Once I got my new welder I finished the welding off, cleaned them up and gave them a coat of primer.
Then the next stage was to test them out. The restoration ramps say theirs can hold 2000Kg so I tried it with my 1900Kg Lexus. I was a bit nervous as there was no one else in he garage to guide me so I was being very cautious, I did record it on my tablet just in case something happened and I could send it to "you've been framed" to make some money out of it. Fortunately it went well.
The guy who got them was really happy and said they will be used to help restore his mk2 Zodiac, so we were both happy.
It had been about 6 weeks since I had done anything tot he van, I really want to get on with the engine swap so I had been looking on Ebay pretty much every day for a LS400 with LPG. I missed out on a couple and was thinking about something else when about 2 weeks ago I saw a nice, honest looking 1999 LS400, 105,000 miles, wee bit tatty bodywork but most importantly, it had LPG. The bad thing was its 300 miles away from me in Birmingham. Not something I could just pop over and have a look at. I contacted the seller and asked a few questions and I was pretty set on it. It was a bit over my budget but would be worth it on fuel savings alone. I asked one of my relatives if I could borrow a bit of cash off them and they agreed, so, I had the money. Now the gamble was how honest the seller had been.
Which brings me up to yesterday morning at 5:20am . I bought a plane ticket from Edinburgh to Birmingham, then 2 train tickets and the seller met me in the Lexus at the train station car park around 10:30am. We took it for a test drive and I checked everything over. I was really happy with it, it does have a few dings but over all its a great car. I bought it from the guy and drove the 300miles back home. Using LPG and sitting just slightly over the legal speed limit
The drive was ok, there's a slight wobble in the steering between 50-65 mph which I'm hoping is just the wheels needing balanced and the tracking done. It needs a good clean, inside and out. New drivers side indicator lens and a good service for the engine and LPG. It has a service history upto the previous owner, fortunately he only put 10,000 miles on it as he has never had the engine oil changed since he bough it 2 1/2 years ago.
Older and younger brother, 5 years apart.
I can now plan the engine swap. I'm going to have to wait another month I think. I cant take any holidays from work right now as winter is our busiest time of the year but were going to be closed over Christmas so I may ask for an extra week at the same time. Atleast it gives me a few weeks to plan it out and maybe get the rest of the drivers door finished.
G-Man- Mayor

- Number of posts : 30743
Location : Fowlerville, MI
Age : 62
Registration date : 2008-05-06
as always love to see your metal work, I was lucky last year and got to see a 1960 deluxe Thames van at the Baker's show in MI. Never thought I would get to see one up close. Very coooool vans for sure. Have you found any others ones in your area???
vanny- Moderator
- Number of posts : 14776
Location : Ashburnham, MA
Age : 65
Registration date : 2012-09-22
Thanks for the updates and pics Kev! Nice to see how a master gets it done. Very inspirational! 
_________________
“The future will soon be a thing of the past."
http://public.fotki.com/Vintage-Vans/vintage-vans-es/ruff-diamond-1/?cmd=fs_slideshow
kevbarlas- Number of posts : 60
Location : Edinburgh, Scotland
Registration date : 2010-12-09
G-Man wrote:as always love to see your metal work, I was lucky last year and got to see a 1960 deluxe Thames van at the Baker's show in MI. Never thought I would get to see one up close. Very coooool vans for sure. Have you found any others ones in your area???
There are 2 that i have seen upclose here and a few more than i know of.
December part 1
I've been taking it easy since I got the new Lex. I could have been finishing off the drivers door but I decided I would take a break from the van for a little bit. In the mean time I decided my welders could do with a cart to make moving them around the workshop easier. I didn't really go into too much detail with plans, I had it in my head how I wanted it to look and just went with it. I had 2 large rear wheels from an old power wash lying around and lots of scrap 3mm sheet from work collected already.
I wanted it to look nice as well as being practical so I put a bit more extra effort into it than I normally would. It had to hold my Mig, Tig, gas bottle and a drawer for accessories.
There's not a lot of build pictures for it as my digital camera is borked and im having to use my tablet in the mean time. I started with a basic frame made from 25mm box then cut the sides out and tacked them in, then the top and bottom shelves. I wanted a nice curved recess for the gas bottle so I cut the 3mm plate into 500mm strips, bent them around a smaller gas bottle then tacked them together. Tacked that to the cart and cut down the side to remove the excess.


After I got the basic shape done I made a drawer for it then welded it all up. Smoothed it down and a little bit of filler on some of the welds to tidy them up then a nice coat of blue we had lying around the work to match the welders. It took a bit of time but I wasn't doing anything else so it was a fun build to do.


I did go down to the van today. Next week is the big engine removal from the Lexus job so I went along to tidy up and prepare a few things. Once that was all done I was looking at the engine bay of the van and was thinking about what I'd need to remove to get the engine in. Its played on my mind for a long time about where to cut and so I had a good clear image of what id need to do. I felt confident enough with my plan to just go ahead and start cutting. The 1UZ-FE dimensions are around 26" cubed.
I marked out with my scribe the area I'd need to remove, the area left between the sides was around 36". That gives me 5" space each side for access when fitting.


I also had a few bolts to undo.

Then with a 1mm cutting disc in the grinder I started to cut.

Once cut the panel lifted straight up and out.

So now I have loads of space to fit a V8!.


Now I can't wait to get on with next week, Just got to get Christmas out the way first
Oh, I have also put my little book on offer for the holiday period. For the next 2 weeks I have taken 35% off the price so for the UK that's £3.90 and for the USA that's $6.38 for 585 pages of images and reading . You could buy it for yourself, something to read on that nice shiny new tablet, laptop, phone etc... That someone bought you for Christmas or give it as a gift to someone you know that may be interested in it. Either way, it helps me out with the build.
This link will take you straight to the discounted price https://sellfy.com/p/zFxy/-kev/
Or click on the pic below.
[url=https://sellfy.com/p/zFxy/-kev/ ]
 [/url]
If it asks for a discount code its - Kev
Merry Christmas everyone expect part 2 of this update late next week!
G-Man- Mayor
- Number of posts : 30743
Location : Fowlerville, MI
Age : 62
Registration date : 2008-05-06
You should see them more often than me, they were made there. to see one in MI is something to see.
vanny- Moderator
- Number of posts : 14776
Location : Ashburnham, MA
Age : 65
Registration date : 2012-09-22
That's a great looking cart for the welding equipment. Should make it much easier to work!! Your back will appreciate it when you get older like most of us on this site! I picked up your Thames diary and can't wait to check it out. Merry Christmas to everyone over on the other side of the pond!
_________________
“The future will soon be a thing of the past."
http://public.fotki.com/Vintage-Vans/vintage-vans-es/ruff-diamond-1/?cmd=fs_slideshow
Zuffen- Number of posts : 165
Location : Sydney Australia
Registration date : 2011-07-28
Kev,
I think the front sump on the LS engine will be a problem.
Have you done any measuring for it?
There's a pretty active UK contingent on lextreme.com so you should be able to do a swap for a rear sump from a Soarer.
Otherwise it looks like an easy drop in.
I think the front sump on the LS engine will be a problem.
Have you done any measuring for it?
There's a pretty active UK contingent on lextreme.com so you should be able to do a swap for a rear sump from a Soarer.
Otherwise it looks like an easy drop in.
kevbarlas- Number of posts : 60
Location : Edinburgh, Scotland
Registration date : 2010-12-09
Zuffen wrote:Kev,
I think the front sump on the LS engine will be a problem.
Have you done any measuring for it?
There's a pretty active UK contingent on lextreme.com so you should be able to do a swap for a rear sump from a Soarer.
Otherwise it looks like an easy drop in.
It is a little problem but not a huge one, more info below
December part 2
Well, I was going to wait until later on to post this but the news is too good to wait. The photos are a mixture of crappy tablet photos and normal digital camera photos so the quality may not be the best.
On Friday evening my brother helped me get the other Lexus along to the garage. I didn't have any insurance so we had to tow it. I know it was probably still not very legal but atleast it was less illegal than driving it without insurance. We used a one man tow and I got my Bro to sit in the other Lexus so he could help me brake. Both of them together was just about 40 foot long.


Then, yesterday I went along to the garage to start the stripping of the engine bay. I tried searching on various forums about removing an engine from an LS400 but I couldn't find anything so I thought id document the process of doing it for others. I don't go into detail about how to remove it, more of a list and in the order I done it.

First I started with the bonnet, 4 bolts and the window washer tube to remove.

Next up was the removal of the battery and battery tray. There are 4 bolts holding the tray down.

Then the air intake.

After that I jacked the car up and took the Frankenstein of an exhaust off. (for sale if anyone's interested)

Whilst under there I took the prop shaft bolts off.

I then drained the radiator and removed that. 2 Bolts hold the radiator on at the top, careful when removing the transmission lines as some fluid will come out. There is also a block connector on the radiator to take off.

Up next was the removal off the radiator fan. 4 bolts and a tap of a hammer to free it off.

To make the engine removal easier I decided to take the power steering pump off. I got under the car and disconnected the power steering lines with a bucket underneath to catch the fluid. Make sure to turn the steering a few times to pump as much of the fluid out as you can.

The pump is held on with 3 bolts, one on the front of the block and 2 behind the pump.

After that I called it a night and went home. Then today I got up early and picked my brother up and we headed back to the garage to get on with it.
I wanted to take the A/C pump off. Ofcourse this is going to be filled with refrigerant gas. I know your supposed to get it drained professionally but well, needs must and all so I jammed a set of pliers in the valve to release the pressure then undone 2 lines to the pump and another 4 bolts.

On the engine bay firewall you can see the wiring re the harness goes into the interior. There are 2 nuts holding the rubber grommet in place. Inside you want to remove the carpet, air bag and a bit of the dash to get access to the ECU and another box that I don't know what it was called. Unplug the connectors then pull the loom through to the engine bay.

Then there are a few other obvious connectors and not so obvious Earthing straps to remove but that's about the jist of it. The next step was to get the engine out. My brother went under the car and took the gearbox bracket off (4bolts) . Then we put the engine crane into position and tied a bit of rope around the lifting points and put a little bit of tension on it.
Ross wrestling with the rope.


Back underneath I thought it would be wise to slacken the anti roll bar to let it drop down a bit, 4 bolts that hold the bushes in place and a nut on each side of the ball joint. Only thing left was to undo the engine mounts, 2 bolts.
Then the big step, jacking the engine out. We managed to jack it up a bit and pull. There was a earthing strap that Ross managed to notice and stop us in time before damaging it. It did get jammed and for a while I was certain I had to undo the other bolts on the propshaft linkage, so I wasted about 25 mins doing that and it still wouldn't budge. Turns out the exhaust header was hitting against the steering rack. A good mighty shove and it released its grip and it was starting to come out quite easy. Easy until we reached what we thought was the Max height of the engine crane.
To make a bit more clearance I removed the wheels and let the body down a bit more. Doing so gave us just enough clearance and the before we knew it, the engine was out.


After a bit of celebration and gazing at its magnificence I set it down on a pallet to take the strain off the engine hoist. We had plenty of time to kill so we thought we would see if we could place it into the van, just to see what exactly would need to be done to get it to fit.
We put the engine crane back to work but it just wouldn't pick it up. The engine crane has always been a bit funny. I remember when we were taking the engine out of the van it took ages to get it to lift. I thought it may have not had enough fluid in it so I took the little rubber bung off and filled it up but that didn't do anything. Then I released the valve and manually extended and retracted the piston which I think helped as when I retracted it right down it gave me the money shot and squirted fluid all over my face. It worked fine after that..... It even went higher up than before, which would have helped earlier on.
So, engine on crane and jacked up. We removed a wheel from the van to make it easier getting the engine in the passenger door.

It was a tight squeeze but it got in.
Feeling a bit excited and my head rushing 1000mph thinking of all the cans of worms.


We were just going to rest it on top of a bit of wood and the box on the chassis so we could visualize how it would look but excitedly decided to get it lower and more of how it would look. To do so we encountered a few extra bits to remove. The oil filter was hitting against the chassis so that got removed and the exhaust manifolds were fowling the chassis so they got removed. Then the engine mounts were taking off and it managed to slide roughly into position. The What's in the way now is the bar that joins both hubs in the steering which I think I could maybe dog-leg or U bend out of the way but, its in! So, to all the naysayer's out there saying it wouldn't fit, it does!


Ok, OK, I know its not really in and installed but its looking promising, its a huge relief for me anyway. So with a million and one things in my head now about what direction to take and lists of what to do to get it properly in I will do some mundane things like removing the ret of the wiring look from the Lexus and various other pieces I will need.
Oh, and a special thanks to my Brother, You were a huge help today!

vanny- Moderator
- Number of posts : 14776
Location : Ashburnham, MA
Age : 65
Registration date : 2012-09-22
Congrats! Looks like all the hard work paid off for you!! It looks right at home in there!!!
_________________
“The future will soon be a thing of the past."
http://public.fotki.com/Vintage-Vans/vintage-vans-es/ruff-diamond-1/?cmd=fs_slideshow

Big W- Number of posts : 3282
Location : Saskatoon,Sask,Canada
Age : 60
Registration date : 2011-01-13
Great job guys. That Lexus motor is going make that thing fly. You better put a wing on it.
RipVanArkie- Moderator
- Number of posts : 987
Location : Central Arkansas
Registration date : 2008-05-13
Greatness!
_________________
Later,
Rip
2013 MidSouth Econoline Meet
Host of the MidSouth Econoline Meet, Petit Jean State Park, AR
1967 Econoline Pickup
1966 Econoline Supervan
1967 Econoline 8-door regular van
1965 ChevyVan, Cargo, 250/3speed
1964 Econoline 8-door Window Van, 4spd
1966 Falcon SuperVan, Automatic

RodStRace- Number of posts : 3046
Location : Chino Valley
Registration date : 2010-01-21
AAAAmazing!
Glad it seems to fit. I'd bolt up the fan and check radiator clearance before fabbing any mounts. You might need another few mm in one direction or another.
Do a bit of research and find out if the instrument cluster 'talks' to the PCM. It may be easier to adapt the instruments to the Thames dash then to disable the communication. I remember writing a few articles on Lexus cars and finding some had 27 computers!!! You won't need the Door Modules, Seat Modules, Memory Modules, Lighting Module, sound system (the warning chimes play through it!) and will probably go without the Lexus auto A/C which has another module, but check before hacking!
Zuffen- Number of posts : 165
Location : Sydney Australia
Registration date : 2011-07-28
The Lexus will run without the instrument cluster but you may need an adaptor for the speedo pulse to keep the trans happy.
I'd be wary of modifying the steering as it will be under quite some stress.
What's hitting the steering, is it the sump?
To get around the fan issue put an electric fan on it and you can snuggle the engine up pretty close to the radiator.
I assume you will make your own headers as the existing LS400 ones are pretty horrible and will certainly foul the chassis. The stock headers can be installed either upside down or swapped from side to side so look at the options as the mounting bolts are on the centreline of the ports.
A Hilux oil filter will fit and is a lot smaller than the stock LS400 filter. You can buy relocation kits for the oil filter as well.
kevbarlas- Number of posts : 60
Location : Edinburgh, Scotland
Registration date : 2010-12-09
January update
This month I have been focusing on clearance issues and getting the engine in its place. I went along to the garage a couple of times and checked over the engine and after lots of measuring I decided to use the original engine mounts but with different (thinner) rubber bushes and fabricate new chassis mounts.
First thing I done was remove a section of the chassis to allow easier removal and installation of the engine and box. I marked in chalk where I wanted to cut.

When removed it made it a lot easier to jack the engine up on my own and position it easier. I will be welding on a few bits of angle back to the chassis so I can have this section as a bolt on piece for the future should I need to work on it again.

The sump was fowling both the steering track rod and the suspension cross brace.


So I had to come up with a solution to it. I had a few options.
1. Cut a section of the sump out at the rear and move the whole engine back to let the track rod have the space but doing so might still not give me enough room.
2. Raise the height of the engine to clear both with out modifying the sump or anything at all. Bad point is it raises the centre of gravity, larger angle for the prop shaft to run and fitting seat would be tricky, so I pretty much blanked this.
3. Cut 20-30mm of the front of the sump to allow the trackrod to move. This is a good contender as the oil pickup wouldn't get interfered with as it sits far enough to the rear
4. Heat and bend the trackrod and extend it ever so slightly. I have determined the trackrod to be made of forged steel so it would be possible to do all this then get it re-tempered again. I'd really rather not have to mess with anything to do with the steering though.
5. Get a whole rear sump from a soarer, unfortunately there's not many soarers around here.
In the end I went with number 3.
Having made that conclusion I got the engine where I wanted it and measured up for a set of chassis brackets. I also spent about 3 days trying to source suitable rubber bushes. After a lot of searching I ended up going with BMW M20 bushes. They are a nice simple design. M10 thread, 67mm round and 47mm tall. If they work on a BMW engine then they should be upto the 1UZFE. Plus at £9 each they are affordable. I ordered a set and used a piece of threaded rod as a spacer whilst waiting on them arriving.

The way I worked out where I needed the brackets to go I worked out the width of the inside of the chassis rails which was 600mm then the width between the engine mounts was 505mm. That gave me 95mm clearance, divided by 2 is 47.5mm. That's how much each chassis bracket hole had to stick out by. Next was height. I knew the BMW mounts were 47mm tall so I took that into account and marked it on the chassis.
(the scribbles probably mean more to me)
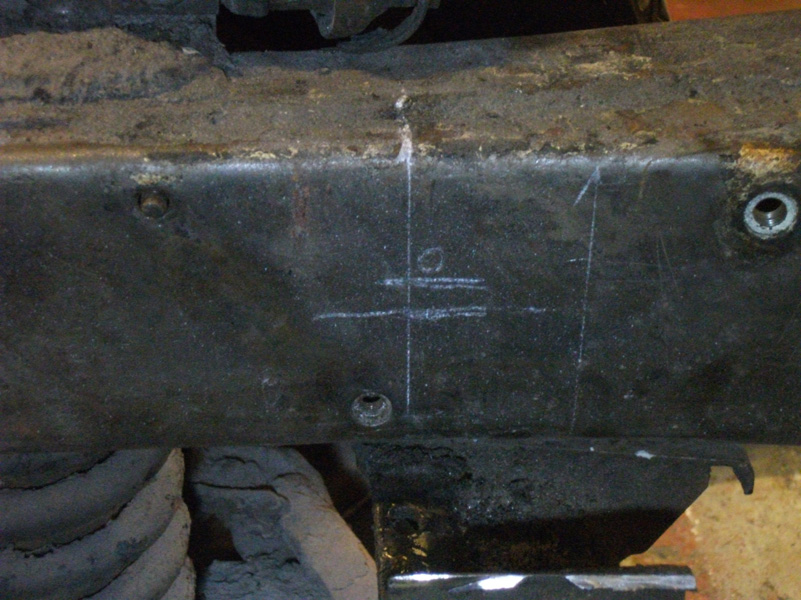
At this point I realised that it would interfere with another piece that joins the cross brace to the chassis. It was made from quite thick metal so I assumed it was definitely needed for strength.

I looked at the engine mounts and realised there 25mm off set from the centre of the bolts. I swapped both sides over which put the offset further back.

I moved my marks 50mm further back and clearance was fine.
I moved onto fabricating some brackets. With all my sizes in my note book I done a couple of sketches and came up with a nice simple bracket. I cut the base out of card and double checked my sizes were fine then cut all I needed from some 6mm plate.
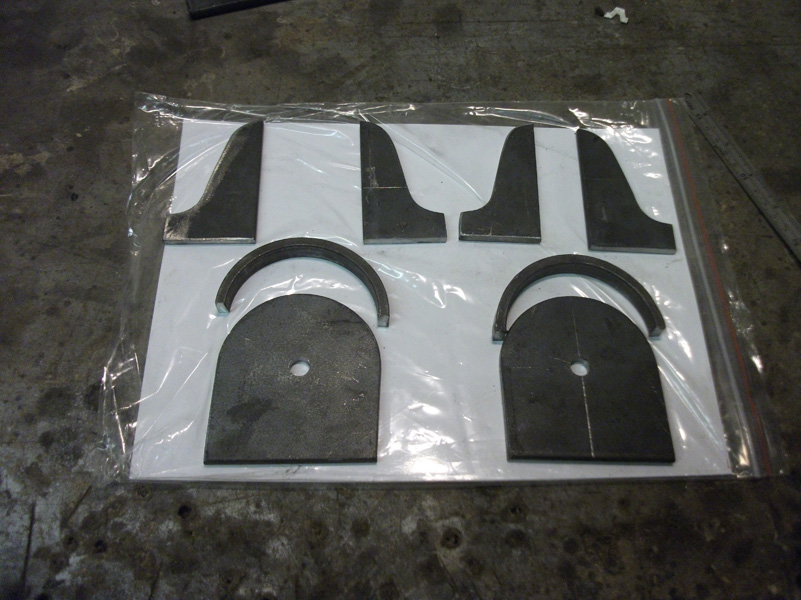
Tacked and welded them up.

Then cleaned up.


I lifted the engine back up and tacked the brackets on with an inch of weld either side. Strong enough to support the engine but easy enough to remove if I had to reposition them. I also used my piece of threaded rod as the bushes hadn't arrived yet.

I slowly lowered the engine and hoped for the best. They lined up perfectly and I checked engine mounts off my list.


With the position finalised I checked over all my other clearance worries.
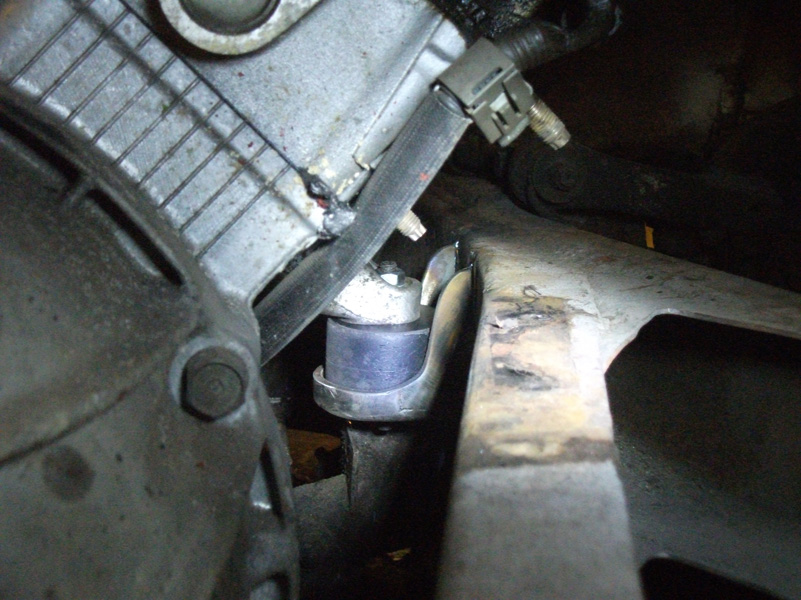
Sump sits about 15mm from the cross brace, plenty enough for me.

May need to do a little check-out for the alternator unless I reposition it up to where the steering pump was (not going for power steering in the van)
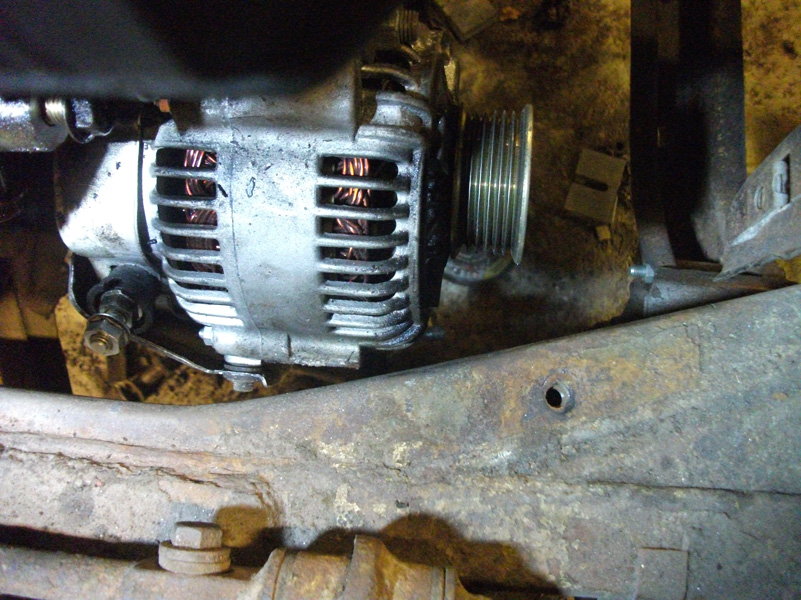
Even the oilfilter has access in its stock location. The perspective of the photo makes it look closer to the spring than it is, its fine, although I may use a Hi-lux filter as its a little shorter in length.

I haven't modified the sump yet but will do soon.
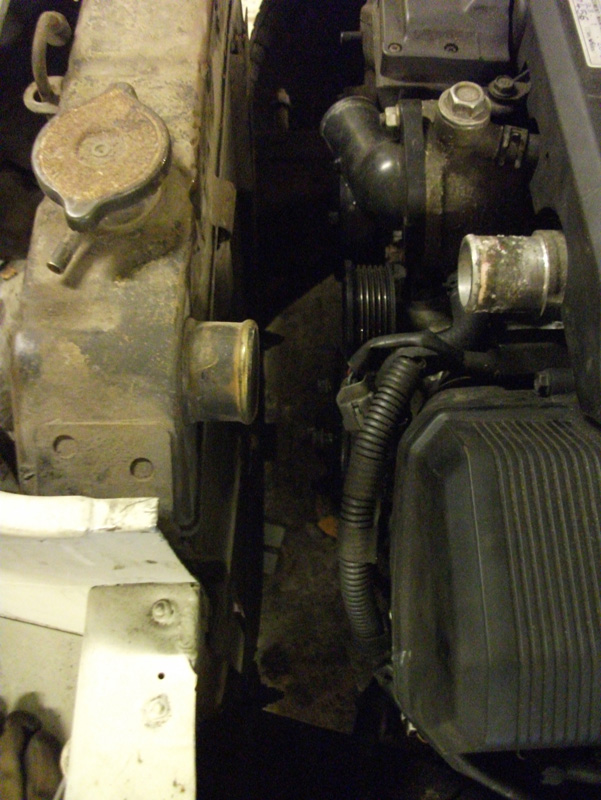
I placed the stock radiator in place to see what it looks like. Im unsure what to do with the rad. It is quite thick so I may get it re-cored and see how it goes. I know of someone in Australia that has a rover V8 in his Thames and uses the stock rad with good results. If I could find a thin engine fan it might get bolted in, or an electric fan pushing through.

A few weeks later I had been thinking of how to mount the gearbox mount. I used the original Lexus bushes and mount bracket and came up with a little idea for chassis mounts.
First I cut 2 pieces of 6mm plate, drilled some holes and bolted them into place for something to start from.

I toyed with a few ideas and ended up using some 25mm thick wall box section I had left over from another job. I experimented with my pipe bender to put a nice radius in them rather than a sharp angle cut and welded.

My apprentice... Sorry, my brother came along and helped me out with some cutting and coffee.

With his help I made a pair of brackets up and tacked them into place. Oh, to get my position for the gearbox I first made sure the shaft was in the centre of the chassis rails. Then remembering my pinion angle on the gearbox was 2 degrees I lowered the jack under the gearbox so it was also perpendicular at 2 degrees and took all my measurements from there.
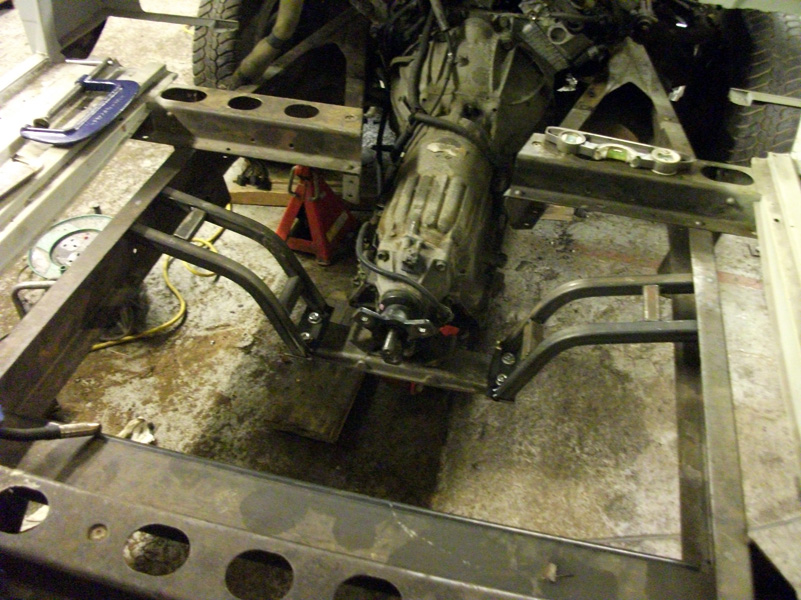


That was just yesterday so I haven't finished it yet but you get the idea. I will be putting another 2 bits of box between both brackets to strengthen it all up.
I have also been thinking of clearance around the air intake. Where it is just now it comes out pretty much where I will need a seat. I thought about raising the seat height (which I need to do anyway) but I would need to raise it way too much for it to be comfortable for me sitting.

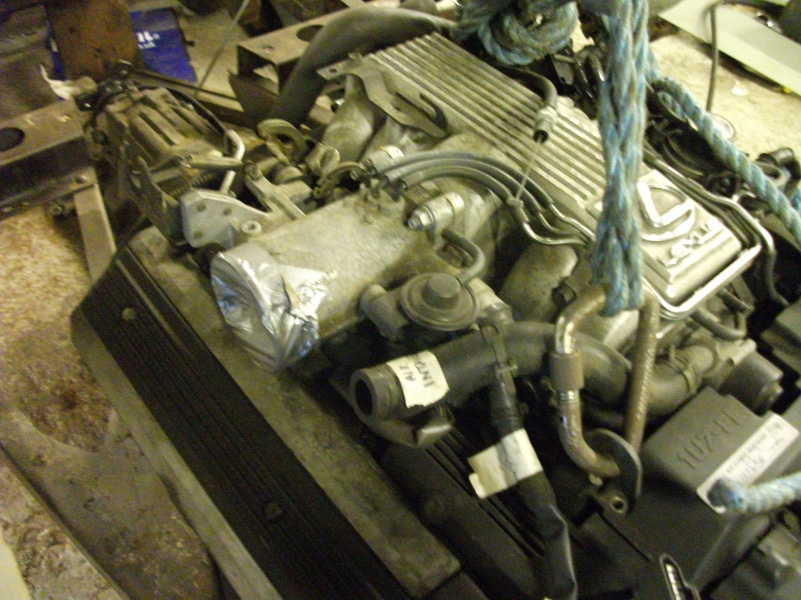

My solution is to re-position the throttle body away from the manifold. I have bought 3 76mm Stainless steel elbows and found some 6mm stainless to use as flanges and using my Tig I plan to join it all so it will look something like this, with the throttle body now above and pointed behind. Aslong as its airtight it shouldn't cause any running issues.
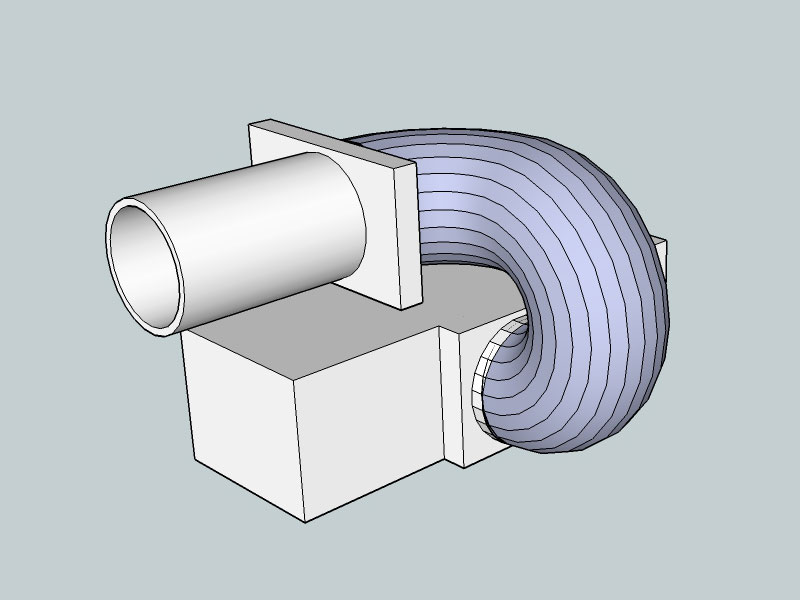
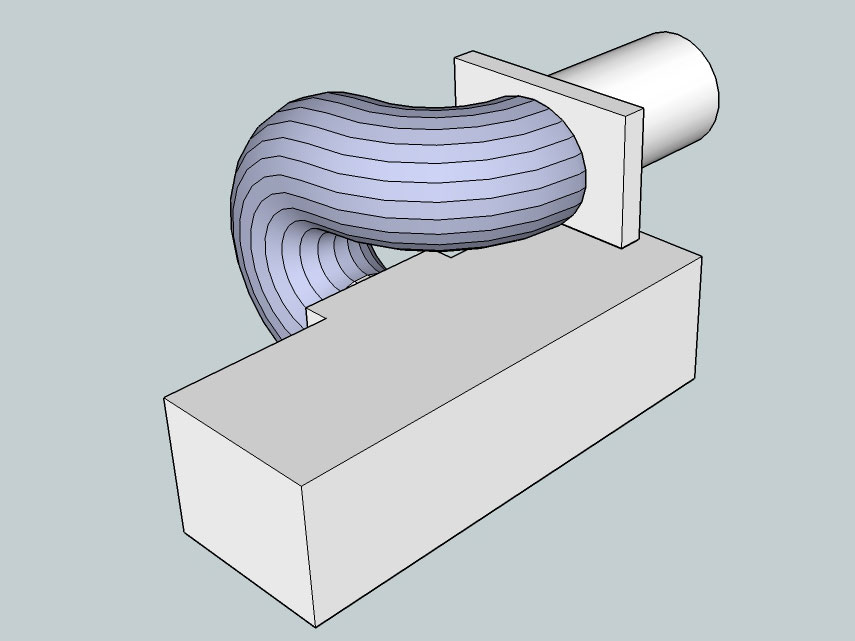
Remember the 'bonnet' has a double hump so there is plenty of clearance underneath.

Oh, The engine mounts arrived so i also put them on.

I am setting myself a goal. The Scottish Ford day I went to last year was good fun and I hope to get it along again this year. So, my goal is to have the van towed down like last time but for it to be able to move under its own power to get it into position at the show. Which means I have a lot to do like finish up the engine bay, prop shaft, brakes and steering re-hauled, modified, replaced etc.. Scottish Ford day is September 7th, so 7 months and 12 days to go. Wish me luck!
This month I have been focusing on clearance issues and getting the engine in its place. I went along to the garage a couple of times and checked over the engine and after lots of measuring I decided to use the original engine mounts but with different (thinner) rubber bushes and fabricate new chassis mounts.
First thing I done was remove a section of the chassis to allow easier removal and installation of the engine and box. I marked in chalk where I wanted to cut.
When removed it made it a lot easier to jack the engine up on my own and position it easier. I will be welding on a few bits of angle back to the chassis so I can have this section as a bolt on piece for the future should I need to work on it again.
The sump was fowling both the steering track rod and the suspension cross brace.
So I had to come up with a solution to it. I had a few options.
1. Cut a section of the sump out at the rear and move the whole engine back to let the track rod have the space but doing so might still not give me enough room.
2. Raise the height of the engine to clear both with out modifying the sump or anything at all. Bad point is it raises the centre of gravity, larger angle for the prop shaft to run and fitting seat would be tricky, so I pretty much blanked this.
3. Cut 20-30mm of the front of the sump to allow the trackrod to move. This is a good contender as the oil pickup wouldn't get interfered with as it sits far enough to the rear
4. Heat and bend the trackrod and extend it ever so slightly. I have determined the trackrod to be made of forged steel so it would be possible to do all this then get it re-tempered again. I'd really rather not have to mess with anything to do with the steering though.
5. Get a whole rear sump from a soarer, unfortunately there's not many soarers around here.
In the end I went with number 3.
Having made that conclusion I got the engine where I wanted it and measured up for a set of chassis brackets. I also spent about 3 days trying to source suitable rubber bushes. After a lot of searching I ended up going with BMW M20 bushes. They are a nice simple design. M10 thread, 67mm round and 47mm tall. If they work on a BMW engine then they should be upto the 1UZFE. Plus at £9 each they are affordable. I ordered a set and used a piece of threaded rod as a spacer whilst waiting on them arriving.
The way I worked out where I needed the brackets to go I worked out the width of the inside of the chassis rails which was 600mm then the width between the engine mounts was 505mm. That gave me 95mm clearance, divided by 2 is 47.5mm. That's how much each chassis bracket hole had to stick out by. Next was height. I knew the BMW mounts were 47mm tall so I took that into account and marked it on the chassis.
(the scribbles probably mean more to me)
At this point I realised that it would interfere with another piece that joins the cross brace to the chassis. It was made from quite thick metal so I assumed it was definitely needed for strength.
I looked at the engine mounts and realised there 25mm off set from the centre of the bolts. I swapped both sides over which put the offset further back.
I moved my marks 50mm further back and clearance was fine.
I moved onto fabricating some brackets. With all my sizes in my note book I done a couple of sketches and came up with a nice simple bracket. I cut the base out of card and double checked my sizes were fine then cut all I needed from some 6mm plate.
Tacked and welded them up.
Then cleaned up.
I lifted the engine back up and tacked the brackets on with an inch of weld either side. Strong enough to support the engine but easy enough to remove if I had to reposition them. I also used my piece of threaded rod as the bushes hadn't arrived yet.
I slowly lowered the engine and hoped for the best. They lined up perfectly and I checked engine mounts off my list.
With the position finalised I checked over all my other clearance worries.
Sump sits about 15mm from the cross brace, plenty enough for me.
May need to do a little check-out for the alternator unless I reposition it up to where the steering pump was (not going for power steering in the van)
Even the oilfilter has access in its stock location. The perspective of the photo makes it look closer to the spring than it is, its fine, although I may use a Hi-lux filter as its a little shorter in length.
I haven't modified the sump yet but will do soon.
I placed the stock radiator in place to see what it looks like. Im unsure what to do with the rad. It is quite thick so I may get it re-cored and see how it goes. I know of someone in Australia that has a rover V8 in his Thames and uses the stock rad with good results. If I could find a thin engine fan it might get bolted in, or an electric fan pushing through.
A few weeks later I had been thinking of how to mount the gearbox mount. I used the original Lexus bushes and mount bracket and came up with a little idea for chassis mounts.
First I cut 2 pieces of 6mm plate, drilled some holes and bolted them into place for something to start from.
I toyed with a few ideas and ended up using some 25mm thick wall box section I had left over from another job. I experimented with my pipe bender to put a nice radius in them rather than a sharp angle cut and welded.
My apprentice... Sorry, my brother came along and helped me out with some cutting and coffee.
With his help I made a pair of brackets up and tacked them into place. Oh, to get my position for the gearbox I first made sure the shaft was in the centre of the chassis rails. Then remembering my pinion angle on the gearbox was 2 degrees I lowered the jack under the gearbox so it was also perpendicular at 2 degrees and took all my measurements from there.
That was just yesterday so I haven't finished it yet but you get the idea. I will be putting another 2 bits of box between both brackets to strengthen it all up.
I have also been thinking of clearance around the air intake. Where it is just now it comes out pretty much where I will need a seat. I thought about raising the seat height (which I need to do anyway) but I would need to raise it way too much for it to be comfortable for me sitting.
My solution is to re-position the throttle body away from the manifold. I have bought 3 76mm Stainless steel elbows and found some 6mm stainless to use as flanges and using my Tig I plan to join it all so it will look something like this, with the throttle body now above and pointed behind. Aslong as its airtight it shouldn't cause any running issues.
Remember the 'bonnet' has a double hump so there is plenty of clearance underneath.
Oh, The engine mounts arrived so i also put them on.
I am setting myself a goal. The Scottish Ford day I went to last year was good fun and I hope to get it along again this year. So, my goal is to have the van towed down like last time but for it to be able to move under its own power to get it into position at the show. Which means I have a lot to do like finish up the engine bay, prop shaft, brakes and steering re-hauled, modified, replaced etc.. Scottish Ford day is September 7th, so 7 months and 12 days to go. Wish me luck!
Zuffen- Number of posts : 165
Location : Sydney Australia
Registration date : 2011-07-28
Kevin,
I run a stock Range Rover radiator with my 1UZ.
At one stage I had a supercharged 1UZ making a little under 600hp and the radiator handled it with ease.
I'd say go for the Rover rad.
On the throttle body front they can be shortened by cutting the excess length off after the throttle blade and it doesn't effect its performance.
I've seen these with the throttle body mounted vertically on the plenum so you could consider blocking off the original inlet and having the air enter from above with a single 90degree bend to the rear.

Similar topics

|
|
|