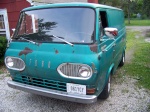
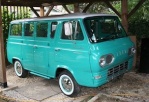
Last weekend i got back to the garage. I wanted to start straight away but because i left the place in a dump i thought id be best to clean up and start fresh. The toilet was disgusting, When the pipes burst the plumber warned us not to keep the water tap on as because the place isnt in use often then there was a chance it could burst again (im not so sure how reliable that information is). I think a few people must have went to the toilet and left it unflushed, the water was minging and there was actually mushrooms growing along the walls. That all got bleached and swept up. The workshop was also a bit of a mess. when i left the last time i never expected to be gone for so long so there was old milk bottles and cups with mould inside, bleurgh! I never got one bit done to the van except stare at it and work out where to start on the bodywork.
On another note, This Saturday was my little nephews three year old birthday so i wanted to make him something special. I stayed behind work a few days last week and took a day and a half off to make this digger for him. He loves watching them and looking at pictures of them.
I started with the dimensions. I dont have any kids of my own so working out the sizes was a bit of a hit and miss. I thought bigger rather than smaller would be better, he could always 'grow into it'. I made a couple of crappy sketches to get a rough idea of the sizes.

Then when i was happy i made a real scale drawing of the side

and front/side

I work at a salvage yard, mainly restoring old georgian/victorian casts. They always get extended and I use 3mm plate for that so i had plenty of scrap off-cuts. It may seem heavy duty but it was free. I started by cutting the panels for the cab out with the grinder and tacking them together. Then i used 25x50 box for the chassis rails. I like asthetics so i rounded the ends of with some 50mm pipe cut in half and welded on.

I never really took any detailed photos of the build ( which i should have) For the treads i but out 3 inch strips of 3mm plate. I used a bit of 90mm pipe to bend round for the ends and cut out a plate for the centre. The base was cut out and the ends formed around the 90mm pipe again. I took some more 25x50 box and cut out a long triangle in the centre and welded it back together to create a smooth 50mm to 25 mm taper.

I got an old leather jacket from my dad and wrapped it along with some foam over a bit of plywood to create a seat.


I never got a photo of the underside but i made a basic chassis underneath, pretty much a rectangle with an extra brace in the centre using 25x50. Two wheels at the back are fixed and two at the front can roate so it has some steering. I realised at this point that the track was quite narrow so i had to think of some stabilizing for it I later welded on some plates to the side with 40mm castors so it still had ground clearance but wont tip over. I also tacked on the main boom.

Again i forgot to take more pictures. At this point i had completed everything and took it home to paint. I chose 'traffic yellow' for the cab and arms and a gloss black for the track and base. For a bit of detail i bought some fablon (black vinyl) and printed out his name 'Ruaridh' (pronounced roo-a-ray) and used that as a template to cut around. I also photoshoped the JCB logo to his initials RRB and cut out some windows. Oh, my house isnt always this messy, i had no time to clean up as i had about an hour before his birthday party to finish everything.


Starting to build it all up now. I started getting excited seeing it nearly finished.


And that was it finished. I was really happy with how it turned out.

The paint was still a bit soft so i wrapped it up in an old bed sheet so it wouldnt stick. Seeing his wee face when he opened it made it all worthwhile. I was a bit apprehensive as to if he could actually use the levers as its quite a bit of weight. He managed it ok but it will be better in a few years, right now he can get the bucket out a bit but any further and it drops. He should have a bit more strength soon enough to get the full reach.


And heres yours truly getting a well earned shot.

Im really happy with it, i know i could have went and bought one but its not the same is it. This is a bit more personal and it should last 10 times longer than a plastic one.
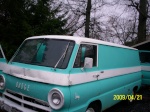
Today (24/4/11) i went to the garage and started on the metal work (Atlast!!!!) The paint that is remaining on the body seems to be in areas that im goping to be cutting out or working around so what paint is left i will deal with as i restore.
I thought the best place to begin would be with an easy bit. The passanger side of the van is'nt as rusty as the drivers so i started there. Just above the passanger door the channel is quite rusty at the front.

So i cut it out.


A lot of the front of it had rusted out completley. I Started to make a template to replace the area and think really hard about how the bits that are gone would look. Wow, i never realised just how long it took to think about, mark and cut a basic template out. It was made a little harder as the bit that had gone was curved and raises up slightly. Looking at it from the top it also curves slightly from where the door would line up. I must have spent atleast 3 hours figuring everything out and making a cardboard template. I realised you also have to think about how everything is placed together, like what over-laps what and where spotwelds will go.


I then placed it upto the body using masking tape to hold it in place and made a few slight changes but thankfully it all pretty much lined up.


Now i need to get a sheet metal folder. Ive looked at ones on the internet and i dont have a spare £200 for a decent one and the likes of machinemart and screwfix they all look a bit flimsy and poor quality. So , i might just have to make one. Thats probably what il post next time.
On another note, This Saturday was my little nephews three year old birthday so i wanted to make him something special. I stayed behind work a few days last week and took a day and a half off to make this digger for him. He loves watching them and looking at pictures of them.
I started with the dimensions. I dont have any kids of my own so working out the sizes was a bit of a hit and miss. I thought bigger rather than smaller would be better, he could always 'grow into it'. I made a couple of crappy sketches to get a rough idea of the sizes.
Then when i was happy i made a real scale drawing of the side
and front/side
I work at a salvage yard, mainly restoring old georgian/victorian casts. They always get extended and I use 3mm plate for that so i had plenty of scrap off-cuts. It may seem heavy duty but it was free. I started by cutting the panels for the cab out with the grinder and tacking them together. Then i used 25x50 box for the chassis rails. I like asthetics so i rounded the ends of with some 50mm pipe cut in half and welded on.
I never really took any detailed photos of the build ( which i should have) For the treads i but out 3 inch strips of 3mm plate. I used a bit of 90mm pipe to bend round for the ends and cut out a plate for the centre. The base was cut out and the ends formed around the 90mm pipe again. I took some more 25x50 box and cut out a long triangle in the centre and welded it back together to create a smooth 50mm to 25 mm taper.
I got an old leather jacket from my dad and wrapped it along with some foam over a bit of plywood to create a seat.
I never got a photo of the underside but i made a basic chassis underneath, pretty much a rectangle with an extra brace in the centre using 25x50. Two wheels at the back are fixed and two at the front can roate so it has some steering. I realised at this point that the track was quite narrow so i had to think of some stabilizing for it I later welded on some plates to the side with 40mm castors so it still had ground clearance but wont tip over. I also tacked on the main boom.
Again i forgot to take more pictures. At this point i had completed everything and took it home to paint. I chose 'traffic yellow' for the cab and arms and a gloss black for the track and base. For a bit of detail i bought some fablon (black vinyl) and printed out his name 'Ruaridh' (pronounced roo-a-ray) and used that as a template to cut around. I also photoshoped the JCB logo to his initials RRB and cut out some windows. Oh, my house isnt always this messy, i had no time to clean up as i had about an hour before his birthday party to finish everything.
Starting to build it all up now. I started getting excited seeing it nearly finished.
And that was it finished. I was really happy with how it turned out.
The paint was still a bit soft so i wrapped it up in an old bed sheet so it wouldnt stick. Seeing his wee face when he opened it made it all worthwhile. I was a bit apprehensive as to if he could actually use the levers as its quite a bit of weight. He managed it ok but it will be better in a few years, right now he can get the bucket out a bit but any further and it drops. He should have a bit more strength soon enough to get the full reach.
And heres yours truly getting a well earned shot.
Im really happy with it, i know i could have went and bought one but its not the same is it. This is a bit more personal and it should last 10 times longer than a plastic one.
Today (24/4/11) i went to the garage and started on the metal work (Atlast!!!!) The paint that is remaining on the body seems to be in areas that im goping to be cutting out or working around so what paint is left i will deal with as i restore.
I thought the best place to begin would be with an easy bit. The passanger side of the van is'nt as rusty as the drivers so i started there. Just above the passanger door the channel is quite rusty at the front.
So i cut it out.
A lot of the front of it had rusted out completley. I Started to make a template to replace the area and think really hard about how the bits that are gone would look. Wow, i never realised just how long it took to think about, mark and cut a basic template out. It was made a little harder as the bit that had gone was curved and raises up slightly. Looking at it from the top it also curves slightly from where the door would line up. I must have spent atleast 3 hours figuring everything out and making a cardboard template. I realised you also have to think about how everything is placed together, like what over-laps what and where spotwelds will go.
I then placed it upto the body using masking tape to hold it in place and made a few slight changes but thankfully it all pretty much lined up.
Now i need to get a sheet metal folder. Ive looked at ones on the internet and i dont have a spare £200 for a decent one and the likes of machinemart and screwfix they all look a bit flimsy and poor quality. So , i might just have to make one. Thats probably what il post next time.