VintAGE-Vans

Would you like to react to this message? Create an account in a few clicks or log in to continue.

BRINGING IT ALL TOGETHER.... A's, G's & E's


+49
sundanceuk
jimthefred
66mnecotruck
vanny
RipVanArkie
BlueSteel
Scotts_A100
RodStRace
campin'fool 2
jkr
Gothboy
dodge man
1040imp
transam400
Vanner63
dan nachel
sidspop
Vanadian
kykayaker37
white-lightning
Rayallen
southern man
whopman
Scott
VanninBlaino
Stoopid john
Zuffen
bumpbug
DanTheVanMan
Big W
Nightmoves
kgdb
wylee
EconoUSAparts
sasktrini
Vantastic
toad
Oldsmobubble
Twinpilot001
SDEconoTruck
econopoor
bugeye bob
Sy Hollinshead
dix
austinmodhouse
67a 100 pickup
G-Man
Van Halen
kevbarlas
53 posters

    1959 Ford Thames camper van restoration

    DanTheVanMan
    DanTheVanMan
    Commissioner
    Commissioner


    Number of posts : 7900
    Location : Escanaba, Michigan
    Age : 62
    Registration date : 2008-10-08

    1959 Ford Thames camper van restoration  - Page 6 Empty Re: 1959 Ford Thames camper van restoration

    Post by DanTheVanMan Wed Sep 12, 2012 3:47 pm

    Kev,
    You are truly a "Marveled Master of the Metal"!!!

    Always a pleasure to view you posts and follow this amazing project van as it slowly reborn thanks to your skilled hands and dedication to preserving this very unique vehicle.

    And from "all" of the members here at Vintage-Vans:
    I'd like say "Congratulations to you and your bride on your upcoming wedding! queen king

    And again, it's always a pleasure viewing this post and look forward to seeing more updates after a bit of time of course!

    DanTheVanMan


    _________________
    DanTheVanMan    
    1965 Chevy G10 Sportvan Custom
    1984 Jeep CJ-7 Laredo, Restored
    2004 Kawasaki KLR650
    1997 Jeep TJ Sport

    My Mini Gallery

    1959 Ford Thames camper van restoration  - Page 6 Qr_cod10

    <-<-<- Cruising is not a "Point A to Point B" thing, but an "Everything in between thing!  <-<-<-
    1040imp
    1040imp


    Number of posts : 42
    Location : Glasgow Scotland
    Registration date : 2012-09-24

    1959 Ford Thames camper van restoration  - Page 6 Empty Re: 1959 Ford Thames camper van restoration

    Post by 1040imp Tue Sep 25, 2012 1:49 pm

    What an amazing resto. I hope to see this one about the Scottish shows some day.

    avatar
    kevbarlas


    Number of posts : 60
    Location : Edinburgh, Scotland
    Registration date : 2010-12-09

    1959 Ford Thames camper van restoration  - Page 6 Empty Re: 1959 Ford Thames camper van restoration

    Post by kevbarlas Sun Nov 04, 2012 2:16 pm

    November update 2012

    Well, i did it, i got married. It was a great day and i now have a wife. One extra cool thing was my dad made me a sword. He made my brother a dirk (long dagger) for his wedding a few years ago and i remember saying i wanted one too when i got married, but bigger (as brothers do). So my wish came true and he hand crafted me this.

    1959 Ford Thames camper van restoration  - Page 6 2movaec

    Its a hand and a half sword. The blade was a piece of steel he found in a skip i think and the handle was a piece of red-wood i gave him a while ago. The pommel piece was from a hydraulic ram cut to size and the brass was from bits he had lying around. Ive mentioned before how old-skool my dad is and he cut it all by hand, with a hacksaw and file, then hand polished to mirror like reflection. I love it!. He even made a strap for me to be able to wear it on my back, i wore it the whole day.
    1959 Ford Thames camper van restoration  - Page 6 Op1xn7

    Me and my beautiful wife , Jana Barlas.

    1959 Ford Thames camper van restoration  - Page 6 2zz3lvs

    I wasnt formerly told i was getting a sword so it was a great surprise to get it a week before the wedding. I did have a huge incline i would get a sword though. So i wanted to make something for my dad as thanks. I thought about a little kilt pin so i started to draw a few designs and got stuck on a mini claymore style one, like this.

    1959 Ford Thames camper van restoration  - Page 6 10nuadu

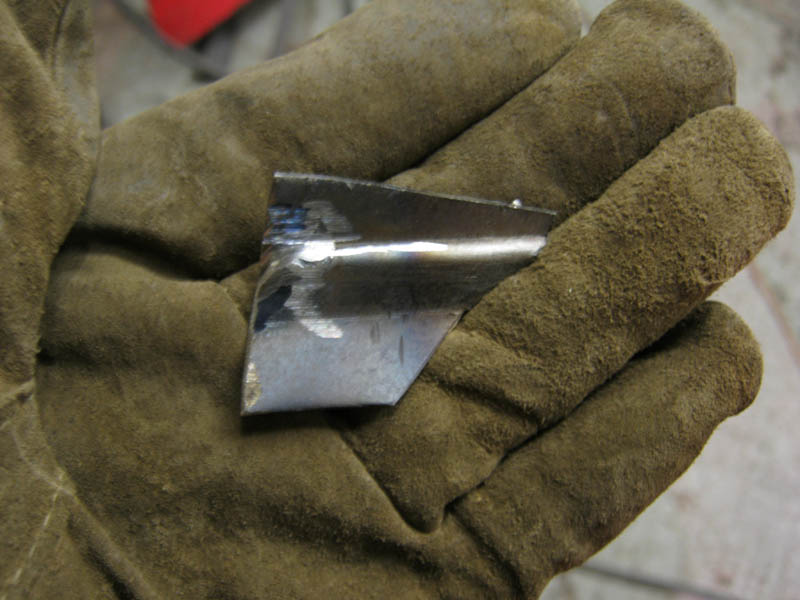
    I had a little piece of stainless steel left over from a stove handle i made so i shaped it into a blade.

    1959 Ford Thames camper van restoration  - Page 6 Nv8i0z

    Then i got a thick piece of brass and scribed the shape of the guard piece on it. drilled 6 holes for the decorative part and roughly cut it out.

    1959 Ford Thames camper van restoration  - Page 6 2crulo7

    Then the most labourious part, using some small jewelers files i added some shape and rounded the decorative ends off.

    1959 Ford Thames camper van restoration  - Page 6 2sany53

    1959 Ford Thames camper van restoration  - Page 6 Fdczug

    Then i made the handle, i had thought about using some copper pipe but i really wanted it to be about 6mm wide all i could find was 8mm which put it out of scale a little. I then had an idea of using a piece of 6mm round bad and cutting a spiral in it with a hacksaw. Then using the jewlers files again, i rounded the cut mark off to give it a kind of 'rope' look.

    1959 Ford Thames camper van restoration  - Page 6 N6fh93

    After that i drilled a hole through the guard piece, into the blade and into the handle and tapped it to m4 i think, then threaded a piece of brass so when it was all tightend together it wouldnt come back off easily. A little ball of brass was put drilled and tapped and held in a drill. I used a file and spund the drill to act like a ghetto lathe then glued the brass end cap on the handle. I bought a basic large nappy style pin and welded it on the back of the blade part. Little bit of a spit and polish and it was done.

    1959 Ford Thames camper van restoration  - Page 6 14mt835

    1959 Ford Thames camper van restoration  - Page 6 2tmab

    The day before the wedding we got the kilts from the hire shop and my dad tried his kilt ont. Thats when i gave it to him. When i first gave him it he said thanks and then i told him i made it he couldnt belive it, He thought i had just bought it, awesome.


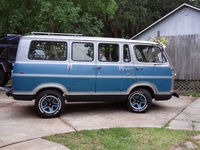
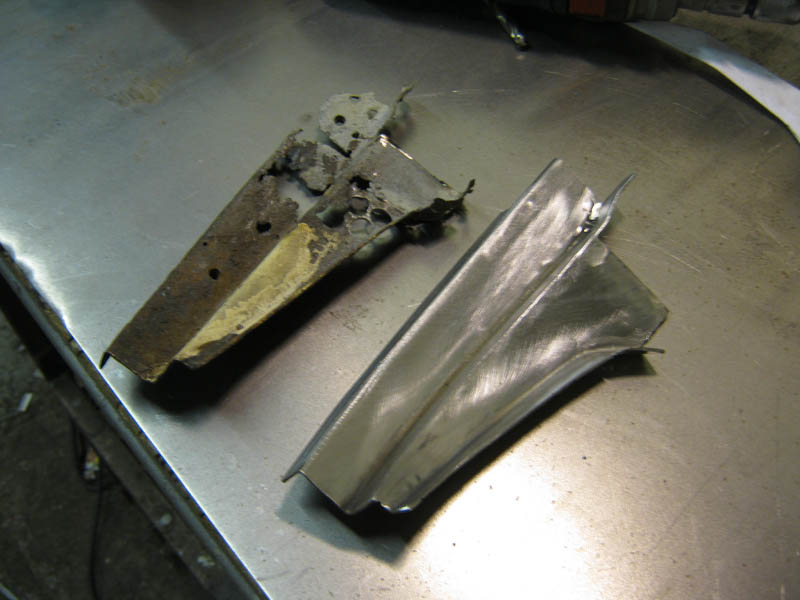
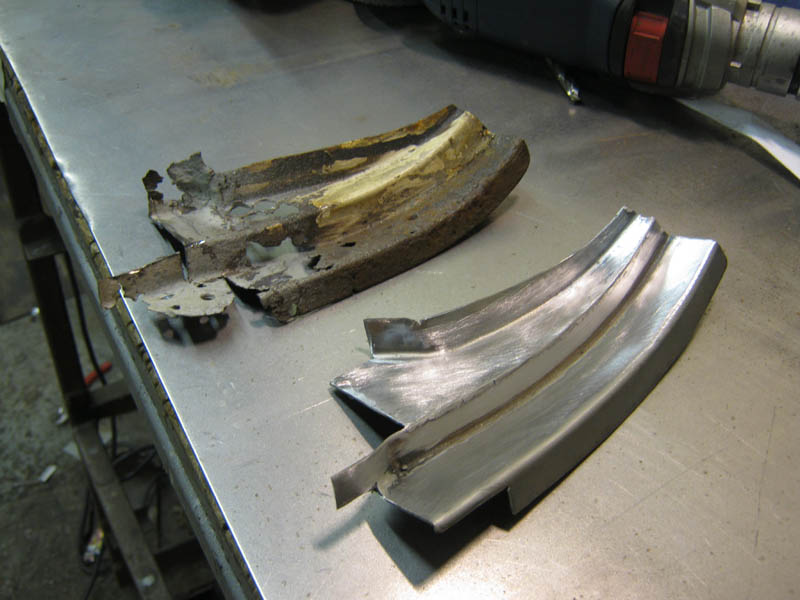
    Anyways, back to the main reason im writing this blog thing, the van! I did get a few days of work done when i could over all the wedding jazz. Just before the big day I made the other dished panel for the rear of the van, using the one i had made already as a template and working in a mirror reflection kind of way. Mark it all out using a scribe then chalk around it so i know what lines to follow, the cutting disc was a good size for the dished area.

    1959 Ford Thames camper van restoration  - Page 6 5knb7a

    dished part first, lots of blows then tidying up the edge.

    1959 Ford Thames camper van restoration  - Page 6 140wv1w

    1959 Ford Thames camper van restoration  - Page 6 20hqyk8

    Cut and fold the lines and weld it up.

    1959 Ford Thames camper van restoration  - Page 6 2yzjvqa

    1959 Ford Thames camper van restoration  - Page 6 14vji8y

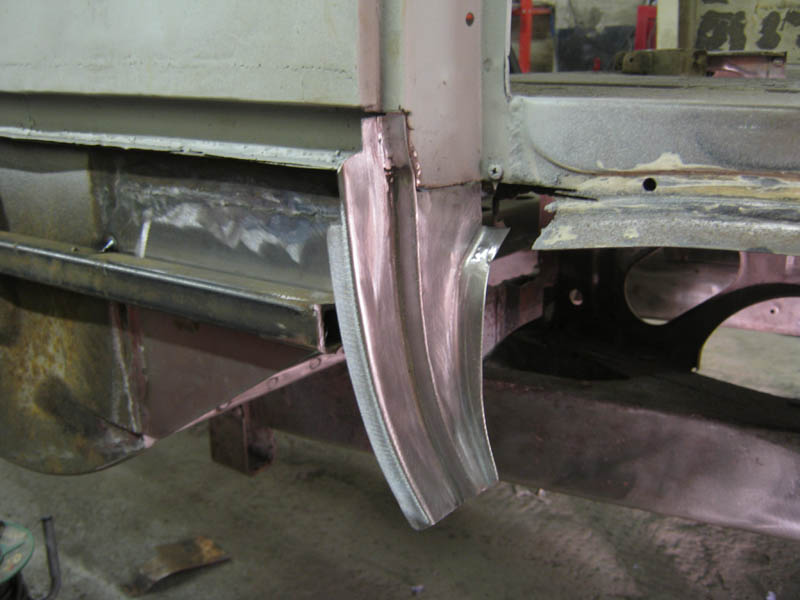
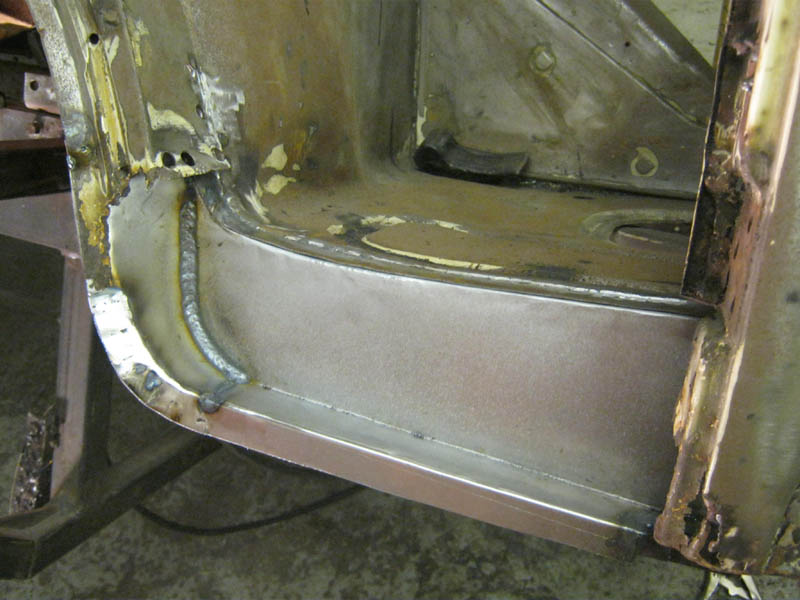
    I then tacked them in place to get an idea of how the back end will fit together.

    1959 Ford Thames camper van restoration  - Page 6 V75gl1

    1959 Ford Thames camper van restoration  - Page 6 30ufwj8

    Not bad, getting there.

    1959 Ford Thames camper van restoration  - Page 6 2lw4uiu

    I was driving home from work one night with the work van and i drove past an newsagent that had chucked an old newspaper stand out in a skip. So i went back at night and took it out, perfect for keeping my garage a bit neater.

    1959 Ford Thames camper van restoration  - Page 6 2z4mir4

    The next peice i started on was getting the rear valance sorted. I was waiting on some more 1.2mm sheet so i thought id make the smaller peice up in 2 sections then join them together. This is the peice i started on.
    outside:

    1959 Ford Thames camper van restoration  - Page 6 Bdmt5i

    Inside:

    1959 Ford Thames camper van restoration  - Page 6 22mfxf

    2 rectangles cut to size.

    1959 Ford Thames camper van restoration  - Page 6 2ah9t21

    I folded them up seperatly on my folder.

    1959 Ford Thames camper van restoration  - Page 6 2hmk5tk

    I drew in chalk on the old piece to help me identify the crease lines.

    1959 Ford Thames camper van restoration  - Page 6 Kcnrs1

    Using the hammer, vice and a few other things i got the lines to match.

    1959 Ford Thames camper van restoration  - Page 6 6omliq

    Both ends done i tacked them to a straight edge and clamped them, then welded them together to make one longer panel.

    1959 Ford Thames camper van restoration  - Page 6 2rdhq2x

    Welded up

    1959 Ford Thames camper van restoration  - Page 6 20h125j

    1959 Ford Thames camper van restoration  - Page 6 1qn884

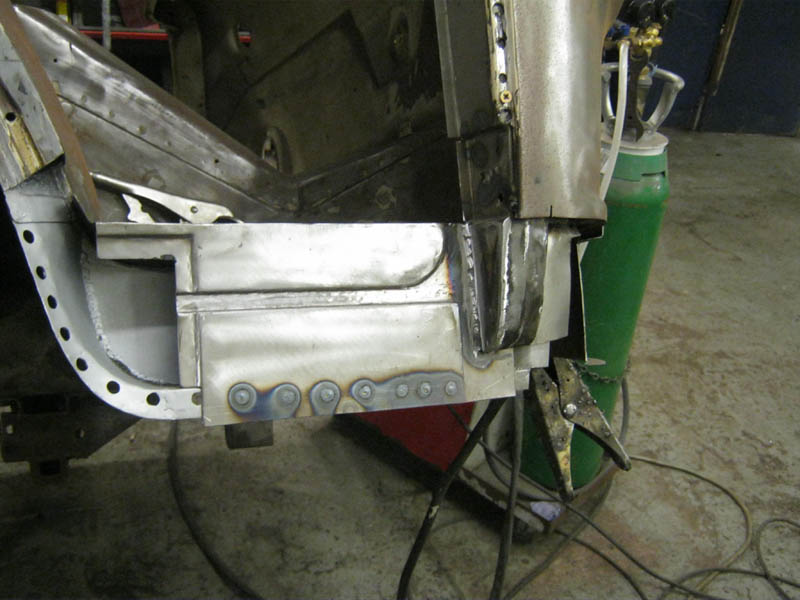
    Using my new hole saw i cut the 3 larger ones then drilled out the rest for spot welding them to the other panels.

    1959 Ford Thames camper van restoration  - Page 6 Fz54bs

    1959 Ford Thames camper van restoration  - Page 6 Idapw4

    I clamped it into position on the van to get an idea of it all together

    1959 Ford Thames camper van restoration  - Page 6 28i3zio

    Neat.

    1959 Ford Thames camper van restoration  - Page 6 2napdth


    On another note, i think ive gone off getting it dipped (this van has had lots of plan changes eh) . The main reason is cost, it would be minimum £1000 for it all to be done and thats not including trailering it somewehere down south, petrol, etc.... So, ive went back to the rust converter paint. I cleaned up the waist line metal on the inside and splodged a whole load of this stuff on it.

    1959 Ford Thames camper van restoration  - Page 6 2131xy9

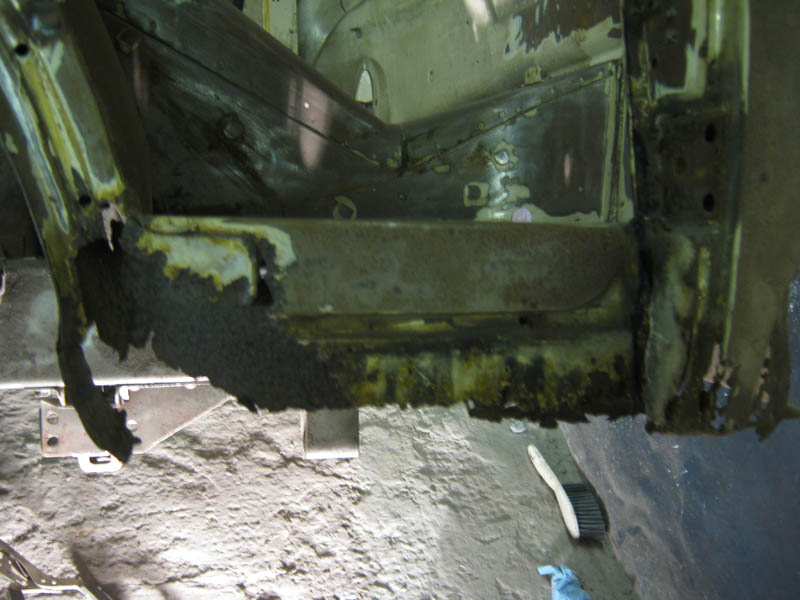
    The next part for the rear valance was the top peice. I wanted to re-do this in 3mm plate as this will get a lot of foot traffic being the first thing you step on to get in the back of the van. The old peice was all bent and dented and i dont want that. I had to bide my time though as i wanted to make this in the work and seeing as they helped out a lot anyway with holidays for the wedding i didnt want to push my luck. In the mean time i made a little start on the front, just under the drivers side wheel arch to be precise. I forgot my camera this day (well, i thought i did, turns out i just never noticed it was there) so i used my tablet pc for these, photo quality isnt the best.

    Outside doesnt look too bad

    1959 Ford Thames camper van restoration  - Page 6 Fm8jef

    But from the inside its gone.

    1959 Ford Thames camper van restoration  - Page 6 23hoto9

    1959 Ford Thames camper van restoration  - Page 6 Nld9w4

    I made some chalk marks of where to cut.

    1959 Ford Thames camper van restoration  - Page 6 6sz1jb

    Then quickly changed my mind as i realised i was cutting a double seam, so i moved it over a wee bit, oops.

    1959 Ford Thames camper van restoration  - Page 6 23i81p3

    *sigh*

    1959 Ford Thames camper van restoration  - Page 6 907d5c

    Just cut that crap out and re-make it.

    1959 Ford Thames camper van restoration  - Page 6 Atncxe

    As i was cutting i was making a plan of where to start. I treat it like a puzzle "well, i cant start there as that needs to be done first, but if i do that then that will mess up the idea for that bit, mmmhmmm, well, il do that, then i can do that."
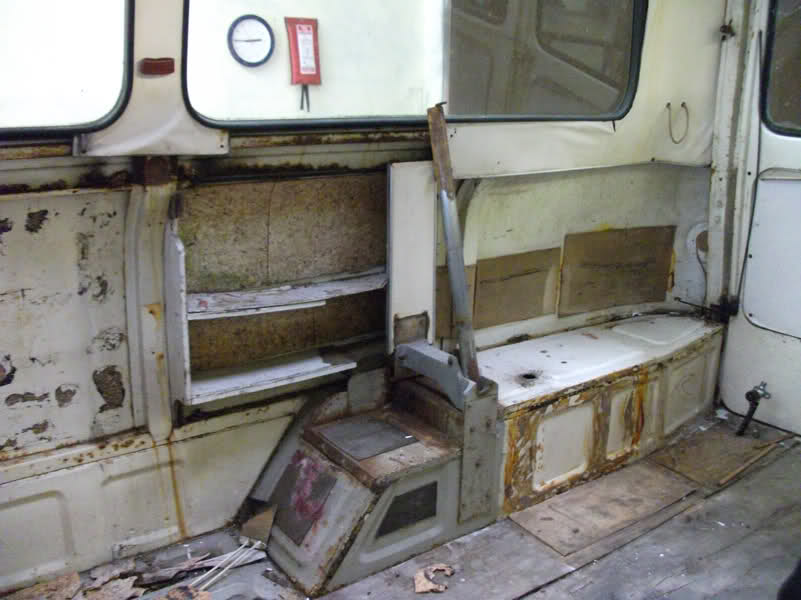
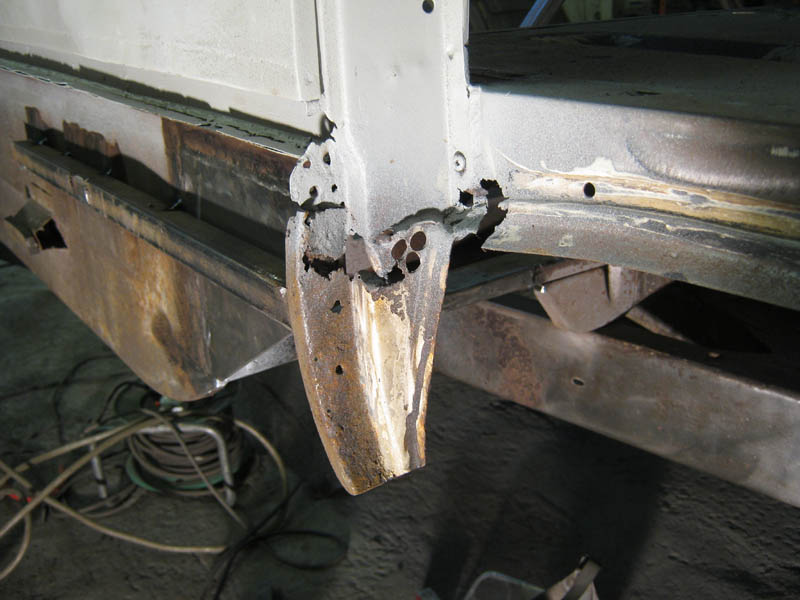
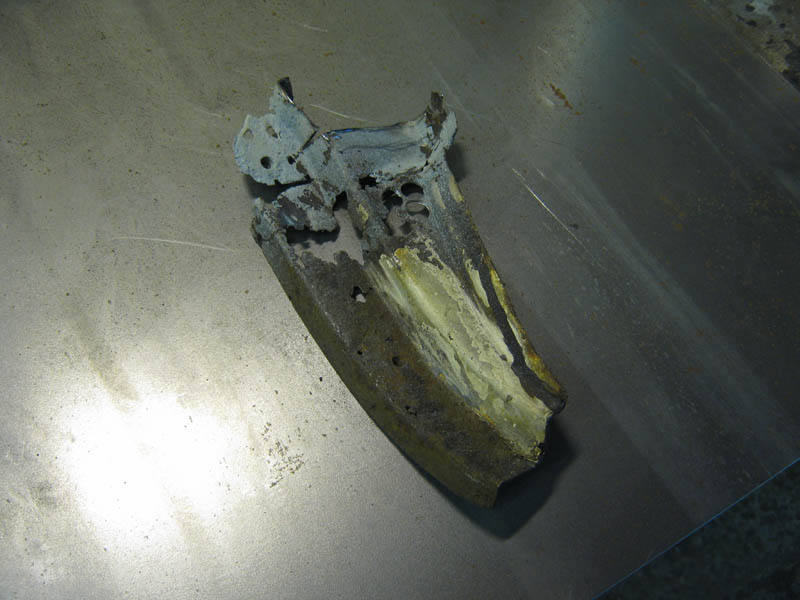
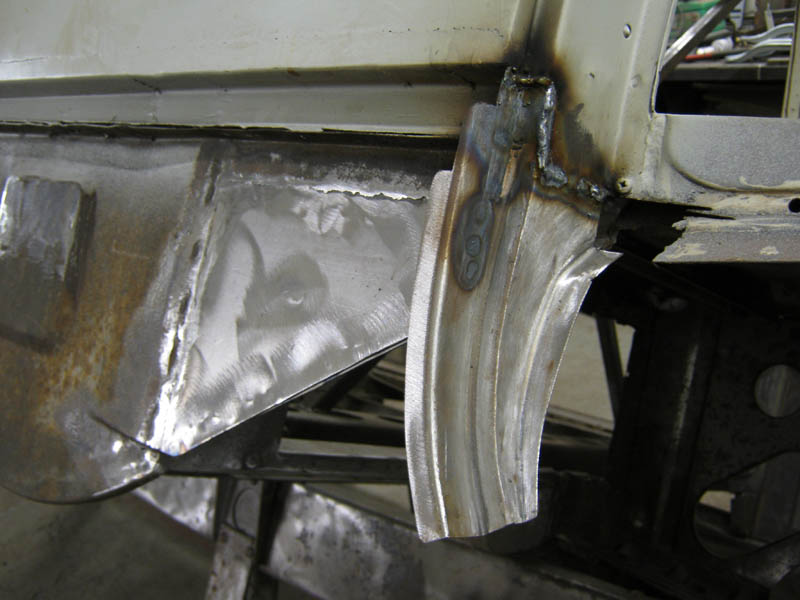
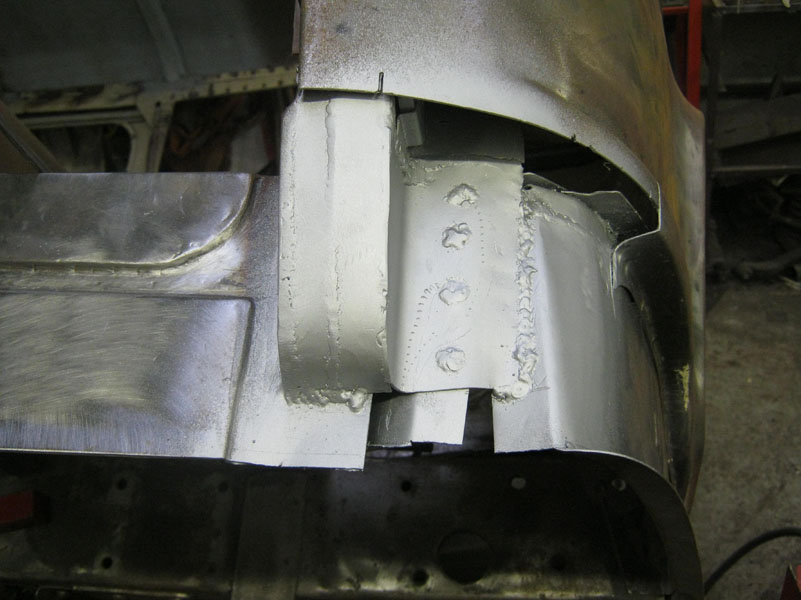
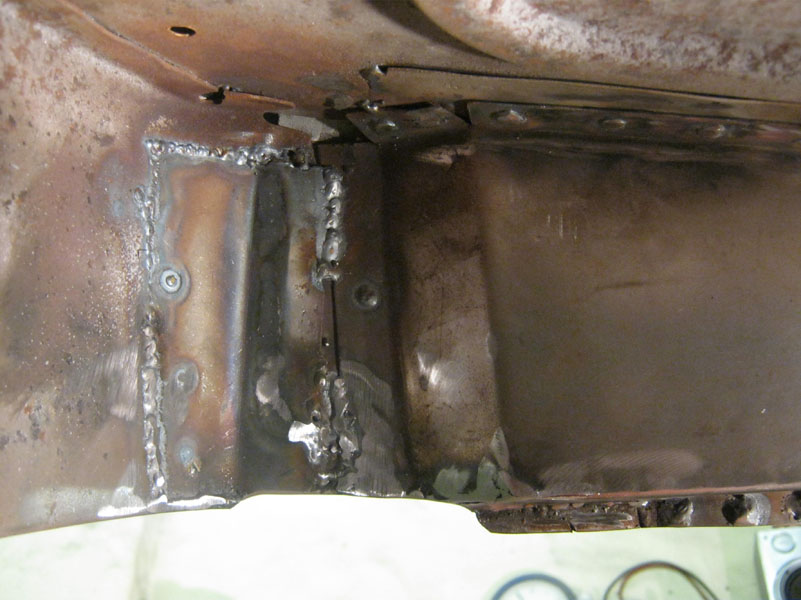
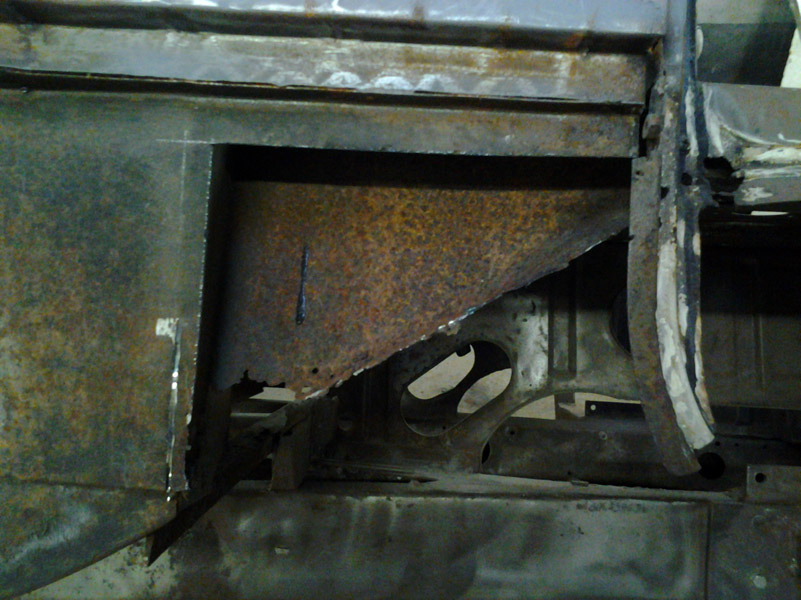
    First bit to do was remake the area around the rear inside. There is an aperture for a little storage box, i think it was just a dormobile thing as its been cut out with a torch or something and not very neat, like the rear wheel arch area i already fixed. It should become a bit clearer as i work.

    1959 Ford Thames camper van restoration  - Page 6 Vmud5f

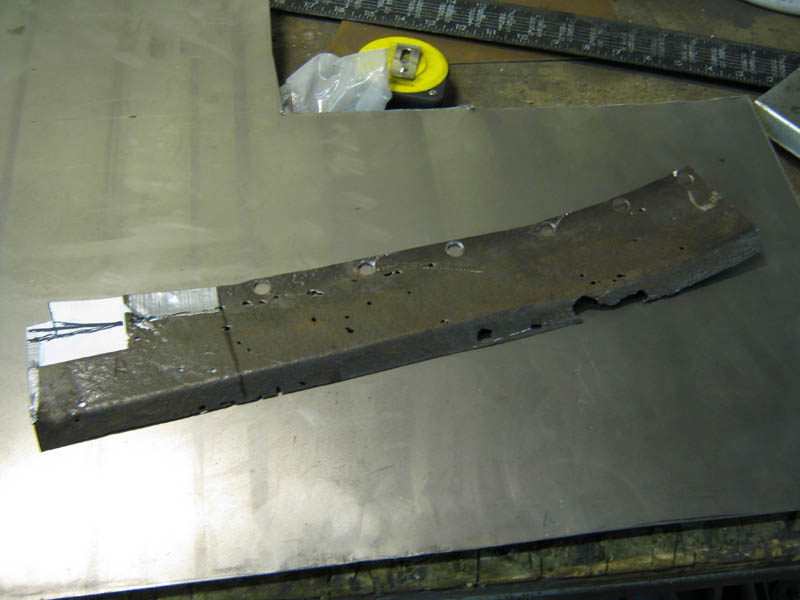
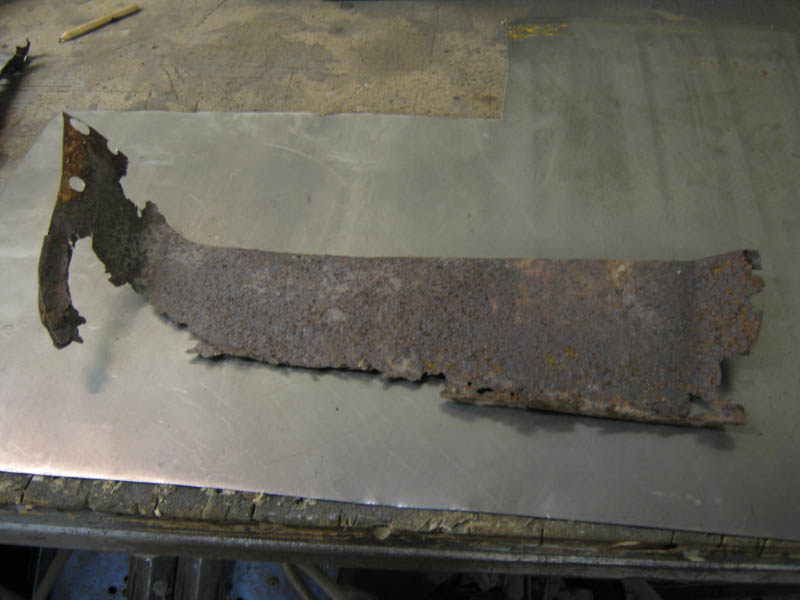
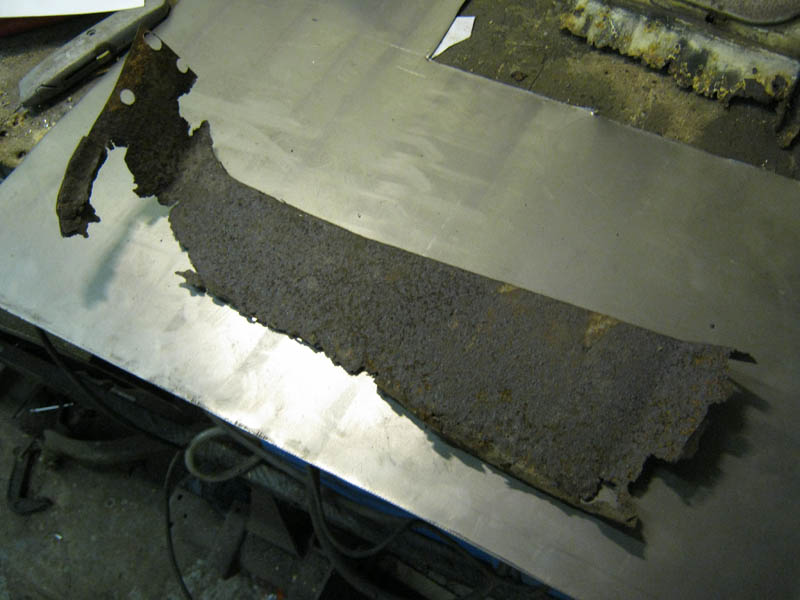
    I had this to work from.

    1959 Ford Thames camper van restoration  - Page 6 34rxi6x

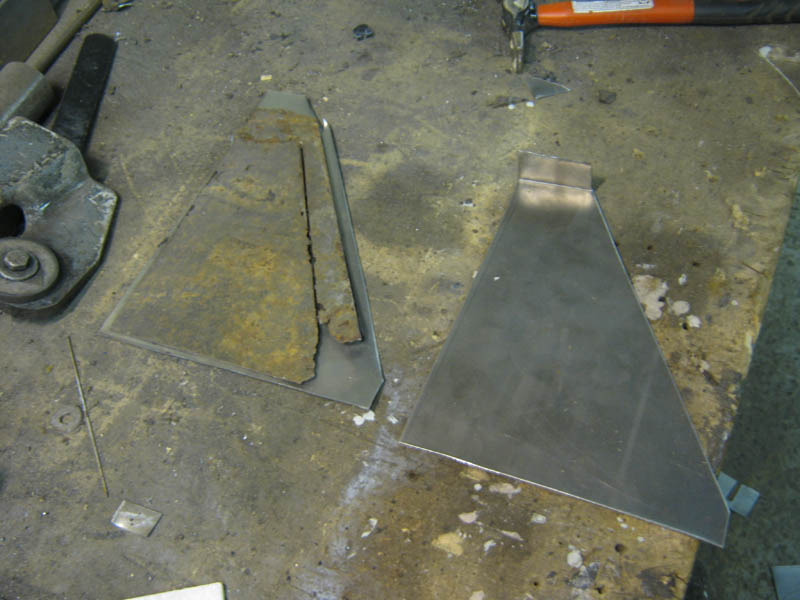
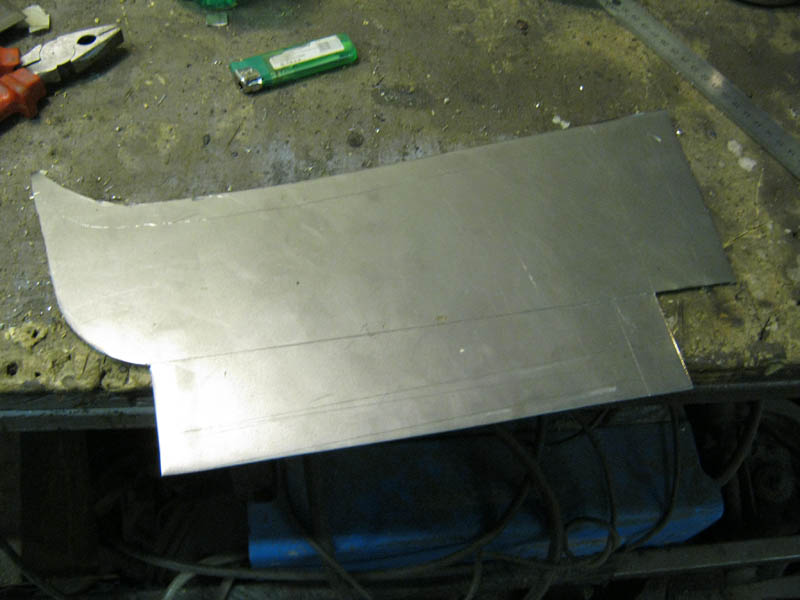
    Little bit of measruing and guessing i had this panel to cut out.

    1959 Ford Thames camper van restoration  - Page 6 2rynh8w

    Cut cut, snip snip.

    1959 Ford Thames camper van restoration  - Page 6 6st8it

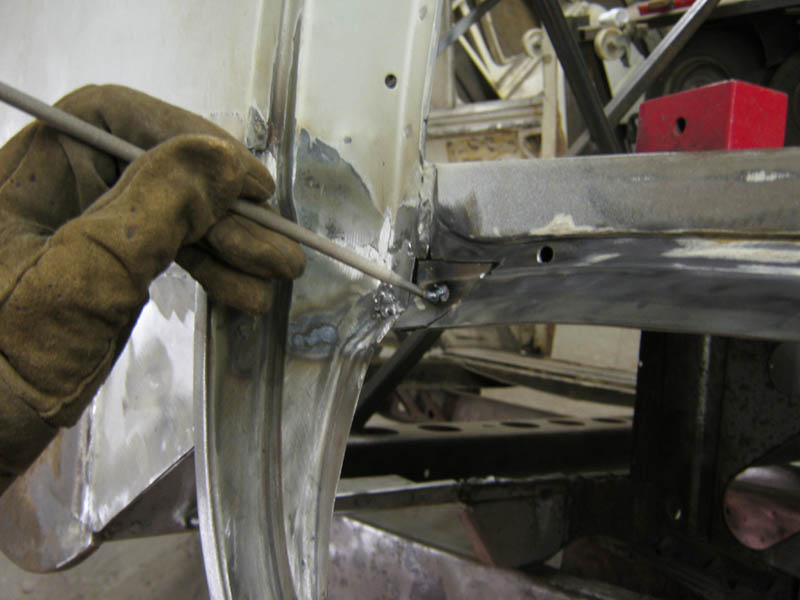
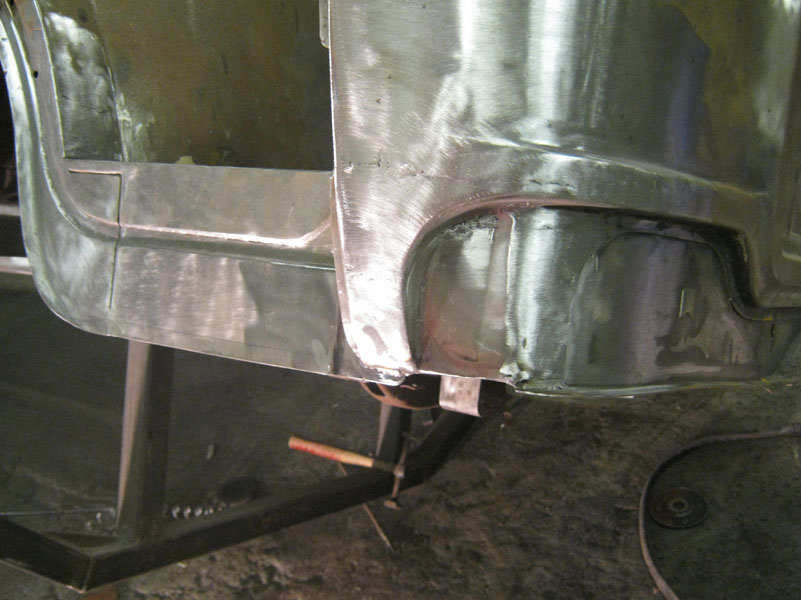
    Folded up and tacked in place.

    1959 Ford Thames camper van restoration  - Page 6 23ubzvq

    Clear now?

    1959 Ford Thames camper van restoration  - Page 6 97mzqo

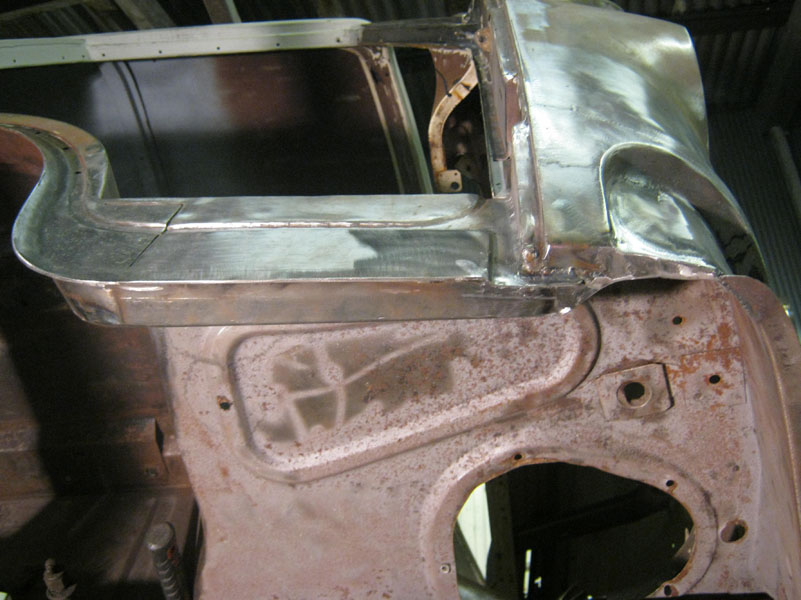
    I started on the next peice to put in there, that joins the floor pan area to this panel i made.

    1959 Ford Thames camper van restoration  - Page 6 2vc7za0

    Folded up

    1959 Ford Thames camper van restoration  - Page 6 14bqhz5

    To be continued.

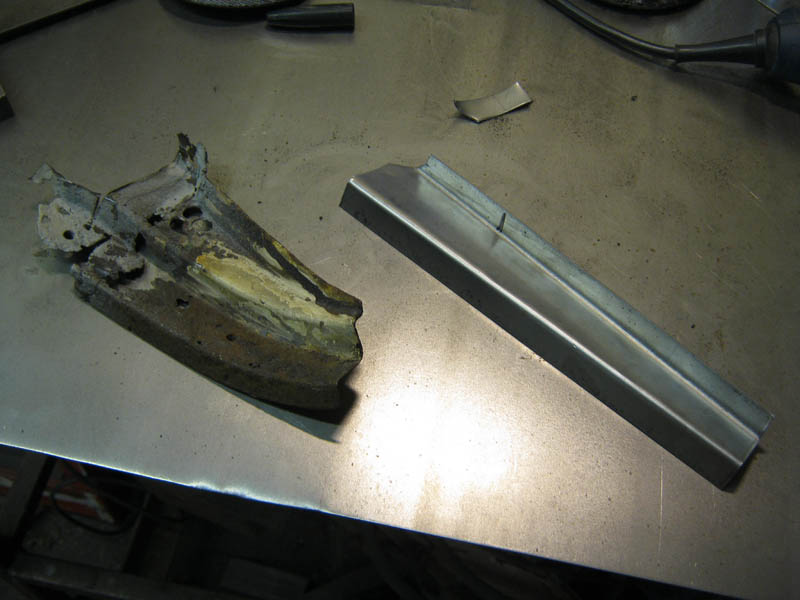
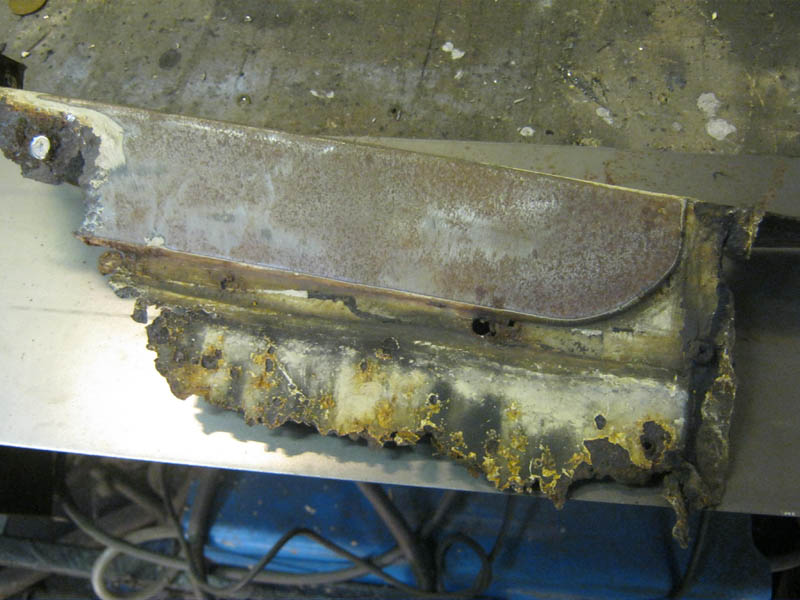
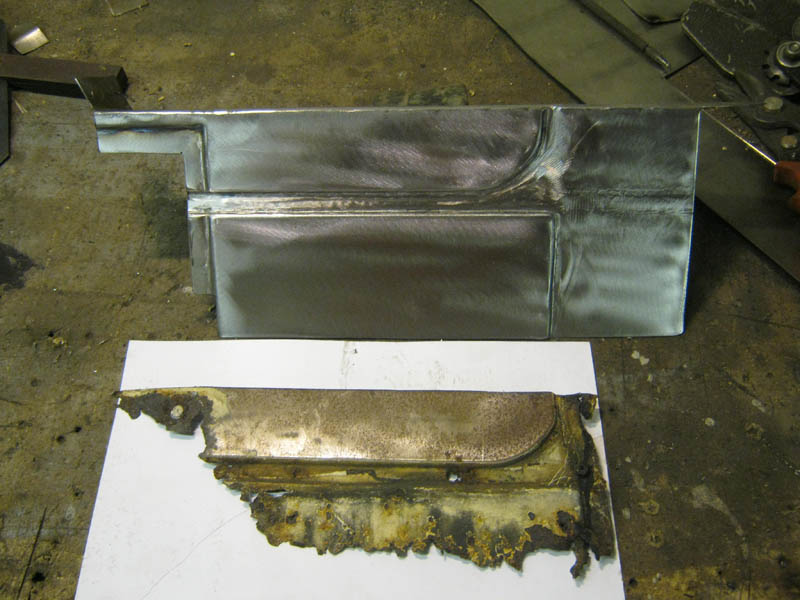
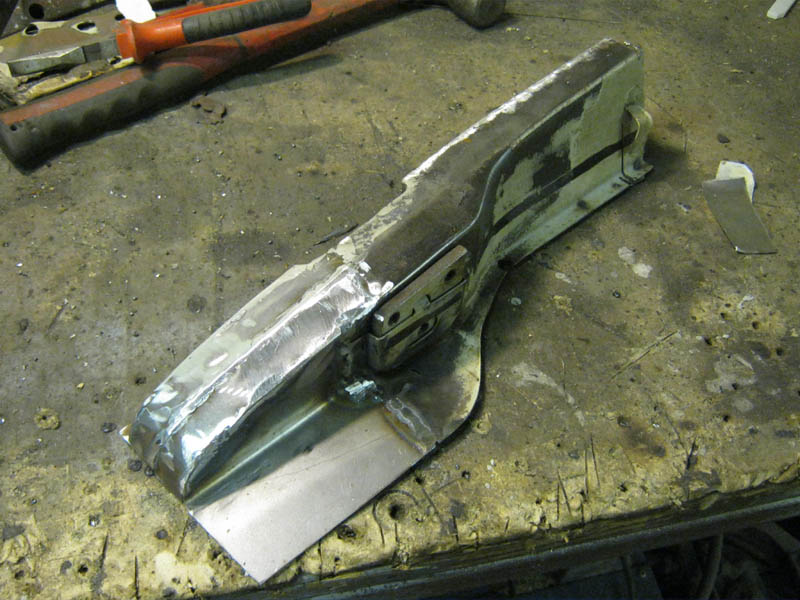
    I thought seeing as it was after the wedding that enough time had passed at work so i asked to stay behind one night so i could cut the rear valance top out of some scrap 3mm plate. A lot easier at work as we have a plasma cutter there. I never had my camera there so these are when i got it back to the garage. for the lip at the rear i used a peice of 25mm angle with one edge cut to 13mm and tacked on to the top. Heres the old and somewhat new peice.

    1959 Ford Thames camper van restoration  - Page 6 2uivq8m

    Bit closer

    1959 Ford Thames camper van restoration  - Page 6 2mo84l0

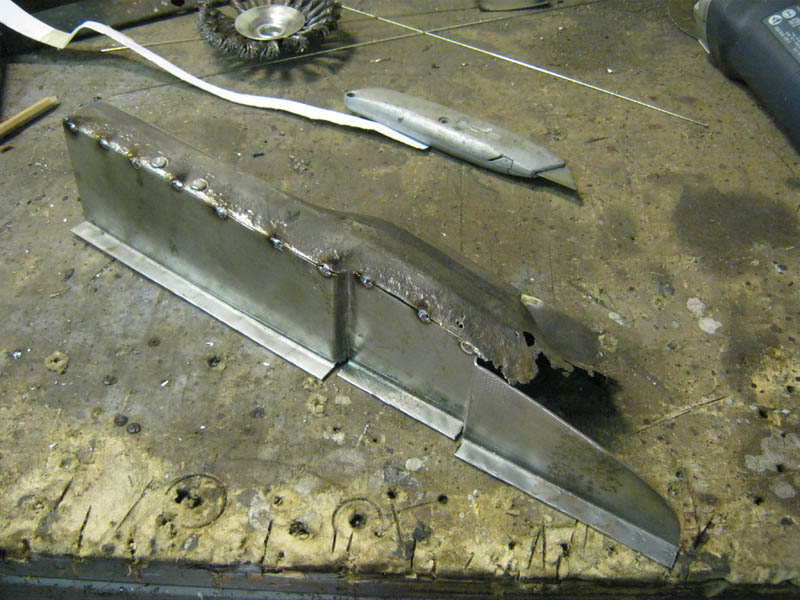
    I tacked it to a peice of square box to minimize distortion. I decided to Tig weld it along to make it a bit neater and less to grind.

    1959 Ford Thames camper van restoration  - Page 6 208a6xj

    Even when you try your best to stop heat distortion theres always some, you can see the slight curve in this peice.

    1959 Ford Thames camper van restoration  - Page 6 2l917dl

    I used a hammer to get it roughly back into shape, im going to be welding more to it so no point in getting it perfect right now. I then cut the ends to shape and test fitted it into place.

    1959 Ford Thames camper van restoration  - Page 6 Xgaa06

    It was sitting a couple of mm high, upon further investigation i realised it was the dished panels i had made were sitting slightly squint.

    1959 Ford Thames camper van restoration  - Page 6 343oroz

    I cut a line in to them then flatened the top out. (not photo'd)

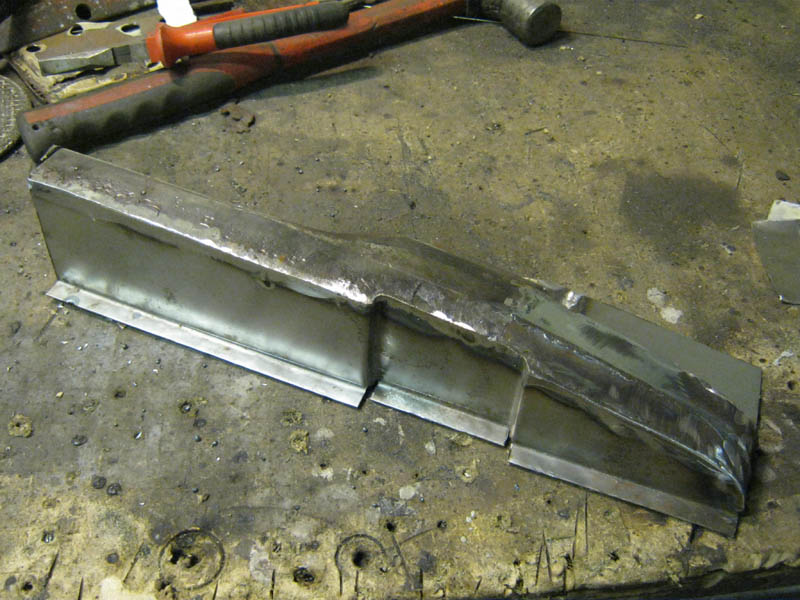
    I made the rubber seal channel out of another peice of 25mm x3mm angle, one edge cut to 14mm this time. I was going to cut slits into it to get the curve then weld them up but i found just bending it in the vice and some carefull taps were enough to get it to flow. I used the top panel as a guide for how much to bend.

    1959 Ford Thames camper van restoration  - Page 6 2evrg3n

    Then i got a peice of 12mm square bar and bent that to follow suit, and used some 2mm packers and lots and lots of clamps. This is to minimze distortion again and to try and keep an even 14mm gap all the way round.

    1959 Ford Thames camper van restoration  - Page 6 2r6e5gj

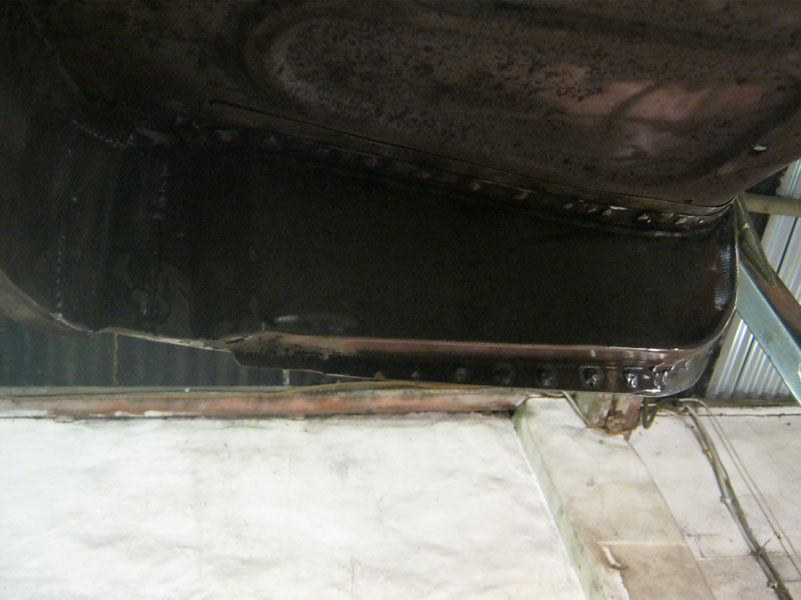
    Prior to welding. I just used the mig for this peice to save time as its not going to be seen.

    1959 Ford Thames camper van restoration  - Page 6 24yvjno

    Tested in place again.

    1959 Ford Thames camper van restoration  - Page 6 2por3t3

    I closed the rear doors again and used a peice of chalk to mark where to cut for the actual valance peice.

    1959 Ford Thames camper van restoration  - Page 6 2ebsdo4

    Cut it off with the grinder.

    1959 Ford Thames camper van restoration  - Page 6 S2yyva

    after i cut it i thought a bit about preperation as once welded in it wont be easy to get at to paint, so i primered the underneath of the top panel and used that rust converter paint on the inside of the rear valance.

    1959 Ford Thames camper van restoration  - Page 6 23kaqn9

    Which left me with nothing to do until it all dried so i decided to come home and write this post for today.

    Hope to get more done soon, its been good getting back to it after all the time ive been away. especially when im working on a peice i want to see finished.

    untill next time, cheers!
    Twinpilot001
    Twinpilot001


    Number of posts : 6186
    Location : spokane ,Wa.
    Registration date : 2009-09-28

    1959 Ford Thames camper van restoration  - Page 6 Empty Re: 1959 Ford Thames camper van restoration

    Post by Twinpilot001 Sun Nov 04, 2012 2:30 pm

    Wonderful Crafysmanship- looks very nice - happy for Both of you- Happy Life =Happy wife & Happy Vannin!!
    dodge man
    dodge man


    Number of posts : 2036
    Location : ohio
    Registration date : 2012-08-08

    1959 Ford Thames camper van restoration  - Page 6 Empty Re: 1959 Ford Thames camper van restoration

    Post by dodge man Sun Nov 04, 2012 3:25 pm

    awsome workmanship, keep the pictures comming, cant wait to see it done,
    Big W
    Big W


    Number of posts : 3282
    Location : Saskatoon,Sask,Canada
    Age : 60
    Registration date : 2011-01-13

    1959 Ford Thames camper van restoration  - Page 6 Empty Re: 1959 Ford Thames camper van restoration

    Post by Big W Sun Nov 04, 2012 6:29 pm

    Congrats on your wedding. Always enjoy the pics, as the craftsmanship is most inspiring. Excellent job on this restoration.
    avatar
    kevbarlas


    Number of posts : 60
    Location : Edinburgh, Scotland
    Registration date : 2010-12-09

    1959 Ford Thames camper van restoration  - Page 6 Empty Re: 1959 Ford Thames camper van restoration

    Post by kevbarlas Sat Nov 24, 2012 2:06 pm

    Mini - November part 2
    Thanks everyone for the kind words about the wedding, really appreciate it. Things seem to be going great with the whole marrige thing, im still allowed out to the garage anyway;) .

    I started to rebuild the rear valance of the van with the pieces i had made/fixed. I tacked the actual valance onto the 3mm top plate and dished panels i had welded in place earlier.

    1959 Ford Thames camper van restoration  - Page 6 1erzt

    Then i flipped the van on its side to put the back panel i had made in place.

    1959 Ford Thames camper van restoration  - Page 6 Mbnwbl

    My clamps werent quite long enough so i had to do a bit of an extension on them.

    1959 Ford Thames camper van restoration  - Page 6 Eqz1on

    When that was all done i decided to test it by standing on it. Made me feel a bit like brunnel in that famous photograph of him with his top hat on standing infront of a big set of chains.

    1959 Ford Thames camper van restoration  - Page 6 2cymebr

    With it all tacked i started on the welding. Done the back panel first with some Mig plug welding.

    1959 Ford Thames camper van restoration  - Page 6 2d9d43l

    Then i seam weld the valance to the top and sides.

    1959 Ford Thames camper van restoration  - Page 6 2m3r2vc

    And going over with the grinder and flap discs brings it up a treat.

    1959 Ford Thames camper van restoration  - Page 6 2ui7z4p

    I welded a couple of pieces in to join the door seal part with the 3mm plate to neating it up.

    1959 Ford Thames camper van restoration  - Page 6 2moqj2c

    1959 Ford Thames camper van restoration  - Page 6 2vai6as

    I hung the doors back on to re-check for clearances, everything was ok.

    1959 Ford Thames camper van restoration  - Page 6 2cxferc

    With that all done i realised that the rear and drivers side were pretty much done metal wise. It had all started to get a light coat of surface rust which would make things harder if i just left it. I bought some more of the same epoxy primer i used on the roof and decided to protect what ive done so far. Its a non-porous primer so it should protect it until ive finished the whole body and reach the finishing stages.

    I started on the inside and rear valance. Any piece that is going to be hidden from view such as the rear of the valance is going to be painted in chassis paint. Its a lot tougher and harder on rust but that will be applied after the top coats of paint, much later.

    Heres the inside, still had some paint to remove and light rust to contend with.

    1959 Ford Thames camper van restoration  - Page 6 2najux2

    1959 Ford Thames camper van restoration  - Page 6 2znoi93

    Half-way there

    1959 Ford Thames camper van restoration  - Page 6 2laabn7

    A nice shiney coat of primer!

    1959 Ford Thames camper van restoration  - Page 6 2dl2ir7

    1959 Ford Thames camper van restoration  - Page 6 3179yte

    1959 Ford Thames camper van restoration  - Page 6 Fefbkk

    1959 Ford Thames camper van restoration  - Page 6 2ah8y74

    Before and afters - I like doing this, gives me a sence of achievment.

    1959 Ford Thames camper van restoration  - Page 6 3448jn4
    1959 Ford Thames camper van restoration  - Page 6 20kq1x2

    1959 Ford Thames camper van restoration  - Page 6 2h7jdqs
    1959 Ford Thames camper van restoration  - Page 6 25zmmqg

    1959 Ford Thames camper van restoration  - Page 6 Mcg2eq
    1959 Ford Thames camper van restoration  - Page 6 5d785i

    1959 Ford Thames camper van restoration  - Page 6 2ew0f9i
    1959 Ford Thames camper van restoration  - Page 6 Hs013r

    Then the next day i decided to do the outside. Looking pretty down-trodding here.

    1959 Ford Thames camper van restoration  - Page 6 25arygn

    1959 Ford Thames camper van restoration  - Page 6 282n9c1

    Using the poly-abrasive disks and wire wheels got it back to shiney.

    1959 Ford Thames camper van restoration  - Page 6 1zn4qbb

    1959 Ford Thames camper van restoration  - Page 6 29c4eb9

    I know it looks exactly like the previous photo but this is another step i do. I bought some "phoskleen" its called, basically its an acid that etches the surface and also neautralisis any light rust pits. It turns the metal a slight bluey yellow.

    1959 Ford Thames camper van restoration  - Page 6 Mt74a9

    Then the coat of primer.

    1959 Ford Thames camper van restoration  - Page 6 1222pnp

    1959 Ford Thames camper van restoration  - Page 6 2z4xq85

    1959 Ford Thames camper van restoration  - Page 6 2ufaonr

    1959 Ford Thames camper van restoration  - Page 6 290vt4l

    1959 Ford Thames camper van restoration  - Page 6 Wb72jd

    1959 Ford Thames camper van restoration  - Page 6 Mttem8

    Its good to see everything i have done so far in one colour, it all 'flows' really well now.
    Now that all my work is protected i will make a start on the drivers side of the front cab. I still have the passangers side of the van to do but this should break it up a bit.

    Cheers
    Big W
    Big W


    Number of posts : 3282
    Location : Saskatoon,Sask,Canada
    Age : 60
    Registration date : 2011-01-13

    1959 Ford Thames camper van restoration  - Page 6 Empty Re: 1959 Ford Thames camper van restoration

    Post by Big W Sat Nov 24, 2012 8:21 pm

    Haha cheers damn even I'm getting excited and I don't even own it...lol. Looking good Kev.
    white-lightning
    white-lightning


    Number of posts : 237
    Location : Salem, Va
    Registration date : 2011-02-24

    1959 Ford Thames camper van restoration  - Page 6 Empty Re: 1959 Ford Thames camper van restoration

    Post by white-lightning Sat Nov 24, 2012 8:59 pm

    If I have already said it, I will say it again, your van will be better than new when you finish.
    SDEconoTruck
    SDEconoTruck


    Number of posts : 310
    Location : San Diego, California
    Registration date : 2010-05-26

    1959 Ford Thames camper van restoration  - Page 6 Empty Re: 1959 Ford Thames camper van restoration

    Post by SDEconoTruck Sat Nov 24, 2012 10:15 pm

    When that was all done i decided to test it by standing on it. Made me feel a bit like brunnel in that famous photograph of him with his top hat on standing infront of a big set of chains.

    Hi Kev,

    Not many on this side of the pond have heard of Mechanical Engineer Isambard Kingdom Brunel- but I am sure they recognize some of his works like the Great Eastern and Great Western, gigantic side-paddlewheel steamers that laid the first trans-Atlantic cable... (just a little trivia you tapped into)

    1959 Ford Thames camper van restoration  - Page 6 Isamba10

    Keep at it!

    George
    1040imp
    1040imp


    Number of posts : 42
    Location : Glasgow Scotland
    Registration date : 2012-09-24

    1959 Ford Thames camper van restoration  - Page 6 Empty Re: 1959 Ford Thames camper van restoration

    Post by 1040imp Sun Nov 25, 2012 7:46 am

    Amazing. I can't wait to see this out and about!

    kevbarlas - the Scottish IKB. Gaun yersel son!
    Gothboy
    Gothboy


    Number of posts : 714
    Location : So Cal Baby!
    Registration date : 2012-07-02

    1959 Ford Thames camper van restoration  - Page 6 Empty Re: 1959 Ford Thames camper van restoration

    Post by Gothboy Tue Nov 27, 2012 5:49 am

    WOW I have missed alot on this thread! Congrats on the marriage and the new life my friend! That van is even more amazing than last time I checked in! Looking like a wonderful likf ahead for you! Congratulations again! Smile
    avatar
    kevbarlas


    Number of posts : 60
    Location : Edinburgh, Scotland
    Registration date : 2010-12-09

    1959 Ford Thames camper van restoration  - Page 6 Empty Re: 1959 Ford Thames camper van restoration

    Post by kevbarlas Mon Dec 31, 2012 10:57 am

    December update

    Merry Xmas everyone. I've been quite busy the past couple of weeks in the garage. Quite a bit of progress but not as much as i wanted (as usual). Now that the roof is done, the drivers side is done and the rear is done it leaves me with the front and passenger side to do.
    To give myself a break from repeating myself a lot i decided to do the front cab section. I think i had kinda started on it in the last update with this section.

    1959 Ford Thames camper van restoration  - Page 6 23i81p3

    So i had to make this piece once cut out, nice straight forward repair.

    1959 Ford Thames camper van restoration  - Page 6 2lafy89

    Used the old as a template and cut it out.

    1959 Ford Thames camper van restoration  - Page 6 Ruod9z

    Welded in place.

    1959 Ford Thames camper van restoration  - Page 6 2yvusk3

    Now the next panel was a bit trickier, this piece goes behind what i just welded in. Its about 10" long and one edge is flat then curves round and the other has 4 different fold in it. It took me a bit of time to get this right. Its probably the most complicated panel ive made from one piece.

    1959 Ford Thames camper van restoration  - Page 6 334kx00

    1959 Ford Thames camper van restoration  - Page 6 2ihp3d0

    Getting there, I know it doesn't look like much but there's also a slight dip that is hard to see, so it curves as well as being folded. I've found when making panels that at points it looks nothing like what your trying to create, its not until the end that it all comes together.

    1959 Ford Thames camper van restoration  - Page 6 54tzrd

    More perseverance

    1959 Ford Thames camper van restoration  - Page 6 A5kkm

    1959 Ford Thames camper van restoration  - Page 6 6y0bys

    And done!

    1959 Ford Thames camper van restoration  - Page 6 Mhg8l3

    1959 Ford Thames camper van restoration  - Page 6 317jfvp

    Before welding it in i thought it would be wise to do the little section that sits at the rear of the door. This section was actually good to make, it looks complicated but in the end it wasn't.

    1959 Ford Thames camper van restoration  - Page 6 Sxg9zd

    Cut it out for sizes and to use as a template.

    1959 Ford Thames camper van restoration  - Page 6 211mbev

    1959 Ford Thames camper van restoration  - Page 6 34zlp9w

    After thinking about it for a while i thought it would be best to split it into 2 sections. Cutting the curved section out first and folding it.

    1959 Ford Thames camper van restoration  - Page 6 33lfel0

    Then using the shrinker/strecher i put a slight curve in it. Then the top piece was cut out and tapped with a hammer to give it a little flange.

    1959 Ford Thames camper van restoration  - Page 6 B51uti

    Then weld the 2 to make 1. I liked making this, was quick to do and is big part of the door frame.

    1959 Ford Thames camper van restoration  - Page 6 35kkdft

    1959 Ford Thames camper van restoration  - Page 6 N4ikas

    1959 Ford Thames camper van restoration  - Page 6 Fa0o3m

    1959 Ford Thames camper van restoration  - Page 6 24vmqzq

    I welded both panels in place at this point too.

    1959 Ford Thames camper van restoration  - Page 6 2637cqo

    1959 Ford Thames camper van restoration  - Page 6 99mf46

    Continuing along from those i had to repair this piece.

    1959 Ford Thames camper van restoration  - Page 6 1qphjd

    cut it out. make a new piece and weld it in.

    1959 Ford Thames camper van restoration  - Page 6 Snzyw2

    1959 Ford Thames camper van restoration  - Page 6 34t7u6p

    1959 Ford Thames camper van restoration  - Page 6 29lic8w

    I was also left a little piece to patch here..

    1959 Ford Thames camper van restoration  - Page 6 16hjm8w

    couple of folds in the patch piece.

    1959 Ford Thames camper van restoration  - Page 6 Yjrqf

    Little tip, if the panel is too small to hold properly you can tack another longer piece of metal, in my case an Arc rod, and use that to hold it place.

    1959 Ford Thames camper van restoration  - Page 6 10eefwp

    Welded up and cleaned a little. I asked the wife for a Dremel for Xmas so i can get into the corners and edges better.

    1959 Ford Thames camper van restoration  - Page 6 2dig19t

    And a few other holes go the same treatment underneath so it is all sealed now, sweet.

    1959 Ford Thames camper van restoration  - Page 6 316xb9g


    Next up is the box section at the front.

    Here it is the day i bought the van. I remember looking at this at first and not really knowing how i would fix it and hopefully it would all come clear when it came to it. But no, i was still a bit stumped. Particularly because the other side was the same and i never really had enough there to get dimensions from. I managed to get a hold of my mate who is also restoring a Thames, i went round to his to get some photos and sizes which helped a lot, so thanks George!

    1959 Ford Thames camper van restoration  - Page 6 14dziib

    Here it is from the inside

    1959 Ford Thames camper van restoration  - Page 6 A5b10

    1959 Ford Thames camper van restoration  - Page 6 M8zqrb

    And out

    1959 Ford Thames camper van restoration  - Page 6 6ok57a

    I drilled the spot welds out and removed the inner section.

    1959 Ford Thames camper van restoration  - Page 6 2b5vuv

    1959 Ford Thames camper van restoration  - Page 6 W0olsj

    1959 Ford Thames camper van restoration  - Page 6 30wtjme

    Yeah.......great.

    The post and front corner of the van are also needing replaced. I found a quality repair someone had made earlier though.

    1959 Ford Thames camper van restoration  - Page 6 208dxn6

    Oh wait, did i say quality, i meant crap. The old mesh and fiberglass technique.

    1959 Ford Thames camper van restoration  - Page 6 35mi2di

    1959 Ford Thames camper van restoration  - Page 6 35mi2di

    1959 Ford Thames camper van restoration  - Page 6 Aadt6p

    Something that i still never knew was how it should all join up inside. Obviously i couldn't take my friends Thames apart to find out so this piece will be put together in the best way i can think. There's about 5 panels that all get layered here. Bit of a shame as ive tried to keep everything as original as i can with the restoration but i cant do anything else here.

    1959 Ford Thames camper van restoration  - Page 6 2a7j0ac

    I removed the front section as well

    1959 Ford Thames camper van restoration  - Page 6 2h6vk09

    First thing to do is weld a new strip in here so i have something decent to weld to.

    1959 Ford Thames camper van restoration  - Page 6 Dq0ndl

    Then i had a little bit at the back to patch.

    1959 Ford Thames camper van restoration  - Page 6 2l95rgj

    Back to the inner piece *sigh*

    1959 Ford Thames camper van restoration  - Page 6 2rykaw3

    Made a few measurements (that were wrong, more on that later,bugger) and cut it out.

    1959 Ford Thames camper van restoration  - Page 6 Ir8ft0

    Folded it over , the curved lip was a bit of a pain, i used a pair of pliers and folded it little by little and used a hammer to neaten it.

    1959 Ford Thames camper van restoration  - Page 6 Rlaxc3

    Then the rear section was bent and tacked in.

    1959 Ford Thames camper van restoration  - Page 6 X1zt3m

    The rear section would stretch too much so i had to cut slits in it.

    1959 Ford Thames camper van restoration  - Page 6 2yljtis

    tacked into position.

    1959 Ford Thames camper van restoration  - Page 6 Ejdeoi

    1959 Ford Thames camper van restoration  - Page 6 Vzh7nq

    I never realized at this point but it is actually about 30mm too tall. You see at the bottom the lip is supposed to be in line with the front valance. I still hadn't noticed this so i carried on.

    Before starting on the front cover i had to cut a few other pieces out to replace first. The inner post was rotting at the bottom so i had to gain access to that. Drilled out a few spot welds and cut some bits out.

    1959 Ford Thames camper van restoration  - Page 6 Qq3cdz

    1959 Ford Thames camper van restoration  - Page 6 Xdtjcm

    1959 Ford Thames camper van restoration  - Page 6 6fd2te

    post out.

    1959 Ford Thames camper van restoration  - Page 6 Jkhbms

    valance corner off.

    1959 Ford Thames camper van restoration  - Page 6 2h3671j

    Heres the front off to repair. The main section was rotten but the top and lip were OK, so i decided to make a new main section and join it to the original.

    1959 Ford Thames camper van restoration  - Page 6 332cbba

    The piece i need to make has channel in it for the door rubber to sit in. I remember seeing a forum that had some guys from Vietnam or Thailand, something like that, repairing VW vans and the guy showed an example of how he created these channels with hand tools so i thought id do the same.

    1959 Ford Thames camper van restoration  - Page 6 2rhtyip

    I marked the channel on a bit of sheet then clamped the edge of it to a piece of 50mm angle.

    1959 Ford Thames camper van restoration  - Page 6 K3qbn4

    Then i got an old chisel and made it blunt with the grinder. Then tapped it against the angle so it would create a little dip and carried along to the end.

    1959 Ford Thames camper van restoration  - Page 6 24npg29

    After a little while i got a channel done, nice one!

    1959 Ford Thames camper van restoration  - Page 6 2dgkcqv

    Then i tapped out a curve and a few other details.

    1959 Ford Thames camper van restoration  - Page 6 2m7f23k

    Welded the new to old and gave it a tidy up.

    1959 Ford Thames camper van restoration  - Page 6 I5642g

    1959 Ford Thames camper van restoration  - Page 6 1y70rb

    Placed into position for welding later.

    1959 Ford Thames camper van restoration  - Page 6 Mwqe0o

    1959 Ford Thames camper van restoration  - Page 6 346456w

    Here is the door post. I don't know how this should look at the bottom so its a bit made up.

    1959 Ford Thames camper van restoration  - Page 6 Mrwkjo

    1959 Ford Thames camper van restoration  - Page 6 Kbzo83

    Cut the rotten out.

    1959 Ford Thames camper van restoration  - Page 6 Kbzo83

    New piece tacked to old

    1959 Ford Thames camper van restoration  - Page 6 1628u2x

    A few more pieces and weld it up.

    1959 Ford Thames camper van restoration  - Page 6 Vmqjax

    1959 Ford Thames camper van restoration  - Page 6 34eesk7

    Then weld the post to the front. Now, this is when i realized the other section was too tall. I think where i went wrong was that i deliberately made the inner and outer piece a bit longer so i can cut them back to size later. But i went wrong somewhere and made the inner piece to have the lip too far down. I could just leave it because i don't think anyone will notice, i have tried to tell myself that but ive went this far trying to keep it original that i don't think i will be happy with it ever until i fix it. So i shall fix it. Its hard to explain by typing down but i will show what i mean in a future update once its been done.

    1959 Ford Thames camper van restoration  - Page 6 Jg4m1h

    As i was a bit few up with how the corner was going i thought id complete the rear as that is in the right place.

    I cut the little piece i had left off and put another channel into a peice of sheet

    1959 Ford Thames camper van restoration  - Page 6 2bof1w

    Marked the rest, cut it out, drilled some spot weld holes and bent the flange up.

    1959 Ford Thames camper van restoration  - Page 6 Xfdv6x

    Put in place.

    1959 Ford Thames camper van restoration  - Page 6 2wc0b6a

    To complete it i made the little piece above the wheel arch.

    1959 Ford Thames camper van restoration  - Page 6 1i02ty

    Then tidied it up. I got my Dremel by this point (thanks wife) but i never had any cutting discs. I want to put the groves back into the areas that i had to weld to make it look more OEM.

    1959 Ford Thames camper van restoration  - Page 6 2u6hfg7

    1959 Ford Thames camper van restoration  - Page 6 Dcvmol

    1959 Ford Thames camper van restoration  - Page 6 14dziib
    1959 Ford Thames camper van restoration  - Page 6 2n3yud

    Thats all for this time. I'm starting to realize that there's not really a huge amount of main bodywork left to do then i get to start on the mechanicals. I will do the doors and valance when im stuck with the mechanicals or after, just to give me a break from metalwork all the time.

    I should also have some good news that should become clearer in a couple of months or so, and oh, thanks for whoever voted for me on the retro-rides 'best build thread of 2012' , means a lot.
    jkr
    jkr


    Number of posts : 1148
    Location : prince edward island canada
    Age : 66
    Registration date : 2008-05-29

    1959 Ford Thames camper van restoration  - Page 6 Empty Re: 1959 Ford Thames camper van restoration

    Post by jkr Mon Dec 31, 2012 11:08 am

    YOU KNOW SOME PEOPLE ARE GOOD WITH A PIECE OF METAL AND A WELDER. YOU SIR ARE A "REMBRANT". nice work to say the least...........
    DanTheVanMan
    DanTheVanMan
    Commissioner
    Commissioner


    Number of posts : 7900
    Location : Escanaba, Michigan
    Age : 62
    Registration date : 2008-10-08

    1959 Ford Thames camper van restoration  - Page 6 Empty Re: 1959 Ford Thames camper van restoration

    Post by DanTheVanMan Mon Dec 31, 2012 11:12 am

    I agree! Like I said before, he is the master of metal!!!!

    AMAZING WORK!!!!! cheers


    _________________
    DanTheVanMan    
    1965 Chevy G10 Sportvan Custom
    1984 Jeep CJ-7 Laredo, Restored
    2004 Kawasaki KLR650
    1997 Jeep TJ Sport

    My Mini Gallery

    1959 Ford Thames camper van restoration  - Page 6 Qr_cod10

    <-<-<- Cruising is not a "Point A to Point B" thing, but an "Everything in between thing!  <-<-<-
    white-lightning
    white-lightning


    Number of posts : 237
    Location : Salem, Va
    Registration date : 2011-02-24

    1959 Ford Thames camper van restoration  - Page 6 Empty Re: 1959 Ford Thames camper van restoration

    Post by white-lightning Mon Dec 31, 2012 11:36 am

    Nice,work. I almost always, get ideas to fix my van seeing your work.
    dix
    dix
    Moderator 1st Class
    Moderator 1st Class


    Number of posts : 8731
    Location : pittsburgh pa
    Age : 67
    Registration date : 2008-05-29

    1959 Ford Thames camper van restoration  - Page 6 Empty Re: 1959 Ford Thames camper van restoration

    Post by dix Mon Dec 31, 2012 11:40 am

    The reason there were so many car makers in the old days is because there were more people like you. your work and talent amazes me


    _________________
    still vannin since 1974
    Big W
    Big W


    Number of posts : 3282
    Location : Saskatoon,Sask,Canada
    Age : 60
    Registration date : 2011-01-13

    1959 Ford Thames camper van restoration  - Page 6 Empty Re: 1959 Ford Thames camper van restoration

    Post by Big W Mon Dec 31, 2012 1:22 pm

    always inspires me when I see the great craftsmanship in the repairs of this ride. Again this is definitely a confidence booster for all those that are worried or scared to tackle rust issues. I know...I am one of them...lol. Not anymore. Can't waite to cut the driver side rocker off of mine...hehe. cheers
    Zuffen
    Zuffen


    Number of posts : 165
    Location : Sydney Australia
    Registration date : 2011-07-28

    1959 Ford Thames camper van restoration  - Page 6 Empty Re: 1959 Ford Thames camper van restoration

    Post by Zuffen Mon Dec 31, 2012 4:13 pm

    Defineitely a "Metal Whisperer"

    One question; are the two pennies on the bench used when welding to absorb heat or did they just fall out of your pocket?
    econopoor
    econopoor
    Econoline Guru


    Number of posts : 1747
    Location : Jackson TN
    Registration date : 2010-04-18

    1959 Ford Thames camper van restoration  - Page 6 Empty Re: 1959 Ford Thames camper van restoration

    Post by econopoor Mon Dec 31, 2012 5:19 pm

    You deserved to win. This is a great build thread. It's my favorite.

    Duane in Tennessee
    jkr
    jkr


    Number of posts : 1148
    Location : prince edward island canada
    Age : 66
    Registration date : 2008-05-29

    1959 Ford Thames camper van restoration  - Page 6 Empty Re: 1959 Ford Thames camper van restoration

    Post by jkr Tue Jan 01, 2013 4:11 am


    you use pennies on the back side of a hole when welding with a mig. your weld won't fall through and you can fill the area much easier with less splatter. copper will not stick to a weld from a mig so it comes right off, less grinding too.
    wylee
    wylee


    Number of posts : 917
    Location : middletown,ny
    Registration date : 2009-04-03

    1959 Ford Thames camper van restoration  - Page 6 Empty Re: 1959 Ford Thames camper van restoration

    Post by wylee Tue Jan 01, 2013 4:31 am

    your metal skills are outstanding sir.................
    avatar
    kevbarlas


    Number of posts : 60
    Location : Edinburgh, Scotland
    Registration date : 2010-12-09

    1959 Ford Thames camper van restoration  - Page 6 Empty Re: 1959 Ford Thames camper van restoration

    Post by kevbarlas Sun Jan 20, 2013 11:17 am

    Zuffen wrote:Defineitely a "Metal Whisperer"

    One question; are the two pennies on the bench used when welding to absorb heat or did they just fall out of your pocket?

    The pennies just happend to fall out my pocket. They look like copper but now-a-days they are usually only about 1.5% copper. Technically the pre-1992 pennys are worth more in material than actualy pennys. I do use the copper trick to fill large holes though.

    January 2013

    I got some good news this month. I won 2 online forum votes.

    I won the retro rides build of the year poll - http://retrorides.proboards.com/index.cgi?board=rra2012vb&action=display&thread=142076

    and Practical Performance Car magazine 'Thread of the year' - http://www.ppcmag.co.uk/forum/viewtopic.php?f=1&t=10788

    That gave me quite a good boost. It is really nice to be recognised amongst all the other projects people are doing. I really enjoy writing my updates for the van, It keeps me motivated and focused with the build. I always try to include as much details as i can so i can get advice or help someone else out who is tackling there own project. My project has been going on for about 2 and a half years now, doesn't feel like it though. I hope for it to be atleast road legal in the next 2 and a half years. I try not to rush things and stick to my original plan. I want it to be as such that it would be hard for someone to tell it has even been restored. There is some areas that i could have just cut out and replaced with a much simpler repair but i cant let myself do that.

    I wanted to finish of the front drivers side corner, this is what i was left with once i had cut it off earlier.

    1959 Ford Thames camper van restoration  - Page 6 105a71h

    The rear piece was made using the shrinker/stretcher

    1959 Ford Thames camper van restoration  - Page 6 1z5nggg

    I cut all the rust from the damaged areas, added the rear section and a little patch for the bottom.

    1959 Ford Thames camper van restoration  - Page 6 Vqle9s

    The rot i cut out was used as a template the new piece.

    1959 Ford Thames camper van restoration  - Page 6 209sl5g

    I forgot to take the inbetween photos but this is the repair section complete ready to get welded back in place.

    1959 Ford Thames camper van restoration  - Page 6 28ipxqd

    Then I cleaned up the inside of this area on the body and gave it a quick spray of weld-through primer.

    1959 Ford Thames camper van restoration  - Page 6 Vqkv3o

    And attached the repair back to the body like this and gave it a good going over with the grinder.

    1959 Ford Thames camper van restoration  - Page 6 Msp60

    1959 Ford Thames camper van restoration  - Page 6 2djuk3

    1959 Ford Thames camper van restoration  - Page 6 1jam3k

    Its nearly done, just need to make a new inner section for the post using the old as the template

    1959 Ford Thames camper van restoration  - Page 6 2yx11u1

    In place and cleaned up

    1959 Ford Thames camper van restoration  - Page 6 Pxg9e

    1959 Ford Thames camper van restoration  - Page 6 34ni5uv

    Finally i just filled the last of the gaps underneath and the corner is now finished.

    1959 Ford Thames camper van restoration  - Page 6 2wfr3io

    Really happy with how this area has turned out. One step closer eh.

    1959 Ford Thames camper van restoration  - Page 6 A5b10
    1959 Ford Thames camper van restoration  - Page 6 Afhk0p

    1959 Ford Thames camper van restoration  - Page 6 2a7j0ac
    1959 Ford Thames camper van restoration  - Page 6 Oumg7r

    1959 Ford Thames camper van restoration  - Page 6 6fd2te
    1959 Ford Thames camper van restoration  - Page 6 2ujifep
    1959 Ford Thames camper van restoration  - Page 6 M8ijgm

    The next step is a little repair to the seat pan area and i may cut the A-post like i did on the other side and see how much rot is there. Then i will prime drivers side of the cab.

    That is as far as i have been able to do this month as last weekend whilst driving to the garage the water pump on the Lexus seized. Luckily i caught it in time before it over heated but i have had to sort that out. I got it towed back to my mum and dads and ive been working on it outside the house. The thing about the water pump is its driven off the timing belt so im having to renew the pump, belt and 2 tensioners. I got all the bits last Friday there and started fitting them on Saturday but it wasn't until then that i noticed the new belt had a nick in it. I don't want the belt to snap and have to repeat everything so im going to send it back and just get a genuine Lexus one. Ofcourse all these kind of things happen just as the MOT and road tax run out at the end of this month, crap.
    dix
    dix
    Moderator 1st Class
    Moderator 1st Class


    Number of posts : 8731
    Location : pittsburgh pa
    Age : 67
    Registration date : 2008-05-29

    1959 Ford Thames camper van restoration  - Page 6 Empty Re: 1959 Ford Thames camper van restoration

    Post by dix Sun Jan 20, 2013 5:57 pm

    you must think about welding some thing in your sleep.LOL


    _________________
    still vannin since 1974
    Zuffen
    Zuffen


    Number of posts : 165
    Location : Sydney Australia
    Registration date : 2011-07-28

    1959 Ford Thames camper van restoration  - Page 6 Empty Re: 1959 Ford Thames camper van restoration

    Post by Zuffen Wed Jan 23, 2013 10:03 pm

    One good point about the Lexus engine it's non-interference so if it broke the belt the valves won't hit the pistons.

    Worst part of that job is resetting the cam timing.

    Sponsored content


    1959 Ford Thames camper van restoration  - Page 6 Empty Re: 1959 Ford Thames camper van restoration

    Post by Sponsored content


      Current date/time is Thu May 16, 2024 9:29 pm