


I used Rustoleum rusty metal primer, which is an oil base and rolled and brushed it on. It thins best with Naptha, not mineral spirits. My sister is inHillsboro, and lamenting the lack of sun these days. The Naval jelly works, but ospho is better. I have heard it's not so good with epoxy paints over it, but no experience. I do know Imron goes over it just fine...
+16
66mnecotruck
millwright71
Big W
Vannin Ken
dix
dodge man
Digz
G-Man
SteelyVan
westcoastvanner
vanny
Wheelie
Joe Van
RodStRace
Gothboy
Dawgboy
20 posters
Dawgvan: A '64 A100 Build thread

Dawgboy- Number of posts : 278
Location : San Diego, CA
Registration date : 2013-04-20

Guest- Guest
Cool, thanks for sharing. What I came across only in read article after article is that you have to do it in steps, and really rinse it off.
Dawgboy- Number of posts : 278
Location : San Diego, CA
Registration date : 2013-04-20
So I backed off in this, these last two weeks as I've been really sick, but in going through my lists and dreams and thoughts, I am having a quandary about cutting holes in the body, and I need your opinions.
It's a 64, first year of production, and it's also rust free. The only exterior adulteration init's life up to this point is 16 holes in the roof for the roof rack mounts. I don't know if that really means anything for the DV's intrinsic value, but before I cut any holes in it, I would like to gauge that with your help.
My intent for the van is camping and Road trips, with some moderate back country banging around in deserts and Baja. No real 4x4 stuff, but a lot of dirt roads.
Two things that I want to do involve a hole in the roof.
1. Put in an RV vent. Should I? Where is the appropriate spot in an A 100 roof that won't mess up the channels?
2. Install a wood stove, which will require a 4" circle cut out in the roof.
Below are a few photos of the stove.
So... Will I kill any value cutting these two holes in an otherwise great roof?
Where's the best spot for a vent in an A 100?
Dickenson Newport solid fuel yacht stove


I'm sure you wonder, Yes the tile slides up and downtoseal the firebox, and it has a damper on the ash box, as well as on the flue. It's very safe inside a small space. It burns charcoal very well and can put out a lot of heat. Certainly enough to keep my girlfriend "scantily clad".
It's a 64, first year of production, and it's also rust free. The only exterior adulteration init's life up to this point is 16 holes in the roof for the roof rack mounts. I don't know if that really means anything for the DV's intrinsic value, but before I cut any holes in it, I would like to gauge that with your help.
My intent for the van is camping and Road trips, with some moderate back country banging around in deserts and Baja. No real 4x4 stuff, but a lot of dirt roads.
Two things that I want to do involve a hole in the roof.
1. Put in an RV vent. Should I? Where is the appropriate spot in an A 100 roof that won't mess up the channels?
2. Install a wood stove, which will require a 4" circle cut out in the roof.
Below are a few photos of the stove.
So... Will I kill any value cutting these two holes in an otherwise great roof?
Where's the best spot for a vent in an A 100?
Dickenson Newport solid fuel yacht stove
I'm sure you wonder, Yes the tile slides up and downtoseal the firebox, and it has a damper on the ash box, as well as on the flue. It's very safe inside a small space. It burns charcoal very well and can put out a lot of heat. Certainly enough to keep my girlfriend "scantily clad".
Guest- Guest
i say chop it.
do what you want with it. its your van to use!
but thats me.....
do what you want with it. its your van to use!
but thats me.....
G-Man- Mayor

- Number of posts : 30743
Location : Fowlerville, MI
Age : 62
Registration date : 2008-05-06
I agree your van, to me seems that wood stove is still overkill. Bet it will cook you Med rare LOL. For value the wood stove will hurt you down the road. If you do go that way make a patch now that can be welded in later
Dawgboy- Number of posts : 278
Location : San Diego, CA
Registration date : 2013-04-20
I figured that I could make a "hood" to go in the stove pipe hole as well as I am going to make the stove removable for summer use and put the cook stove there. The "Hood" will have a fan in it.
The stove is only rated 4000-6500 BTU, so it's not as hot as it might look.
The stove is only rated 4000-6500 BTU, so it's not as hot as it might look.
Guest- Guest
There is a guy at my work that did something like this. pretty cool BUT 
Even during the cold ass winter days he said that the wood burning heater/stove can get pretty hot. He said something like sleeping naked with his girlfriend still made them sweat while camping. Not sure if it was the heater though
Even during the cold ass winter days he said that the wood burning heater/stove can get pretty hot. He said something like sleeping naked with his girlfriend still made them sweat while camping. Not sure if it was the heater though
Dawgboy- Number of posts : 278
Location : San Diego, CA
Registration date : 2013-04-20
So here is my "instant Ghetto" CDX and milk crate bed. We are going camping this weekend and decided not to tent it. I don't want to mount anything at this point so this is just for this weekend.Also Re installed the heater after a thorough cleaning. No idea what brand this heater is, but it's not stock, is it?


Heater:


Heater:

vanny- Moderator
- Number of posts : 14775
Location : Ashburnham, MA
Age : 65
Registration date : 2012-09-22
Can't wait to hear how the camping trip turns out! Have a GREAT time!!!
_________________
“The future will soon be a thing of the past."
http://public.fotki.com/Vintage-Vans/vintage-vans-es/ruff-diamond-1/?cmd=fs_slideshow
Digz- Number of posts : 3794
Location : United States Six Lakes MI
Registration date : 2008-05-17
I like that quick bed idea. I haven't committed to any bolt in bed/platform myself. Makes some ideas for storage and easily removed units. Have fun !
Dawgboy- Number of posts : 278
Location : San Diego, CA
Registration date : 2013-04-20
New locks for every door off ofe eViLbay. $19.99 a set is so worth it! Going to have them re-keyed next week, after our Inagural campout tonight.


Dawgboy- Number of posts : 278
Location : San Diego, CA
Registration date : 2013-04-20
So... Camping went well. We spent 2 nights in the van at 3500 feet, and it was cold at night, but the van with a Black Cat heater was by far warmer than even my Kodiak Canvas tent. Plus, when it was time to leave, we folded our chairs and table and left...
Things I do need to do though are all Organizational... Need to go vertical and build out my Rock N Roll bed so we can easily store stuff under it.
Things I do need to do though are all Organizational... Need to go vertical and build out my Rock N Roll bed so we can easily store stuff under it.
vanny- Moderator
- Number of posts : 14775
Location : Ashburnham, MA
Age : 65
Registration date : 2012-09-22
Sounds like a Great camping trip and it paid off cause now you know much better what you need to do to get it more functional for you! Score!!!
_________________
“The future will soon be a thing of the past."
http://public.fotki.com/Vintage-Vans/vintage-vans-es/ruff-diamond-1/?cmd=fs_slideshow
Dawgboy- Number of posts : 278
Location : San Diego, CA
Registration date : 2013-04-20
New seats from the Boneyard today. $60.00 including the belts. The Captains Chairs will come off the pedestals and go up front, and the Bench is a "Rock and Roll" and folds flat and slides forward on a track. I'm going to make a platform behind it for a full bed.
Also got a horn from a Mercedes wagon. Loud ist zher gut!


Also got a horn from a Mercedes wagon. Loud ist zher gut!


vanny- Moderator
- Number of posts : 14775
Location : Ashburnham, MA
Age : 65
Registration date : 2012-09-22
What a Deal! Are those Captain's Chairs narrow enough for the front with the doghouse there?
_________________
“The future will soon be a thing of the past."
http://public.fotki.com/Vintage-Vans/vintage-vans-es/ruff-diamond-1/?cmd=fs_slideshow
Dawgboy- Number of posts : 278
Location : San Diego, CA
Registration date : 2013-04-20
We shall see, I thing I will make it as they are the same width as what is in there now, with a narower back. Pretty sure the arm rests have to come off though.
Today I got a water tank, a sink, more seat belts, a couple of neat old "Oh sh*t" handles, some interior mood lighting, a set of B van sun visors that look like a match-up at the bracket, and a set of four folding table brackets that will definitely get used.
Pics later, after a hose down and cold drink.
vanny- Moderator
- Number of posts : 14775
Location : Ashburnham, MA
Age : 65
Registration date : 2012-09-22
Sounds like a successful day at the BoneYard!
_________________
“The future will soon be a thing of the past."
http://public.fotki.com/Vintage-Vans/vintage-vans-es/ruff-diamond-1/?cmd=fs_slideshow

dodge man- Number of posts : 2036
Location : ohio
Registration date : 2012-08-08
those look like some comfortable seats, good find,,
Dawgboy- Number of posts : 278
Location : San Diego, CA
Registration date : 2013-04-20
Got a bunch more stuff today. A 6 gallon water tank, a Stainless sink, 3 assorted "Oh Shit" handles, a set of 4 nifty folding table supports plus some assorted brackets. a set of sun visors that match the seats. Also a bunch of electrical parts, relays and switches and buss connectors as well as a whole bunch of 4gauge wire for the battery setup.


I think the plan is to build a small cabinet with some quick release latches on it to easily remove. Inside a Reliance "Baja" 2,5 gallon jug and the pump, and a Cat Litter jug for the grey water. Make the power cord long so I can use it in or out of the van, but right by the side door so you can wash hands while standing outside.


I think the plan is to build a small cabinet with some quick release latches on it to easily remove. Inside a Reliance "Baja" 2,5 gallon jug and the pump, and a Cat Litter jug for the grey water. Make the power cord long so I can use it in or out of the van, but right by the side door so you can wash hands while standing outside.

vanny- Moderator
- Number of posts : 14775
Location : Ashburnham, MA
Age : 65
Registration date : 2012-09-22
Sounds like it's gonna be a nice setup. Can't wait to see the progress pics! Congrats on the Score today!
_________________
“The future will soon be a thing of the past."
http://public.fotki.com/Vintage-Vans/vintage-vans-es/ruff-diamond-1/?cmd=fs_slideshow

dix- Moderator 1st Class

- Number of posts : 8729
Location : pittsburgh pa
Age : 66
Registration date : 2008-05-29
let the fun begain
_________________
still vannin since 1974
Dawgboy- Number of posts : 278
Location : San Diego, CA
Registration date : 2013-04-20
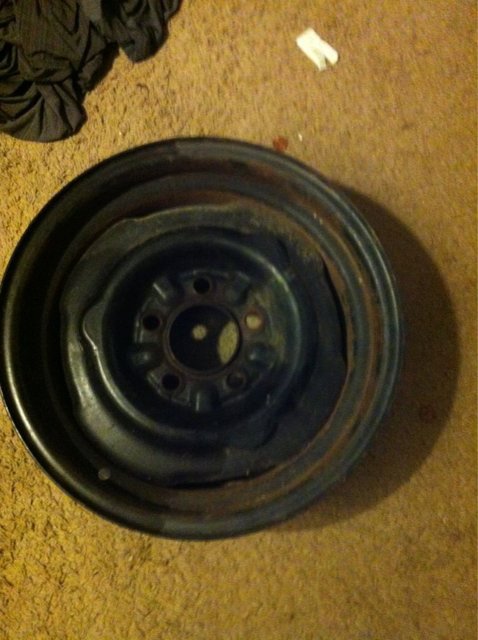
First off, Thanks, A100 Wrench for the awesome straight rim! Here is what I did with it.
Today's project was to get the '64 vintage rim that will be my spare ready to have a tire put on it. First step was 3 days of Ospho baths I dr the work week, then today a heavy rinse, sanding, degreasing, and then two coats of primer. Let it sit in a nice warm spot and gave it it's first coat of gloss black.


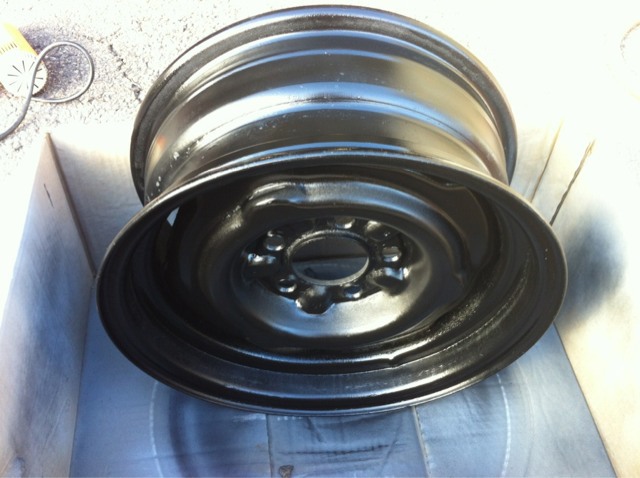
Today's project was to get the '64 vintage rim that will be my spare ready to have a tire put on it. First step was 3 days of Ospho baths I dr the work week, then today a heavy rinse, sanding, degreasing, and then two coats of primer. Let it sit in a nice warm spot and gave it it's first coat of gloss black.
dodge man- Number of posts : 2036
Location : ohio
Registration date : 2012-08-08
looks like new now, good job,
vanny- Moderator
- Number of posts : 14775
Location : Ashburnham, MA
Age : 65
Registration date : 2012-09-22
Shweet! Nice Work!
_________________
“The future will soon be a thing of the past."
http://public.fotki.com/Vintage-Vans/vintage-vans-es/ruff-diamond-1/?cmd=fs_slideshow
Dawgboy- Number of posts : 278
Location : San Diego, CA
Registration date : 2013-04-20
So for the back seat Rock-n-Roll bed, I decided I needed to make it 2 inches higher to get it to clear the driver side rear wheel well. And to do that, I needed to make some steel extensions I can weld to the seat base.
I'm using 1" square tube I liberated from a pile in my dad's shop. Pretty sure this was from the roof rack of his 72 Titan MH, which went as far north as Fairbanks and the arctic circle back in 1980, as well as many trips all over the southwest and Baja.
So I stripped the paint and cut 4, 3" blocks and 2, 20" rails, and welded one together. This will also get welded to the bottom of the seat unit.
Needs a lot of cleanup, more later.


Here's my Hunny doing an artists rendering...


I'm using 1" square tube I liberated from a pile in my dad's shop. Pretty sure this was from the roof rack of his 72 Titan MH, which went as far north as Fairbanks and the arctic circle back in 1980, as well as many trips all over the southwest and Baja.
So I stripped the paint and cut 4, 3" blocks and 2, 20" rails, and welded one together. This will also get welded to the bottom of the seat unit.
Needs a lot of cleanup, more later.
Here's my Hunny doing an artists rendering...


|
|
|