I just ordered the d&d disk brake conversion with master cyl. anyone installed this already? also what do you guys think about an air suspention?
+3
mcVann
Big W
esimmons178
7 posters
65 econoline disk brake conversion.
esimmons178- Number of posts : 5
Location : Indianapolis
Registration date : 2015-01-05
- Post n°1
 65 econoline disk brake conversion.

Big W- Number of posts : 3282
Location : Saskatoon,Sask,Canada
Age : 60
Registration date : 2011-01-13
Welcome to VV. The disc brake conversion is a great place to start. It's on my "2do" list as well. I think the air bags are great...A lot of work... But great. These vans look real kool down low. There are a few baggings in progress in these forums. Do a quick search for air bags and see if it's something within your skill set. The back is the easy part...but when it comes to the steering and bump steer issues, I would prefer a stock ride with maybe one leaf removed and a good pair of front shocks.

esimmons178- Number of posts : 5
Location : Indianapolis
Registration date : 2015-01-05
hey thanks a lot for the reply, I will check those out.

mcVann- Number of posts : 39
Location : Venice, CA
Registration date : 2013-09-24
esimmons178 wrote:I just ordered the d&d disk brake conversion with master cyl. anyone installed this already? also what do you guys think about an air suspention?
how did the disk brake conversion Go. and Im looking for disks, what kit did you get?

colt45- Number of posts : 6
Location : abbeville alabama
Registration date : 2016-02-09
I just put the same kit on my spring special. I have not driven it because I"m in the tear down stage of a full rebuild. The kit when on very easy. Took about 4 hours total including running new brake lines to all four wheels. I bought the disc/disc brake kit that includes everything.

AthensTxMc- Number of posts : 61
Location : Athens, Texas
Registration date : 2014-03-14
How did you get the drums off without ruining the hubs in the front?
Seth G- Vintage-Vans Listings Manager

- Number of posts : 2087
Location : Anacortes, WA
Age : 51
Registration date : 2013-04-24
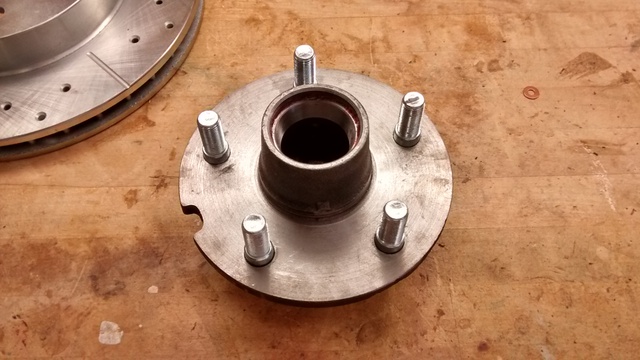
5/8" hole saw Athens, on a drill press, slow with some cutting oil. Cuts like butter, just get into the drum a bit and you should be good to pull the drum and knock out the studs. Support the hub though it's a soft casting. Have the hub turned on a brake lathe. When putting in new studs they must be around .005" larger than the hole on the knurl if not changing like for like. Otherwise you need to drill and/or ream them out. I spent a lot of time of designing and installing discs on the front and learned a thing or two. Lateral runout should be averted and avoided, radial runout should be as well but it isn't as critical. If you just press in studs w/o checking and they are more than .005" you will mushroom the casting all around the hole on the face of the hub and lateral run out will be very bad. Lateral run out should as close to zero as possible. I would recommend to do it yourself and use either the 90's intrepid or Dakota discs w/ gm metric style calipers. It's slightly more specific and I'd be happy to share I just don't have the info at hand, pm me. Both are much shallower than the jeep rotors d and d is made for. Also putting those studs they list in will reek havoc on the hub if you aren't prepared for it, and they are designed to pin the rotor so it would need faced on both sides after pinning on a brake lathe to be done properly. Use long studs and cut them to length or for a radial fit like mine use the studs I used and drill the hub to 15.5 mm iirc, dbl chk. Also, the deep Jeep rotor will interfere with the sway bar links. The Dakota rotors are better for steel rims, otherwise go with the Intrepid's. I'm not sure if the Dakota rotors will interfere, I don't think they will but they may, I never got one to check. But I have a couple of the jeep rotors and d & d spec'd hoses I'd send you for shipping cost if you need them.
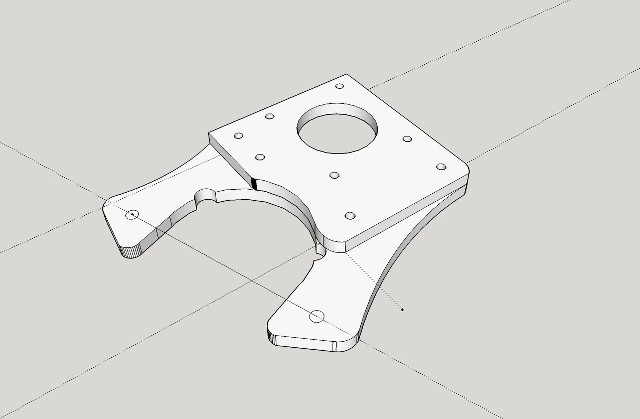



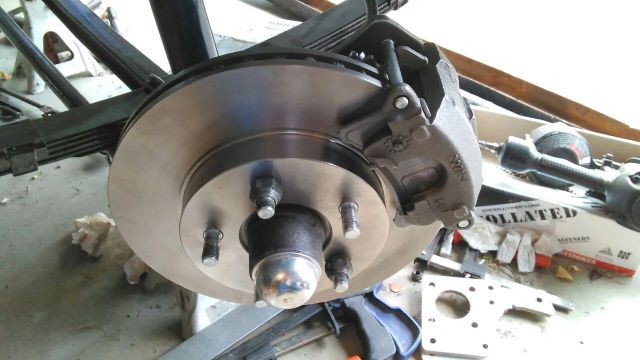

I was thinking about having a few brackets water jetted but there's some fine tuning in the cad file I don't have time to get to any time soon.
Also don't use the hose d & d specs either. There are better choices, I got that hose above with a kit for the rear I didn't end up using and haven't gotten to asking what it's oem use is. I'll get to it, but it's better, it clips in oem style, only slight relief needed in the frame bracket, if any.
I learned a lot from Vic Lafontaine's wealth of knowledge and a little bit of need to get er done and done right done once... that an good ol merican common sense dmit.... lol in future at least I hope Always the goal


I was thinking about having a few brackets water jetted but there's some fine tuning in the cad file I don't have time to get to any time soon.
Also don't use the hose d & d specs either. There are better choices, I got that hose above with a kit for the rear I didn't end up using and haven't gotten to asking what it's oem use is. I'll get to it, but it's better, it clips in oem style, only slight relief needed in the frame bracket, if any.
I learned a lot from Vic Lafontaine's wealth of knowledge and a little bit of need to get er done and done right done once... that an good ol merican common sense dmit.... lol in future at least I hope

Seth G- Vintage-Vans Listings Manager

- Number of posts : 2087
Location : Anacortes, WA
Age : 51
Registration date : 2013-04-24
For some more clarity on the issue with the studs. Dorman lists the 610-169 studs as having a knurl of .620". If this were true they would be perfect, but the set I have here measures @ .624-.625". The oem studs have a knurl of around .620" so your increasing the interference fit by 4-5 thousands which was enough to mushroom the hub face when I installed .625" knurl 610-109 studs. A 15.75 mm drill bit fixed this issue. Alternatively, you can press the studs in(they'll go it fine, I don't think .010" is to much except it will likey distort the face), pop them back out, then have the hub faced and press them back in or use a new set if they get boogered up in the process. I made a block of hardwood that had a hole for the hub and each stud to ensure a flat surface to press against. that also helps with not distorting the face of the hub. After installing the rotor I measure almost no lateral runout on the rotor face doing it this way. Also ensure that the stud holes on the mating side of the rotor hat are chamfered, b/c there will be slight distortion very near the stud no matter how you do it.
The front rotors from an 87 Dodge Dakota 4wd are what I would use if I were to do it over again. But I need to mount a sway bar first to see if there would be interference with using those instead of the '95 front Intrepid rotors. The intrepid rotors cause caliper to rim interference with the 15" repro steelies I used. The offending metal on the rims could have been ground away but I had already powder coated them. I used 3/16" wheel spacers to fix the problem which also helped with the offset with those rims. The '92 AWD front Areostar rotors are similar to the Dakota rotors in depth @ around 2.5" but are only 10.28" diameter vs 11.315" Dakota rotors. The advantage of the Intrepid rotors is that you don't need a spacer between the 2 caliper brackets and I'm fairly certain there will be no interference with the sway bar links, but I don't yet have a sway bar to see. I don't think there would be any caliper to rim problem with alloy wheels.
I have a query in to the vender on the application for the brake hose I used. I'll post it for you guy's when I find out.
jifop- Number of posts : 65
Location : Hertfordshire, UK
Registration date : 2016-05-22
Hey Seth, that looks great.
I'd definitely be interested in a parts list and drawing of your adapter, I need to convert mine but I'm in the UK so parts are expensive! But I can have a bracket cut locally to me.
I'd definitely be interested in a parts list and drawing of your adapter, I need to convert mine but I'm in the UK so parts are expensive! But I can have a bracket cut locally to me.

Seth G- Vintage-Vans Listings Manager

- Number of posts : 2087
Location : Anacortes, WA
Age : 51
Registration date : 2013-04-24
- Post n°10
 Re: 65 econoline disk brake conversion.
1 post? PM me jifop.
I heard back from the vender, he said they have those hoses made, but that I could use a mid 80's Monte Carlo front hose in a pinch. I looked it up and it looks good. Maybe slightly longer but otherwise identical. So there you go. The square hole in the frame clip might need a *touch with a step bit then it will clip in, but that's all and way better than the pipe thread on the other hose.
I heard back from the vender, he said they have those hoses made, but that I could use a mid 80's Monte Carlo front hose in a pinch. I looked it up and it looks good. Maybe slightly longer but otherwise identical. So there you go. The square hole in the frame clip might need a *touch with a step bit then it will clip in, but that's all and way better than the pipe thread on the other hose.


