VintAGE-Vans

Would you like to react to this message? Create an account in a few clicks or log in to continue.

BRINGING IT ALL TOGETHER.... A's, G's & E's


+2
Abitibi
AZ SuperVan
6 posters

    Installing the Pertronix Ignitor II and Flamethrower Coil

    AZ SuperVan
    AZ SuperVan


    Number of posts : 219
    Location : Cave Creek AZ
    Registration date : 2013-09-12

    Installing the Pertronix Ignitor II and Flamethrower Coil Empty Installing the Pertronix Ignitor II and Flamethrower Coil

    Post by AZ SuperVan Fri Nov 28, 2014 9:07 am

    Background:

    The breaker points, coil and distributor type ignition system that came stock in our Econolines was invented by Charles Kettering about 1913.  The amazing thing is that it is basically unchanged from the original design.  Originally cars were powered by 6 volt batteries.  This is important to know because the ignition system was also designed around 6 volts.  When the battery voltage was increased to 12 volts, (primarily to make another one of Ketterings invention, the electric starter, work more reliably in cold weather) the higher voltage caused problems with the breaker points.  

    Voltage is what enables a spark to jump a gap, the higher the voltage the more "pressure" there is to jump the gap.  In this case he gap is the opening between the breaker points.  The reason this is critical is that that spark may not look like much, but it actually heats up to about the same temperature as the surface of the sun!  This in turn burns the contact points leaving them pitted increasing the resistance to current flow when the points are closed.  The simple solution: add a resistor inline with the ignition to dropp the voltage back to about 6 volts.

    If you are used to working on Fords, you may not even be aware of this added resistor.  Other manufacturers often added a ceramic resistor under the hood, but Ford used a special piece of high wire built into the wiring harness.  This wire is sometimes covered with cloth insulation to protect the other wires from the heat generated by the high resistance of the wire.  

    Understanding that the stock ignition is designed to operate at about 6 volts is important when you start thinking about upgrading the ignition to more modern technology.


    Last edited by AZ SuperVan on Sat Nov 29, 2014 8:55 pm; edited 1 time in total
    AZ SuperVan
    AZ SuperVan


    Number of posts : 219
    Location : Cave Creek AZ
    Registration date : 2013-09-12

    Installing the Pertronix Ignitor II and Flamethrower Coil Empty Re: Installing the Pertronix Ignitor II and Flamethrower Coil

    Post by AZ SuperVan Fri Nov 28, 2014 9:22 am

    The coil is fed through the resistance wire and it sees 6 volts.  When the points are closed they ground one set of windings inside the coil called the primary.  This charges the coil by creating a powerful magnetic field.  When the points open, the only path to ground is through the secondary windings of the coil.  The secondary has a much greater number of turns and this makes the coil act like a transformer dramatically increasing the voltage from about 6 volts to about 30,000 volts.  This is the high voltage needed to jump the gap in your spark plugs.

    This system works well enough that it went largely unchanged for over 50 years.  The biggest problem is that ever time the ignition fires, the system is wearing out.  This is why you used to have to get a tune up ever 6 thousand miles.

    With the advent of the transistor, which is basically a solid state switch, there was a huge window for improvement.  Basically the idea is to use a transistor to replace the points.  In the earliest transistorized ignitions, they still needed a way to trigger the transistor so they were still using points.  The points lasted longer as they were now switching far less power, but they still wore out.

    The Pertronix Ignitor

    In 1974 an engineer at Per-Lux, now know as Pertronix, patented the ideal solution. A fully enclosed electronic replacement that fit entirely under the distributor cap and only required a single electrical connection. That product became known as the Pertronix Ignitor.
     
    Although the ignitor has been proven reliable over millions of miles in countless vehicles, it has been a source of controversy in Ford applications. The ignitor requires 12 volts to operate properly. Fords use a resistor wire between the ignition switch and the coil positive post to drop the voltage to the coil to about 6 volts. The instructions for the ignitor show a power connection being made at this point, but that only applies for other makes of vehicle where the resistor wire is not used and the coil is being fed 12 volts.  

    Feeding the ignitor a lower voltage sort of works. During starting, Fords use a resistor wire bypass. While the starter is cranking, the resistor wire is bypassed feeding 12 volts to the coil.  This is to counter the voltage drop that occurs when the starter motor is being cranked. This higher voltage also results in a hotter spark to help ignite the rich starting mixture. The reason that Ford uses a lower voltage after starting the engine is to reduce the arcing across the ignition points. An electrical arc is extremely hot (think arc welder) and burns up the point contacts. The higher the voltage the more distance an arc can jump. The stock coil is designed to work with lower voltages and can run a higher voltage briefly, but higher voltages will eventually overheat the coil leading to early failure.

    So the key to reliability when installing the ignitor in your Econoline is to run a new 12 volt source to the ignitor. You need a power source that is hot whenever the key is in the run or start position.
    AZ SuperVan
    AZ SuperVan


    Number of posts : 219
    Location : Cave Creek AZ
    Registration date : 2013-09-12

    Installing the Pertronix Ignitor II and Flamethrower Coil Empty Re: Installing the Pertronix Ignitor II and Flamethrower Coil

    Post by AZ SuperVan Fri Nov 28, 2014 9:27 am

    Important stuff to know:

    The ignitor is an on off switch. To work properly, it needs to switch from one mode to the other very quickly. If it supplied with too low a voltage, the switching process is much slower. During the period where the switch is not completely on or off, it has to dissipate the power being fed into it in the form of heat. Eventually that excess heat damages the internal components and the Pertronix will fail. It doesn't happen quickly, but it will happen eventually.

    There are three versions of the Pertronix Ignitor. The original Ignitor 1 does a great job at a reasonable price. It has one limitation. If you leave the ignition switch turned on with the engine not running, it will damage the Ignitor 1. The Ignitor 2 is our recommendation. It won't fail if you leave the ignition switch on, and it automatically adjusts the dwell to match engine RPM for a hotter spark. The Ignitor 3 adds multi spark and a built in adjustable rev limiter. This is a great choice for high performance builds, but probably a little more than you need for a cruiser.

    I am going to attempt to show how to install the Pertronix Ignitor in an Econoline. Although this is an easy project, if you are not familiar with basic mechanical procedures you may wish to have this done by a professional. Always disconnect the negative battery terminal before starting any electrical project and wear proper protective gear, in particular eye wear.
    AZ SuperVan
    AZ SuperVan


    Number of posts : 219
    Location : Cave Creek AZ
    Registration date : 2013-09-12

    Installing the Pertronix Ignitor II and Flamethrower Coil Empty Re: Installing the Pertronix Ignitor II and Flamethrower Coil

    Post by AZ SuperVan Fri Nov 28, 2014 10:06 am

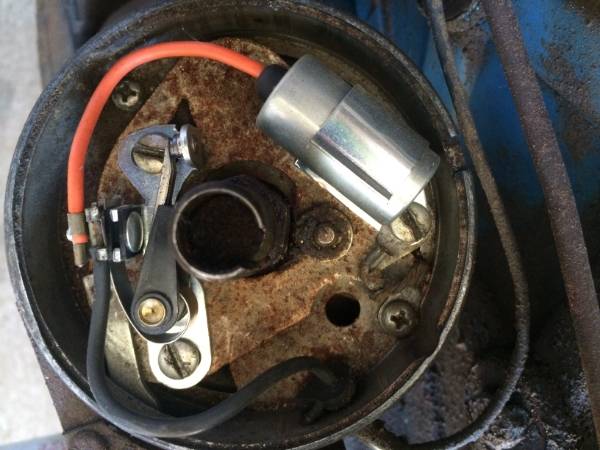
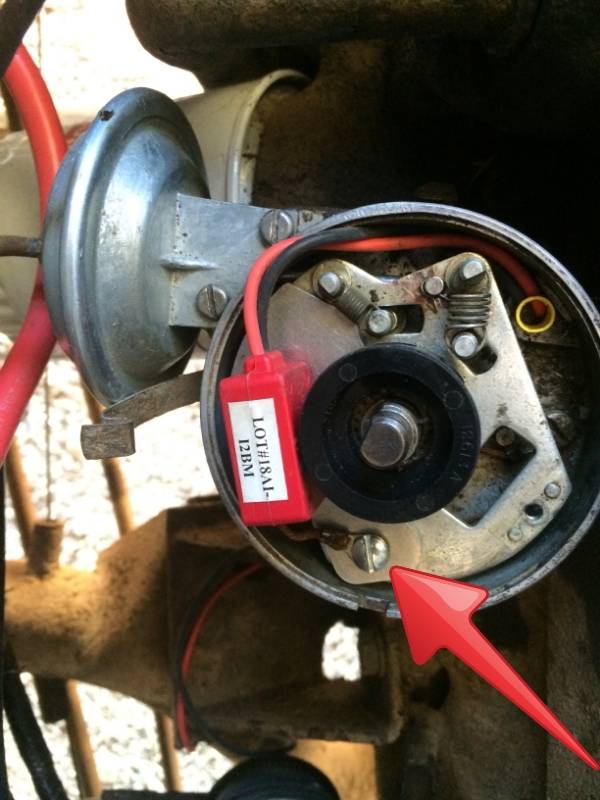
    Withe the distributor cap and rotor removed, on a '65 170 cubic inch six with the Load-O-Matic distributor you can see a raised area surrounding the distributor shaft.  This raised area requires you to modify the Pertronix that is listed for the van. The big six (240 cubic inch) and other baby sixes without this distributor don't have this raised area and do not require modification. The modification will probably void your warranty so that may be reason to stop right here for some.  

    Installing the Pertronix Ignitor II and Flamethrower Coil 672aa32b-4be7-49a1-91ed-d2fa5c10050d_zps0c6cf13b
    The Pertronix has an aluminum base that must sit flat when mounted in the distributor.  To make it work with this distributor I had to bevel the iside edge and slightly reshape the base of the Pertronix.  I did it with a hand file in about 10 minutes, maybe less.

    Here is a shot of the distributor on a '67 big six.  No modification needed is your distributor looks like this.

    Installing the Pertronix Ignitor II and Flamethrower Coil Ac44d202-29a5-4dbc-b0c2-d2274777786e_zps488d3da1
    AZ SuperVan
    AZ SuperVan


    Number of posts : 219
    Location : Cave Creek AZ
    Registration date : 2013-09-12

    Installing the Pertronix Ignitor II and Flamethrower Coil Empty Re: Installing the Pertronix Ignitor II and Flamethrower Coil

    Post by AZ SuperVan Fri Nov 28, 2014 10:22 am

    Remove the points and condensor.  I toss them in the glove box so if there ever was a problem you have a plan B that can be easily installed.

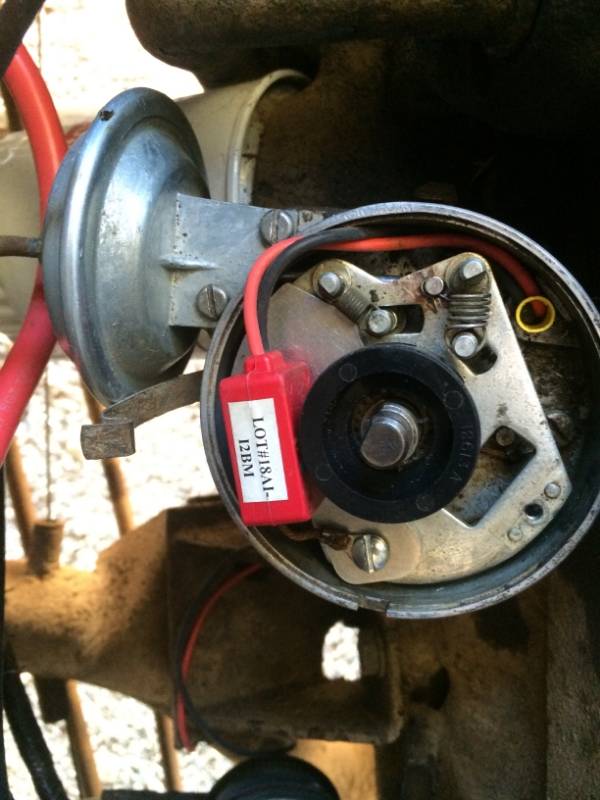
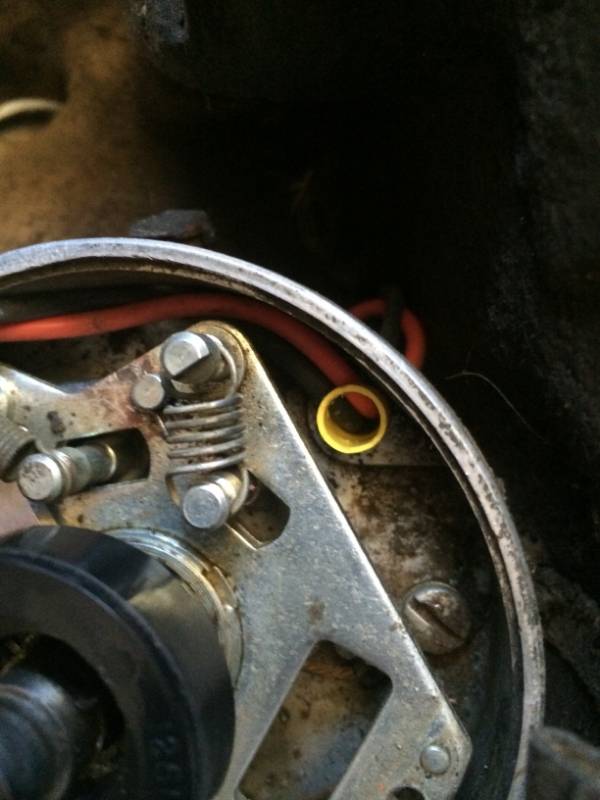
    The Pertronix installs with one screw.  There is a post on the bottom of the aluminum plate that fits into the other screw hole used by the points.  You will need to route the two wires around the breaker plate and down through the base of the distributor.  I used a yellow insulator from a butt connector to route the wiring.  I drilled a hole through the side of the insulator to help the wires make the right angle turn.  It is important to make sure the wires don't restrict the movement of the breaker plate, and that they won't rub or chafe against the plate when it moves.

    Installing the Pertronix Ignitor II and Flamethrower Coil B74c5728-8203-45b9-95d9-ad2ac1ba85a5_zps00383602

    A close up of the insulator

    Installing the Pertronix Ignitor II and Flamethrower Coil 150c93f3-fd47-4ead-8342-3281ec723a24_zps01b7aa4b
    AZ SuperVan
    AZ SuperVan


    Number of posts : 219
    Location : Cave Creek AZ
    Registration date : 2013-09-12

    Installing the Pertronix Ignitor II and Flamethrower Coil Empty Re: Installing the Pertronix Ignitor II and Flamethrower Coil

    Post by AZ SuperVan Fri Nov 28, 2014 10:56 am

    The black disc is the magnet ring that triggers the Ignitor.  It slips over the six sided cam that used to open the points.  When the magnets imbedded inside the ring sweep past the Ignitor it induces a very small current in a coil inside.  That small pulse is what tells the Ignitor when to open or close the circuit.  The last step before putting the distributor cap back on is to adjust the air gap between the ignitor and the magnet ring.  A small rectangular piece of clear plastic is included for this purpose.  You just place it in-between the two parts push them together and tighten one screw and you are done.  This is not a precision thing so don't sweat it.

    Okay this is the end of the first step.  You will never have to mess with points again.  You will never have to think about dwell.  You will set the timing exactly the same way, by rotating the distributor, as with points.  The nice part is that everything fits under the cap so you don't have to find new places to install modules or boxes.

    The two wires from the Ignitor go to the coil.  The red lead goes to coil positive and the black lead goes to coil negative.  

    At this point you have a decision to make.  

    Option 1
    The stock coil is designed to run on 6 volts and will over heat if you try to run 12 volts to it.  However, the Pertronix needs to have 12 volts.  You can run a new power lead for the Pertronix to supply 12 volts.  Just go to the Red with Green stripe wire on the back of the ignition switch and tap into it and run a new wire to the Pertronix.  (I would recommend that any wire run to the engine be rated for at least 85 degrees C.)  NOTE: in this case the new wire will connect ONLY to the red wire coming out of the Pertronix.  Leave the existing wire attached to the coil positive.

    Option 2
    You can replace the stock coil with one designed to run 12 volts.  CAUTION!  The high output coils will have a low impedance of about .6 OHMS.  These coils will pull too much current through the ignition switch and it will over heat and possibly burn up.  Low for a coil with about 3 ohms of internal resistance.  If you go this route you can then remove the existing resistance wire, and replace it with a piece of regular 16 gauge wire, there by providing 12 volts at the coil and the Pertronix.

    Option 3
    You can replace the stock coil with a High Output coil like the Pertronix Flamethrower.  This will increase spark voltage bay about 50% and allow you to run a wider gap on your plugs for even better ignition.  These coils have a low impedance, so you will need to use a relay to switch the power.  This is what I did on my van.  Pertronix sells a relay kit with a pre-wired socket and that is what I used, but you could just use a good relay rated for 30 amps and save some money.

    The rest of this article will talk about how to install the relay and high output coil.

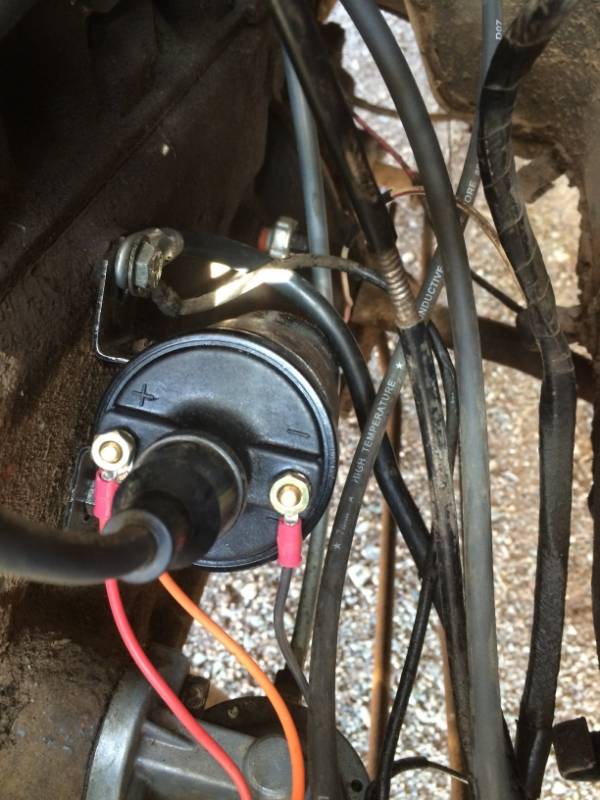
    Changing a coil is simple.  Loosen the clamp and slip the coil out.  The Pertronix is the same diameter as the stock coil so this was super easy.  The installed coil looks like this:

    Installing the Pertronix Ignitor II and Flamethrower Coil D85a92e1-09a5-4aca-b23f-dfe0823f1006_zps7d92e836

    Note that the original coil feed wire is just coiled up and wired tied out of the way, it won't be used.
    AZ SuperVan
    AZ SuperVan


    Number of posts : 219
    Location : Cave Creek AZ
    Registration date : 2013-09-12

    Installing the Pertronix Ignitor II and Flamethrower Coil Empty Re: Installing the Pertronix Ignitor II and Flamethrower Coil

    Post by AZ SuperVan Fri Nov 28, 2014 11:10 am

    The relay only requires connection of four wires and everything you need is right there under the dog house cover.  I mounted the relay next to the starter solenoid.  I used an existing hole in the side of the dog house.  Be sure to clean off any paint at this screw location as this will be the ground location for the relay.

    Installing the Pertronix Ignitor II and Flamethrower Coil A21d7f2b-1f70-488b-8fd5-3b6506deedf1_zps4a15861f

    Remember to disconnect the battery negative lead before doing any electrical work on your van!

    The red wire on the relay goes to the battery side of the starter solenoid.  You will need a ring terminal that fits over the stud.

    The black wire is the ground, use the screw that mounts the relay to secure this connection.

    The purple wire is the trigger.  Run this wire to the I terminal on the front face of the solenoid.  If you have the slip on connector you can use a ring terminal under the nut.  I recommend replacing the slip on connector with a ring terminal.

    The orange wire runs to the Coil positive.

    Now hook the battery back up and you are ready to start the engine.  Although in most cases timing remains the same or close, I would strongly recommend setting the timing.  You may find that you can run a little more base advance, and that you engine idles better.

    Congratulations you now have ignition system technology that might not be older than your grandparents!
    Abitibi
    Abitibi
    Vintage-Vans Listings Manager
    Vintage-Vans Listings Manager


    Number of posts : 479
    Location : Vancouver BC
    Registration date : 2014-06-23

    Installing the Pertronix Ignitor II and Flamethrower Coil Empty Re: Installing the Pertronix Ignitor II and Flamethrower Coil

    Post by Abitibi Mon Dec 01, 2014 8:53 pm

    Amazing details! Great timing as I just bought a Pertronix with their coil and learned a few things from you for sure. What happens if you don't modify the one for the 170? I'll have to take a look on mine later on. Any pictures showing you modification?

    Thanks again!
    Mr. D
    AZ SuperVan
    AZ SuperVan


    Number of posts : 219
    Location : Cave Creek AZ
    Registration date : 2013-09-12

    Installing the Pertronix Ignitor II and Flamethrower Coil Empty Re: Installing the Pertronix Ignitor II and Flamethrower Coil

    Post by AZ SuperVan Tue Dec 02, 2014 7:54 am

    The one thing I didn't take pictures of...  LOL!  actually, unless I had an unmodified unit for comparison I don't think you could see the difference.

    From what I have been able to learn not all 170's came with the distributor that is in my van.  If the Pertronix sits completely flat with the pin inserted in the screw hole, then you are good to go, but if not, like my van, it won't line up properly and it won't work.

    One other item that I need to add is that the ground wire inside the distributor is very important.  I read on a Falcon forum where a guy couldn't get the Pertronix to work, but he had left that part out not realizing that it was important.

    Installing the Pertronix Ignitor II and Flamethrower Coil Bf31161f-0c1e-4431-b776-d6588af98970_zpsd2238336
    Abitibi
    Abitibi
    Vintage-Vans Listings Manager
    Vintage-Vans Listings Manager


    Number of posts : 479
    Location : Vancouver BC
    Registration date : 2014-06-23

    Installing the Pertronix Ignitor II and Flamethrower Coil Empty Re: Installing the Pertronix Ignitor II and Flamethrower Coil

    Post by Abitibi Wed Dec 03, 2014 10:25 am

    This is what my '65 170 looks like. Seems like I might not have to modify it to fit.

    Installing the Pertronix Ignitor II and Flamethrower Coil Image10

    Any chance to tag this thread as a sticky so it can be easily accessed? It's a question that regularly comes back on the forum and this is by far the best tutorial post!

    Cheers
    Mr. D
    AZ SuperVan
    AZ SuperVan


    Number of posts : 219
    Location : Cave Creek AZ
    Registration date : 2013-09-12

    Installing the Pertronix Ignitor II and Flamethrower Coil Empty Re: Installing the Pertronix Ignitor II and Flamethrower Coil

    Post by AZ SuperVan Wed Dec 03, 2014 10:36 am

    Fine with me. I am not sure who does that though. My van sure is running better since I finished this upgrade.

    ratrider likes this post

    Bluelemon
    Bluelemon


    Number of posts : 139
    Location : Atlanta, GA
    Registration date : 2008-07-10

    Installing the Pertronix Ignitor II and Flamethrower Coil Empty Re: Installing the Pertronix Ignitor II and Flamethrower Coil

    Post by Bluelemon Fri Dec 05, 2014 12:45 pm

    Very Good Article !
    I had problem awhile back with an older Petronix. Seems the magnets were held in by a tan 'packing' type tape. The tape came loose and I lost two magnets; so basically running on 4 cylinders.
    This happened right after a gas stop, so I 'assumed' it was bad gas.......
    After diagnosing all the gas details, finally putting the points back in solved the issue. Later told to look at the disc for missing magnets !
    Newer units are sealed and don't use the old tape method.....
    AZ SuperVan
    AZ SuperVan


    Number of posts : 219
    Location : Cave Creek AZ
    Registration date : 2013-09-12

    Installing the Pertronix Ignitor II and Flamethrower Coil Empty Re: Installing the Pertronix Ignitor II and Flamethrower Coil

    Post by AZ SuperVan Fri Dec 05, 2014 12:54 pm

    Must have been a pretty old one... As far as I know they are all sealed designs now. I keep my old points and condensor in the glove box just in case.

    The next time I misfire I am going to tell my wife that my magnets fell out.
    Bluelemon
    Bluelemon


    Number of posts : 139
    Location : Atlanta, GA
    Registration date : 2008-07-10

    Installing the Pertronix Ignitor II and Flamethrower Coil Empty Re: Installing the Pertronix Ignitor II and Flamethrower Coil

    Post by Bluelemon Fri Dec 05, 2014 1:28 pm

    She will probably ask if they fell out of Your head !
    Rick65SpringSpecial
    Rick65SpringSpecial


    Number of posts : 11
    Location : Houston, TX.
    Registration date : 2013-03-04

    Installing the Pertronix Ignitor II and Flamethrower Coil Empty Re: Installing the Pertronix Ignitor II and Flamethrower Coil

    Post by Rick65SpringSpecial Fri Dec 09, 2016 9:08 am

    Great write up. I think most peeps here may have manual trannys, mind has an auto. Question, how has the P2 been working for the auto trannies? Reason I ask is that I also have a 65 Corvair and from reading on the vair forums, there has been issues with using the P2 on auto trannies due to the low idle, works ok when driving but misses cylinders and does not run smooth at idle. What has the been the experience of those here with autos? The vairs with the P1 have no reported problems at idle, not sure the difference between the P1 and P2 and why the P2 is affected by idle speed

    Thanks
    Rick
    Texas
    AZ SuperVan
    AZ SuperVan


    Number of posts : 219
    Location : Cave Creek AZ
    Registration date : 2013-09-12

    Installing the Pertronix Ignitor II and Flamethrower Coil Empty Re: Installing the Pertronix Ignitor II and Flamethrower Coil

    Post by AZ SuperVan Fri Dec 09, 2016 11:01 am

    The transmission should not make any difference. I have used them both (P1 and P2) on other vehicles with automatic transmissions with no issues. My guess is that a vehicle with a very badly worn distributor shaft might have enough wobble to effect the device. The Pertronix itself has no effect on idle speed.
    Rick65SpringSpecial
    Rick65SpringSpecial


    Number of posts : 11
    Location : Houston, TX.
    Registration date : 2013-03-04

    Installing the Pertronix Ignitor II and Flamethrower Coil Empty Re: Installing the Pertronix Ignitor II and Flamethrower Coil

    Post by Rick65SpringSpecial Fri Dec 09, 2016 12:15 pm

    I would agree with you, tranny should not make a difference, but I have seen a video of an auto (powerglide) with the P2 installed and at idle (600rpm), it ran like shit. Had a lot of cutout and missing, same one with points ran great. Don't think it was the dist. the ones that had problem keep their vair in top shape. Most go back to points or the P1 because of the problem . Again no reported problems with the P1 in the auto. Seth Emerson came out with a HEI unit.dist. that works great for the vairs, that what I going to install in the vair, but a little more pricy then the P2. I got all the parts for a duraspark so thats what I'm going to install in the epup. Anyhoo, Your write up was very informative, and I also learn to use a relay if I try the P2. Thanks again.

    Rick
    TX.
    AZ SuperVan
    AZ SuperVan


    Number of posts : 219
    Location : Cave Creek AZ
    Registration date : 2013-09-12

    Installing the Pertronix Ignitor II and Flamethrower Coil Empty Re: Installing the Pertronix Ignitor II and Flamethrower Coil

    Post by AZ SuperVan Fri Dec 09, 2016 12:37 pm

    Ahh... Okay, poor operation at idle is caused by low voltage at the Pertronix device. They need to run 12 volts directly to the Pertronix. The voltage at the coil is about 6.5 or so at idle and that is not enough for the Pertronix to switch cleanly. The reason it is happening with the automatic is because idle speed drops when you put the car in drive and voltage drops when you put your foot on the brake and the brake lights light up with the alternator making almost no power.
    Trainmaster
    Trainmaster


    Number of posts : 36
    Location : Rockaway Beach, New York
    Registration date : 2018-06-04

    Installing the Pertronix Ignitor II and Flamethrower Coil Empty Petronix With Resistor Wire

    Post by Trainmaster Wed Feb 13, 2019 4:42 am

    Just a note from my experience:  I installed the Pertronix I with the original coil and resistor wire still in place; operating it on about 6 volts.  It worked flawlessly in my 67 3-speed.  

    A call to Pertronix told me that's okay if it works.  The lower voltage won't cause any harm.  

    So if you are using the Pertronix I, you may want to give a try to just mounting the unit and wiring it up like the stock points.  May work fine for you.  Been runnig it for seven years...
    AZ SuperVan
    AZ SuperVan


    Number of posts : 219
    Location : Cave Creek AZ
    Registration date : 2013-09-12

    Installing the Pertronix Ignitor II and Flamethrower Coil Empty Re: Installing the Pertronix Ignitor II and Flamethrower Coil

    Post by AZ SuperVan Thu Feb 14, 2019 3:02 pm

    Trainmaster wrote:Just a note from my experience:  I installed the Pertronix I with the original coil and resistor wire still in place; operating it on about 6 volts.  It worked flawlessly in my 67 3-speed.  

    A call to Pertronix told me that's okay if it works.  The lower voltage won't cause any harm.  

    So if you are using the Pertronix I, you may want to give a try to just mounting the unit and wiring it up like the stock points.  May work fine for you.  Been runnig it for seven years...

    You might want to try running 12 volts to it to see if it makes a difference. All you have to do to test is to run a jumper wire from the battery side of the solenoid to the coil + where you have the Pertronix hooked up. You might notice a better idle, possibly pick up a few RPM even at idle.
    Rick65SpringSpecial
    Rick65SpringSpecial


    Number of posts : 11
    Location : Houston, TX.
    Registration date : 2013-03-04

    Installing the Pertronix Ignitor II and Flamethrower Coil Empty Re: Installing the Pertronix Ignitor II and Flamethrower Coil

    Post by Rick65SpringSpecial Mon Mar 04, 2019 5:30 pm

    Just a few things I've learned on how to tell which distributor you may have. If you look at AZ's picture of his loadomatic, it is a D shape and solid shaft, only has vacuum advance, looking at Abitibi's pic and it is a C shape. and has both vacuum and centrifugal advance. My 240 has the loadomatic, I've only seen the loadomatic used with the Autolite 1100/1101 carbs with the spark valve on the side of the carb. Also the 1100/1101 carbs have two versions, the one with one dash pot is for manual tranny and the double dash pot, one on either side, is for the automatic.

    Rick
    TX
    Pdxgeo
    Pdxgeo


    Number of posts : 18
    Location : Portland, OR
    Registration date : 2016-11-27

    Installing the Pertronix Ignitor II and Flamethrower Coil Empty Re: Installing the Pertronix Ignitor II and Flamethrower Coil

    Post by Pdxgeo Thu Dec 17, 2020 7:05 pm

    Id like to add to this topic one my experience and two some more technical stuff.

    I did the pertronix and used it with the original 6v wire for a week or two and it started instantly, idles well and drove fine. I just added the relay and it started instantly but with more power if that makes sense. The idle is definitely smoother and a bit higher, I need to get my timing light out there and set timing before i drive it but it does seem like there is some difference. The van has been sitting for about a week in 40's/50's wet ass weather and it started without even needing to tap on the gas pedal. I know Im geeking out but it feels good to have a 50 year old with its original motor start so well.

    Secondly the relay I was able to find at my local aps had all white wires so I will add the locations of the wires to this post. #85: ground, #86: front face of Starter solenoid, #30: Hot side of starter solenoid, #87: to +coil

    AZ SuperVan likes this post


    Sponsored content


    Installing the Pertronix Ignitor II and Flamethrower Coil Empty Re: Installing the Pertronix Ignitor II and Flamethrower Coil

    Post by Sponsored content


      Current date/time is Thu Apr 18, 2024 8:43 pm