


Rod, So will the side and rear doors work if swapped? This just opens up my options depending on what I might find in the JY. The look as though everything else is compatible, and since im not going for a factory restore, I wont mind what doors I find. You get what I mean Im sure.
+18
dodge man
Dawgboy
Wheelie
HandiVanMan
Digz
rustyspoke66
Axlejack
dix
millwright71
rigatoni
jkr
SnarkyPoet
Space Truckin
white-lightning
rebar
austinmodhouse
RodStRace
Gothboy
22 posters
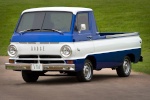
Gothy's new 68 High top NOW WITH PICS! :)

Gothboy- Number of posts : 714
Location : So Cal Baby!
Registration date : 2012-07-02

SnarkyPoet- Number of posts : 174
Location : Francestown, NH, USA
Registration date : 2009-12-22
I use a heavy duty latching solenoid mounted under the floor of the van as a battery disconnect. I've got it wired to a wireless momentary switch on a key fob. I use a pertronix igniter II instead of points, so when I hit the kill switch, it stops the van dead. (You can use a regular momentary switch instead of a remote one.) The solenoid is wired to the positive side of the battery, so it works as a safety cut off when I'm working on the van as well.

RodStRace- Number of posts : 3046
Location : Chino Valley
Registration date : 2010-01-21
Gothboy wrote:Rod, So will the side and rear doors work if swapped? This just opens up my options depending on what I might find in the JY. The look as though everything else is compatible, and since im not going for a factory restore, I wont mind what doors I find. You get what I mean Im sure.
The latch assemblies are a @#$% to swap out.
So, you can put side doors on the rear and have the ability to get out and no emblems, or if you bolt rear doors to the side, you have emblems on the side (ugly, IMHO) and no way to get out except climb over the engine.
Ya gotta make your choice depending on what you can find, though.
Gothboy- Number of posts : 714
Location : So Cal Baby!
Registration date : 2012-07-02
@Snarky REALLY great idea! I used to know a guy who developed a kill system for cars where you would turn the key off and press the horn button onjce to arm it. When you pressed the horn after shutting it off, the horn would not sound, only arm the kill system. If pressed a second or more times, the horn functioned normally. To start the vehicle, you would turn on the key, press the horn twice then start the car. If pressed a third time or more the horn would sound normally, but not those first two times. I tried anbd tried for a LOOOONG time to see if I could get it explained, but never got anywhere. Too bad, cause that was a pretty trick system!
@Rod Hey man, thanks again for the info. Looks like I'll be looking for two of the side doors that have the external handle. and ofcourse as many matching key locks as I can find. And naturally, when I go to the Jyards I will post anything I find that you guys will find useful.
Oh, my steering wheel is GROSS! Does anyone know how I get it off so I can clean it real good? I tried pressing and turning the horn button several ways, and tried lifting and turning it. I cannot discern how its removed to access the shaft nut. Please and thank you guys!
*Edit I forgot to say something else. My van has some of those "plastic wall panels" in it, but not all of them. Its got the entire driver side, and one panel on the pass side just behind the front door. Your opinions welcome here... Keep what little I have and try to find the rest, which I dont even know if Im really fond of anyway
Cut the driver one in half and keep the top section, and make a lower section I'll like more...
Or Sell all of them together if they're super hard to find...Id hate to ruin rare parts.
What should I do?
RodStRace- Number of posts : 3046
Location : Chino Valley
Registration date : 2010-01-21
Steering wheel - use simple green or the purple stuff. A tooth brush helps for the grooves. It's gotta soak in and the tooth brush will spatter the gunk everywhere. Best to take it off and do it outside. Problem is, it tends to come back, especially if you don't wash your hands before you drive.
I'd suggest removing the old wrap, doing a super clean and installing a new wrap. Take your time on the wrap and read the instructions, and it will look and feel great.
Horn button - The plastic center cap is carefully pried out of the button base. Then there are screws that hold the base to the adapter. Look around the edge, there is usually a little notch so the tip of a screwdriver can fit in. It's the bottom one on this page.

Plastic interior panels - hard to find, tough to complete a set. Try not to hack them up. If you plan on redoing the interior, they can be used as patterns too.
As for a lot of the little details, try to get a service manual. I prefer a paper copy to the electronic CD copies.
Also, have an A-100 folder in your Favorites so you can save the web adresses of the sites you find useful, like the one I got the picture from.
http://missiondetail.com/A100%20Parts.htm#
another parts manual source (with trucks too)
http://www.sweptline.org/1963_1968_Index.html
The Yahoo group (gotta be a member to post or search)
http://autos.groups.yahoo.com/group/DodgeA100/
and interesting articles or other links that may have parts or ideas you want to incorporate
http://www.hemmings.com/hmn/stories/2009/09/01/hmn_feature21.html
http://www.rv.net/forum/
I also tend to save pics of most of the vans and PUs for sale and any I find on the net. I have a ton of pics that often show the same angles, but you never know when some color or part is lurking in a pic and you can go back and check it.
I'd suggest removing the old wrap, doing a super clean and installing a new wrap. Take your time on the wrap and read the instructions, and it will look and feel great.
Horn button - The plastic center cap is carefully pried out of the button base. Then there are screws that hold the base to the adapter. Look around the edge, there is usually a little notch so the tip of a screwdriver can fit in. It's the bottom one on this page.
Plastic interior panels - hard to find, tough to complete a set. Try not to hack them up. If you plan on redoing the interior, they can be used as patterns too.
As for a lot of the little details, try to get a service manual. I prefer a paper copy to the electronic CD copies.
Also, have an A-100 folder in your Favorites so you can save the web adresses of the sites you find useful, like the one I got the picture from.
http://missiondetail.com/A100%20Parts.htm#
another parts manual source (with trucks too)
http://www.sweptline.org/1963_1968_Index.html
The Yahoo group (gotta be a member to post or search)
http://autos.groups.yahoo.com/group/DodgeA100/
and interesting articles or other links that may have parts or ideas you want to incorporate
http://www.hemmings.com/hmn/stories/2009/09/01/hmn_feature21.html
http://www.rv.net/forum/
I also tend to save pics of most of the vans and PUs for sale and any I find on the net. I have a ton of pics that often show the same angles, but you never know when some color or part is lurking in a pic and you can go back and check it.
rebar- Number of posts : 151
Location : northwest
Registration date : 2012-10-31
RodStRace wrote:Nice idea, rebar! Does the van die with the switch thrown (stops charging too?)
Thanks Mr R. Van keeps running when the switch is thrown, and alt. stops charging. If I turn on the lights or heater, it dies.
Gothboy- Number of posts : 714
Location : So Cal Baby!
Registration date : 2012-07-02
Good news kids! Its got tags now!!! rock on! Now I can park it on the street and work on the things that I dont need it to be dry docked for. Like water pump, dropping gas tank, dizzy upgrade, finding a new door, insulating the dog hou..........................
Oh! Quick question. Ive used pertronix before and had 50/50 luck. excellent on ford, bad design on chevies (vertical play ruins the unit, x3) but never on mopar. Looks to be a good design (unaffected by vertical play, like ford) I like it!
I need a dizzy vaccuum advance, and pertronix. (= $100) but then I went on ebay and found this: http://www.ebay.com/itm/CHRYSLER-DODGE-MOPAR-318-340-360-SB-V8-HEI-DISTRIBUTOR-6513-BLACK-/330837927903?pt=Motors_Car_Truck_Parts_Accessories&vxp=mtr&hash=item4d077a27df (about $100)
For the same price (though I havent checked clearance issues) Has anyone used the HEI setup on their mopar?
Any prefrences here? It'll run me about the same price.
I prefer the GM style dizzy, but I want to run whats better, obviously. What do you all think?
RodStRace- Number of posts : 3046
Location : Chino Valley
Registration date : 2010-01-21
A LOT of Mopar guys tend to lean toward only Mopar stuff on their rides. This can be both a good thing and a bad thing.
GM has had the high performance and rod markets tied up with various components for a long time. Consider the 1-wire alternators and the nearly standardized wiring harnesses for rods using GM steering columns, along with the SBC and turbo 350.
The Ford 8" and 9" rear axles and Mustang II front suspension have also become the common standard.
So, to your question on the HEI distributor.
The GM HEI is a good, reliable, cheap, easy solution. It is simple to install and connect.
However, I tend to prefer the Mopar EI. It is also good, reliable, cheap and easy. It will be as easy if not more so to find, install and repair/replace. The only downfall is that it requires a separate module and ballast along with the additional additional wiring, compared to the HEI, which uses a 12 volt single wire and all components are integral.
Here is a complete new Mopar setup.
http://www.jegs.com/i/JEGS-Performance-Products/555/40031/10002/-1
You can also find the distributor, module and ballast in the wrecking yards, and scavenge the wiring there too.
Here's a walk-thru of a conversion.
http://www.oldengine.org/unfaq/leadfoot/leanburn.htm
RodStRace- Number of posts : 3046
Location : Chino Valley
Registration date : 2010-01-21
Gothboy- Number of posts : 714
Location : So Cal Baby!
Registration date : 2012-07-02
Thats pretty awesome Rod! Thanks! 
So I drove it for the first time yesterday! wasnt flattering after not having been driven in 13 years, but I knew that. I limped it to the tire shop to get the front two swapped. It was pretty funny. Terrible acceleration, Smoked like a train, rattled and shook like a mobile earthquake, and smelled like hell. I enjoyed the heck out of it! lol
At the tire shop (two blocks away) When I started it back up to leave Started up better, ran stronger, didnt smoke much, rattled less, shook the same, didnt have a tire induced bumpy ride, and had better acceleration. the smell will improve, and so will performance and running as she works out her bugs after so long being ignored. Got to put some time in this weekend. It's a "step on the brakes makes left turns" vehicle haha. Easy fix, but funny none the less. Just needs some love.
Gothboy- Number of posts : 714
Location : So Cal Baby!
Registration date : 2012-07-02
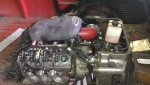
Unexpected problem! Needs a timing cover!!! Auto parts (a really good supplier to me) has told me the only thing they can think of is junkyard because they dont make timing covers for '68 318 motors anymore! Mine has a hole in it. 
Im 99% sure other years of timing cover will fit, but was wondering if anyone knows the differences. If it's the "timing hump" then thats no big deal, because mine was running from one of those add on timers that get attached at the water pump mounting bolts.
Any input please let me know!
Im 99% sure other years of timing cover will fit, but was wondering if anyone knows the differences. If it's the "timing hump" then thats no big deal, because mine was running from one of those add on timers that get attached at the water pump mounting bolts.
Any input please let me know!
RodStRace- Number of posts : 3046
Location : Chino Valley
Registration date : 2010-01-21
Early (60's) is different than late (70-80s) for the reason you mention - the WP inlet is on the other side.
There are a couple places they develop holes.
In the coolant passages, which erode and are a booger to fix, or if the chain is very loose and eats through the side. That can be fixed.
The fun part is the timing cover/oil pan area. You may not want to do the pan too, but it usually gets better results...
and put sealer on all the big bolts that hold the WP through the front cover to the engine.
jkr- Number of posts : 1148
Location : prince edward island canada
Age : 66
Registration date : 2008-05-29
pioneer automotive for the timing cover. they might have the listing for the early l-a engines. they are avaliable through summitt racing too.
Gothboy- Number of posts : 714
Location : So Cal Baby!
Registration date : 2012-07-02
Cool! Where can I find them? There appears to be lots of that name on the net. :/
RodStRace- Number of posts : 3046
Location : Chino Valley
Registration date : 2010-01-21
This shows all the different later covers.

Early covers match the driver's side exit iron water pump, with the timing marks on the passenger side. This is the type installed in all the vans that I am aware of.


Later covers match the passenger's side exit aluminum water pumps with the timing marks on the driver side.

Note that the early WP is shorter, so the pulleys also are different, and the crank damper and pulleys have one offset hole on later setups.
The early stuff also had some strange dampers, but that should not be something to deal with on your van.
Hope that explains the big changes without confusing more!
More info that does not cover what I've just laid out
http://www.allpar.com/mopar/318.html
Early covers match the driver's side exit iron water pump, with the timing marks on the passenger side. This is the type installed in all the vans that I am aware of.
Later covers match the passenger's side exit aluminum water pumps with the timing marks on the driver side.
Note that the early WP is shorter, so the pulleys also are different, and the crank damper and pulleys have one offset hole on later setups.
The early stuff also had some strange dampers, but that should not be something to deal with on your van.
Hope that explains the big changes without confusing more!
More info that does not cover what I've just laid out
http://www.allpar.com/mopar/318.html
Last edited by RodStRace on Thu Dec 20, 2012 11:16 am; edited 1 time in total (Reason for editing : fixed an error)
Gothboy- Number of posts : 714
Location : So Cal Baby!
Registration date : 2012-07-02
Awesome, thank you for clearing that up! Looks like the answer is...... Put some JB type stuff over the hole and hope for the best!
Should have more updates on progress in a few days when its running again. Thanks a million guys!
Should have more updates on progress in a few days when its running again.
rebar- Number of posts : 151
Location : northwest
Registration date : 2012-10-31
This might be of some help.
Ordered a new summit-brand damper from their catalogue, that did not specify year applications. Nice beefy damper, but noticed that it did not have the gravel-deflecting metal shroud attached to the back side of it like the original has (which encompasses the protruding oil seal section of the timing cover). Took some measurements and it seemed that with the new damper the crank pulley would be out of alignment – which would require either buying a new crank pulley or a new fan pulley and re-mounting the alternator. Talked to their tech who agreed that the catalogue should have noted, "1971 on", and suggested I return the damper, which I did.
So, if you update the timing cover, it's possible that the shroud on your old damper may cause it to not fit correctly. I don't know, but maybe Mr R, or someone else can offer more accurate info.
jkr- Number of posts : 1148
Location : prince edward island canada
Age : 66
Registration date : 2008-05-29
http://pioneerautoind.com/
and remember if it is not listed call and check for availability. not all websites have all the listings, especially the older parts.
and remember if it is not listed call and check for availability. not all websites have all the listings, especially the older parts.
Gothboy- Number of posts : 714
Location : So Cal Baby!
Registration date : 2012-07-02
Well for now I used this pain in the butt crap called q-bond to fix the hole in the timing cover. Was redicously annoying and took like an hour for a 1/4 inch hole. Then I gasketed the new water pump and snugly mounted it. Tomorrow I will tighten it all down and give her a run through.
Thanks a million JKR, ill check into that place and see what they have for when I tear down the doghouse in the very near future. Needs insulation so soon is good!
Thanks a million JKR, ill check into that place and see what they have for when I tear down the doghouse in the very near future. Needs insulation so soon is good!
Gothboy- Number of posts : 714
Location : So Cal Baby!
Registration date : 2012-07-02
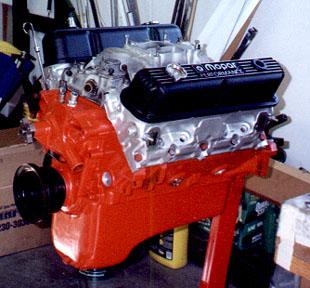
Got my windshield rubber for xmas! YAY! Now I'll get the brakes all dialed in a little better, and take it to the glass shop! I should be able to "daily" it for abit after that! (if that timing cover repair holds up) If not, I sold another of my cars, so I should be able to do an entire engine swap in the near future. Cheers to reliability! lol.

rigatoni- Number of posts : 34
Location : boulder
Registration date : 2011-03-09
Where did u get windshield rubber? Thanks love the vanGothboy wrote:Got my windshield rubber for xmas! YAY! Now I'll get the brakes all dialed in a little better, and take it to the glass shop! I should be able to "daily" it for abit after that! (if that timing cover repair holds up) If not, I sold another of my cars, so I should be able to do an entire engine swap in the near future. Cheers to reliability! lol.
Gothboy- Number of posts : 714
Location : So Cal Baby!
Registration date : 2012-07-02
DIX was nice enough to give us a link to windshield rubber, can be found near the bottom of the main page under "A parts links" Here it is. http://precisionrestorationparts.com/i-8705211-1964-1970-dodge-van-windshield-weatherstrip.html
Looks great, and the price was right! havent got it put in yet, but soon!
Another update! I insulated 90% of the doghouse! WHAT A FREAKIN PAIN!!! Lol. looks great, and should be pretty nice now. I didnt get the front section done because I figure its not touching the seats, and Im gonna open the entire house again to do the engine swap in the next few weeks. I actually couldnt figure out how to take out that section without removing bolts that seemed to be attached to everything including the headlights haha! No big deal. I have to mod the radiator anyway, I think its holding but the overflow tube fell off. I want to have it checked out anyway. Now I have a nasty cruddy old engine in a pretty shiny chrome inside doghouse. Im VERY amused.
RodStRace- Number of posts : 3046
Location : Chino Valley
Registration date : 2010-01-21
To remove the front section, it's good to remove the fan and shroud. They come out the bottom front, which requires removing the belly pan.
It also requires removal of the throttle linkage/cable, shift levers/cable, and the biggie, the wiring harness!
Seems that everything goes through holes in the bottom left side!
I didn't redo the insulation on that one either!
I can't remember if the brakes also interfere with it too. I think the lines dip around it.
millwright71- Number of posts : 531
Location : Northeastern Indiana
Registration date : 2012-05-28
If you plan to upgrade to disc brakes, you have to cut the wiring harness free from the front doghouse piece to get enough room for the master. I waited to remove my complete doghouse until then.
Tom
Tom
Gothboy- Number of posts : 714
Location : So Cal Baby!
Registration date : 2012-07-02
Wow~! THAT was very important! Thank you very much for that! I do plan on the disc brake upgrade, so maybe when I do the motor I'll fit a quick connect right there or something so when I do disc brakes its not a whole lotta drama all over again.


|
|
|