


Contrast instead of all black interior try a different color for two reasons. A black wheel will be hotter and blend with the rest of the interior. A Silver one will stand out and look great also
+18
dodge man
Dawgboy
Wheelie
HandiVanMan
Digz
rustyspoke66
Axlejack
dix
millwright71
rigatoni
jkr
SnarkyPoet
Space Truckin
white-lightning
rebar
austinmodhouse
RodStRace
Gothboy
22 posters
Gothy's new 68 High top NOW WITH PICS! :)
G-Man- Mayor

- Number of posts : 30743
Location : Fowlerville, MI
Age : 62
Registration date : 2008-05-06

RodStRace- Number of posts : 3046
Location : Chino Valley
Registration date : 2010-01-21
dix wrote:I'm thinking the metal flake would be hard to see in black.
j3V4iVBNczbGo9BQ~~_12a.jpg)

Gothboy- Number of posts : 714
Location : So Cal Baby!
Registration date : 2012-07-02
This weekend I FINALLY got around to putting my belly pan on...that is after I replaced my fan belt again.
Funny thing. It runs HOTTER now WITH the belly pan than it did without! ?!?!?!? Dont get it.
Anyway, Also started on making a "clip on" center console for the dash. clip on in the sense that its made to slip onto (because of the shape of the dash and the console) the dash with no major modifications to the dash.
The modifications to the dash were going to be made anyway. I removed the speaker grille section and relocated the drivers end of the crash pad "upright" about a foot closer to the passenger side.
The main housing of the clip on center console is now made, and the new crash pad will be hinged. It was impossible to see what was in the glove box with it the way the factory designed. Quite lame.
Put my copper metal flake wheel on temporarily (until I get a black one) and was amazed mow much clearance I gained by ditching the factory steering wheel. THAT factory wheels not going back on!
Also decided that since I live in the ghgetto and just installed my belly pan...It would be really difficult to get any detritus out of my air flow path behind the grille should any little scum bag kids from my wonderful neighborhood decide that my grille looked like a nice depository. So I made a "grill protector screen?" setup that goes behing my grille and keeps things out other than air and bugs lol. Looks fairly decent and has a fair ammount of retention against pressure (like maybe flying rocks from tires ahead of you). Fine wire so it doesnt interfere with airflow in any way. Im still putting along on this project!

vanny- Moderator
- Number of posts : 14775
Location : Ashburnham, MA
Age : 65
Registration date : 2012-09-22
That's all GREAT stuff Gothboy but as someone on this site once said, and I quote, "Without pics, it never really happened!" 
Sounds like you're still at it and making improvements as you stumble on to things that just don't work as they should from the factory. I'm sure someone will see your improvements and they could inspire someone to make similar improvements, if there were pictures, that is! LOL
Sounds like you're still at it and making improvements as you stumble on to things that just don't work as they should from the factory. I'm sure someone will see your improvements and they could inspire someone to make similar improvements, if there were pictures, that is! LOL
_________________
“The future will soon be a thing of the past."
http://public.fotki.com/Vintage-Vans/vintage-vans-es/ruff-diamond-1/?cmd=fs_slideshow
Gothboy- Number of posts : 714
Location : So Cal Baby!
Registration date : 2012-07-02
D'oh! You got me there amigo! I suppose it IS past time for a mini avalanche of pictures.
Very well, I'll take a couple more tonight. You got me with MY OWN LINE haha!
Very well, I'll take a couple more tonight.

Twinpilot001- Number of posts : 6186
Location : spokane ,Wa.
Registration date : 2009-09-28
GET=EM" Vanny!!!!!!!!!!!!!!!!!!!!!!!!!!!!!!!!!!!!!
No Picx -just BS!!
No Picx -just BS!!
Gothboy- Number of posts : 714
Location : So Cal Baby!
Registration date : 2012-07-02

So last I left off photos wise, I had just gotten new mufflers. I love this pic for some reason. They sound fantastic, and if you're ever needing mufflers or exhaust work in LA County visit Aladdin Muffler. They are THE BEST. Theyve done exhaust systems on close to 15 of my vehicles over the years, and Ive never had ONE complaint. The van runs true duals with glass packs that exit just infront of the rear tire. This is a temporary setup because Im going to build (when Im ready) my own custom exhaust system mainly just because I can and nobody will understand quite what I want. Aladdin will install it for me, as they have on many in the past when I create a unique crazy custom exhaust system for my vehicles.

So after that success I pulled the gas tank which turned out to be a colossal fail. I think I'll have that problem solved pretty soon though, Prospects are lookin great!
Then I found my front bumper. It didnt quite fit, but I knew that before I even went to see it. I REALLY like the tube style bumpers, and this exact one was just what I was looking for. You see how the ends "round the corner" and THEN have a vertical support between the bars?

Well, I knew it would work so I bought it anyway without even measuring anything. I cut the ends off JUST before the curve. Flipped them side to side, and welded them back on. That made the curve AFTER the vertical support thus creating enough distance between the end curves to clear the sides of the van perfectly. Its like it was made for the van! LOVE IT!
Gothboy- Number of posts : 714
Location : So Cal Baby!
Registration date : 2012-07-02
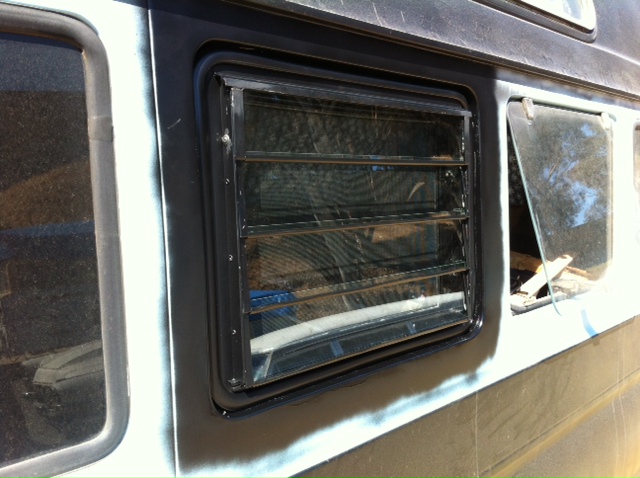
Then I saw one of our friends on here in San Diego had some parts I needed, so I drove down there and got them. I am SO HAPPY with the Jalousie louvered windows after I rebuilt them. I really havent decided where in the van I want them yet, so Ive only installed one. SUPER AWESOME!

And with the great success of the last two mini projects, I decided it was time for some silly little thing to make the van mine. So I took some bored time and designed a stencil out of cardboard and completely from my brain just did it. Unfortunately when I applied it, I left a little gap in the middle and it got a tiny bit fuzzy there. Whatever, I can live with it. Im happy.
That tank stencil turned out well enough to where I finally wanted to paint the dash. What a colossal failure that was. I cleaned it a million times and there was still residue from some sort of oil on it, repelling and fish eye-ing the paint. I'll live with it for now. It looks tolerable. Its the right colors so I can fix it later...when Im not so upset at it lol.

Then I tried looking behind me for the extra can of paint. My foot got5 caught between the tiny tiny distance between the giant bus steering wheel and the seat. That annoyed me to no end, so I pulled out my old copper metalflake wheel and put it on temporarily. MUCH happier now. Now I just need to buy that black metal flake one! WOOO! Thats going to look AWESOME!
Last edited by Gothboy on Wed Jun 19, 2013 6:49 am; edited 1 time in total
vanny- Moderator
- Number of posts : 14775
Location : Ashburnham, MA
Age : 65
Registration date : 2012-09-22
Now I'm a believer, Man! I think anyone with think twice about cutting you off in traffic with that bumper on there. Looks Freakin Awesome! If the Apocalypse happens, you can mow down some serious Zombies with that thing! 
_________________
“The future will soon be a thing of the past."
http://public.fotki.com/Vintage-Vans/vintage-vans-es/ruff-diamond-1/?cmd=fs_slideshow
Gothboy- Number of posts : 714
Location : So Cal Baby!
Registration date : 2012-07-02
I forgot to mention this step before I painted the dash unsuccessfully... lol

This point is where I decided to make that "clip on" center console. Notice how it uses the shape of the dash to lock it in place? It cant go side to side because of the "dished V" of the top rear of the dash. Up and down is not an option because of all the compound curves of the lower sections. Im going to put two small screws to secure it anyway, but it really doesnt NEED them. Id just feel better if ever I got in an accident. I dont need to get beaten with a stereo haha!

I decided I wanted the crash pad shorter, and redesigned because I couldnt find anything in the glove box when it was on there due to poor design. The new one will be hinged and locking.


The clip on center console main housing completed. You can see what I mean for this "rough draft" how it really cant move. The upper large box will house my CB and stereo, and the lower flat section will finish with a flate panel and switches for alkl my goodies like off road lights and BS..... I like toys.
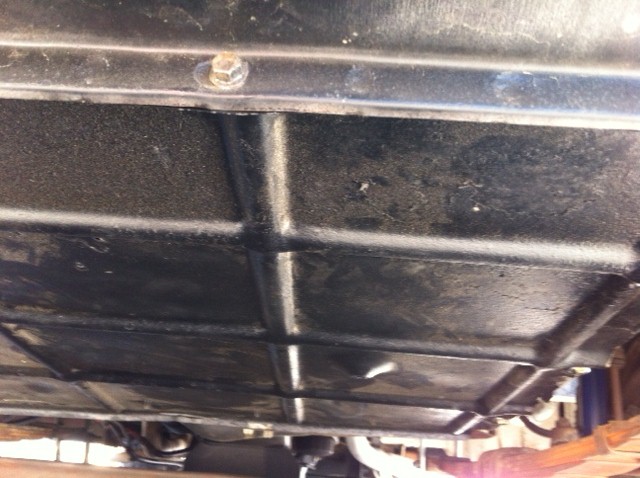
Annnnnnd then I put the belly pan on. The funniest thing is.... It runs warmer now haha! I donno, I'll continue my testing and see if it really IS a problem, or will I have to come up with some crazy innovative idea to help it out.
This point is where I decided to make that "clip on" center console. Notice how it uses the shape of the dash to lock it in place? It cant go side to side because of the "dished V" of the top rear of the dash. Up and down is not an option because of all the compound curves of the lower sections. Im going to put two small screws to secure it anyway, but it really doesnt NEED them. Id just feel better if ever I got in an accident. I dont need to get beaten with a stereo haha!
I decided I wanted the crash pad shorter, and redesigned because I couldnt find anything in the glove box when it was on there due to poor design. The new one will be hinged and locking.
The clip on center console main housing completed. You can see what I mean for this "rough draft" how it really cant move. The upper large box will house my CB and stereo, and the lower flat section will finish with a flate panel and switches for alkl my goodies like off road lights and BS.....
Annnnnnd then I put the belly pan on. The funniest thing is.... It runs warmer now haha! I donno, I'll continue my testing and see if it really IS a problem, or will I have to come up with some crazy innovative idea to help it out.
Gothboy- Number of posts : 714
Location : So Cal Baby!
Registration date : 2012-07-02
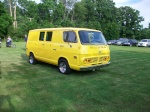
So far heres how she looks on the outside. Its a temporary fix, just so I can get her water proof and weather resistant.....for now. Haha! You can see my limo style hearse peeking in the background!
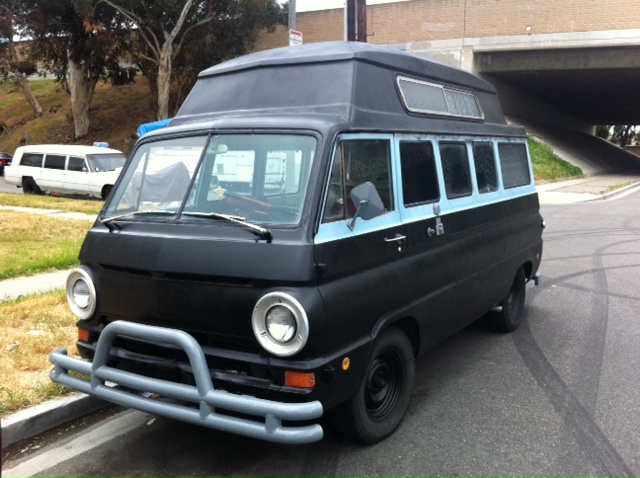
As you can see the cargo door that was rusty has been replaced. Im currently running two "rear" cargo doors while I wait for new rubber seals. Im going to run two "side" cargo doors for the benefit of the inside handles on both side and rear. You can see my little tank stencil Im so happy with lol.
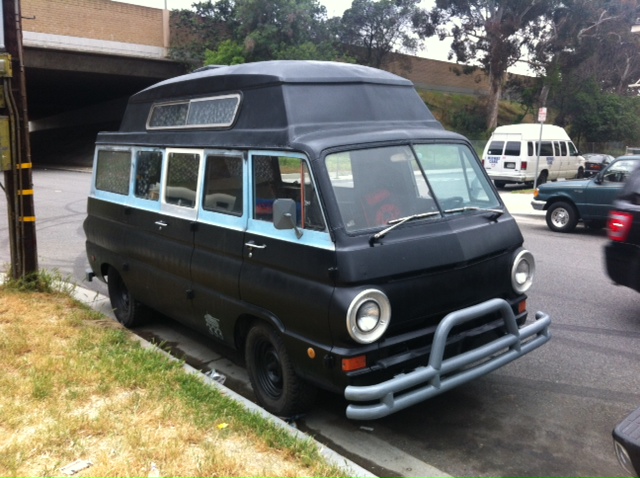
Heres the drivers side (duh) but what you may be wondering is why is ONE window blacked out? Thats because Im planning on removing it, but before I make any serious changes to the outside, I like to KNOW Ill be happy with it first. I painted the inside of it black so I can test whether I'll miss it not being a visible panel BEFORE I remove it. If I decide I really want it to stay, it stays, Otherwise, Its where my new exhaust system will go. Wait for it, you'll definitely find it "interesting"

Last project successful. Grill mesh. Not the way I want, but a way I can be happy with until I fix the slightly smashy front end.
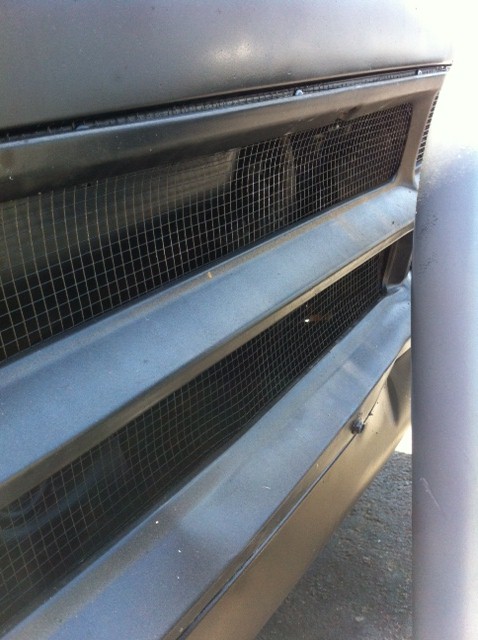
Its definitely strong enough to repel small rocks withoug impeding air flow.

Aaaaannnnnnd Now you're all up to date! Thats alot of updates, but I like to provide alot of pics all at once. It feels like "higher entertainment value" to me. Just wish I had more to show ya! Ive got some pretty cool stuff in mind!
And remember! No pics it didnt happen!
 (didnt realize I was falling prey to my own line haha!)
Any input welcome as this forum as we all know is purely to enhance chat, entusiasm and help with parts and knowhow sharing in our funky little community. Im always willing to share too, so if you want to know something, I'll do what I can to help you get the right answer. Now have a great day and continue to share the Vannin fun! Im gonna go out to the parking lot here at work and check on my little van to see if shes ok out there alone in the cold. lol.
As you can see the cargo door that was rusty has been replaced. Im currently running two "rear" cargo doors while I wait for new rubber seals. Im going to run two "side" cargo doors for the benefit of the inside handles on both side and rear. You can see my little tank stencil Im so happy with lol.
Heres the drivers side (duh) but what you may be wondering is why is ONE window blacked out? Thats because Im planning on removing it, but before I make any serious changes to the outside, I like to KNOW Ill be happy with it first. I painted the inside of it black so I can test whether I'll miss it not being a visible panel BEFORE I remove it. If I decide I really want it to stay, it stays, Otherwise, Its where my new exhaust system will go. Wait for it, you'll definitely find it "interesting"
Last project successful. Grill mesh. Not the way I want, but a way I can be happy with until I fix the slightly smashy front end.
Its definitely strong enough to repel small rocks withoug impeding air flow.
Aaaaannnnnnd Now you're all up to date! Thats alot of updates, but I like to provide alot of pics all at once. It feels like "higher entertainment value" to me. Just wish I had more to show ya! Ive got some pretty cool stuff in mind!
And remember! No pics it didnt happen!
Any input welcome as this forum as we all know is purely to enhance chat, entusiasm and help with parts and knowhow sharing in our funky little community. Im always willing to share too, so if you want to know something, I'll do what I can to help you get the right answer. Now have a great day and continue to share the Vannin fun! Im gonna go out to the parking lot here at work and check on my little van to see if shes ok out there alone in the cold. lol.
Last edited by Gothboy on Wed Jun 19, 2013 6:53 am; edited 1 time in total
Gothboy- Number of posts : 714
Location : So Cal Baby!
Registration date : 2012-07-02
Oh, and Thanks Vanny! You got me jump started again, AND your latest comment REALLY made my day! Take it easy bud! keep smiling!
G-Man- Mayor
- Number of posts : 30743
Location : Fowlerville, MI
Age : 62
Registration date : 2008-05-06
Keep up the good work

Dawgboy- Number of posts : 278
Location : San Diego, CA
Registration date : 2013-04-20
I have touched that bumper and it is a very solid piece of work. I was wishing I had it monday on the freeway, when I had a beemer cut me off and stand on his brakes. I stopped in time, But I did lock up my rear brakes... Had I had that bumper I might have plowed into the beemer on principal...


|
|
|