VintAGE-Vans

Would you like to react to this message? Create an account in a few clicks or log in to continue.

BRINGING IT ALL TOGETHER.... A's, G's & E's


2 posters

    How to: Install a HEI Distributor (The Basics Only)

    DanTheVanMan
    DanTheVanMan
    Commissioner
    Commissioner


    Number of posts : 7905
    Location : Escanaba, Michigan
    Age : 62
    Registration date : 2008-10-08

    How to:  Install a HEI Distributor (The Basics Only)  Empty How to: Install a HEI Distributor (The Basics Only)

    Post by DanTheVanMan Mon Sep 17, 2012 11:32 am

    How to: Install a HEI Distributor


    I have heard horror stories about folks and even some of out members when it comes to install a HEI distributor. Have also heard some methods that were less than correct as to "How to do it". A long with dozens of "Opinions" on the "Best" way to do it. I have found brand new ones that were bad, and some that would work on one motor but not on another identical motor...
    We all have "Our own" way and this is for the novice to get you started doing it correctly.
    You can develop your own bad habits later! lol!


    Easy-to-install HEI (high energy ignition) distributor caps perform better than factory distributors in the high RPM range at which competitive race-cars and performance street machines are driven. A factory-produced ignition and distributor can handle the amount of fuel and air that is being sent into the combustion chambers for burning, but if you tune your vehicle for performance, then only an HEI distributor has the spark you'll need when you cross over the 5000 RPM mark on your tachometer. Tuning an engine should always include the addition of an ignition and distributor that can handle the big horsepower you are looking for. Install a HEI distributor for more spark, and better ignition management. More spark means more fuel and air can be sent into the engine for burning. For older engines it’s a “No-Brain’r”, Better performance, less maintenance and better gas mileage!


    Instructions:

    (1) Remove the distributor cap from the HEI distributor. Slide the distributor gasket up over the gear arm of the distributor and set it in place underneath the distributor body. Apply a thin layer of silicon gel in between the distributor and the gasket and the distributor gasket and the engine to create a better seal once the distributor is seated on the engine. Silicon gel is a liquid gasket that is used frequently in performance shops to help seal two parts together, even if they have a gasket to line the joint already. Silicon liquid gasket dries into a rubber product that helps bind a gasket in place, preventing leaks.

    (2) Turn the distributor so that the rotor will be in the same place as the factory rotor when the engine was stopped and before the old distributor was removed. Insert the distributor gear into the engine. As the distributor gear meshes with the camshaft, the distributor's rotor will turn. Get the distributor installed with the rotor in the same position as the old one was before it was removed. If the rotor moves when inserting the distributor into the engine, rotate the rotor enough so that after inserted, the rotor is in the correct location.

    (3) Tighten the distributor hold-down fastener just enough so that it is snug. The distributor housing will need to be turned so that the vacuum canister is also pointed in the same direction as the old canister before it was removed. Both the distributor rotor and the vacuum canister need to be positioned in the same way as the old ones were, so that the timing will be close enough to the original to get the engine started. Mixed and matched rotors and vacuum canisters can prevent the engine from starting, thus eliminating the chance to correct the timing.

    (4) Place the distributor cap onto the distributor. Connect the spark plug wires onto the distributor cap in the correct order. Spark plug wires should be marked prior to removing an old distributor so that when a new distributor is installed, the wires can be reconnected easily and in the correct order. Starting with the spark plug wire from the number one cylinder, begin to replace the wires one at a time going from cylinder one to cylinder eight.

    (5) Connect the vacuum hose to the vacuum canister of the HEI distributor. You can connect a tachometer to the adapter located on the side of the HEI distributor cap. Start the engine and check the timing to get the new HEI distributor tuned properly. The new HEI distributor will let a factory engine burn more fuel. The timing of the spark is important to get right, and the timing should be adjusted each time the demand for power is increased. After the timing has been adjusted, tighten the HEI distributor hold-down fastener completely to finish the job.

    ** Don't think I've forgotten anything important but sure someone will let me know..
    Hope this helps!!!


    Keep in mind this is only the basics! There are many different opinions on how to do this.

    DanTheVanMan


    _________________
    DanTheVanMan    
    1965 Chevy G10 Sportvan Custom
    1984 Jeep CJ-7 Laredo, Restored
    2004 Kawasaki KLR650
    1997 Jeep TJ Sport

    My Mini Gallery

    How to:  Install a HEI Distributor (The Basics Only)  Qr_cod10

    <-<-<- Cruising is not a "Point A to Point B" thing, but an "Everything in between thing!  <-<-<-
    DanTheVanMan
    DanTheVanMan
    Commissioner
    Commissioner


    Number of posts : 7905
    Location : Escanaba, Michigan
    Age : 62
    Registration date : 2008-10-08

    How to:  Install a HEI Distributor (The Basics Only)  Empty Re: How to: Install a HEI Distributor (The Basics Only)

    Post by DanTheVanMan Mon Sep 17, 2012 4:09 pm

    We always have a member or two chime in with a more detailed version of each topic. This is what we want! The more information we have the better off we all are. It helps us work on our own projects and aids in helping others as well!

    RodStRace's info is very detailed and informative. Taking some of the basic steps listed above and expanding on them.

    Thank you RodStRace!


    RodStRace's expanded info below:


    Start with the following items; new distributor, new spark plug wires, wrench for hold down (usually 9/16” some use ½”), timing light, marking pen, and some white-out or a white crayon.
    Try to do this when the engine is cool and you have plenty of time. Rushing causes mistakes! It should take less than an hour. Read through the instructions before starting.


    (1) Note location of vacuum advance. You will want the new dist. to be in roughly the same location. If it is up against a bracket or the block, you may want to move it so it can move freely. Also note the location of the No.1 wire.
    (2) Remove the dist. Cap. Mark the location of No.1 wire on the dist. Body. This will be used in Step 3.
    (3) Clean off the timing marks on the front of the engine. Using the white-out or a white crayon, mark the timing marks and the line on the balancer so they are easy to see. Rotate the engine over by ‘tapping’ the key and by hand so the timing marks align. A few degrees off is okay. Make sure the rotor is pointing to the No.1 wire mark on the dist. It can be 180 degrees off. If so, rotate the engine one full turn so the timing marks and the rotor align.
    (4) Before removing the old dist. Hold up the new one nearby and see how the dist. body will fit and how the rotor must be turned to align. Disconnect the coil wire. It should be on the “-“ post. Remove the old dist. On Chevy's, the bolt does not need to be removed. The hold down has a slot to allow it to slide back enough to remove the dist. Be careful not to drop anything into the hole once it is removed! Also note that when removed, the rotor and shaft turn slightly due to the gear (except Dodge V8). Pay attention to the amount, because you want the new one to go right back in the same position.
    (5) Remove the distributor cap from the HEI distributor. Slide the distributor gasket up over the gear arm of the distributor and set it in place underneath the distributor body. Apply a thin layer of silicon gel in between the distributor and the gasket and the distributor gasket and the engine to create a better seal once the distributor is seated on the engine. Silicon gel is a liquid gasket that is used frequently in performance shops to help seal two parts together, even if they have a gasket to line the joint already. Silicon liquid gasket dries into a rubber product that helps bind a gasket in place, preventing leaks.
    (I prefer NOT to do this. It will cause tearing of the gasket the next time the timing is changed. Perhaps suggest only one side (gluing it to the dist.))
    (6) Turn the distributor so that the rotor will be in the same place as the factory rotor when the engine was stopped and before the old distributor was removed. Insert the distributor gear into the engine. As the distributor gear meshes with the camshaft, the distributor's rotor will turn. Get the distributor installed with the rotor in the same position as the old one was before it was removed. If the rotor moves when inserting the distributor into the engine, rotate the rotor enough so that after inserted, the rotor is in the correct location.

    NOTE: Sometimes, the oil pump drive shaft will turn, causing the dist. to engage with the gear but NOT seat fully. If this happens, recheck the install a couple times. If it still refuses to fully seat, install the dist. and while putting slight pressure on it, rotate the engine by hand. A helper is useful here! Once it seats, rotate the engine so everything aligns again.

    (7) Tighten the distributor hold-down fastener just enough so that it is snug. The distributor housing will need to be turned so that the vacuum canister is also pointed in the same direction as the old canister before it was removed. Both the distributor rotor and the vacuum canister need to be positioned in the same way as the old ones were, so that the timing will be close enough to the original to get the engine started. Mixed and matched rotors and vacuum canisters can prevent the engine from starting, thus eliminating the chance to correct the timing.
    ( Place the distributor cap onto the distributor. Connect the spark plug wires onto the distributor cap in the correct order. Spark plug wires should be marked prior to removing an old distributor so that when a new distributor is installed, the wires can be reconnected easily and in the correct order. Starting with the spark plug wire from the number one cylinder, begin to replace the wires one at a time going from cylinder one to cylinder eight.
    NOTE: Most Non-HEI caps use an internal tower connection. Most HEI caps use a different wire terminal type that is the same as the spark plug end. If you are reusing your old wires, make sure they will work with the new cap, or buy new wires.
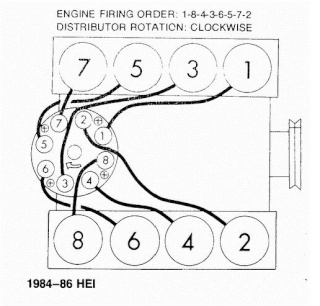
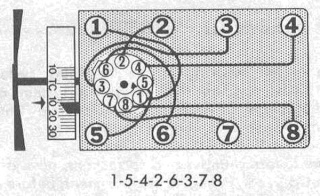
    Here are the common firing orders and cylinder numbers. If you have a late model engine, you need to verify the correct firing order.
    Straight 6.
    How to:  Install a HEI Distributor (The Basics Only)  L610

    Chevy V8
    How to:  Install a HEI Distributor (The Basics Only)  V8_che10

    Dodge V8
    How to:  Install a HEI Distributor (The Basics Only)  V8_dod10

    Ford V8
    How to:  Install a HEI Distributor (The Basics Only)  V8_for10

    Note that Ford numbers the cylinders differently. They also have a different firing order for the HO 302 and other V8s. they are 1-3-7-2-6-5-4-8 in the same direction.
    (9) An HEI distributor requires only one connection, since the coil is in the cap. This is normally a switched 12V source, NOT the typical resistor or ballast resistor feed provided to point-style distributors. READ the instructions that came with your new distributor!!! If your HEI dist. requires 12V and you do not fix this, it will run poorly!
    (10) Connect the vacuum hose to the vacuum canister of the HEI distributor. You can connect a tachometer to the adapter located on the side of the HEI distributor cap. Start the engine and check the timing to get the new HEI distributor tuned properly. The new HEI distributor will let a factory engine burn more fuel. The timing of the spark is important to get right, and the timing should be adjusted each time the demand for power is increased. After the timing has been adjusted, tighten the HEI distributor hold-down fastener completely to finish the job.

    Note that for best performance, the initial timing, centrifugal advance and vacuum advance should all be adjusted to your vehicle, load and driving habits.


    _________________
    DanTheVanMan    
    1965 Chevy G10 Sportvan Custom
    1984 Jeep CJ-7 Laredo, Restored
    2004 Kawasaki KLR650
    1997 Jeep TJ Sport

    My Mini Gallery

    How to:  Install a HEI Distributor (The Basics Only)  Qr_cod10

    <-<-<- Cruising is not a "Point A to Point B" thing, but an "Everything in between thing!  <-<-<-
    Jessetygr
    Jessetygr


    Number of posts : 90
    Location : Montreal
    Registration date : 2012-01-06

    How to:  Install a HEI Distributor (The Basics Only)  Empty Re: How to: Install a HEI Distributor (The Basics Only)

    Post by Jessetygr Mon Aug 26, 2013 8:32 am

    HeyDanTheVanMan,
    I'm just on the verge of making the jump from my old distributor to an HEI unit.
    I have a 65 Falcon with a rebuilt 170.
    I've been having a lot of problems with my Van randomly loosing spark (i.e.: driving it around all day; stop & starting it and all of sudden, it just won't fire.. The engine turns, it gets gas but it doesn't seem to be getting spark!

    I currently have (what I think) is a load-o-matic Dist. but the points have been swapped out for an Pertronix IgnitorII Electronic Ignition & coil to match.
    It almost seems that there is poor wiring connection as once again, it happened after I've been out rolling around. I checked all the wiring and it seems solid & well connected?
    When it's up and rolling, it runs amazing but everything seems to point to an issue in and around the Dist.

    The HEI conversion seems like a no brainer as far as much better MPG & performance but what scares me is that I've read about the need for some serious mods to the dog box in order for the HEI unit to fit... I was wondering if this is in fact the case? I've read quite a few threads about the install process but no threads really mentions the need to cut a whole in the side of the dog box to make extra space.
    Just wondering if you've ever had to do this?
    Thanks for your help.
    J


    DanTheVanMan
    DanTheVanMan
    Commissioner
    Commissioner


    Number of posts : 7905
    Location : Escanaba, Michigan
    Age : 62
    Registration date : 2008-10-08

    How to:  Install a HEI Distributor (The Basics Only)  Empty Re: How to: Install a HEI Distributor (The Basics Only)

    Post by DanTheVanMan Wed Aug 28, 2013 9:06 am

    Jessetygr,
    Have to be honest and say I have never did the swap on a 170. They do fit on Chevy's so if the rumor is that there is space issues then I would do some measuring first. As for as the current issue with using the Pertronix Ignitor II with a stock dist. I have had issues years ago. the problem was that with the higher output from the Pertronix caused jumping (or arching) across the terminals inside the cap do to the small size of the stock dist. And when always seem to get worse after the engine warmed up...

    Was going to recomment you post in "E" Between the seats" but just noticed you did! Hopefully the Ford guys can shed some light for you... Good luck! Dan

    https://vintage-vans.forumotion.com/t35773-doghouse-mods-for-an-hei-distributor


    _________________
    DanTheVanMan    
    1965 Chevy G10 Sportvan Custom
    1984 Jeep CJ-7 Laredo, Restored
    2004 Kawasaki KLR650
    1997 Jeep TJ Sport

    My Mini Gallery

    How to:  Install a HEI Distributor (The Basics Only)  Qr_cod10

    <-<-<- Cruising is not a "Point A to Point B" thing, but an "Everything in between thing!  <-<-<-
    Jessetygr
    Jessetygr


    Number of posts : 90
    Location : Montreal
    Registration date : 2012-01-06

    How to:  Install a HEI Distributor (The Basics Only)  Empty Re: How to: Install a HEI Distributor (The Basics Only)

    Post by Jessetygr Thu Aug 29, 2013 1:25 pm

    Hey Dan,
    Thanks for the intel. I chicken out last minute on the HEI. After speaking with Mike at Classic Inlines, I decided to go with a DuraSpark II complete kit. This is the 2nd time I've had distributor issue in the past month (which always results in a tow truck ride) so I figure it was probably smarter to just go with a complete new ignition system to ensure everything is compatible..
    (As a Canadian, I can tell ya that nothing sucks worse than burning up the last few weeks of summer with Van off the road when winter is just around the corner.. We only have about 5 months of vanning weather before the snow arrives! LOL)
    Jes


    DanTheVanMan
    DanTheVanMan
    Commissioner
    Commissioner


    Number of posts : 7905
    Location : Escanaba, Michigan
    Age : 62
    Registration date : 2008-10-08

    How to:  Install a HEI Distributor (The Basics Only)  Empty Re: How to: Install a HEI Distributor (The Basics Only)

    Post by DanTheVanMan Thu Aug 29, 2013 3:12 pm

    Jess. I grew up in "Upper Michigan" on the shores of Lake Superior and understand the 4 months from Snow-2-Snow!!

    Glad to hear you got it figured out.

    Dan cheers 


    _________________
    DanTheVanMan    
    1965 Chevy G10 Sportvan Custom
    1984 Jeep CJ-7 Laredo, Restored
    2004 Kawasaki KLR650
    1997 Jeep TJ Sport

    My Mini Gallery

    How to:  Install a HEI Distributor (The Basics Only)  Qr_cod10

    <-<-<- Cruising is not a "Point A to Point B" thing, but an "Everything in between thing!  <-<-<-

    Sponsored content


    How to:  Install a HEI Distributor (The Basics Only)  Empty Re: How to: Install a HEI Distributor (The Basics Only)

    Post by Sponsored content


      Current date/time is Mon Nov 25, 2024 6:15 pm