VintAGE-Vans

Would you like to react to this message? Create an account in a few clicks or log in to continue.

BRINGING IT ALL TOGETHER.... A's, G's & E's


+10
RipVanArkie
Big W
G-Man
Nightmoves
RodStRace
Twinpilot001
savage
Digz
61econoline
Zuffen
14 posters

    An Australian's Version of an Early

    Zuffen
    Zuffen


    Number of posts : 165
    Location : Sydney Australia
    Registration date : 2011-07-28

    An Australian's Version of an Early Empty An Australian's Version of an Early

    Post by Zuffen Mon Dec 19, 2011 9:38 pm

    Whilst this doesn’t constitute an “early” by your definitions it’s as close as we’ll get here in Australia.

    We were never lucky enough to have the A100, or the G or E vans/pickups, sold in our country. As best I can ascertain there are 2 or 3 here and that’s it. I spent my whole career insuring specialist cars and never came across one or even heard of one in Australia.

    Being a Baby Boomer I spent my pocket money as a teenager buying American Hot Rod Magazines in the late 60’s and lusted after an A100, just like the Little Red Wagon. Now I’m old and retired and can afford to import one the rules we have over here says I can’t have an engine in it larger than 5.7litres or around 318cu”. So why bother?

    Given I can’t have what I wanted I looked around to see what I could have.

    An Australian's Version of an Early Images14

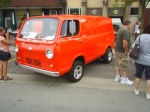
    The above is a Mitsubishi L300 an ugly 8 seater van. Powered by a 1600cc 4 cylinder engine with 4 on the tree it was about as inspirational as driving a Honda. Mitsubishi and Chrysler had a close relationship in Australia, with the first 100 vans sold being called a Chrysler L300 before Mitsubishi took over the Australian arm of Chrysler.

    These have a separate chassis that grants them more lenient modifying opportunities under our stupid modified vehicles laws.

    I purchased a Holden Commodore with a 6.2litre Ls3 putting out 420hp with a 6 speed auto for $6,500 as an insurance wreck. After selling off what I didn’t want for $3,000 this gave me a very cheap engine and trans.

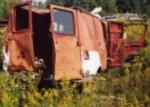
    Following the wreck were two of the above vans (my neighbours weren’t too happy) and I went from there.

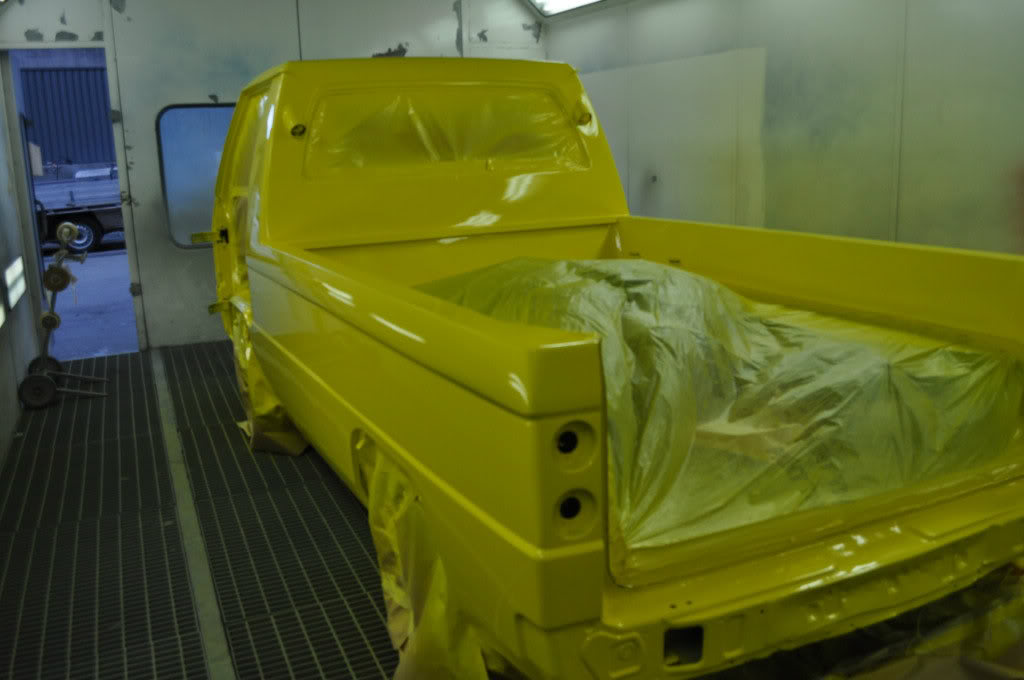
    After attacking the vans with a 9” angle grinder and my MIG I came up with a pickup with reasonable proportions that I should be able to register as an “Individually Constructed Vehicle” which means it must pass current emissions and safety laws, quite similar to any advanced country’s rules.

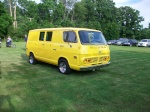
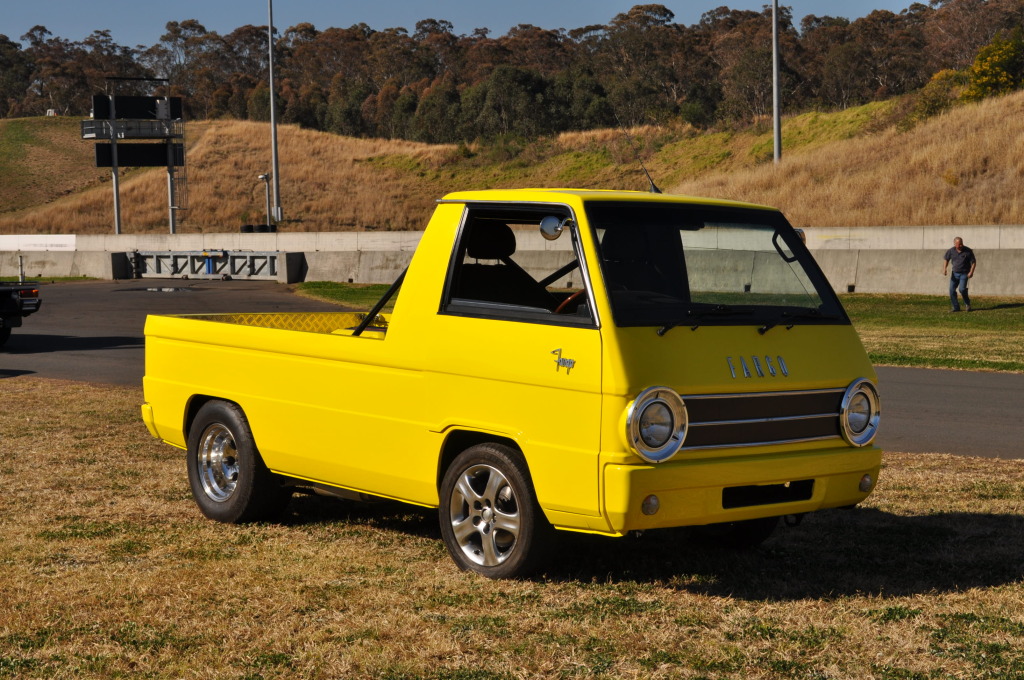
    This is the end result complete with my 19 year old son.

    An Australian's Version of an Early Dsc_0013

    As you can see it has a certain early American pickup shape to it.
    In the process I narrowed the rear of the chassis 200mm (8”) to fit the 10” wheels and 28x12x15 tyres. This necessitated a new diff housing which came from a Nissan Patrol and is as tough as a Ford 9” but comes with 11” disc brakes from the factory and are available here for a few hundred dollars. I narrowed the short side of the housing by 345mm (around 13”) and flipped the centre in the housing, as the drive is counter rotating. I used a front diff centre fitted with the LSD from a rear diff (straight bolt in) to give me a low pinion diff rotation the correct way for my drive. I couldn’t just flip the diff as I needed the long side on (our) driver’s side of the car.

    The original van had leaf springs but I changed to a 4 bar and panhard from the Patrol is they work well and are next to free. Rear springs are a set of front springs from the spare van and they seem to work well.

    Front suspension is a well-designed independent system with smallish disc brakes from the factory. I upgraded the brakes with hubs from another Mitsubishi an L200, which bolts straight on and has 6 lug wheel mounting to match the Patrol, plus Patrol rotors and callipers which when combined with the Patrol master cylinder gave me good brakes at nominal cost. I had to machine the front rotors and make new dogbones for the callipers but nothing too hard.

    An Australian's Version of an Early Dsc_0014
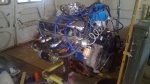
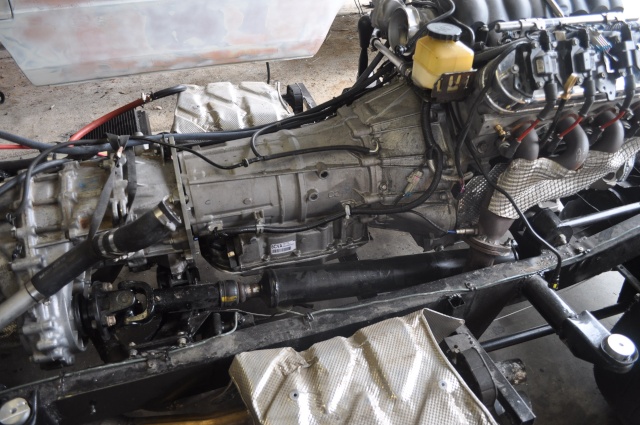
    The engine sits in the rear tray (rather than under the front seats) with the harmonic balanced right above the axle centreline. In the above photo it is temporarily wired for its test drive around our driveway. My wife is still unhappy about the burn out marks.

    With the engine sitting facing the wrong direction I needed to send the drive to the diff somehow. I used a Patrol transfer case and drive a standard length Patrol tailshaft from the front drive output of the transfer. This sends the drive down beside the engine to the offset diff. The diff centre is exactly under the air-conditioning compressor in the above photo.

    I made a simple 10mm (3/8”) plate adaptor to bolt the trans to the transfer case and had a short spud shaft made to transfer the drive.

    You may also notice the intake manifold has been spun 180 degrees as the engine looked a bit silly with the throttle body at the rear. This was much more involved than I originally thought and took quite a few days and lots of grinding and machining to get to work. I don’t recommend it.

    The interior of the car has had a later dash fitted with a custom set of instruments. I’ll be using two original driver’s seats as they mount easily and are already approved in part of my compliance testing. My engineer has specified a roll cage as he is concerned about the strength of the upper seat belt mounts now the body has been chopped down. The rear braces for the bar will run through the rear cab wall and be sealed by some toilet fittings designed to couple the flush pipe from the cistern to the bowl. Nothing like creativity. Once I get the bar from the pipe bender I’ll install it and commence the approval process before I go much further with the chassis.

    The load area will be finished with aluminium (aluminium!!) checkerplate.
    At this stage we’ve test driven the vehicle on a private road and it’s pretty quick as it only weighs around 1250kg or 2750lb so it has around 300hp per tonne power weight ratio.

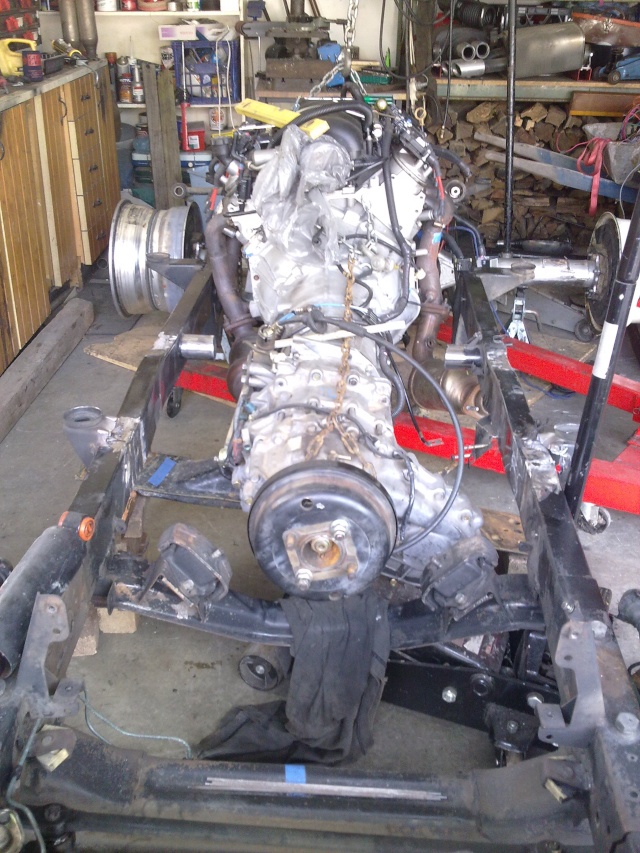
    An overhead shot shows just how big the engine is. The load area is basically full of engine and transmission.

    An Australian's Version of an Early Dsc_0016

    Weight distribution is looking like 40/60 front/rear so it won’t be any worse than a Porsche 911 in basic handling but a long way short in adhesion.

    Those headlight rims that look a lot like A100 ones are in fact genuine A100 rims I imported.

    As the car is no longer a Mitsubishi I get to call it what I want and I’m leaning toward FARGO. The reason behind this is my name is Rod Garnett and FARGO would be an acronym for F*%king Awesome Rod Garnett Original. Plus my late dad drove a FARGO when I was born. I know self-praise is no praise but it just appeals to me.

    At this stage the only things I haven’t personally done are make the spud shaft for the transmission, re-configure the wiring and shorten and re-harden the axle shaft. All other fabrication has happened in my garage and been done by me personally. I dislike “farming” stuff out and of the 3 items above the wiring was done incorrectly and I couldn’t start the engine until I sorted it out. The bending and welding of the roll cage will be number 4 that I haven’t done.


    Last edited by Zuffen on Mon Dec 19, 2011 9:40 pm; edited 1 time in total (Reason for editing : Dope can't spell!)
    61econoline
    61econoline


    Number of posts : 655
    Location : florida
    Registration date : 2009-04-16

    An Australian's Version of an Early Empty Re: An Australian's Version of an Early

    Post by 61econoline Mon Dec 19, 2011 10:48 pm

    I like it great job keep the pics coming
    Digz
    Digz


    Number of posts : 3794
    Location : United States Six Lakes MI
    Registration date : 2008-05-17

    An Australian's Version of an Early Empty Re: An Australian's Version of an Early

    Post by Digz Tue Dec 20, 2011 4:49 am

    Thats freakin' COOL!! My hats off to ya on all the work. I agree, if the A's had been updated a bit in appearance that may well have been the result. I have never been around a Mitzy van to take a look at them , some interior and any other pics would be great to. And something tells me Wheelie Bars are in the rigs future. Smile
    savage
    savage


    Number of posts : 2626
    Location : Where Rust Never Sleeps in Ft Wayne IN
    Registration date : 2008-05-15

    An Australian's Version of an Early Empty Re: An Australian's Version of an Early

    Post by savage Tue Dec 20, 2011 7:11 am

    Cool Great project & some heavy modification & fab work. You can't get what you want, you make it. Sweet
    Twinpilot001
    Twinpilot001


    Number of posts : 6186
    Location : spokane ,Wa.
    Registration date : 2009-09-28

    An Australian's Version of an Early Empty Re: An Australian's Version of an Early

    Post by Twinpilot001 Tue Dec 20, 2011 7:46 am

    [iWonderful Work from down under!! truely a craftsman- great to see !! Now all you need (suggestion?) is the wheele bars & drag chute = ie" little red wagon?? Maybe even red with some Fl;ames?/ Happy Vannin to Ya!!Welcome
    RodStRace
    RodStRace


    Number of posts : 3046
    Location : Chino Valley
    Registration date : 2010-01-21

    An Australian's Version of an Early Empty Re: An Australian's Version of an Early

    Post by RodStRace Tue Dec 20, 2011 8:48 am

    Amazing work, FARGO it is!
    I should be able to register as an “Individually Constructed Vehicle” which means it must pass current emissions and safety laws, quite similar to any advanced country’s rules.

    I must say that I'm glad the US is not as advanced!
    Emissions would be tough but for the most part something that could be done. Safety is another matter. Crumple zones mean you would have to build 2 and crash one (or more, they have to check multiple zones), air bags and belt pretensioners along with the computer to operate them.
    For the most part depending on the state here, if you build a 1980 vehicle differently, you only have to meet 1980 standards. You could take the Mits van and put any other 1980 or newer engine in it. Emissions testing is only in some areas. No safety inspections for modifications like yours.
    avatar
    Guest
    Guest


    An Australian's Version of an Early Empty Re: An Australian's Version of an Early

    Post by Guest Tue Dec 20, 2011 7:41 pm

    and i thought we had it hard here in Canada....had a great lauf...2corrosive
    Nightmoves
    Nightmoves


    Number of posts : 2214
    Location : Old Hickory Tenn.
    Age : 64
    Registration date : 2008-11-17

    An Australian's Version of an Early Empty Re: An Australian's Version of an Early

    Post by Nightmoves Tue Dec 20, 2011 7:54 pm

    Killer update on that van.Looks like a modernized A.Love the ribbed look on the roof.The angles look perfect at the back of the cab too,great job.Motor & trans transformation really fills that bed up.Whole lotta labor & pencil work made it all complete.Freakin awesome on the FARGO!
    Zuffen
    Zuffen


    Number of posts : 165
    Location : Sydney Australia
    Registration date : 2011-07-28

    An Australian's Version of an Early Empty Re: An Australian's Version of an Early

    Post by Zuffen Wed Dec 21, 2011 10:25 pm

    Thanks for the kind words.

    I’m not a great chronicler of builds as I tend to build them for myself and not others, hence I don’t have many build photos.

    Things have a strange way of moving. The same night I posted my photos I was advised by my engineer that he had had his authority to approve my vehicle withdrawn by the Roads Authority in NSW. This effectively puts the build on hold until I find another engineer with enough common-sense to approve my ideas.

    Never mind things will sort themselves out. If I can’t register it I’ll lighten it and go drag racing.

    This is an early photo during “mock up” of how I wanted the car to look. You will notice I have parts of the pillars of the van taped to the sides of the cab to get the angles and proportions to what I think are acceptable. You can also see the side sliding door, doorhandle, fuel door and sliding door track that all needed to have metal cut/shaped so I could MIG them in. I’d never MIG’ed before this vehicle. Also in the photo is the top half of the lift up tailgate that became the rear wall of the cab. You may just be able to discern the cut across the roof where I used the rear of the van roof and door frame to form part of the rear wall of the cab. Not so obvious is the front turn indicator that has been removed plus the door key lock and rear view mirror mounts. The cab rear wallis made up of 5 separate parts plus the sides of the cab that all had to line up. And I thought a roof chop would be hard!

    Additionally the front of the rear wheel arch needed to be moved forward 2” to clear the wheel and allow the wheel to sit in the centre of the opening.
    In this photo you can compare the original chassis with its 4 cylinder engine with the (almost) finished product.

    An Australian's Version of an Early Ssc_0012

    The chassis was narrowed from just behind the front wheels to make it an almost straight line to the rear of the chassis. This necessitated removing the cross members, narrowing the chassis by “pie cutting” bending, re-welding and plating it with 3mm (1/8”) steel on both sides of the rails from the front suspension to the rear suspension mounts. All body mounts then needed to be extended to return them to the original mounting points for the body.

    You will notice the fuel tank was moved to the rear to allow the exhaust to exit both sides of the vehicle. The tank is from another Holden from the 80’s and I had to build a sump for the EFI pump to live in. I used a dead cat converter that I cut in half and filled the outlet on then welded it to the tank. The fuel pump is in the front corner so it won’t drag on the road should the car get up on its rear wheels. I sealed the tank after my welding using POR15’s tank sealant and it was brilliant.

    The front cross member needed the rack and pinion mounts off a later model van grafted on in the right spot to avoid bump steer.

    An Australian's Version of an Early Dsc_0024

    A different view showing the layout of the radiator where the original engine wheezed its way through life. Excuse my messy workshop. My main tools of destruction are a drill press, a 10”lathe and bench grinder all older (and more worn) than me. Both chassis’ and the body shell just fit in the garage with about a foot to spare!

    For anyone curious the wheel on the floor is off a McLaren F1 road car. One of those things specialist insurer’s end up with! IT just happens to be the same proportions as the M/T’s I am using so it was handy for mocking up.

    An Australian's Version of an Early Dsc_0025

    In this photo you can see the sides of the tray have been fitted with some sheet steel I had bent to join the body sides and roll over the top and allow a place for the checker plate to sit when installed.

    The rear corners were made from 3mm plate and have a rectangular cut out in them so I can get into work on the tailgate locks, rear lights and fuel filler. The fuel filler is located insie the tray behind a factory fuel door grafted into the body. This means I can lock the fuel filler from grubby fingers. The rectangular holes are covered by flush fitting plates held down by elastic bungee cord. Easy to fit, remove and won’t fall off.

    An Australian's Version of an Early Dsc_0026

    A shot of the interior. I removed the original dash (that looked like it came out of an A100 it was so dated) and replaced it with a dash from a 1990’s Mitsubishi van. This nesecitated cutting the old steel dash out and making all new mounts for this dash then getting it all assembled and working. As part of the dash transplant I gained a tilt steering wheel and power rack and pinion steering in lieu of the old unassisted worm and nut on the original van. The instrument cluster I built myself and it had 6 round instruments that aren’t obstructed by the steering wheel plus warning lights for all the usual items.
    The dash I made was a piece of 3mm Perspex that I shaped to the original binnacle then drilled the holes in it for the gauges. I then drilled holes for the warning lights and after painting it all black I used the warning light symbols from the original dash and glued them behind the Perspex. I used “grain of wheat” light globes inserted into metal sewing thimbles that I then glued behind each warning light. A day or so wiring and I had it working. The front Perspex cover I made by heating so 1mm Perspex in the oven (my wife was out shopping) and then shaped it to fit the curve of the dash. Once assembled it looks quite “factory”.

    I made a mount for the gear shift to bring it into nice reach as it has a tiptronic function I will use. I had to shorten the throw of the shifter as it would have hit the radiator, which then meant shortening the shift lever on the transmission by a proportional amount. The shift lever on the transmission need to be rotated 180 degrees to make the transmission operated in the reverse direction as the lever and transmission are now facing 180 degrees from each other rather than the same direction.

    An Australian's Version of an Early Dsc_0027

    This shot shows the rear suspension with a lower trailing arm at the bottom of the shot. The top trailing arm is hidden behind the chassis rail. The corrugations in the rail are from the factory not me. You can see how far the diff centre is offset plus the cable operated disc callipers. These callipers are required as the handbrake on a non-4x4 must operate directly on the wheels and not through the driveline like a Patrol handbrake. This means the car has 6 disc callipers on it.

    The diff centre is a serious bit of kit. One advantage of this centre is it comes with a good factory locker standard and I can fit an air locker into it and have the comfort of an open diff (means it will be driveable in the wet) and the equivalent of a full spool when I want it. The axles are almost 2” thick and are not know for breaking in tough 4x4 situations.

    An Australian's Version of an Early Dsc_0028

    All in all every panel has been cut and welded to some extent. The tailgate is the bottom half of the top hinged tailgate from the van. I filed the number plate area so it’s flat and mounted the top hinges on the bottom of the tailgate. I built a 2x2” frame inside the tailgate then added 3mm steel checkerplate so that it was strong enough to sit or walk on. The tailgate weighs 35kg or 80lb.

    To secure the tailgate I’m using two front door bear claw latches and I originally had it electrically operated but I changed it to mechanical for reliability as the locks need a good pull to release.

    The bumper has had a number plate recess cut into it so the plate is legible if the tailgate is down. The California numberplate came from a Porsche my wife and I purchased on our honeymoon 22 years ago. We brought the car home and kept it for 10 years before deciding to move on.

    The tail lights are designed to look “industrial” as this is what US pick-ups had. I know the right hand side ones are closer together but that just needs adjusting when being fitted.

    An Australian's Version of an Early Dsc_0029

    Not much more will happen for a month or so whilst I sort the engineer situation plus get over the Christmas season.
    G-Man
    G-Man
    Mayor
    Mayor


    Number of posts : 30743
    Location : Fowlerville, MI
    Age : 62
    Registration date : 2008-05-06

    An Australian's Version of an Early Empty Re: An Australian's Version of an Early

    Post by G-Man Thu Dec 22, 2011 4:08 am

    Very Cool!!! Only thing is someone put the steering wheel on the wrong side, I would fix that!!! (just kidding ) Very nice work
    Zuffen
    Zuffen


    Number of posts : 165
    Location : Sydney Australia
    Registration date : 2011-07-28

    An Australian's Version of an Early Empty Re: An Australian's Version of an Early

    Post by Zuffen Wed Apr 11, 2012 3:15 am

    After 3 months it must be time for an update.

    Sice the last update I've had the body off doing some more work on the chassis.

    Nothing much just making things more permanent than they were.

    The tray has been fitted with diamond plate, or as we know it checkerplate, as it won't show dents from being walked on. It will be painted the same as the body.

    No pictures of it yet as the back of the truck is full of tools etc.

    Interestingly some one on another Forum painted one of my photos red and it looks like red it will be, but without the stripe.

    An Australian's Version of an Early Screen10

    I hope the final finish is a little more even.

    Another member of the same Form said he felt the rear window was too large and I have to agree with him. I was content with it as it was but if you look at it the window is simply too tall for the other windows in the car. This is caused by me "standing" the window up straighter when I put the back in the cab.

    I spent a few weeks driving around looking at the rear windows in cars, vans and utes (pick up's) looking for the right one. Had afew close shaves whilst perving. I also dod this whilst driving around New Zealand last weekwith simmilar close shaves. I didn't have much sucess so I headed off to my local pick and pull salvage yard with a tape measure.

    I came away with a rear window from a Mazda Bravo tray back. This is 100mm (4's") shorter than the existing window but almost the identical width top and bottom.

    When I got it home I realised it would be a real mongrel to fit so I went back and chopped the back our of the cab from the Mazda so I have an easy install to do. I just needed to make it fit and do 5 metres (15') of spot welds with my MIG! Two hours af welding later it was done.

    The install is nearly finished and when done I'll post up some photos.

    I think it turned out well.

    On a different tack I've finally got my half cage fitted after waiting since early December for the pipe bender to bend it up for me. He finally did but did it wrong so I stood over him whilst he did it again. I didn't bother having him notch and weld the braces as the vehiclew would be finished before he was! I ended updoing that myself.

    An Australian's Version of an Early Dsc_0036

    The crucifix is slightly offset to the driver's side due to the way it mounts in the cab.

    The fun part was installing the rear braces as they had to pass through the rear cab wall then the tray to mount on the chassis. This gave 4 points to get in a straight line ( the roll bar, cab wall, rear tray and chassis mounts) whilst only being able to see 2 points at any one time. Lots of measuring and calculations later and the holes are done and the braces installed.

    I used the exhaust pipe and toilet parts to seal the braces mentioned in an earlier post.

    An Australian's Version of an Early Dsc_0035

    Another task was to sort the tailgate.

    I was never happy with the locking mechanism nor its 50kg (110lb weight. I need traction but not dragging around a heavy tailgate.

    I toyed with stripping it and welding it shut but my 19 year old said I couldn't have tailgate parties if I did that so I ended up stipping it and re-building it so it only weighs about 15kg and has simple locks that work well.

    The latest big news is my FARGO badge for the front of the car turned up today from Canada. The local Post Office lost it and I needed to persuade them to find it (making a fuss at the counter works well) and it's complete but a little pitted.

    The letter "G" is missing one leg but I figure I can sort it our or chase another on the Forum. I rather like that they're a little pitted and worn as the vehicle s supposed to be old.

    My wife finds it amusing that I can get exited over a 45 year old badge for a vehicle I've never seen. Strange but after more than 10 trips to the States I've never seen an A100 inthe flesh.

    Whilst the body was off I sorted the air conditioning so now I can get it checked and gassed up.

    Hopefully in the next week it will be mobile again and I'll get some photos of how it's going.
    Zuffen
    Zuffen


    Number of posts : 165
    Location : Sydney Australia
    Registration date : 2011-07-28

    An Australian's Version of an Early Empty Re: An Australian's Version of an Early

    Post by Zuffen Wed May 30, 2012 3:47 am

    After 6 weeks time for an update.

    I've spent most of the last couple of months finishing off all those little things on the list that may be minor but take forever.

    My to do list is down to about 10 items after which the final assembly will commence.

    A while back I dropped a spanner onto the alloy radiator and damaged a couple of cores. The radiator lives under the seats and to remove it for repair I had to lift the body.

    After a couple of attempts to repair the radiator I ordered a new one. Problem with that is the radiator needed all the outlets moved and the original filler tube filled in.

    That's all good when I'm home and have my friendly TIG man just up the road but what if it happened away from home?

    I decided to find a new home for the radiator, which ended up under the rear tray, which necessitated the relaocation of the passenger's side exhaust and swapping the air conditioning condensor for the trans cooler. The hot air out of the radiator will warm/cool the trans cooler so it won't need a thermostat to bring the trans up to temp.

    Once the exhaust was removed I made the decision to have a complete new one made which will all go out the driver's side from one pipe. This will make it quieter and easier to pass the engineering tests it has to undergo. Once registered I'll revert to a split system with a sound to suit the car.

    Once the exhaust is done the paintshop will have it and hopefully it will be out of there in less than a fortnight.

    This means by the end of June I could be doing the final trim and assembly ready to send it off to the engineering tests.

    I would expect them to take a couple of weeks and once it passes it will be registered.

    So all going well sometime in August we could be driving the car around.

    Once I get it back from paint I'll post up some progress pics.
    Big W
    Big W


    Number of posts : 3282
    Location : Saskatoon,Sask,Canada
    Age : 60
    Registration date : 2011-01-13

    An Australian's Version of an Early Empty Re: An Australian's Version of an Early

    Post by Big W Wed May 30, 2012 6:04 am

    Can't waite to see your end result. It's going to look spectacular. Nice body mod indeed.
    Zuffen
    Zuffen


    Number of posts : 165
    Location : Sydney Australia
    Registration date : 2011-07-28

    An Australian's Version of an Early Empty Re: An Australian's Version of an Early

    Post by Zuffen Tue Aug 07, 2012 1:47 am

    Well time marches on and progress is slowly being made.

    I sent the car off for paint in early June for what was to be a 10 working day turnaround.

    I watched today as they put the final coats on the body.

    Only took 7 weeks!

    Before it went to paint I changed the rear window as the one that was in it come in the original tailgate and in the conversion I stood the tailgate up more so the window became too deep. This caused the bottom of the window to be 2" below the side windows and they just didn't look right.

    I sourced a rear cab wall and window out of a 1990's Mazda pick up and fitted it to the rear panel. It looks much more in proportion and makes the car look more balanced from the rear three quarter angle.

    I also rebuilt the tailgate on the rear (not the one on the rear of the cab) to lighten it and make it work a little better.

    Here's a photo of the car in the paintbooth.

    An Australian's Version of an Early DSC_0012-1

    The colour is officially "WTF Yellow" which is 100% tinter without any other colours (colors)in it.

    My 17 year old son said "You'll either say WTF did I do that for or go Wow. If the former it will grow on you."

    I went WOW and so has everyone who's seen it.

    I feel like a dog with two di.. Oh sorry got carried away! Rolling Eyes
    Digz
    Digz


    Number of posts : 3794
    Location : United States Six Lakes MI
    Registration date : 2008-05-17

    An Australian's Version of an Early Empty Re: An Australian's Version of an Early

    Post by Digz Tue Aug 07, 2012 3:13 am

    That's so Cool! Can't wait to see it in full dress! LOL @ DW2D
    Big W
    Big W


    Number of posts : 3282
    Location : Saskatoon,Sask,Canada
    Age : 60
    Registration date : 2011-01-13

    An Australian's Version of an Early Empty Re: An Australian's Version of an Early

    Post by Big W Tue Aug 07, 2012 9:53 pm

    That's gonna look real nice. Ya it's going to be bright, But it's going to be seen also which is even kooler. Can't waite to see it all back together.
    RipVanArkie
    RipVanArkie
    Moderator


    Number of posts : 987
    Location : Central Arkansas
    Registration date : 2008-05-13

    An Australian's Version of an Early Empty Re: An Australian's Version of an Early

    Post by RipVanArkie Thu Aug 09, 2012 8:16 pm

    Very Cool build!
    Zuffen
    Zuffen


    Number of posts : 165
    Location : Sydney Australia
    Registration date : 2011-07-28

    An Australian's Version of an Early Empty Re: An Australian's Version of an Early

    Post by Zuffen Mon Sep 03, 2012 1:33 am

    I contacted my Engineer on Saturday night and he advised he would be at Eastern Creek (Sydney's Drag Stip) this afteroon and I should come out for a play.

    Whilst we weren't drag racing we were using the braking area for drive by sound checks, braking and lane change tests.

    My car wasn't propared for any of this but stopped, steered and went very well.

    It failed the static noise test the drive by was marginal.

    I have a list of things to do to get it through engineering (my Peep mirrors don't have E markings so they fail as well). Not sure how I'll get around that one.

    The doors need intrusion bars added (I clearly forgot about them!) but it isn't too hard.

    Whilst there another guy having his Trike tested asked when I imported the A100 so looks like my efforts have worked out.

    All in all a great afternoon.

    The interior is basically finished but I need to sort out a few minor issues with wiring but again they go on the check list and get ticked off once sorted. Rome wasn't built in aday.

    Some photo's from the afternoon.

    I think I have the stance right and the 10's and 5.5" wheels work well together.


    An Australian's Version of an Early Dsc_0012

    An Australian's Version of an Early DSC_0015-3


    The tray worked out well. Still needs quite a bit of work but the overall plan is working.

    An Australian's Version of an Early DSC_0019-1

    It will be another couple of weeks before much else changes to make it photo worthy but once the interior is sorted I'll post up some photos of my first efforts at trimming a car from scratch.
    Digz
    Digz


    Number of posts : 3794
    Location : United States Six Lakes MI
    Registration date : 2008-05-17

    An Australian's Version of an Early Empty Re: An Australian's Version of an Early

    Post by Digz Mon Sep 03, 2012 5:11 am

    You mentioned moving the radiator to the rear tray. Any pics of that transistion and setup? Unbeleivable what you have accomplished!
    G-Man
    G-Man
    Mayor
    Mayor


    Number of posts : 30743
    Location : Fowlerville, MI
    Age : 62
    Registration date : 2008-05-06

    An Australian's Version of an Early Empty Re: An Australian's Version of an Early

    Post by G-Man Mon Sep 03, 2012 6:28 am

    Looks Bad A$$
    Twinpilot001
    Twinpilot001


    Number of posts : 6186
    Location : spokane ,Wa.
    Registration date : 2009-09-28

    An Australian's Version of an Early Empty Re: An Australian's Version of an Early

    Post by Twinpilot001 Mon Sep 03, 2012 6:33 am

    Great -more pics please & info on drivetrain too
    Big W
    Big W


    Number of posts : 3282
    Location : Saskatoon,Sask,Canada
    Age : 60
    Registration date : 2011-01-13

    An Australian's Version of an Early Empty Re: An Australian's Version of an Early

    Post by Big W Mon Sep 03, 2012 9:40 am

    Man that's looking real nice. Great job. cheers
    Zuffen
    Zuffen


    Number of posts : 165
    Location : Sydney Australia
    Registration date : 2011-07-28

    An Australian's Version of an Early Empty Re: An Australian's Version of an Early

    Post by Zuffen Thu Sep 06, 2012 11:42 pm

    Sorry about the size of the photos. I'll repost and give a run down on the driveline.

    An Australian's Version of an Early Dsc_0016

    I think I should have closed the driver's door before I took the photo.

    An Australian's Version of an Early Dsc_0017

    Wheels are 10x15"on the rear and 5.5x16 on the front. I needed to move up to 16's to clear the brake callipers. The rotors are 305mm or around 12"

    Rear shot of the tray area showing the engine with the coolers for the transmission and air conditioning mounted at the front. The roll cage braces pass through the cab wall and are sealed with fittings off a toilet pan. Behind the engine is a spare wheel and the aluminium cover on the back of the engine is to keep fingers out of the fan belt. The aluminium box in front of the engine holds the air filter elements. I did this as I couldn't think of a way to make the air cleaner look any good so this is what I came up with.

    The drive line is turned 180degrees to normal.

    An Australian's Version of an Early Dsc_0111

    The engine is attached to a standard GM 6L80E which has had the output shaft shortened by 2" to allow it to be coupled to a Nissan Patrol two speed transfer case via a short spud shaft I had made.

    The drive is taken off the front output shaft of the transfer case and power goes to the rear via a standard Patrol driveshaft. The rear axle is again a Patrol item with 345mm (about 14") cut off the short side of the diff. This allows the assembly to be centred under the car but have the diff centre very close to the chassis rail so the driveshaft runs in a straight line.

    Because the engine is back to front the drive shaft rotates the wrong direction meaning I would have 6 revers gears and one forward gear a bit like an Italian tank.

    To overcome that I flipped the diff centre upside down by redrilling the housing and the centre. I made a jig from a stainless boat prop shaft and alloy trunnions I machined up to make sure it was all in line.

    An Australian's Version of an Early Image011

    The above photo shows the axle in its final position and shows how much it needed to be shortened.

    On Tuesday I'm towing it 200 miles to the engineer in Cnaberra who will start checking the strength of the seats, their mounting method, the seat belt anchorages and the side door strength.

    In Australia we have very specific rules on having door intrusion bars to stop wayward cars coming through your door and meeting you. Up until 2009 forward control vehicles didn't need bars as the front wheel was considered enough to slow down the Volvo driver trying to get into your seat. The Engineer wil tell me how big the bar must be and where and how it must be installed so it will comply. Once I have the information I get to tow my car back home then fit the bars to his specifcations and do any other remedial work he specifies. I then return it to him for the next set of tests. I expect to make the trip up to 5 times before everything checks out.

    To register my vehicle it must pass almost all the tests GM or Ford would have to carry out to sell a new car in 2012.

    It may take a while and cost a bit but I think it will be worth it.


    avatar
    ChevyVanMan1


    Number of posts : 425
    Location : Your Nation's Capital
    Registration date : 2009-07-19

    An Australian's Version of an Early Empty Re: An Australian's Version of an Early

    Post by ChevyVanMan1 Mon Dec 24, 2012 12:45 pm

    Wow, what a project. Well done. Thanks for sharing it with us. I hope you had good fortune with inspections and such.

    I live in the US Capital and it's almost impossible to register anything homebuilt. DC even outlawed a cab company that moved in with clean, natural gas cabs (all brand spanking new). And, unless an electric car comes from the mainline auto manufacturers they won't inspect because they have no emissions to test. Essentially, you'd have to mount a gas engine in it to pass emissions.

    I sure hope Australian motor vehicles isn't filled with dumb people and dumb regulations like mine.

    Thanks again, Mark

    Zuffen
    Zuffen


    Number of posts : 165
    Location : Sydney Australia
    Registration date : 2011-07-28

    An Australian's Version of an Early Empty Re: An Australian's Version of an Early

    Post by Zuffen Mon Dec 24, 2012 3:11 pm

    This has been an interesting journey.

    The car passed the FEA tests in Canberra and I have an appointment for 6th February for it to be put through the emissions test.

    Assuming it passes that, which it should, my Engineer then puts it on a hoist and inspects it to satisfy himself it has been built in a workman like manner and that it's fit for it's last test before registration.

    The last test entails measuring the brake performance and handling of the vehicle on a closed track. This is to ensure it won't fall over during the "moose test" and that it's safe for the road. Once past this final hurdle a VIN will be issued to the vehicle and it can then be registered.

    Whilst our controlling authorities aren't exactly modified car friendly they do use a fair degree of commonsense in how the system runs. As long as a vehicle passes all the test criteria they lay down it can be registered.

    I've taken the hardest route to do this as the vehicle will register as a 2014 model vehicle so it has a lot more hoops to jump through than a vehicle that has been less modified.

    Had I not placed the engine at the rear and not narrowed the chassis the vehicle would be driving around the road now.

    Sponsored content


    An Australian's Version of an Early Empty Re: An Australian's Version of an Early

    Post by Sponsored content


      Current date/time is Sat May 11, 2024 7:37 pm