5 posters
On The Road Again

veefre- Number of posts : 424
Location : San Leandro, California
Registration date : 2008-09-10
- Post n°1
 On The Road Again

G-Man- Mayor

- Number of posts : 30743
Location : Fowlerville, MI
Age : 63
Registration date : 2008-05-06
- Post n°2
 Re: On The Road Again
Looks great!!!!

Guest- Guest
- Post n°3
 Re: On The Road Again
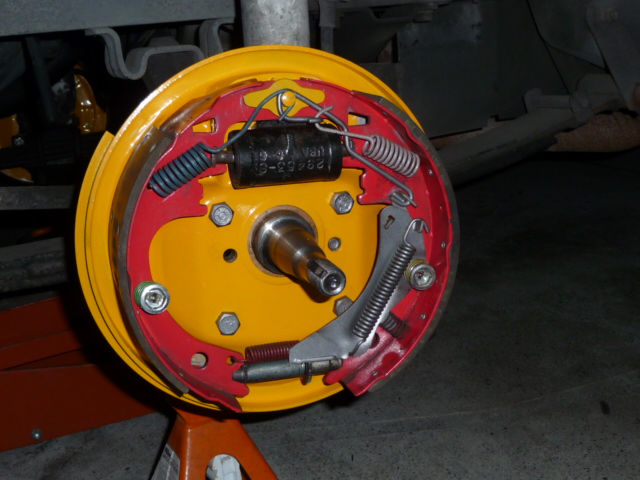
Wow. Ketchup and Mustard anyone? 
Looks awesome!
Hey...there's nothing wrong with drum brakes when they are working properly right?
Looks awesome!
Hey...there's nothing wrong with drum brakes when they are working properly right?

Guest- Guest
- Post n°4
 Re: On The Road Again
Take that off the spindle and mount a clock in the center. That belongs on a wall. very Nice!

veefre- Number of posts : 424
Location : San Leandro, California
Registration date : 2008-09-10
- Post n°5
 Re: On The Road Again
Hee hee. Didn't think of the clock idea. Maybe if I convert over to disc brakes and the backing plate(s) is still presentable that's what I'll do.
Drum brakes can work just fine, although disc brakes do seem to be able to handle greater loads and stresses. I have a '50 Plymouth with dual cylinder drum brakes and they are pretty much bullet proof although they will fade on long steep downhills. I'm a bit concerned about the failure of both backing plates I've seen on my '67 van's front brakes, and also suspect is brewing with one of the backing plates I got off the '64 junker. I guess as Donivan suggested I'll tear down one of the failed backing plates and see if I can figure out what is causing the problem. I had concluded that some spot welds to either side of the anchor bolt were failing and leading to the greater failure, but then the question becomes why the spot welds are failing.
Drum brakes can work just fine, although disc brakes do seem to be able to handle greater loads and stresses. I have a '50 Plymouth with dual cylinder drum brakes and they are pretty much bullet proof although they will fade on long steep downhills. I'm a bit concerned about the failure of both backing plates I've seen on my '67 van's front brakes, and also suspect is brewing with one of the backing plates I got off the '64 junker. I guess as Donivan suggested I'll tear down one of the failed backing plates and see if I can figure out what is causing the problem. I had concluded that some spot welds to either side of the anchor bolt were failing and leading to the greater failure, but then the question becomes why the spot welds are failing.

donivan65- Governor

- Number of posts : 12248
Location : San Diego, California
Registration date : 2008-05-12
- Post n°6
 Re: On The Road Again
I would say old age and metal fatigue,,,,,those backing plates get red hot then cool off and all the while the drums are trying to twist them off as well as the wheels trying to pull them off on turns,,,,,loose wheel bearings,,,,causing the drums to pull and push the shoes flexing the backing plates,,,,,,and good old rust,,,,,

veefre- Number of posts : 424
Location : San Leandro, California
Registration date : 2008-09-10
- Post n°7
 Re: On The Road Again
Oh, you mean my nice yellow powder coat is going to be more like burnt umber after a few stops? Say it ain't so, Doni!  Oh well, as long as the van stops straight and soon enough, it's ok.
Anyway, your explanation makes sense... multiple causes... but I'm still wondering why I haven't seen such a failure on old mopar drum brake backing plates - and I've trashed some of those drums quite thoroughly, spun wheel bearings, etc.
Could over adjustment vis-a-vis the automatic shoe heel adjusters have something to do with it? I recall taking off the cable-link automatic adjusters on my '64 Plymouth and putting in manual adjusters, when a brake mechanic said the cable type could stretch, and over-adjust and cause premature shoe wear. But the Chevy adjuster looks well designed with a stiff metal link that would seem to be unlikely to change over time.
I have some extra time of late and will set about dissecting the failed backing plates. The one that spit out a chunk into the drum/shoe interface is in real bad shape. Looks a lot worse when removed from vehicle. Even with the anchor bolt still holding the guide bracket in position, the guide bracket has warped so much that I can clearly see the little nubbins and depressions where I think there were once spot welds. The backing plate on the other side is in better condition, but the crack is real - I could see light through it.

DanTheVanMan- Commissioner

- Number of posts : 7905
Location : Escanaba, Michigan
Age : 62
Registration date : 2008-10-08
- Post n°8
 On The Road Again
WOW. THAT BRINGS "PRETTY" TO A WHOLE NEW LEVEL!!!!

donivan65- Governor

- Number of posts : 12248
Location : San Diego, California
Registration date : 2008-05-12
- Post n°9
 Re: On The Road Again
Well actually we want to hear more about the Harbor Freight powder coat system than those backing plates. Have you used it on other things? How much does those colors cost and how much does it cover? Those backing plates will be a real good test for it.

Kakster- Number of posts : 236
Location : Torrance, CA
Registration date : 2008-05-18
- Post n°10
 Re: On The Road Again
Here is a link to more info: http://www.harborfreight.com/cpi/ctaf/Displayitem.taf?itemnumber=94244

veefre- Number of posts : 424
Location : San Leandro, California
Registration date : 2008-09-10
- Post n°11
 Re: On The Road Again
I got the HF powder coat system about a year ago, and it's been sitting unopened until now. It cost me about $50 on sale; I think it regularly goes for $70 or so. HF offers only four powders: flat black, white, red, and yellow. Although I've done some internet searching and other companies will sell one powder as well.
The process - as I've described here or in another thread - is pretty simple. The colors come in little 8 oz (I think) containers that are otherwise identical to the powder cups used on the gun. They cost about $5 each, as I recall. The coverage is pretty good - some powder gets in the air, and some on the ground, but with the electrostatic attraction most of it winds up on the part. I hung the plates by a wire from a rafter, and rotated them 180 degrees for each coat so as to get good coverage (the powder will tend to settle on horizontal surfaces). I found it best to do one coat that way, then cure in the oven, cool, and then give them another coats, same method. These are the only objects I've done so far, however, I did powder coat the little arrow shaped shoe retainers - the plates that go between the toes of the shoes and the springs - and these came out pretty much the same.
From the reading I've done it appears that the main variable is the thickness/size of the piece. Bigger/thicker means a longer cure time. However one can get around this by starting the timing once the powder just melts and gets glossy - add 15 or 20 minutes after that and the results are pretty good.
The other gotcha is that one should use up the powder within 6 months of opening a container, or discard it. I gather this is because moisture in the air once opened will tend to clump the powder. Even so, the instructions say to add the unused powder back into the original container, which I've done, and so far no problems with that.
The brake shoe cores were already red, which is part of the reason why I selected yellow for these backing plates.
My next powder project will probably be the 10 bolt differential cover. I'm thinking a Tequila Sunrise effect: red at the bottom fading to orange to yellow on top. No idea if it will work as planned but I can always just do it in all red if it misses. The main issue will be cleaning all that heavyweight gear oil off the back side before the bead blasting commences.
Also the air cleaner will probably get a coat - the paint is in pretty bad shape and I think it would look nice in red - with a white undercoat to make it "pop". Although if I can locate some powder locally I'll look for a metallic gray or green instead.


