VintAGE-Vans

Would you like to react to this message? Create an account in a few clicks or log in to continue.

BRINGING IT ALL TOGETHER.... A's, G's & E's


5 posters

    '67 Van108 V8 Valve Guide Seal Replacement

    veefre
    veefre


    Number of posts : 424
    Location : San Leandro, California
    Registration date : 2008-09-10

    '67 Van108 V8 Valve Guide Seal Replacement Empty '67 Van108 V8 Valve Guide Seal Replacement

    Post by veefre Wed Mar 16, 2011 10:12 pm

    My '67 was running rough at idle and stinking a lot as well when I pulled up to a stop or into my driveway. I decided it was probably the valve guide seals, so my last project was to replace them.

    I got the new seals - both 0-ring and Umbrella - at Napa. Took me a while to get at the valve train - the motor really is shoehorned into the dog house. And I had concerns about how to apply compressed air to keep the valves in place, how to turn the crank, etc etc etc. Finally got it all figured out. Discovered that an screw type spring compressor works MUCH better at O-ring seal replacement than the simpler lever type. In fact I think the lever type is useless for that kind of work.

    Upon taking apart the 1st valve, #1 exhaust, discovered that the existing head had been machined to accept positive type seals, and that's what it had. Of course both the o-ring seals and the positive seals were rock hard from heat and age. So I went back to Napa and got new positive seals (still have the umbellas just in case).

    The o-ring seals are very tricky to replace. I imagine they are tricky on a head out of the motor. The head on the motor in the vehicle makes it even worse. The trick is that you have to compress the spring and the weird GM steel umbrella and mating funnel thingie to below the o-ring groove. Then carefully place the lubricated o-ring over the valve stem and push it into place. I made a little pusher tool out of the plastic barrel of a ball point pen (just the right diamter) and that made it easier. After all that, just put the keepers in place and the spring with orings is locked into place.

    The new positive seals were kind of tricky too. I selected a more pricey kind that are some sort of rubber with a teflon insert to go around the stem. The box came with a little thin plastic guide to ease the seal over the top of the valve stem and past the grooves. Some times the seals didn't want to go on smoothly even with that, and I found I had to kind of knead the teflon ring back into shape in a couple of cases. Lubing the machined boss of the top of the valve guide helps a lot too.

    The biggest surprise came at the end of the job when I adjusted the preload on the valves. I suspected that it was a bit off already, as I checked each vavle bevore I took off the rockers, and put them back to approximately where they were when I started. But when I did the final adjustment, with the motor warm, valve covers off, and motor running, it was obvious that there had been little to no preload on the hydraulic adjusters. This meant that the engine had been starved for air.

    After I hot adjusted the valve train the motor seemed to idle much smoother. The road test confirmed it: feels like a new motor. Much smoother and more powerful. Even better, it doesn't stink like it did when I pulled up to a stop.

    Fortunately the valve train had been maladjusted on the tight side, which mean the exhaust valves were having plenty of time to rest on their seats and cool off. Too much preload could mean that the valves never close long enough, so they could in that case overheat.

    OK, it's not a hot rod (it's only a 283 with 195 rated HP), but it feels like a new motor to me.

    Did the valve guide seals really need replacing? Maybe not. The main fix here was the valve lash adjustment. Even though these have hydraulic automatic lash adjusters, it would seem that even those don't work like they should without enough preload.

    I got this van about three years ago, and am told it was rebuilt maybe 10 years ago. I think whoever did it either didn't adjust the valves right, or there was wear on the valve train. Although I didn't see any evidence of that wear. The valve stem tips are not worn, for example. So I'm thinking it was a bad valve adjustment (or no adjustment at all).

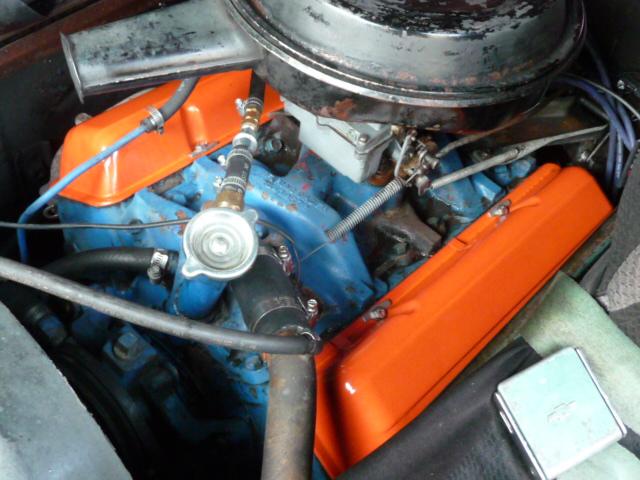
    I also powder coated the valve covers while I was at it. Now, instead of peeling Ford blue (sacrilege!) they are now the closest I could get to a Chevy orange by mixing yellow and red powder. I wanted to do them in just yellow, but the friend who sold me the van insisted they had to be orange... ;-)

    I'll try to take a photo and post it here.
    jrinaman
    jrinaman


    Number of posts : 890
    Location : zelienople,pa.
    Age : 60
    Registration date : 2011-03-10

    '67 Van108 V8 Valve Guide Seal Replacement Empty Re: '67 Van108 V8 Valve Guide Seal Replacement

    Post by jrinaman Wed Mar 16, 2011 10:45 pm

    i would have to agree, orange.
    RodStRace
    RodStRace


    Number of posts : 3046
    Location : Chino Valley
    Registration date : 2010-01-21

    '67 Van108 V8 Valve Guide Seal Replacement Empty Re: '67 Van108 V8 Valve Guide Seal Replacement

    Post by RodStRace Thu Mar 17, 2011 6:51 am

    Glad you got it all done. I agree that on a SBC the lever type are not as useful.
    A couple things to mention for those attempting this.
    After removing the rocker arms and after you have pressurized the cylinder, try tapping the retainers on the top of the springs with a spark plug socket. This tends to break free the keepers from the retainer.
    It's also a good idea to have a magnet handy, and lay out rags across the bottom of the heads to keep track of the keepers.
    Work clean and check the drainback holes at each end of the heads to make sure they are clear. Use a coat hanger wire to open them up if needed.
    If they are plugged, there is no way the valve cover gasket will seal.
    Pay attention as you work. If a pushrod wobbles, it's bent. Replace it.
    If a spring doesn't need as much effort to remove, it's probably weak. Replace it.
    veefre
    veefre


    Number of posts : 424
    Location : San Leandro, California
    Registration date : 2008-09-10

    '67 Van108 V8 Valve Guide Seal Replacement Empty Re: '67 Van108 V8 Valve Guide Seal Replacement

    Post by veefre Thu Mar 17, 2011 8:02 am

    Rod,

    Good advice... for next time Smile ...

    I had pretty good luck with the keepers, but I did keep a magnet handy. I found it most useful for grabbing the keepers off the valve stem while the spring was compressed.

    The biggest problem I encountered was that the doghouse walls were a bit too close to the motor to allow the screw-type of spring compressor to get a real good purchase. But I made do. Once I got the spring out, I was able to reposition the compressor for a better squeeze and that made insertion of the o-rings go smoother. A little rap with the heel of my hand was all that was needed to break the keepers free from the spring caps.

    The one thing I didn't do, but wish I had, was to do an oil change just before the the work. The oil in there looked pretty good on the dipstick, but it did have a bad smell to it once I got going and there was compressed air ventilating the block. Halfway through I'd had enough and changed the oil and the filter, and after that the aroma was more livable.

    I also did a fair amount of research on the best way to adjust the valve lifter lash. The service manual actually says to do it with #1 and #6 cylinders at TDC, but doesn't say if it's on a cold or warm engine. I did a fair amount of internet research and most of the recommendations were that the valves are best adjusted warm with the engine running, and with 1/2 to 1 turn in. I settled on 3/4 turn in and the results are very good.

    The springs all seemed pretty stiff on compression so I wasn't too worried about that part. And the pushrods also all seemed to be straight and true. The oil return holes are huge and although I didn't probe them I didn't see an issue with drainage.

    It was interesting adjusting the valves running. I noticed that as I turned the adjusters in 1/4 turn, the engine would react a bit, then recover and run quieter and smoother. I figure the little stumble was the adjuster pumping up and opening the valve the proper distance. This little stumble was most noticeable at the first 1/4 turn. The last 1/4 turn didn't cause the motor to stumble much if at all - an indication, I think, that the adjusters had sufficient preload at 1/2 turn to keep the clearances.


    I used little oil suppression clips on each valve, but after seeing that oil was dripping on the headers anyway, fashioned some thin aluminum flashing as half-covers to direct any splashed oil back into the head instead of onto the headers. That actually worked pretty well without having to butcher up a valve cover. It also allowed me to adjust valves on both sides of the motor without having to take covers off and on.

    RodStRace
    RodStRace


    Number of posts : 3046
    Location : Chino Valley
    Registration date : 2010-01-21

    '67 Van108 V8 Valve Guide Seal Replacement Empty Re: '67 Van108 V8 Valve Guide Seal Replacement

    Post by RodStRace Thu Mar 17, 2011 8:30 am

    Yeah, I have a set of those little blockers and found that they were more trouble than they were worth. Laughing
    The stumble is from the lifter being full and opening the valve more, keeping it open. Then it bleeds down and settles into the correct lash. You can see this with a vacuum gauge if you want.
    Factory calls for 1-2 turns from loose, most HP guys prefer 3/4 of a turn. This has less room for error, but allows a few more RPMs before the lifters 'pump up' and cause valve float. Not something you will run into unless you are revving over 5000 RPM.
    It's the later heads that have the narrow drainbacks. with these old vans you never know what's under the doghouse cover!
    One more thing that you mentioned reminded me....when adjusting the lifters, have a fire extinguisher handy. I have seen a few car fires, and they were all caused by electircity and/or fuel, but with that oil running all over the exhaust, it's a good idea. I have never seen one catch while doing this, but never say never!
    Twinpilot001
    Twinpilot001


    Number of posts : 6186
    Location : spokane ,Wa.
    Registration date : 2009-09-28

    '67 Van108 V8 Valve Guide Seal Replacement Empty Re: '67 Van108 V8 Valve Guide Seal Replacement

    Post by Twinpilot001 Thu Mar 17, 2011 9:30 am

    Yes = everyone is correct- Ive made a set of valve covers that I cut holes over each valve to gain adjustment- this way it keeps the oil from all over you , engine & such - while adjusting the valves! Works good- also Ive had engines installed in vehicles (chev) come into my shop with same condition as yours - engine builder set the valves - never (anyone) went back & ever adjusted the valves HOT!! They Just = get it installed, running & get paid!! many shops still do the same way. By the way- ive got the same van year & combination as you do . Found when i looked @ the 283 - someone had just done the heads on it. Was a clean motor with less than 70k miles on it - I buile a stroker 350 & am in process of installing it - will finish when all the snow & rains quit. Have fun with the van -Happy Vannin
    veefre
    veefre


    Number of posts : 424
    Location : San Leandro, California
    Registration date : 2008-09-10

    '67 Van108 V8 Valve Guide Seal Replacement Empty Re: '67 Van108 V8 Valve Guide Seal Replacement

    Post by veefre Thu Mar 17, 2011 6:29 pm

    RodStRace wrote:Yeah, I have a set of those little blockers and found that they were more trouble than they were worth. Laughing
    The stumble is from the lifter being full and opening the valve more, keeping it open. Then it bleeds down and settles into the correct lash. You can see this with a vacuum gauge if you want.
    Factory calls for 1-2 turns from loose, most HP guys prefer 3/4 of a turn. This has less room for error, but allows a few more RPMs before the lifters 'pump up' and cause valve float. Not something you will run into unless you are revving over 5000 RPM.
    It's the later heads that have the narrow drainbacks. with these old vans you never know what's under the doghouse cover!
    One more thing that you mentioned reminded me....when adjusting the lifters, have a fire extinguisher handy. I have seen a few car fires, and they were all caused by electircity and/or fuel, but with that oil running all over the exhaust, it's a good idea. I have never seen one catch while doing this, but never say never!

    Rod,

    Did you mean factory calls for 1 to 2 turns from loose, or 1/2 turns from loose?

    Originally I set it to 1/2 turns from loose, which quieted everything down, and then I gave each valve an extra 1/4 turn for a total of 3/4 turn.

    I have no plans to hotrod this, but considering that it ran for a long time with very tight valves (that is, they didn't open much), or if you will, very loose valve lifter adjustment, it didn't do much harm, as too much lifter preload could potentially result in the valves never closing long enough not to overheat.

    Anyway, I could go back and add another 1/4 turn if you think that would be a good idea. Otherwise I'll just leave it be for now. Had a heck of a time lining up the lower screws to fasten down the valve covers. Now I know why there are those big long ass screw bolts with wings for sale in the preformance section of auto parts stores. Might have to get some of those, although I do prefer the stock look. Not that my powder version of Chevy orange will look very stock...
    RodStRace
    RodStRace


    Number of posts : 3046
    Location : Chino Valley
    Registration date : 2010-01-21

    '67 Van108 V8 Valve Guide Seal Replacement Empty Re: '67 Van108 V8 Valve Guide Seal Replacement

    Post by RodStRace Thu Mar 17, 2011 9:04 pm

    The lower bolts are easy except in vans!
    I have messed with a few chevys, but they are not my forte.
    When adjusting a hydraulic lifter, they are designed to pump up to take up clearance, but not to extend fully.
    This means that any tighter than 'loose' is going to level out properly, using the oil as a cushion. They can be 1/8th of a turn in from loose to a little past 2 amd a half turns. Around that point, they bottom out and hang the valve open. Anywhere between those points is 'good enough' if the oil is clean, the lifter isn't worn or gummed up or any other mechanical problem is there. The proper way is a half turn to one full turn.

    '67 Van108 V8 Valve Guide Seal Replacement Cranecamslifterinstallation
    veefre
    veefre


    Number of posts : 424
    Location : San Leandro, California
    Registration date : 2008-09-10

    '67 Van108 V8 Valve Guide Seal Replacement Empty Re: '67 Van108 V8 Valve Guide Seal Replacement

    Post by veefre Thu Mar 17, 2011 9:28 pm

    Rod,

    Thanks much for the explanation.

    Sounds like I'm right in the ball park with 3/4 turn in from just past loose.

    By just past loose I mean I backed out the nut until I heard clatter, then in till I didn't hear it. Then I turned it in 3/4 turn. So it might be 7/8 turn in by someone else's technique?

    Just took the van on a sunset run. It pulled much better than before on the freeway, easily hitting 70 and even pulling on a long hill (HW 13) that it struggled to maintain 55 before. Once I got into the twisties it also pulled well in 3rd at 30 to 40 mph uphill, something that it couldn't do before. It also runs much quieter and smoother. Like a well oiled clock, or so they say. It also seems to run cooler as well as with higher oil pressure. It is also more "drivable", meaning that pulling out from a stop is smoother with less fussing with the throttle and clutch. The jury is out on whether it also has cured world hunger.

    It is tending to idle a bit slow at times, so I'll probably be re-adjusting the idle mixture and speed settings. Now that it's actually taking the gulps of air/fuel it's designed to take, the previous adjustment is probably not optimal.
    veefre
    veefre


    Number of posts : 424
    Location : San Leandro, California
    Registration date : 2008-09-10

    '67 Van108 V8 Valve Guide Seal Replacement Empty Re: '67 Van108 V8 Valve Guide Seal Replacement

    Post by veefre Fri Mar 18, 2011 3:04 pm

    OK, here's the promised photo of the "Chevy Orange Powder" valve covers.

    You can see someone must have had a surplus of blue paint when they rebuilt the motor. In some places you can see a Chevy Orange-Red paint, where the blue has flaked off, but the more orange tone was the best I could do by mixing red with yellow powder. Eventually I'll repaint the intake manifold/valley cover with Chevy Red-Orange, and I might try another go at modifying the powder to be closer to red than orange for the valve covers. In fact, I might even try to powder coast the intake manifold in a redder shade of orange as well. The advantage of the powder is that it is very durable and tough. In fact, this photo was taken after I used up two cans of engine cleaner to get the accumulated oil and dirt of the thing. The solvent didn't faze the powder coat.

    '67 Van108 V8 Valve Guide Seal Replacement New_va10
    veefre
    veefre


    Number of posts : 424
    Location : San Leandro, California
    Registration date : 2008-09-10

    '67 Van108 V8 Valve Guide Seal Replacement Empty Re: '67 Van108 V8 Valve Guide Seal Replacement

    Post by veefre Sun Mar 20, 2011 10:26 am

    What, nobody likes the orange and blue color scheme?

    Razz
    panelmanrd
    panelmanrd


    Number of posts : 801
    Location : kcmo
    Age : 63
    Registration date : 2009-10-04

    '67 Van108 V8 Valve Guide Seal Replacement Empty Re: '67 Van108 V8 Valve Guide Seal Replacement

    Post by panelmanrd Thu Mar 31, 2011 6:01 pm

    veefre, been building chev small blocks for years, thats just how i do them
    the tip from crane cams explains it perfectly. warm engines work better the
    lifters will pump down faster, warm oil thinner, cold oil not so thin.
    veefre
    veefre


    Number of posts : 424
    Location : San Leandro, California
    Registration date : 2008-09-10

    '67 Van108 V8 Valve Guide Seal Replacement Empty Re: '67 Van108 V8 Valve Guide Seal Replacement

    Post by veefre Sat Apr 02, 2011 12:34 am

    panelmanrd wrote:veefre, been building chev small blocks for years, thats just how i do them
    the tip from crane cams explains it perfectly. warm engines work better the
    lifters will pump down faster, warm oil thinner, cold oil not so thin.

    Thanks, it's good to know I did something right.

    Sponsored content


    '67 Van108 V8 Valve Guide Seal Replacement Empty Re: '67 Van108 V8 Valve Guide Seal Replacement

    Post by Sponsored content


      Current date/time is Mon May 20, 2024 12:03 am