


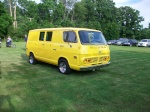
VANagain, It was cool just seeing the smile on your face behind the wheel. Very nice job for sure. Do you think you'll have it ready for you guy's van meet in Sept. ????
+55
Vannin Ken
SportVan
chester42
NipRing
Scotts_A100
millwright71
ndjarrett
66 Surf Wagon
Joe Van
Wheelie
Jay 13
Chevboner
Gothboy
sandyvan
dix
the_surfing_guy
southern man
kookykrispy
Space Truckin
vanny
dodge man
thatcherworks
ScottyJones
pan58head
Big W
m1dadio
austinmodhouse
mbasaraba
Lazarusvan
mrclean
LiveWire64
sparky
SDEconoTruck
EconoCarl
Twinpilot001
Nightmoves
BILLS66
sasktrini
Scott
Digz
64chevy
wylee
wacko
RipVanArkie
wideload
DanTheVanMan
mo_1040
itruns
savage
BvrWally
Vanish
G-Man
Kakster
VANagain
donivan65
59 posters
Back to......VANagains NEWest 65 Chevy SportVan Deluxe
G-Man- Mayor

- Number of posts : 30743
Location : Fowlerville, MI
Age : 62
Registration date : 2008-05-06
- Post n°151
 Re: Back to......VANagains NEWest 65 Chevy SportVan Deluxe
![]() by G-Man Sun May 30, 2010 10:00 am
by G-Man Sun May 30, 2010 10:00 am
donivan65- Governor
- Number of posts : 12227
Location : San Diego, California
Registration date : 2008-05-12
- Post n°152
Re: Back to......VANagains NEWest 65 Chevy SportVan Deluxe
![]() by donivan65 Sun May 30, 2010 10:16 am
by donivan65 Sun May 30, 2010 10:16 am
The van did pretty good for its 1st run,,,,,,,,,now its the little things that need to be done,,,,,,the 3 wire alternator is not hooked up,,,,,as a matter of fact, no wiring is hooked up,,,,,,just a jumper wire to the HEI,,,,,,,the whole doghouse has to be rewired,,,,,,the windshield is cracked but we will try and put in the one that we got from the orange van,,,,,He needs to cut a hole in the floor and put the battery down in there instead of the wonderfull place under the passenger seat that SportVans have them,,,,,,the exhaust hot box bolt has a stripped out stud and you hear that exhaust leaking,,,,,he needs to get it registered,,,,,the right front corner needs repairing or replacing,,,,carb needs to be rebuilt,,,,,,but he has the major things done,,,,,now its just those little things that need to be fixed,,,,,,and there are a lot of them,,,,,,,,

Scott- Number of posts : 1651
Location : Anoka, MN
Age : 54
Registration date : 2008-05-20
- Post n°153
Re: Back to......VANagains NEWest 65 Chevy SportVan Deluxe
![]() by Scott Sun May 30, 2010 8:37 pm
by Scott Sun May 30, 2010 8:37 pm
VANagain wrote:I think aluminum is plenty strong, especially because gravity is pulling the crossmember down. The blocks are really just spacers. I suppose there is torque on them. We'll see how they fare.
I tossed my PowerGlide and 200-4r up on a table today and checked out the difference in Bellhousing Curves. I don't have any measurements to share, I kind of did the whole thing caveman style, but it was pretty obvious that the spacers are needed. Guess I'm starting to get a little lazy, and almost talked myself into trying the mount first, then if needed adding the spacers later.
Your right VANagain, the aluminum is plenty strong. I checked the numbers printed on the aluminum blocks, Wikipedia has good info on the different types.
Here is what I ended up with:
T6 temper 6061 has an ultimate tensile strength of at least 42,000 psi (290 MPa) and yield strength of at least 35,000 psi (241 MPa). More typical values are 45,000 psi (310 MPa) and 40,000 psi (275 MPa), respectively.[3] In thicknesses of 0.250 inch (6.35 mm) or less, it has elongation of 8% or more; in thicker sections, it has elongation of 10%. T651 temper has similar mechanical properties. The famous Pioneer plaque was made of this particular alloy. A material data sheet [4] defines the fatigue limit under cyclic load as 14,000 psi.
Not sure what all that means, but to me it means it won't have any problem taking the torque, or years of engine viberation. I guess it still wouldn't hurt to check the torque after a few hundred miles.

VANagain- Number of posts : 1046
Location : San Diego, CA
Age : 62
Registration date : 2008-05-16
- Post n°154
Re: Back to......VANagains NEWest 65 Chevy SportVan Deluxe
![]() by VANagain Sun May 30, 2010 10:35 pm
by VANagain Sun May 30, 2010 10:35 pm
I need to make similar spacer blocks (2" tall) to lower my sway bar so it clears the 2nd Gen master cylinder I put in. I see that 2nd Gens have bends in their sway bars to clear it, but I hear their ends are different than 1st Gen's.
Today I made NO progress on the van! After two years of that van sitting on jackstands, my significant other couldn't wait to clean up that half of the driveway! With my help, of course. I spent the rest of the day repairing toilets at my rental!
Tomorrow Don's coming over to make sure I'm on task!
Today I made NO progress on the van!
Tomorrow Don's coming over to make sure I'm on task!
donivan65- Governor
- Number of posts : 12227
Location : San Diego, California
Registration date : 2008-05-12
- Post n°155
Re: Back to......VANagains NEWest 65 Chevy SportVan Deluxe
![]() by donivan65 Sun May 30, 2010 10:41 pm
by donivan65 Sun May 30, 2010 10:41 pm
Is she showing some enthusiasm about your progress,,,,,,,

Digz- Number of posts : 3794
Location : United States Six Lakes MI
Registration date : 2008-05-17
- Post n°156
Re: Back to......VANagains NEWest 65 Chevy SportVan Deluxe
![]() by Digz Mon May 31, 2010 8:56 am
by Digz Mon May 31, 2010 8:56 am
I tried to make the 2nd gen sway bar work on mine, I deemed it not practical.
I cannot remember if it had to do wiith the disc brakes totally I think the shocks were also in the way. If you have the 1st gen bar it would be easiest to make the blocks. IMO
I cannot remember if it had to do wiith the disc brakes totally I think the shocks were also in the way. If you have the 1st gen bar it would be easiest to make the blocks. IMO
donivan65- Governor
- Number of posts : 12227
Location : San Diego, California
Registration date : 2008-05-12
- Post n°157
Re: Back to......VANagains NEWest 65 Chevy SportVan Deluxe
![]() by donivan65 Mon May 31, 2010 7:14 pm
by donivan65 Mon May 31, 2010 7:14 pm


VANagain- Number of posts : 1046
Location : San Diego, CA
Age : 62
Registration date : 2008-05-16
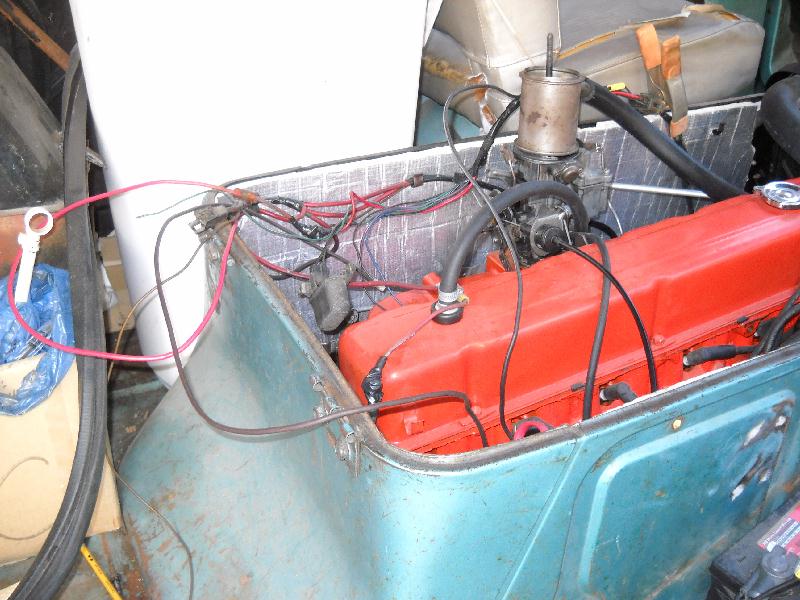
Thanks for posting today's photos Don. And for helping me get past my analysis paralysis. I was working on my wiring as if it would be the final, perfect wire loom. But when you said all we needed at this point was a prototype, that was just what I needed to hear. So what you see pictured here is part of a wire loom from a 70s Impala grafted onto part of the van's original loom. Removed many unecessary wires because I upgraded to a 3-wire (10si) alternator. I can finally start the engine using the key, the battery now gets charged, and the rest of the van has power! We had fun checking to see what lights and stuff worked and what didn't.
We removed my cracked windshield and had intended on putting in a good one, but we found some rust that should be dealt with first along the metal at the bottom. No actual rust holes though, thank goodness, but I want to clean it up.
Later I took a windy ride to see if I could eliminate the backfiring by adjusting the timing while driving. (Try doing that in a muscle car!) Didn't help though. I still need to rebuild my carburetor. But now that I think about it, I maybe my mechanical or vacuum advance aren't working. Don lent me a fancy timing light that allows me to test both. The HEI distributor is out of a junkyard, so who knows.
I did do some nice wiring down by the starter. Don convinced me of the value of adding a Ford-type solenoid (a relay, actually) to shorten the route that energizes the S terminal on the starter's solenoid. Now the Start wire from the key goes to S on the Ford solenoid, which requires less power to energize. This connects the Ford's two big lugs, one wire hooked to the battery terminal on the Chevy solenoid and the other to the S on the Chevy solenoid. Now the power to actuate the Chevy solenoid only has to travel a little over a foot! And using some beefier wire. Plus this solenoid is outside of the doghouse where it should stay cooler.

I found a very thorough explanation of how the charging wiring was done in late 60s Chevrolets. I learned a lot from it. I always thought our van wiring was unique, with the horn relay being used as a junction block. Turns out all Chevys were that way. And it was quite brilliant. And that bus bar on the horn relay turns out to be a perfect place to add other devices.
http://www.madelectrical.com/electricaltech/chevymain1.shtml
Click on "Electrical Tech" for more good info. I like their idea of using relays to give more power to the headlights as well as your dash lights, and ease the burden on your headlight switch. And they tell you everything you need to know (and more) about 3-wire alternators. Note: if you get one for a straight six in a 1st Gen, you'll want it at the 9:00 assembly location. Mine happened to be that way, so the wire plugs are away from the engine. (You can take them apart and change their direction.)
Plus this and other web sites show a different way to use a Ford solenoid so you end up with just one wire going to your starter! It does add one more cable between your battery and your starter but that's how Ford did it.
http://www.allstarperformance.com/downloads/instruction_sheets//ALL76201_Solenoid_Wiring_Kit.pdf
I may switch to this someday. I already made a metal jumper like this. No volltage loss in that connection!
We removed my cracked windshield and had intended on putting in a good one, but we found some rust that should be dealt with first along the metal at the bottom. No actual rust holes though, thank goodness, but I want to clean it up.
Later I took a windy ride to see if I could eliminate the backfiring by adjusting the timing while driving. (Try doing that in a muscle car!) Didn't help though. I still need to rebuild my carburetor. But now that I think about it, I maybe my mechanical or vacuum advance aren't working. Don lent me a fancy timing light that allows me to test both. The HEI distributor is out of a junkyard, so who knows.
I did do some nice wiring down by the starter. Don convinced me of the value of adding a Ford-type solenoid (a relay, actually) to shorten the route that energizes the S terminal on the starter's solenoid. Now the Start wire from the key goes to S on the Ford solenoid, which requires less power to energize. This connects the Ford's two big lugs, one wire hooked to the battery terminal on the Chevy solenoid and the other to the S on the Chevy solenoid. Now the power to actuate the Chevy solenoid only has to travel a little over a foot! And using some beefier wire. Plus this solenoid is outside of the doghouse where it should stay cooler.
I found a very thorough explanation of how the charging wiring was done in late 60s Chevrolets. I learned a lot from it. I always thought our van wiring was unique, with the horn relay being used as a junction block. Turns out all Chevys were that way. And it was quite brilliant. And that bus bar on the horn relay turns out to be a perfect place to add other devices.
http://www.madelectrical.com/electricaltech/chevymain1.shtml
Click on "Electrical Tech" for more good info. I like their idea of using relays to give more power to the headlights as well as your dash lights, and ease the burden on your headlight switch. And they tell you everything you need to know (and more) about 3-wire alternators. Note: if you get one for a straight six in a 1st Gen, you'll want it at the 9:00 assembly location. Mine happened to be that way, so the wire plugs are away from the engine. (You can take them apart and change their direction.)
Plus this and other web sites show a different way to use a Ford solenoid so you end up with just one wire going to your starter! It does add one more cable between your battery and your starter but that's how Ford did it.
http://www.allstarperformance.com/downloads/instruction_sheets//ALL76201_Solenoid_Wiring_Kit.pdf
I may switch to this someday. I already made a metal jumper like this. No volltage loss in that connection!
donivan65- Governor
- Number of posts : 12227
Location : San Diego, California
Registration date : 2008-05-12
- Post n°159
Re: Back to......VANagains NEWest 65 Chevy SportVan Deluxe
![]() by donivan65 Tue Jun 01, 2010 10:08 am
by donivan65 Tue Jun 01, 2010 10:08 am
Well,,,,,,,just in case you have not noticed, it is no picnic sitting on the battery while going down the road, so I think my fold up seat needs to be put in there and that battery moved UNDER the floor where it BELONGS!!!!!

donivan65- Governor
- Number of posts : 12227
Location : San Diego, California
Registration date : 2008-05-12
- Post n°160
Re: Back to......VANagains NEWest 65 Chevy SportVan Deluxe
![]() by donivan65 Sun Jun 06, 2010 12:15 am
by donivan65 Sun Jun 06, 2010 12:15 am
Today I brought over my old jump seat so I don't have to sit on the battery and VanAgain installed it,,,,,,,and after draining some gas out of his motorcycle to put in the van, I took it for a ride without the windshield, then Rich drove it again. We ran into some distributor problems,,,,,the parts he got for a 2nd edition distributor, like the centrifugal weights, bushings and rotor, were different than his,,,,,,,I'm thinking he has a 1st edition distributor with a 2nd cap and rotor on it,,,,,,


Nightmoves- Number of posts : 2214
Location : Old Hickory Tenn.
Age : 64
Registration date : 2008-11-17
- Post n°161
Re: Back to......VANagains NEWest 65 Chevy SportVan Deluxe
![]() by Nightmoves Sun Jun 06, 2010 9:11 am
by Nightmoves Sun Jun 06, 2010 9:11 am
Cruisin down the road,wind in your hair,......in a Van! haa!
VANagain- Number of posts : 1046
Location : San Diego, CA
Age : 62
Registration date : 2008-05-16
Okay, it was fun to drive the van with no windshield a couple of times (blows away the fumes you get from driving with no doghouse cover!) but it's time to finish the swap. I got the rust and sticky sealant cleaned off the windshield frame today. The rust was mostly along the bottom edge. Luckily I found only a few small holes in the metal at the two lower corners. I used an angle grinder, wire wheel and a Dremel to remove all the rust I could and then hit it with some Purple Power rust converter I got from Don. Then I primed the bare metal. I'll apply another coat of primer and then some paint this week. I'm not doing anything too fancy, I just want to install the replacement windshield next weekend. When I get the van painted they can give this area some more attention if it needs it.


Regarding the distributor, it's amazing it ran at all with the wrong rotor! The spark had to jump about an inch to reach the terminal in the distributor cap! I figure it was backfiring when I gave it gas because it would advance and then decide to jump to the wrong plug wire. Fortunately a cheap and easy fix!
It still doesn't accelerate very well though. I'm hoping a carb rebuild will fix that. And maybe some more playing with the timing and the mechanical advance weights (which currently have no plastic bushings).
donivan65- Governor
- Number of posts : 12227
Location : San Diego, California
Registration date : 2008-05-12
- Post n°163
Re: Back to......VANagains NEWest 65 Chevy SportVan Deluxe
![]() by donivan65 Sat Jun 12, 2010 9:29 pm
by donivan65 Sat Jun 12, 2010 9:29 pm
Seen Rich's van again,,,,,we put a used windshield in it and pulled the exhaust manifold to repair the pulled out helicoils in the hot box,,,,,,


VANagain- Number of posts : 1046
Location : San Diego, CA
Age : 62
Registration date : 2008-05-16
- Post n°164
Re: Back to......VANagains NEWest 65 Chevy SportVan Deluxe
![]() by VANagain Sun Jun 13, 2010 12:07 am
by VANagain Sun Jun 13, 2010 12:07 am
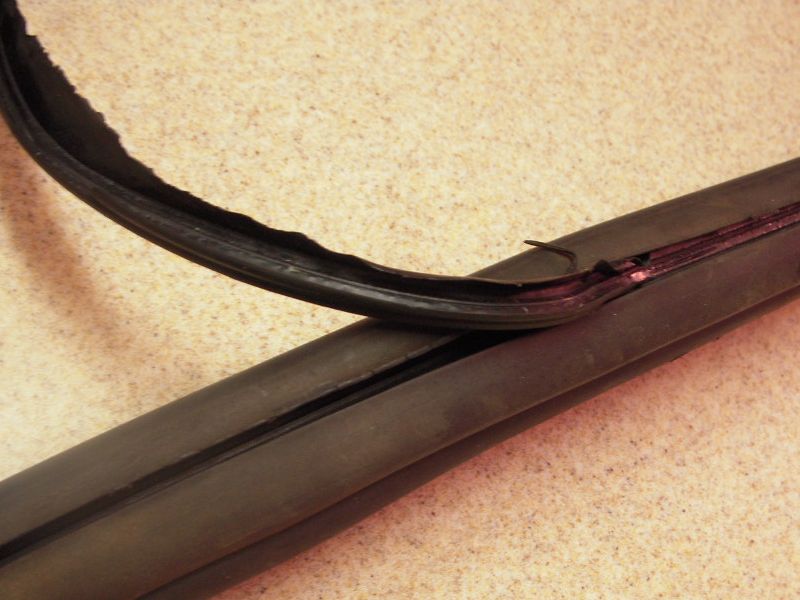
You can see in that photo how badly the hot box was leaking exhaust! When I tightend the one bolt, the one stud just kept getting taller. It was pulling itself right out of the helicoil. In that photo you can see what's left of the helicoil sticking out of the intake manifold, looking like a sprung spring. I'll try installing another helicoil and see if it will hold.
And since this exhaust manifold doesn't have a heat riser, I need to put the solid gasket in there next time. It should also seal a bit better than the one shown here. and block the exhaust from heating up the carb.
Don's rope trick really helped during the windshield installation. He had routed it in the slot of the rubber gasket before we started. I pulled it out as I went along on the inside, working the flap of rubber over the metal frame. And we managed to get the glass in with no cracks!
Driving the van should be much more pleasant now! -- once I get the carb rebuilt and the intake gaskets replaced. Plus I've got a new exhaust system to put on this time, which will also help with that new car feel!
Digz- Number of posts : 3794
Location : United States Six Lakes MI
Registration date : 2008-05-17
- Post n°165
Re: Back to......VANagains NEWest 65 Chevy SportVan Deluxe
![]() by Digz Sun Jun 13, 2010 4:28 am
by Digz Sun Jun 13, 2010 4:28 am
Thats a big thing checked off a list for sure! My glass guy said they needed to be roped in, I need to do the install in the gray hippy van yet. If you say things fast enough they sound easy. Looks like some special tools and know how are required. Any tips if I get brave enough to try it myself?? Where to start and how you use the rope?
donivan65- Governor
- Number of posts : 12227
Location : San Diego, California
Registration date : 2008-05-12
- Post n°166
Re: Back to......VANagains NEWest 65 Chevy SportVan Deluxe
![]() by donivan65 Sun Jun 13, 2010 11:45 am
by donivan65 Sun Jun 13, 2010 11:45 am
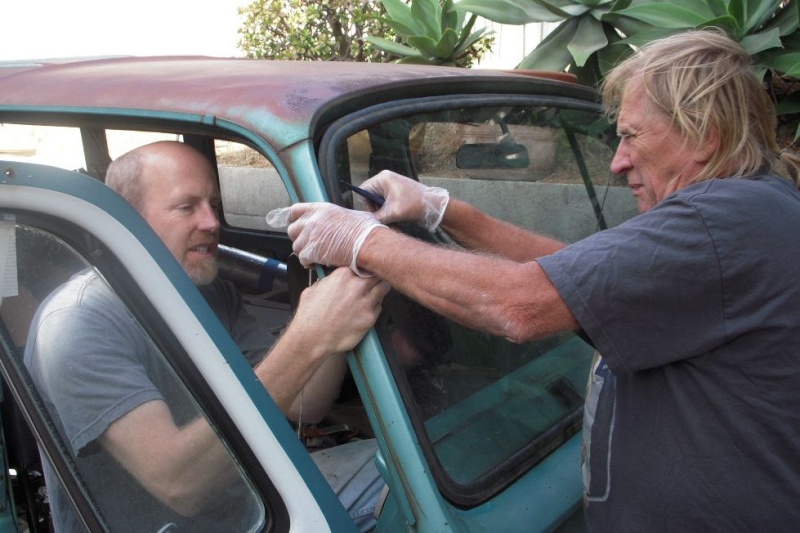
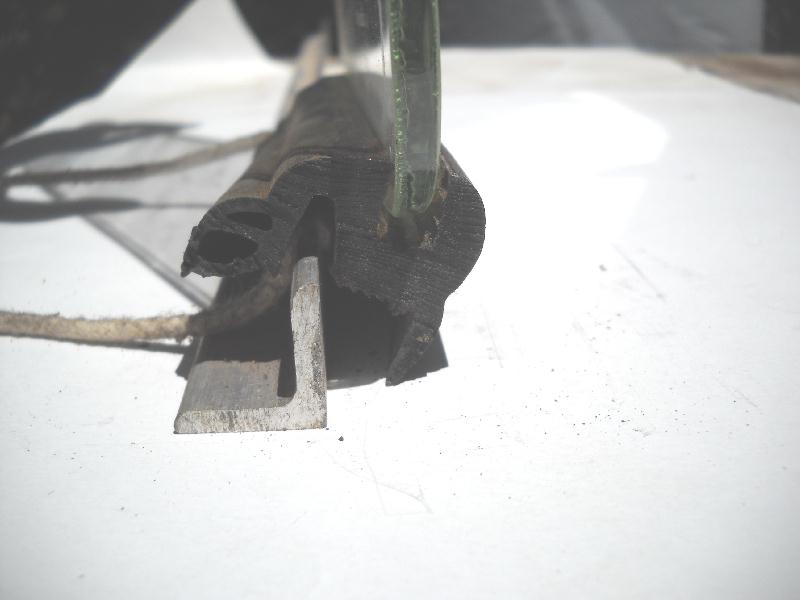
Ok, the idea is to get the rubber lip of the gasket inside the van,,,,,,so you put like a 3/16" diameter rope in that center groove of the gasket which will end up hooked over the flange. Wrap it all around the way around the gasket, tape the ends together in the middle at the bottom of the windshield. Spray the gasket with silicone spray,,,,,put the windshield and gasket up against the body and then,,,,,while someone pushes the windshield in, the other one inside will pull up on the rope,,,,which lifts the gasket up over the flange and while the windshield is always being pushed in on, the gasket slides up and over the flange and you are in,,,,,,And you might have to give that windshield one more push to get the gasket seated all the way in. There are no special tools,,,,,I was using a plastic scraper on the outside to reach in just to kind of help that rope and gasket get moving. Here is the idea of how it goes,,,,,,,,


Digz- Number of posts : 3794
Location : United States Six Lakes MI
Registration date : 2008-05-17
- Post n°167
Re: Back to......VANagains NEWest 65 Chevy SportVan Deluxe
![]() by Digz Sun Jun 13, 2010 8:25 pm
by Digz Sun Jun 13, 2010 8:25 pm
Thanks for the demo Don !
donivan65- Governor
- Number of posts : 12227
Location : San Diego, California
Registration date : 2008-05-12
- Post n°168
Re: Back to......VANagains NEWest 65 Chevy SportVan Deluxe
![]() by donivan65 Sun Jun 13, 2010 8:56 pm
by donivan65 Sun Jun 13, 2010 8:56 pm
That gasket and windshield kind of floats in the frame,,,,,And if you push too hard on the outside, you make it real hard for the rope to lift the edge up and if you pull too fast the rope will come out and the edge will slip back to the outside or you could crack the windshield,,,,,so,,,,,,nice and easy is the word,,,,,tugging and lifting on the inside gasket to help the rope come out and gasket to flip over the flange,,,,always with constant pressure on the windshield. We just put this old one in so he can drive it to the body and paint shop. And since my part was just to lean on the outside of the windshield and keep pressure on it, lets hear what Rich seen on the inside after looking at the 2 ends of the rope that I taped to the bottom of the inside of the windshield for him,,,,,,
VANagain- Number of posts : 1046
Location : San Diego, CA
Age : 62
Registration date : 2008-05-16
- Post n°169
Re: Back to......VANagains NEWest 65 Chevy SportVan Deluxe
![]() by VANagain Mon Jun 14, 2010 11:37 pm
by VANagain Mon Jun 14, 2010 11:37 pm
Great photo demo of the rope trick! Like you said, the rope was put in the groove, wrapped all the way around, and the two ends are taped to the glass on the inside, at the bottom. Sitting on the inside I pulled one end of the rope and it lifted the inner rubber flap over the metal. When I got to the corner pulled the other end of the rope to the other corner. The whole bottom was pretty easy going. At this point we looked at the left and right sides to make sure the window was actually centered. Then we started moving the rope around the corner and up the sides. Now it got tougher. It worked best to have the rope up tight against the point where the rubber met the metal. It wasn't so much sliding it as it was lifting or prying the rubber over the metal. When it was going tough I'd only get about 3/4" at a time. I used my other hand to help lift on the rubber that had already come over. And Don was able to assist from the other side by pushing a plastic crowbar thing on the same part I was trying to get through. And occasionally he would give the glass an extra push which would help secure the progress we had made.
All in all it went in very smoothly. No cracks! But afterwards we noticed that there was "slop" around the windshield. The rubber could be slid up or down about 1/4" either way. The rubber went in sort of a wavy line, as it was not being pushed outward as far by the glass like the original had.
We had traced the glass shape onto a piece of cardboard as a template to get new glass cut someday. We put my old glass on there and it was the same size, so it wasn't like this new glass was cut too small. Then we examined the old rubber from my original window. It looked like it had a rubber "spacer" about 1/4" thick inserted into the groove where the glass went. That would certainly take up the gap we were seeing on the new one. Upon closer examination we found that this was not a piece of rubber but some kind of black silicone or sealant that must have been squirted into the groove before the windshield was put in. Or maybe afterwards? I also noticed that they had put some more of this sealant along the outer edge of the rubber along the top, to help keep water out, I presume. The van I got the unbroken glass out of had no sealant at all and was very easy to remove. (Too easy?)

I will try this technique when I put in my final glass after the van is painted. Without it the glass seems like it will settle into the bottom and leave not much overlap along the top. Plus the sealant would have to help seal it against water and wind.
All in all it went in very smoothly. No cracks! But afterwards we noticed that there was "slop" around the windshield. The rubber could be slid up or down about 1/4" either way. The rubber went in sort of a wavy line, as it was not being pushed outward as far by the glass like the original had.
We had traced the glass shape onto a piece of cardboard as a template to get new glass cut someday. We put my old glass on there and it was the same size, so it wasn't like this new glass was cut too small. Then we examined the old rubber from my original window. It looked like it had a rubber "spacer" about 1/4" thick inserted into the groove where the glass went. That would certainly take up the gap we were seeing on the new one. Upon closer examination we found that this was not a piece of rubber but some kind of black silicone or sealant that must have been squirted into the groove before the windshield was put in. Or maybe afterwards? I also noticed that they had put some more of this sealant along the outer edge of the rubber along the top, to help keep water out, I presume. The van I got the unbroken glass out of had no sealant at all and was very easy to remove. (Too easy?)
I will try this technique when I put in my final glass after the van is painted. Without it the glass seems like it will settle into the bottom and leave not much overlap along the top. Plus the sealant would have to help seal it against water and wind.
VANagain- Number of posts : 1046
Location : San Diego, CA
Age : 62
Registration date : 2008-05-16
I got all the 700R4 stuff hooked up but forgot one: the torque converter lock up wiring. I was reminded during a test drive when I got up enough speed for it to get into 4th gear (overdrive) and when I slowed down it would not downshift and ultimately the engine died. I was like leaving a manual tranny in high gear and not pushing in the clutch when you slow down.
Bowtie Overdrive's solution to this is to tap into the brake light wire and run it to the tranny. So whenever you hit the brakes, it tells the tranny to unlock the torque converter (if it was locked). The only time the converter gets locked is when you hit 4th gear. (Actually you can hook up a switch to force it to lock in other gears to help the tranny run cooler.)
So I've about got their wiring kit hooked up when I discover that my brake lights weren't working. I tracked it down to the brake light switch. I see these for sale on eBay and I thought, uh oh, am I going to need to track down one of those? But I figured I could probably fix it if I took it apart. The switch is so easy to get to, under the van by the brake pedal arm. Someone had put blue silicone on it so I figured it had been repaired at least once before. After prying up the peened-over edges, I removed the black plastic part and found the connections were in pretty good shape inside. I cleaned them up with a dremel wire wheel.
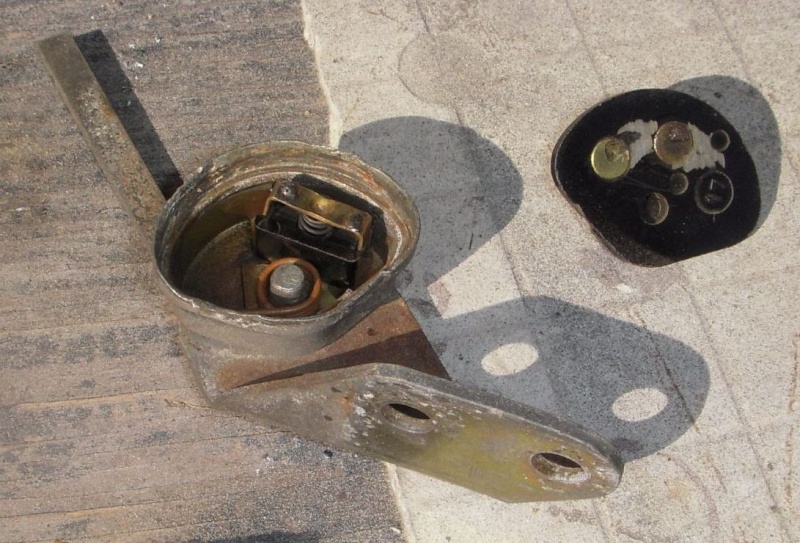
Then I noticed the real problem. The whole casing was rotating along with the switch arm! So the internal parts of the switch never moved. I thought I'd post a photo of the culprit. When you remove the guts of the switch you can see a hole in the casing. And the bracket has a tiny dimple punched in it that is supposed to go into this hole to hold the casing in the proper position. Here you can see the dimple not quite aligned with the hole:

I used a center punch on the backside to try to increase the height of the dimple (not sure that affected it at all). When it was all back together I used a hammer and a vise to reduce the gap between the bracket and the casing. It holds in position now but it's hard to say how long it will stay that way. I may make a steel plate the right shape to bolt onto the bracket that butts up against the two flat sides on the outside of the housing. Then it would be impossible for the housing to rotate.
Bowtie Overdrive's solution to this is to tap into the brake light wire and run it to the tranny. So whenever you hit the brakes, it tells the tranny to unlock the torque converter (if it was locked). The only time the converter gets locked is when you hit 4th gear. (Actually you can hook up a switch to force it to lock in other gears to help the tranny run cooler.)
So I've about got their wiring kit hooked up when I discover that my brake lights weren't working. I tracked it down to the brake light switch. I see these for sale on eBay and I thought, uh oh, am I going to need to track down one of those? But I figured I could probably fix it if I took it apart. The switch is so easy to get to, under the van by the brake pedal arm. Someone had put blue silicone on it so I figured it had been repaired at least once before. After prying up the peened-over edges, I removed the black plastic part and found the connections were in pretty good shape inside. I cleaned them up with a dremel wire wheel.
Then I noticed the real problem. The whole casing was rotating along with the switch arm! So the internal parts of the switch never moved. I thought I'd post a photo of the culprit. When you remove the guts of the switch you can see a hole in the casing. And the bracket has a tiny dimple punched in it that is supposed to go into this hole to hold the casing in the proper position. Here you can see the dimple not quite aligned with the hole:
I used a center punch on the backside to try to increase the height of the dimple (not sure that affected it at all). When it was all back together I used a hammer and a vise to reduce the gap between the bracket and the casing. It holds in position now but it's hard to say how long it will stay that way. I may make a steel plate the right shape to bolt onto the bracket that butts up against the two flat sides on the outside of the housing. Then it would be impossible for the housing to rotate.
savage- Number of posts : 2628
Location : Where Rust Never Sleeps in Ft Wayne IN
Registration date : 2008-05-15
- Post n°171
Re: Back to......VANagains NEWest 65 Chevy SportVan Deluxe
![]() by savage Sun Jul 11, 2010 6:59 am
by savage Sun Jul 11, 2010 6:59 am
When I had my windshield put in the guy used 3M setting & bedding compound, on it to fill gap & kind of hold it in place. So did you find the right gasket or cut one??
VANagain- Number of posts : 1046
Location : San Diego, CA
Age : 62
Registration date : 2008-05-16
- Post n°172
Re: Back to......VANagains NEWest 65 Chevy SportVan Deluxe
![]() by VANagain Sun Jul 11, 2010 11:10 am
by VANagain Sun Jul 11, 2010 11:10 am
Luckily the gasket was in great shape on the windshield I pulled from a van that was being parted out. We were going to cut the rubber to get it out but it turned out to be easy to remove. My guess is that someone replaced it at some point but didn't use any sealant, so we were able to just work the rubber out just using our hands.
donivan65- Governor
- Number of posts : 12227
Location : San Diego, California
Registration date : 2008-05-12
- Post n°173
Re: Back to......VANagains NEWest 65 Chevy SportVan Deluxe
![]() by donivan65 Sat Jul 17, 2010 9:54 pm
by donivan65 Sat Jul 17, 2010 9:54 pm
Ok,,,,,tried a couple of different carbs on the van today,,,,,,ran good enough for a test drive,,,,,,1st stop is to adjust the throttle valve cable,,,,,then a road test down the road and up a hill,,,,,then the temporary idle screw tightens up and the idle gets stuck up high and the engine won't shut down after Rich backs it into his driveway,,,,,,,so heres how the video went,,,,,,

Nightmoves- Number of posts : 2214
Location : Old Hickory Tenn.
Age : 64
Registration date : 2008-11-17
- Post n°174
Re: Back to......VANagains NEWest 65 Chevy SportVan Deluxe
![]() by Nightmoves Sat Jul 17, 2010 10:15 pm
by Nightmoves Sat Jul 17, 2010 10:15 pm
Thanks for the ride,fellas! went through all the gears well,passin gear as well.The lil six just hummed right along.And of course finish it off with a double Cheese burger.
donivan65- Governor
- Number of posts : 12227
Location : San Diego, California
Registration date : 2008-05-12
- Post n°175
Re: Back to......VANagains NEWest 65 Chevy SportVan Deluxe
![]() by donivan65 Sat Jul 17, 2010 10:31 pm
by donivan65 Sat Jul 17, 2010 10:31 pm
VanAgain has a new exhaust manifold on order. It has a real bad exhaust leak and is really noisy,,,,,,,,
Sponsored content

