VintAGE-Vans

Would you like to react to this message? Create an account in a few clicks or log in to continue.

BRINGING IT ALL TOGETHER.... A's, G's & E's


3 posters

    3 Speed Shifter Mechanism Rebuild

    Kramerkolby97
    Kramerkolby97


    Number of posts : 14
    Location : Perkasie, PA
    Age : 27
    Registration date : 2019-12-30

    3 Speed Shifter Mechanism Rebuild Empty 3 Speed Shifter Mechanism Rebuild

    Post by Kramerkolby97 Tue Dec 31, 2019 10:53 am

    When I started having issues with my manual shifter on my van ('65 A100 225cui 3spd manual), I searched everywhere to find info on repairing the mechanism at the base of the steering column for the three speed shifter but had no luck. So I figured I'd do a write up on it.

    I had issues with the van having the incorrect clutch fork and weird repairs by previous owner(s) because of that. The z-bar had been cut and welded to make the fork work and the clutch linkage was butchered as well. The clutch never fully engaged and the van was a bear to drive, consistently grinding gears and caused stress on the whole shifter mechanism. Driving the van home from a local cruise night I was having more trouble with the clutch then usual and ended up busting something within the 3spd mechanism. The whole shifter would travel almost 180 around the steering wheel and wouldn't pick up any gears. Ended up stranded in an intersection, at night, with no hazard lights, fun stuff.

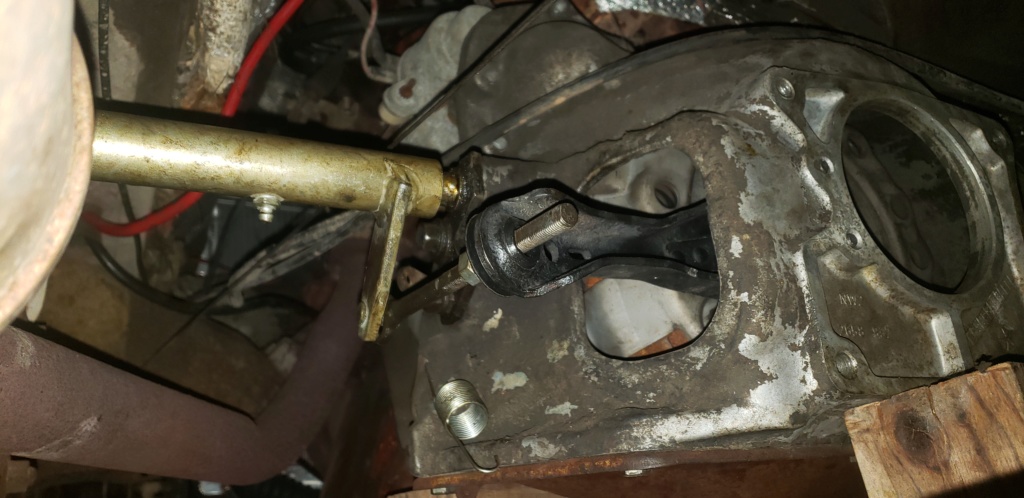
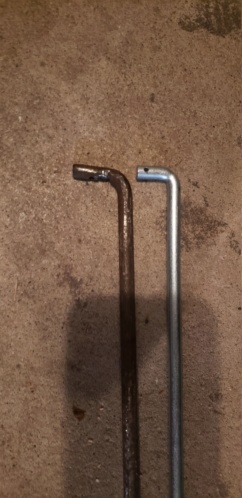
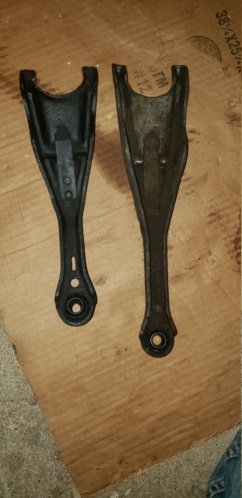
    First, I had to make all the clutch linkages right. Figured out the engine was replaced with a later /6 and bell-housing from a 70's era car. They never bothered to swap the clutch fork and instead butchered everything else. Turns out the right fork is the same as a '65 Mopar B-body (part #2401739), had to replace the pivot for the right fork to attach correctly (part #2266819 same as a 66-67 B-body small block). Sourced an NOS zbar/ torque shaft from https://www.hiltopautoparts.com/ (part #2239667) and a service kit from http://www.brewersperformance.com/ (Search part #CSK on their site, same as 4spd kits). Found a guy selling NOS clutch release rods on ebay: https://www.ebay.com/itm/1964-65-66-67-68-69-70-71-Dodge-Fargo-A100-A108-CLUTCH-RELEASE-ROD/361622542961?ssPageName=STRK%3AMEBIDX%3AIT&_trksid=p2057872.m2749.l2649
    This sorted out most of the clutch issues and made the clutch 1000x better to use.

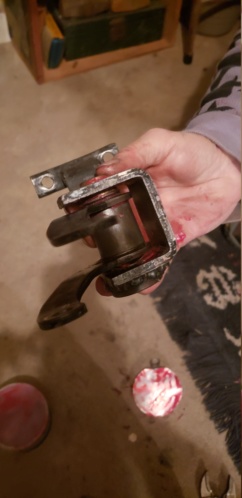
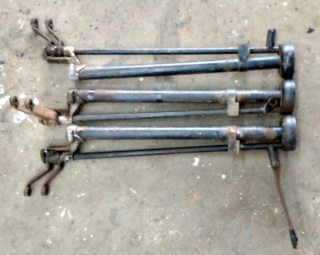
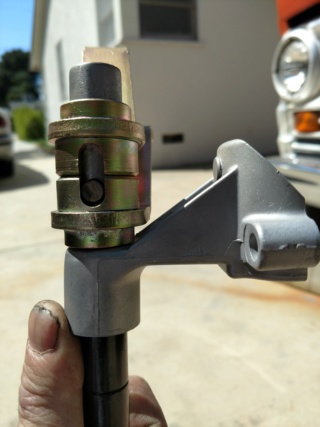
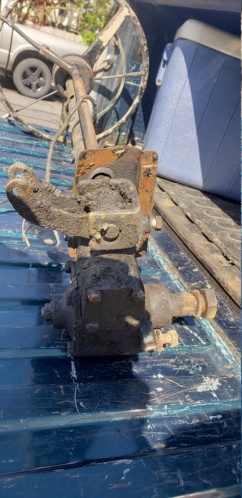
    Then I moved onto the three speed shifter. Originally I had taken it off, cleaned it up, replaced the bushing, washer, and sleeve. Once we got it back together and re-greased it, we learned the upper lever was stripped out hence why the shifter wouldn't pick up a gear. So then I spent a lot of time digging through a Mopar parts book and scoured the internet for every piece to basically completely rebuild the mechanism. I have plenty of pictures and a diagram attached, part numbers and sellers listed below (I didn't replace the pin):

    Bushing: 2201259 (http://www.dpmotorparts.com/homepage.cfm)
    Washer: 2201260 (https://cjmotorparts.com/nos-mopar-parts-inventory)
    Cup: 2201258 (http://www.dpmotorparts.com/homepage.cfm)
    Retainer: 2123129 (Ebay seller only had one)
    Support: 2225707 (https://cjmotorparts.com/nos-mopar-parts-inventory)
    Lever Upper: 2201771 (https://cjmotorparts.com/nos-mopar-parts-inventory)
    Lever Lower: 2201772 (https://cjmotorparts.com/nos-mopar-parts-inventory)

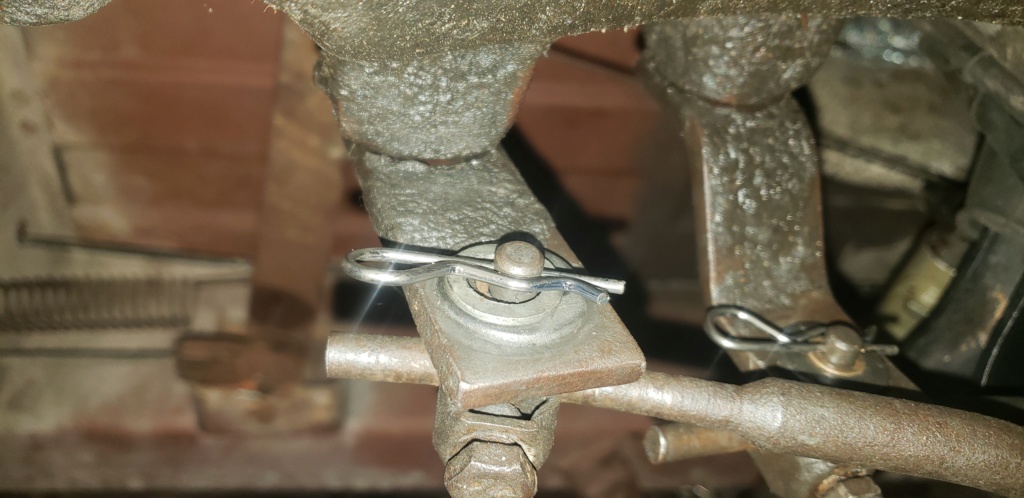
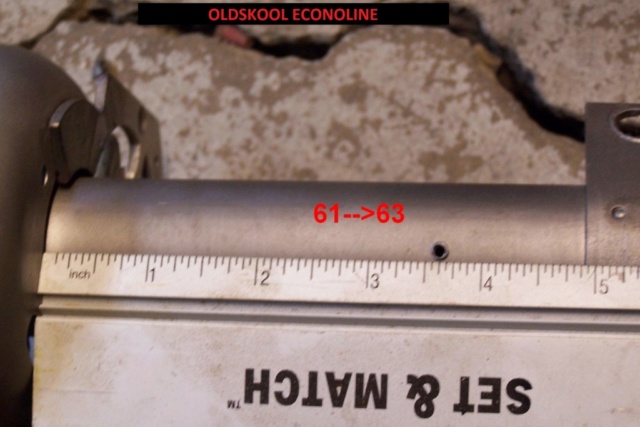
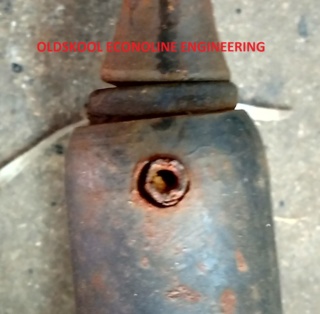
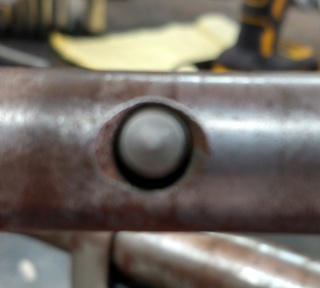
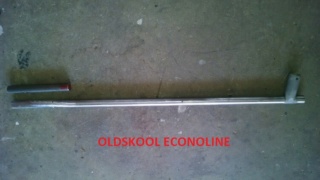
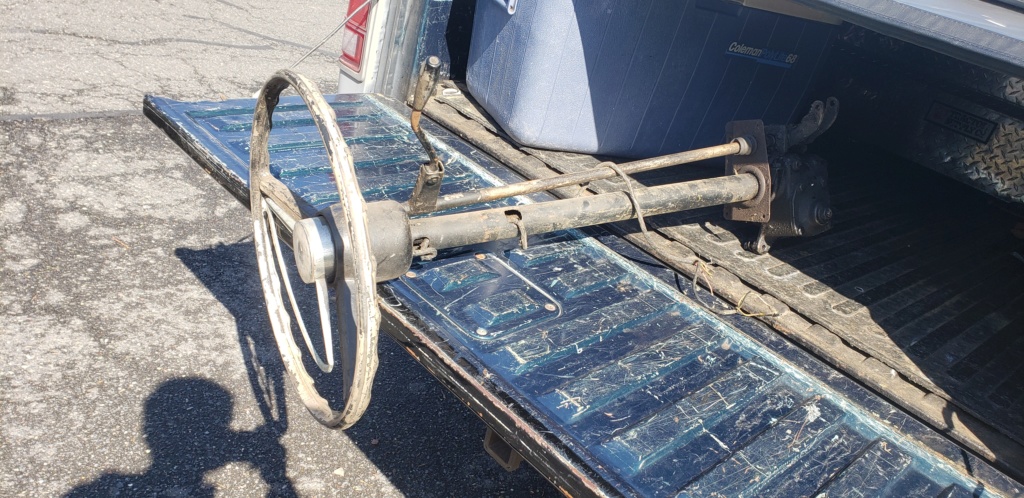
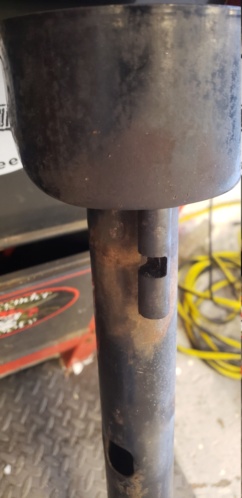
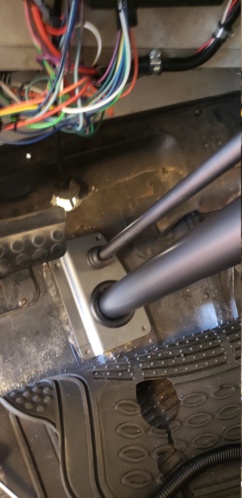
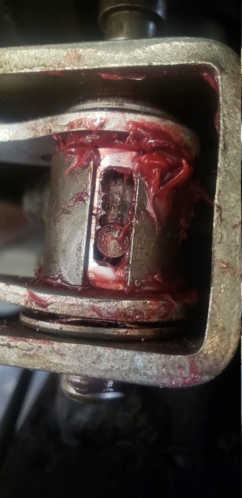
    To get the shifter mechanism off its easiest to remove the grill. Disconnect the shifter rods and move aside. Unbolt the u-bolt that holds the mechanism onto the steering column base. Note the general spot where its seated. Remove the grease fitting and rotate the sleeve till you can see the pin. With a small pair of needle nose pliers you can pull the pin right out. You have to pull the steering wheel, really good write up on that here: (https://vintage-vans.forumotion.com/t50537-steering-wheel-removal-a100). Theres a lockwire/ washer that comes off as well. Loosen up the support bracket for the steering column and now whole column can be pulled up. Best to have a friend around for the next part. Slowly and gently lift the column up and out. This will pull the shaft that goes from the shifter down to the mechanism with it. Have someone hold the mechanism, the column only needs to come up far enough so the mechanism can wiggle off in one piece.

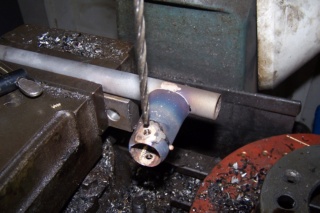
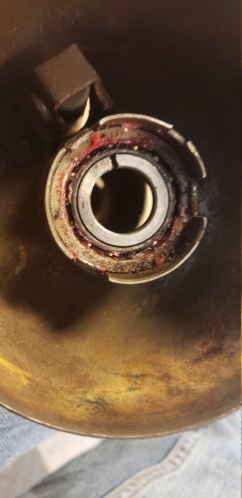
    I put all the new pieces together, greasing everything along the way (Used Mobil One Synthetic, so much cleaner to work with then regular grease.) Stuck a socket extension through the whole thing to help it all align. With help raise and lower the steering column to get the mechanism back on. Align it so the pin can get tapped in and rotate the sleeve to replace the grease fitting, this essentially locks everything in. The steering column can get put back together and the mechanism can get bolted back to the column, you can get some adjustment out of it by moving it up and down on the column base before tightening it down. Add some more grease and it should be good to go.

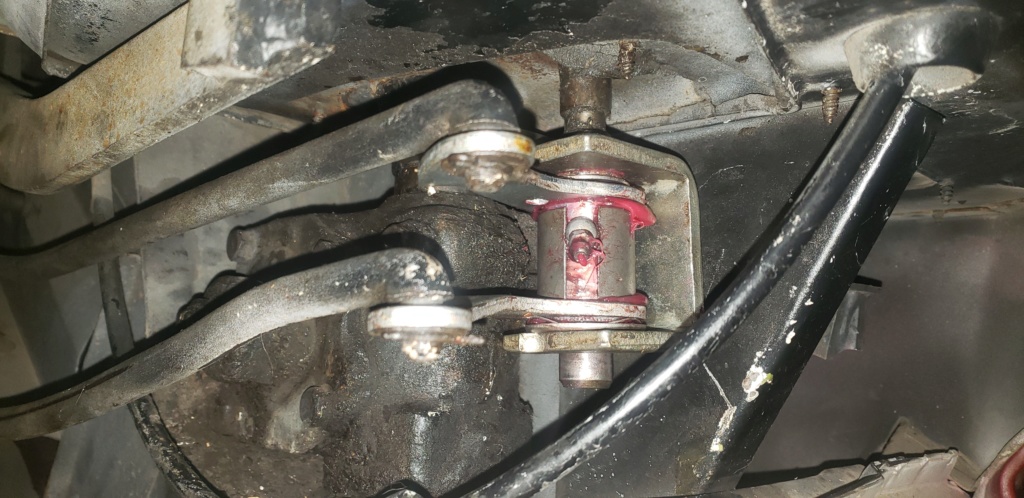
    I also went ahead and replaced the washer and grommet on the end of shifter linkages at the trans. Part numbers and sellers below:

    Bushing: 1676200 (https://cjmotorparts.com/nos-mopar-parts-inventory)
    Grommet: 1941699 (Central Ave Chrysler of Delco had them listed on amazon)

    Hope this helps! Highly recommend Central Jersey Motorparts, Hiltop Autoparts, and Brewers Performance.
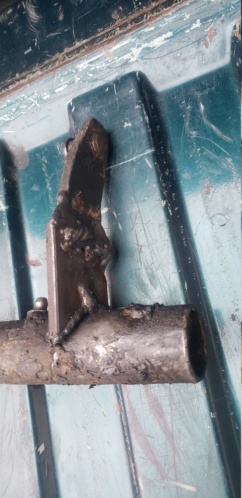
 3 Speed Shifter Mechanism Rebuild 20191011
    3 Speed Shifter Mechanism Rebuild 20191012
    3 Speed Shifter Mechanism Rebuild 20191010
    Kramerkolby97
    Kramerkolby97


    Number of posts : 14
    Location : Perkasie, PA
    Age : 27
    Registration date : 2019-12-30

    3 Speed Shifter Mechanism Rebuild Empty Re: 3 Speed Shifter Mechanism Rebuild

    Post by Kramerkolby97 Tue Dec 31, 2019 10:55 am

    3 Speed Shifter Mechanism Rebuild 20191014
    3 Speed Shifter Mechanism Rebuild 20191015
    3 Speed Shifter Mechanism Rebuild 20191013
    Kramerkolby97
    Kramerkolby97


    Number of posts : 14
    Location : Perkasie, PA
    Age : 27
    Registration date : 2019-12-30

    3 Speed Shifter Mechanism Rebuild Empty Re: 3 Speed Shifter Mechanism Rebuild

    Post by Kramerkolby97 Tue Dec 31, 2019 10:56 am

    3 Speed Shifter Mechanism Rebuild 20191016
    3 Speed Shifter Mechanism Rebuild 20191110
    3 Speed Shifter Mechanism Rebuild 20191210
    Kramerkolby97
    Kramerkolby97


    Number of posts : 14
    Location : Perkasie, PA
    Age : 27
    Registration date : 2019-12-30

    3 Speed Shifter Mechanism Rebuild Empty Re: 3 Speed Shifter Mechanism Rebuild

    Post by Kramerkolby97 Tue Dec 31, 2019 10:57 am

    3 Speed Shifter Mechanism Rebuild 20191212
    3 Speed Shifter Mechanism Rebuild 20191211
    vanny
    vanny
    Moderator


    Number of posts : 14775
    Location : Ashburnham, MA
    Age : 65
    Registration date : 2012-09-22

    3 Speed Shifter Mechanism Rebuild Empty Re: 3 Speed Shifter Mechanism Rebuild

    Post by vanny Tue Dec 31, 2019 11:40 am

    Wow, sorry the previous owners messed things up for you...Very nice of you to post all your links for parts and the process of rebuilding for someone else to use in the future who might run into the same sort of issues! Hope it's all working properly for you now. Thanks for taking the time to help out the next guy or gal to save them some time and aggravation! Very Happy cheers cheers cheers


    _________________
    “The future will soon be a thing of the past."

    http://public.fotki.com/Vintage-Vans/vintage-vans-es/ruff-diamond-1/?cmd=fs_slideshow
    avatar
    Old Skool
    Econoline Guru


    Number of posts : 1306
    Location : North Hills, CA
    Age : 72
    Registration date : 2009-06-13

    3 Speed Shifter Mechanism Rebuild Empty Re: 3 Speed Shifter Mechanism Rebuild

    Post by Old Skool Tue Jan 14, 2020 7:47 am

    Nice thread and THANK YOU. Not sure of why no one mentioned or where it went but,,,I have been posting on VV for MANY years of how to rebuild our steering columns to include what causes the 50 year old issue and how to fix them. In fact I have been rebuilding them for more years than I can remember as well as building automatic steering columns for the same. Perhaps over 200 of them being rebuilt?? My 1st Econoline 53 years ago,,, LOL..
    The very old issue of stuck in gear and having to bump the shifters back into neutral. Also the INFAMOUS clutch issues,, LOL... This will be ANOTHER long post, or actually re post of many LONG posts and threads all over the net.
    Some things looking like they need to be brought out again so that people understand the whole issue and things that you cannot do easily if you dont know about them. To start with being able to use another years steering column in your year truck.
    1961 to 1964 Econolines generally considered an EARLY and 1965 to 1967's referred to as LATES with the 1968's to 1974 referred to as a GENII.
    ALL 1ST GEN ECONOLINES using some parts that are identical from 1961 to 1967 of which would be the FRONT AXLE ITSELF as well as THE STEERING BOX. The mention of the steering box coming back to STEERING COLUMNS and interchangeability. AS mentioned the steering box is the same no matter what year HOWEVER the "earlies" mounting angle being different than the lates. SAME three 7/16th course thread bolts but the mounting holes in different clocking than each other. This is important in that it means you cannot INTERCHANGE a LATE steering column into an early UNLESS YOU RE DRILL THE MOUNTING HOLES IN THE CORRECT LOCATION to match.
    Also important is that you need to also use the CORRECT dash board mounting plate to match BOTH THE YEAR OF THE TRUCK AND THE YEAR OF THE STEERING COLUMN to each other.
    In the earlies there were TWO types of dashboard mounting plates. The 1961, 1962 and some 1963's using a small TRIANGULAR dash bracket and mount on the steering column itself. In 1963 to 1964 then using a different dash bracket. These being all by themselves and even though they look similar to a "late",,,, it is different. On the steering column itself the 63>64 USING THE EXACT SAME MOUNT WELDED TO IT AS THE 1965 TO 1967,,,,,,,,,however welded in a LOWER POSITION. Its the same bracket but the distance is different from the bottom of the bowl to the mount. THIS IS IMPORTANT as I have lost track of how many people over the years try to use a late steering column in an early BUT DONT KNOW that the steering box is mounted at a different angle and the NON ALIGNMENT wears out the steering box as well as bending the shaft and wearing out the upper support bearing as well. To avoid confusion I will RE POST these pictures for this part of the thread.
    avatar
    Old Skool
    Econoline Guru


    Number of posts : 1306
    Location : North Hills, CA
    Age : 72
    Registration date : 2009-06-13

    3 Speed Shifter Mechanism Rebuild Empty Re: 3 Speed Shifter Mechanism Rebuild

    Post by Old Skool Tue Jan 14, 2020 7:50 am

    Long time since posting here and didnt down load the pictures correctly,,,,
    avatar
    Old Skool
    Econoline Guru


    Number of posts : 1306
    Location : North Hills, CA
    Age : 72
    Registration date : 2009-06-13

    3 Speed Shifter Mechanism Rebuild Empty Re: 3 Speed Shifter Mechanism Rebuild

    Post by Old Skool Tue Jan 14, 2020 7:59 am

    Here is another try at the pictures?? Cannot seem to get them to post? Actually late for rebuilding some today and will pick this back up tonight... MUCH MORE TO SAY,, and a lot of pictures for everyone,,,,
    avatar
    Old Skool
    Econoline Guru


    Number of posts : 1306
    Location : North Hills, CA
    Age : 72
    Registration date : 2009-06-13

    3 Speed Shifter Mechanism Rebuild Empty Re: 3 Speed Shifter Mechanism Rebuild

    Post by Old Skool Tue Jan 14, 2020 8:02 am

    3 Speed Shifter Mechanism Rebuild 100_0713
    3 Speed Shifter Mechanism Rebuild 000_0515
    3 Speed Shifter Mechanism Rebuild 000_0516

    avatar
    Old Skool
    Econoline Guru


    Number of posts : 1306
    Location : North Hills, CA
    Age : 72
    Registration date : 2009-06-13

    3 Speed Shifter Mechanism Rebuild Empty Re: 3 Speed Shifter Mechanism Rebuild

    Post by Old Skool Tue Jan 14, 2020 8:03 am

    3 Speed Shifter Mechanism Rebuild 000_0517
    3 Speed Shifter Mechanism Rebuild 000_0518

    Hi Vic, while looking at the latest addition to this thread, I went back a little to see the Econo column stuff and noticed that you couldn't see the measurements on your pics... if you change the pixel settings to 640 when you bring them in, the pics won't get cutoff. I just did that with your pics so here they are for future reference...(Vanny)


    3 Speed Shifter Mechanism Rebuild 65-67e12

    3 Speed Shifter Mechanism Rebuild 61-63e10


    avatar
    Old Skool
    Econoline Guru


    Number of posts : 1306
    Location : North Hills, CA
    Age : 72
    Registration date : 2009-06-13

    3 Speed Shifter Mechanism Rebuild Empty Re: 3 Speed Shifter Mechanism Rebuild

    Post by Old Skool Tue Jan 14, 2020 8:10 am

    Not quite sure of what wrong? These are old pictures but not showing the different years measurements... Hopefully this will show the differences? I also rebuild the 4 spd which isnt in this picture. It has many differences3 Speed Shifter Mechanism Rebuild Img_2010
    3 Speed Shifter Mechanism Rebuild Img_2011
    in parts..
    avatar
    Old Skool
    Econoline Guru


    Number of posts : 1306
    Location : North Hills, CA
    Age : 72
    Registration date : 2009-06-13

    3 Speed Shifter Mechanism Rebuild Empty Re: 3 Speed Shifter Mechanism Rebuild

    Post by Old Skool Tue Jan 14, 2020 8:15 am

    I have been specializing in our steering columns for MANY years and collecting all the parts needed. Here is a small part of the upper support collection of BROKEN ones after I decided to also collect broken ones3 Speed Shifter Mechanism Rebuild Img_2012
    ... LOL
    avatar
    Old Skool
    Econoline Guru


    Number of posts : 1306
    Location : North Hills, CA
    Age : 72
    Registration date : 2009-06-13

    3 Speed Shifter Mechanism Rebuild Empty Re: 3 Speed Shifter Mechanism Rebuild

    Post by Old Skool Tue Jan 14, 2020 8:17 am

    Okay,, kinda figured it out, but really need to run,, will continue later on tonight
    3 Speed Shifter Mechanism Rebuild 000_0411
    avatar
    Old Skool
    Econoline Guru


    Number of posts : 1306
    Location : North Hills, CA
    Age : 72
    Registration date : 2009-06-13

    3 Speed Shifter Mechanism Rebuild Empty Re: 3 Speed Shifter Mechanism Rebuild

    Post by Old Skool Tue Jan 14, 2020 8:18 am

    3 Speed Shifter Mechanism Rebuild 100_1010
    avatar
    Old Skool
    Econoline Guru


    Number of posts : 1306
    Location : North Hills, CA
    Age : 72
    Registration date : 2009-06-13

    3 Speed Shifter Mechanism Rebuild Empty Re: 3 Speed Shifter Mechanism Rebuild

    Post by Old Skool Tue Jan 14, 2020 8:20 am

    ANOTHER weal spot,, I re machine this as standard in my rebuilds,, really gotta run,,, dratzzz3 Speed Shifter Mechanism Rebuild 000_0610
    avatar
    Old Skool
    Econoline Guru


    Number of posts : 1306
    Location : North Hills, CA
    Age : 72
    Registration date : 2009-06-13

    3 Speed Shifter Mechanism Rebuild Empty Re: 3 Speed Shifter Mechanism Rebuild

    Post by Old Skool Tue Jan 14, 2020 8:23 am

    3 Speed Shifter Mechanism Rebuild Img_2013
    avatar
    Old Skool
    Econoline Guru


    Number of posts : 1306
    Location : North Hills, CA
    Age : 72
    Registration date : 2009-06-13

    3 Speed Shifter Mechanism Rebuild Empty Re: 3 Speed Shifter Mechanism Rebuild

    Post by Old Skool Tue Jan 14, 2020 8:31 am

    This is the OTHER major issue,,, The shift pin slop in the shift tube will not allow the pin to find the opposite shift gate and LOCKS up the transmission. The transmission is designed with detent system that will NOT allow you to shift into another gear when its in one of the gears. The OEM hole in it is chamfered on each side which GIVES LESS SUPPORT TO THE PIN,, How many times has that pin moved back and forth for each gear shift times how many years. It could have been better,, I TIG weld a complete new end on using COLD ROLLED STEEL with NO chamfering to offer more support and stronger material. ALSO offering a complete new surface for the shifters to slide on. 3 Speed Shifter Mechanism Rebuild Img_2014
    3 Speed Shifter Mechanism Rebuild Img_2015
    avatar
    Old Skool
    Econoline Guru


    Number of posts : 1306
    Location : North Hills, CA
    Age : 72
    Registration date : 2009-06-13

    3 Speed Shifter Mechanism Rebuild Empty Re: 3 Speed Shifter Mechanism Rebuild

    Post by Old Skool Tue Jan 14, 2020 8:33 am

    LAST ONE,, I gotta get off the putter,,, dratzzzzzzzzz3 Speed Shifter Mechanism Rebuild 81110
    avatar
    Old Skool
    Econoline Guru


    Number of posts : 1306
    Location : North Hills, CA
    Age : 72
    Registration date : 2009-06-13

    3 Speed Shifter Mechanism Rebuild Empty Re: 3 Speed Shifter Mechanism Rebuild

    Post by Old Skool Wed Jan 15, 2020 7:45 am

    Not sure if I made it clear,, but just to make sure,,, you can interchange any early with any early as long as you use the matching dash bracket to either one of the two types.
    CLUTCH linkage,,,, Very old repair and update using bearing ends instead of the factory design. The rod itself from the pedal and to the bell crank (cross over linkage) is nothing more than a length of 5/16th round stock that has been bent on one end and smashed down on the other end. Either end with metal against metal and eventually wears out. The flat side very well known for simply and finally wearing through and breaking. Worst scenario would be facing down hill with one foot on the clutch and the other on the brake pedal at a red light,,,,, The flattened end FINALLY letting loose and launching you through a red light,,,,,, Very easy and inexpensive fix,,,,, The hole in the clutch pedal is already enlarged and so I drill it out to a full 5/16th and install a 5/16th bolt. Careful to find the correct bolt that has enough NONE THREADED and smooth shank protruding through the pedal so that there are NO THREADS inside the Hyme joint type bearing. Weld the hex end and its ready to use. DO the EXACT same thing to each of the two ends on the bell crank. These give you a mounting point for all the bearing ends. I then cut a piece of 5/16th round stock to 47 5/8" and thread both ends to the matching threads of the bearing ends you want to use,,, I use 5/16th FINE THREAD bearing ends. This gives you bearing ends on the rod and works VERY SMOOTHLY without the metal to metal wearing things out,,,, I also use a bearing end on the adjustment link, however it being 5/16th course thread. NO MORE METAL TO METAL anywhere. Some notes,,,, SMALL SIX USES A LONGER bell crank piece as compared to a BIG SIX of which is shorter in length. In regards to the two bronze bearing halves in each side of it,, I have NOT found any and much easier to simply use the nylon round ones used in later years. Perhaps some one will find them again,, I have not seen them for over 30 years now and USED TO BE a standard item in the DORMAN boxes !! They used to be common stocked item. INSPECT the ends of your bell crank as MOST OFTEN they are all wallowed out from broken motor mounts allowing the engine to raise up and destroy them, lack of maintenance and so on..... Here are some reposts of old pictures posted so many times.... LOL... This showing my first setup but not welding the hex side in place.

    3 Speed Shifter Mechanism Rebuild 100_0910
    avatar
    Old Skool
    Econoline Guru


    Number of posts : 1306
    Location : North Hills, CA
    Age : 72
    Registration date : 2009-06-13

    3 Speed Shifter Mechanism Rebuild Empty Re: 3 Speed Shifter Mechanism Rebuild

    Post by Old Skool Wed Jan 15, 2020 7:47 am

    Here is the 5/16th round stock measurements to replace the one that always breaks,,, 3 Speed Shifter Mechanism Rebuild Img_2016
    avatar
    Old Skool
    Econoline Guru


    Number of posts : 1306
    Location : North Hills, CA
    Age : 72
    Registration date : 2009-06-13

    3 Speed Shifter Mechanism Rebuild Empty Re: 3 Speed Shifter Mechanism Rebuild

    Post by Old Skool Wed Jan 15, 2020 7:49 am

    Showing cross over bar,,,,3 Speed Shifter Mechanism Rebuild New_cl10
    Kramerkolby97
    Kramerkolby97


    Number of posts : 14
    Location : Perkasie, PA
    Age : 27
    Registration date : 2019-12-30

    3 Speed Shifter Mechanism Rebuild Empty Re: 3 Speed Shifter Mechanism Rebuild

    Post by Kramerkolby97 Tue May 05, 2020 5:11 pm

    Despite all this work the shifter was still binding, mainly when trying to find neutral and in with 1st and reverse. A previous owner had adapted a Hurst shifter onto the van and screwed up the welds on the shift tube. The bracket were the shifter slides in was actually higher then it was supposed to be and the welds were bulky. I picked up a spare 3spd steering column from a friend to use, figuring mine was too screwed up to use and I'd just swap the whole column.

    To get the shift tube separated from the steering column you have to tap the small pin out by the shifter pivot point (see diagram near the top of the post) then the whole shifter assembly slides out. The shift tube will slide off then, there should be a spring inside too. I cleaned up the whole column and repainted it also I wire wheeled & re-greased all the parts were the shift tube slides and pivots. Combined with a NOS spring I figured this should solve my issues. Got everything back together to find the same issue, learned that the hole were the pin goes in at the base was worn into an oval. Long story short, we had to piece the two shift tubes together. Cut and removed the base off the old tube and welded it into the replacement tube. The base where the shift mechanism seats is a separate piece that is welded on, so it kept the factory appearance. Re-assembled everything again and also straightened out some warps in the shift linkages.

    Spring (Mopar 1632808) https://cjmotorparts.com/nos-mopar-parts-inventory

    She shifts better than new now! I was still able to use the Hurst shifter too, just need to pick up a new ball with a 3spd pattern on it.
    Kramerkolby97
    Kramerkolby97


    Number of posts : 14
    Location : Perkasie, PA
    Age : 27
    Registration date : 2019-12-30

    3 Speed Shifter Mechanism Rebuild Empty Re: 3 Speed Shifter Mechanism Rebuild

    Post by Kramerkolby97 Tue May 05, 2020 5:12 pm

    3 Speed Shifter Mechanism Rebuild 20200412
    3 Speed Shifter Mechanism Rebuild 20200411
    3 Speed Shifter Mechanism Rebuild 20200410
    Kramerkolby97
    Kramerkolby97


    Number of posts : 14
    Location : Perkasie, PA
    Age : 27
    Registration date : 2019-12-30

    3 Speed Shifter Mechanism Rebuild Empty Re: 3 Speed Shifter Mechanism Rebuild

    Post by Kramerkolby97 Tue May 05, 2020 5:13 pm

    3 Speed Shifter Mechanism Rebuild 20200413
    3 Speed Shifter Mechanism Rebuild 20200415
    3 Speed Shifter Mechanism Rebuild 20200414
    Kramerkolby97
    Kramerkolby97


    Number of posts : 14
    Location : Perkasie, PA
    Age : 27
    Registration date : 2019-12-30

    3 Speed Shifter Mechanism Rebuild Empty Re: 3 Speed Shifter Mechanism Rebuild

    Post by Kramerkolby97 Tue May 05, 2020 5:14 pm

    3 Speed Shifter Mechanism Rebuild 20200416
    3 Speed Shifter Mechanism Rebuild 20200510
    3 Speed Shifter Mechanism Rebuild 20200511

    Sponsored content


    3 Speed Shifter Mechanism Rebuild Empty Re: 3 Speed Shifter Mechanism Rebuild

    Post by Sponsored content


      Current date/time is Fri Apr 26, 2024 2:27 pm