VintAGE-Vans

Would you like to react to this message? Create an account in a few clicks or log in to continue.

BRINGING IT ALL TOGETHER.... A's, G's & E's


+5
FIZGIG
Magic Bus
playnpossum
Seth G
Das Boot
9 posters

    My 200 Build!

    Das Boot
    Das Boot


    Number of posts : 76
    Location : Spartanburg, SC
    Registration date : 2013-01-29

    My 200 Build! Empty My 200 Build!

    Post by Das Boot Tue Apr 14, 2015 10:41 am

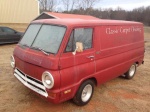
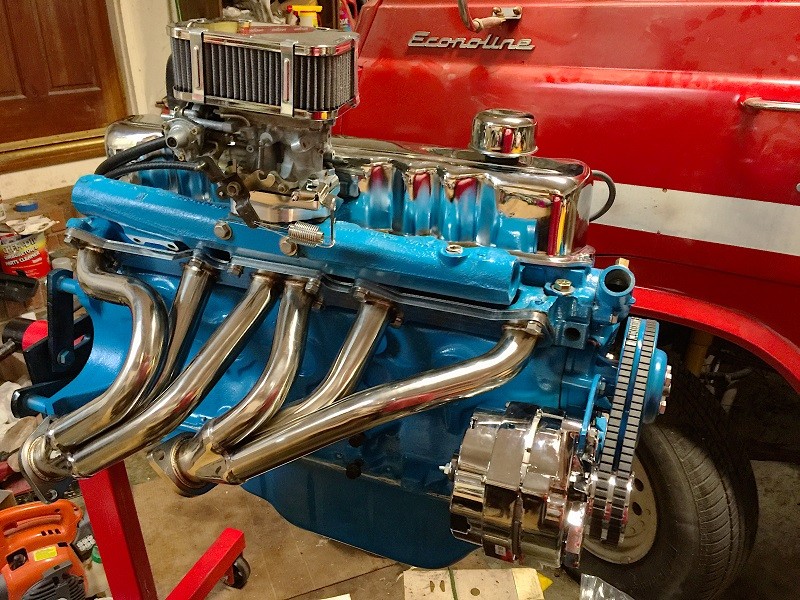
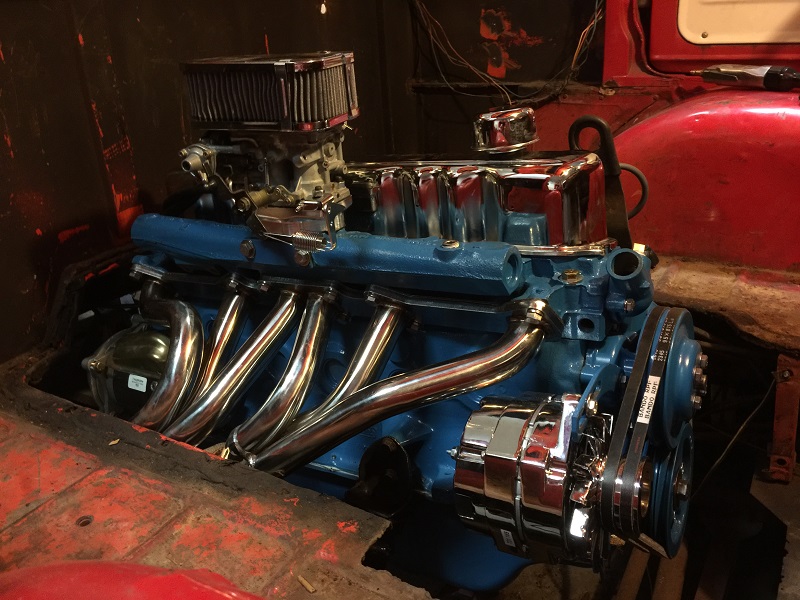
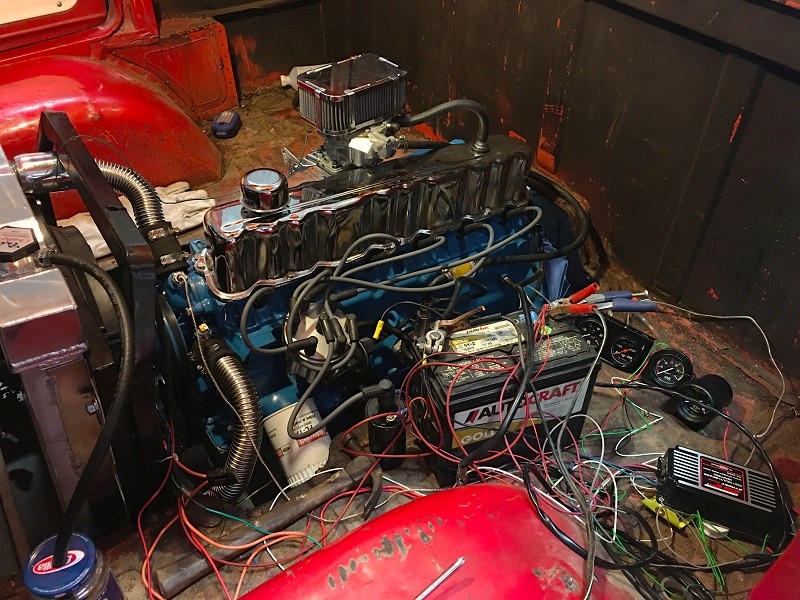
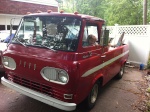
    I just wanted to share my 200 build.  I should be done in the next week or two and I'm getting pretty excited to finally hear it run.  Here's some pictures and a break down of the parts.  I'll post some more soon! Thanks for looking!

    -Brian

    My 200 Build! 14278113

    My 200 Build! 14278114

    My 200 Build! 14278115

    My 200 Build! Imag0610

    My 200 Build! Imag0710

    My 200 Build! Imag0711

    My 200 Build! Imag0712

    My 200 Build! Imag1012

    My 200 Build! Imag1013

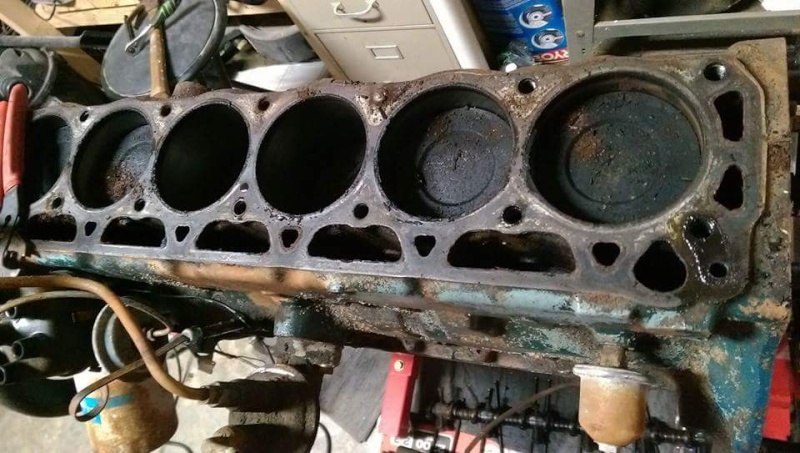
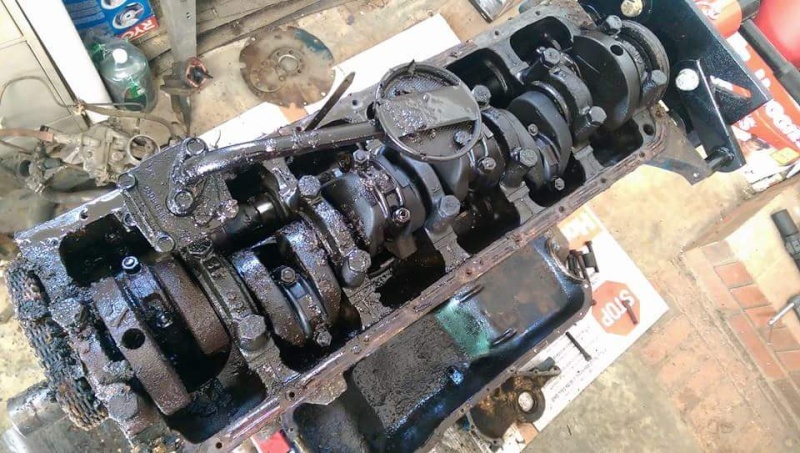
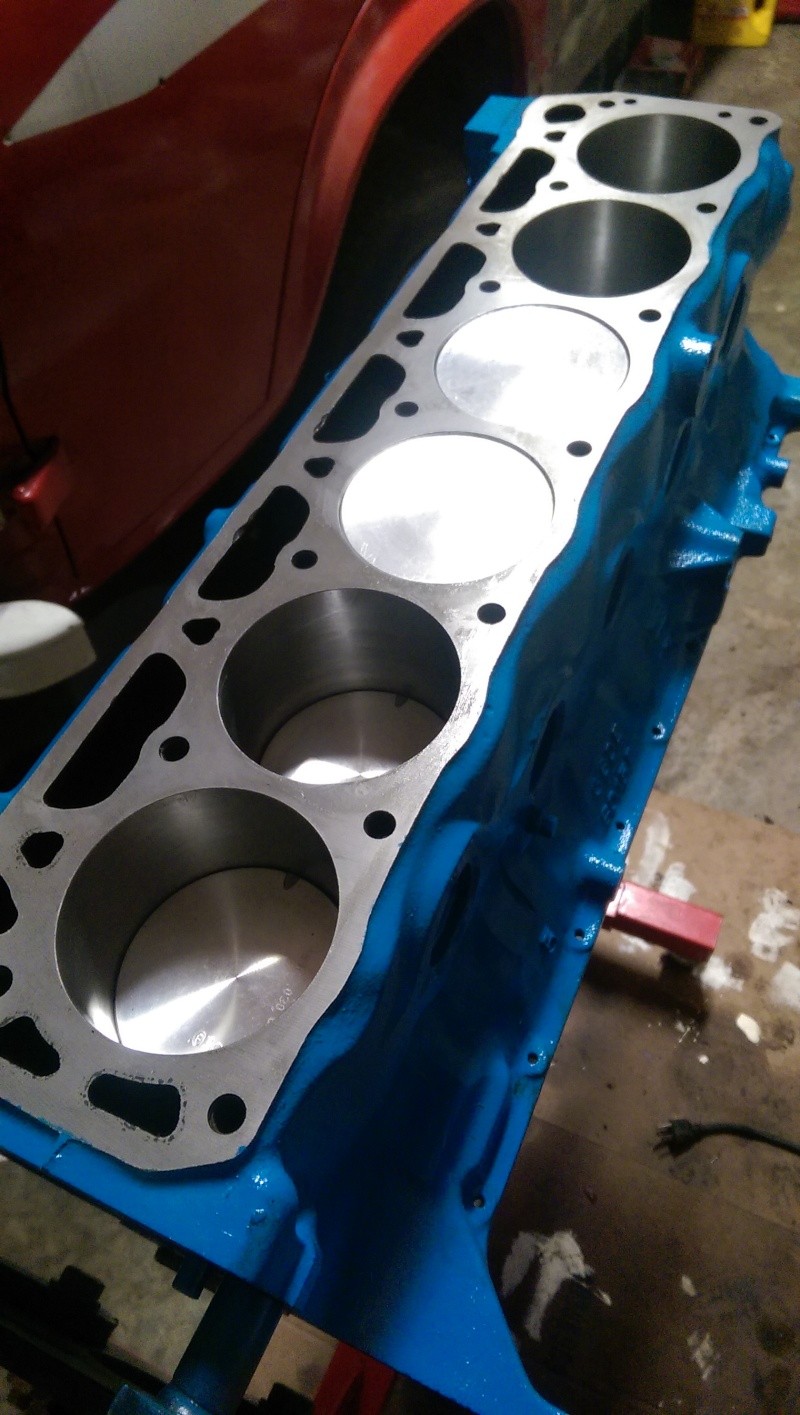
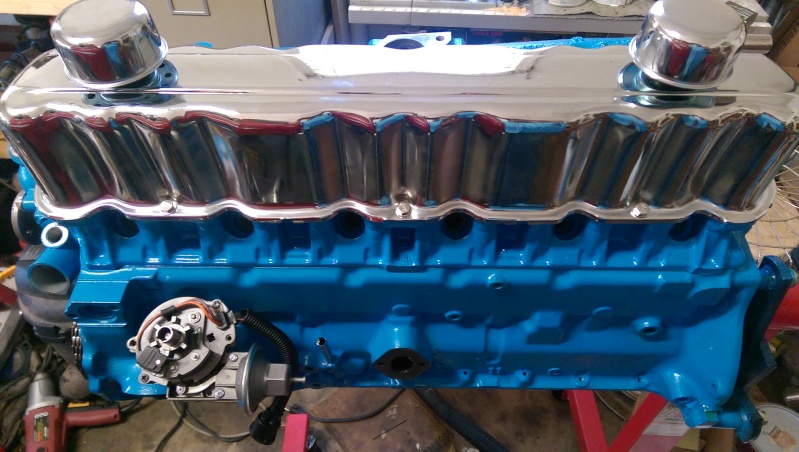
    C6DE  Block – ’66 Mustang
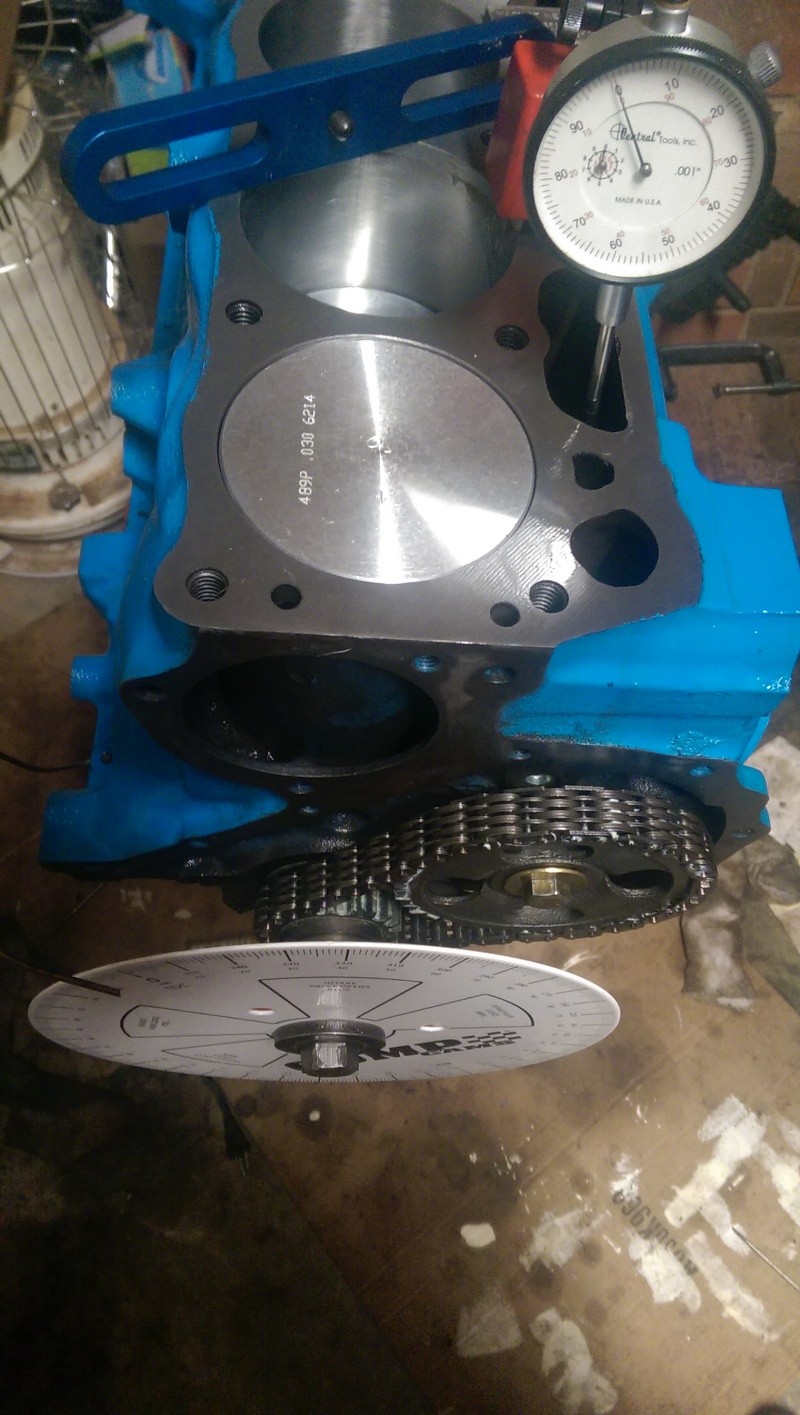
    Cylnders cut .030 and crank cut .010 / .010
    .030 over Tempo HSC pistons (flat top) w/ moly rings
    Standard Rods
    Clay Smith Camshaft 264/274 – 108 w/ Hydraulic Lifters – 3 degrees advance
    Ball & Cup Pushrods
    Standard Timing Set
    Standard Oil Pump, Pickup, and Oil Pan
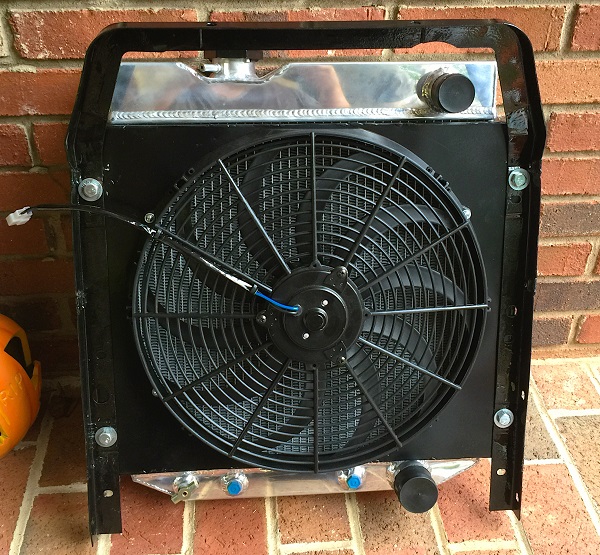
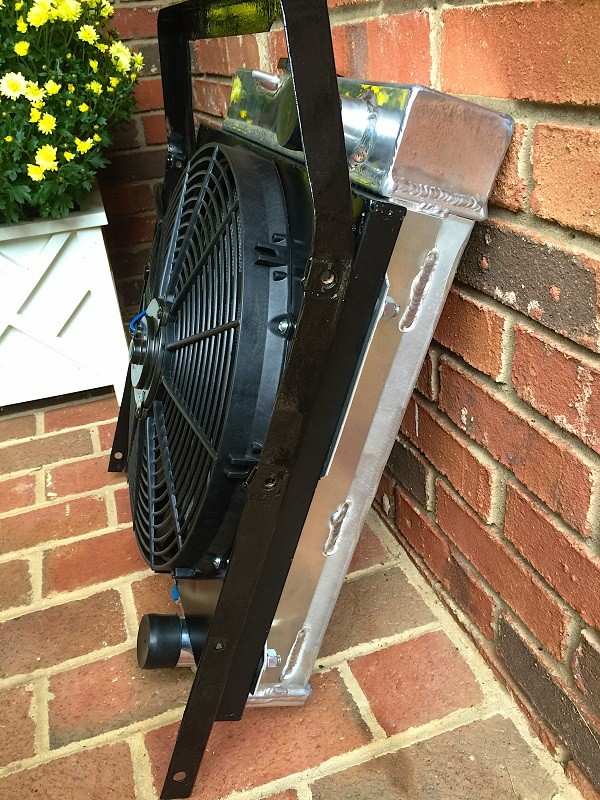
    Standard Water Pump

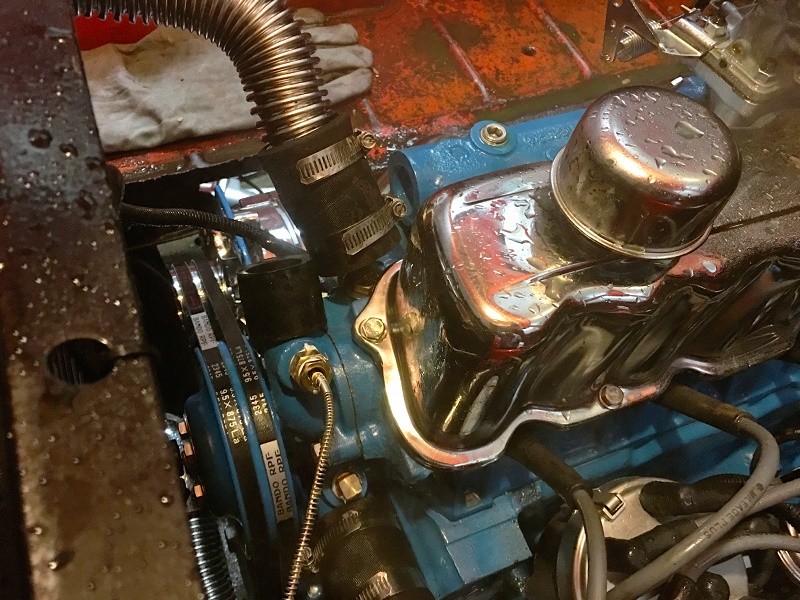
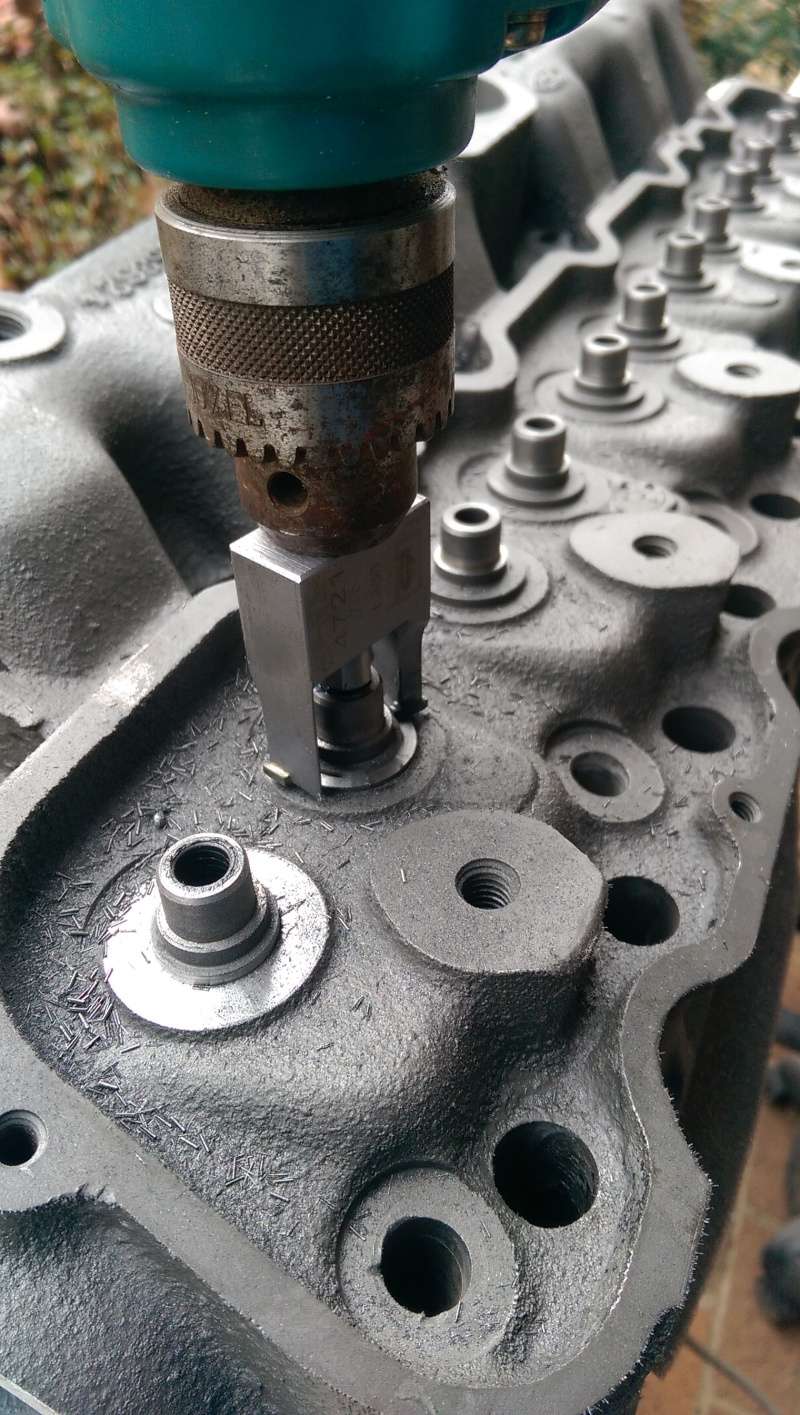
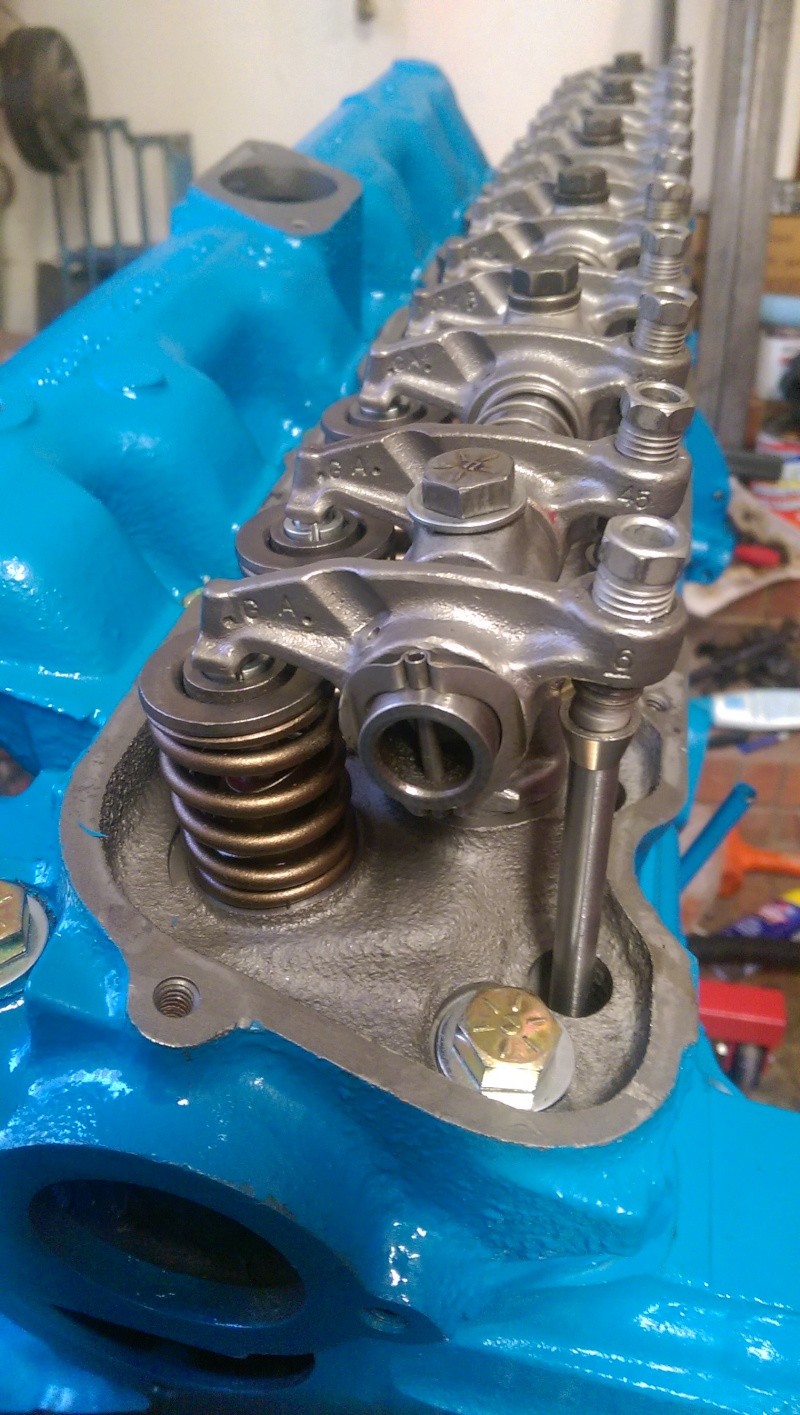
    E0BE  Head – found by local head shop
    Surface cut .060 – chambers 51cc
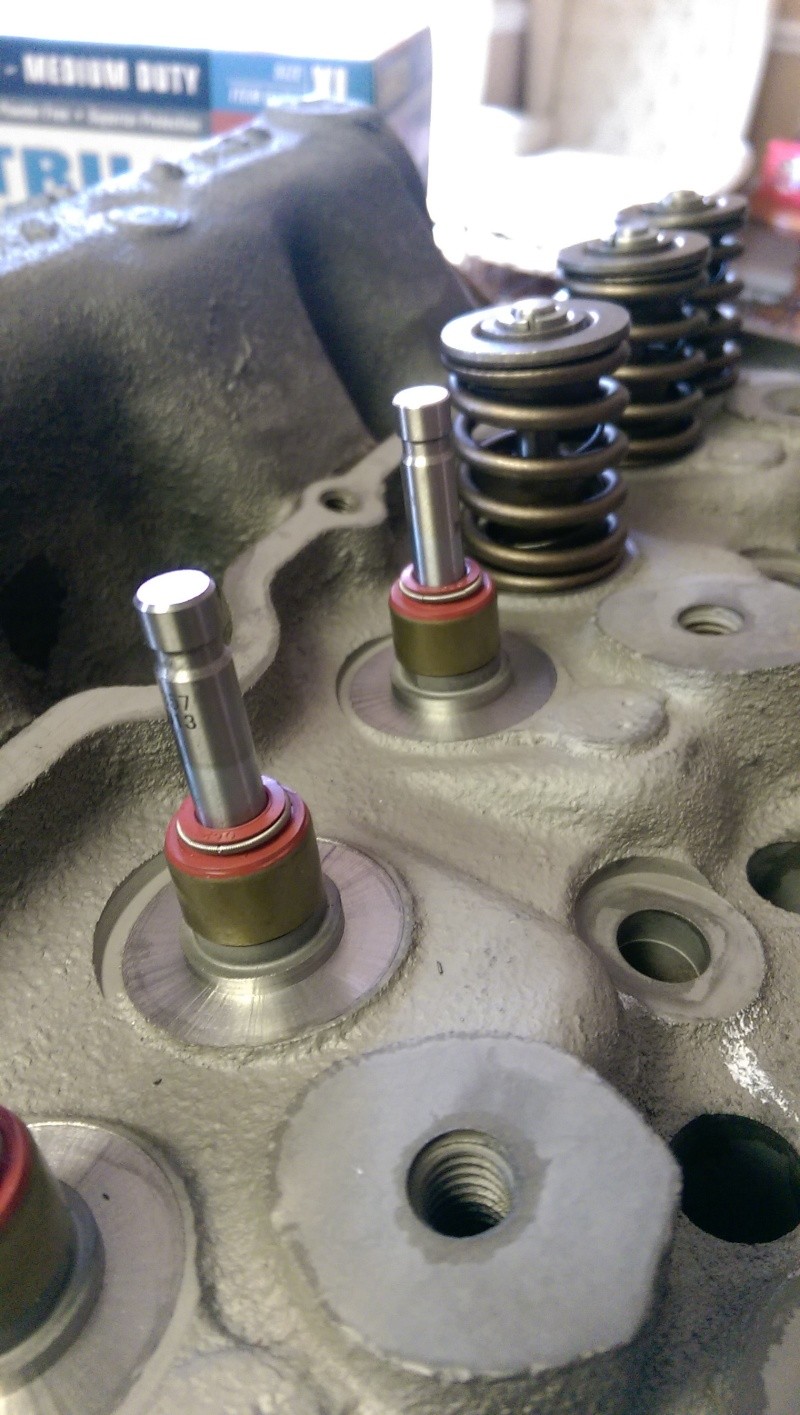
    Valve guide bosses cut to .530 for positive seals
    Valve spring seats cut
    Clay Smith dampened valve springs
    Rebuilt adjustable rocker arms & shaft
    160 degree thermostat
    Victor Reinz Head Gasket - .042 compressed thickness

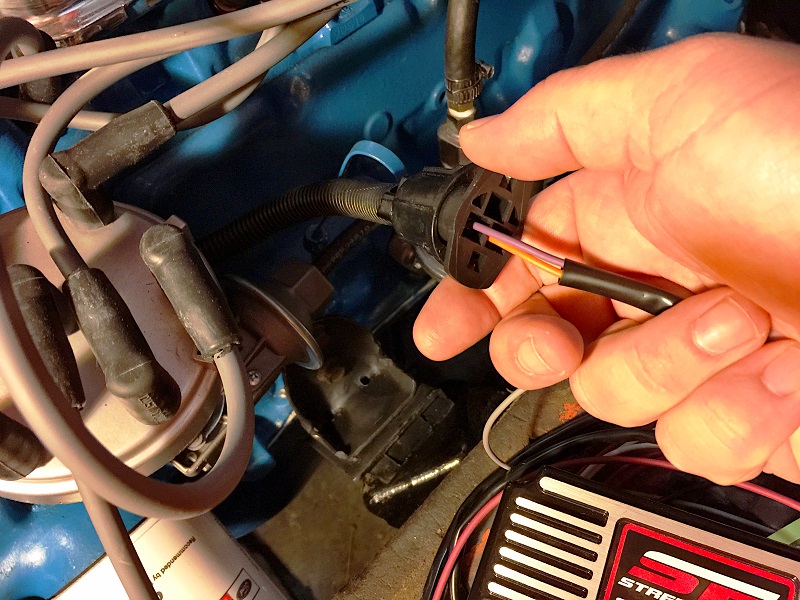
    Duraspark II distributor re-curved for full advance @ 1800 RPM
    Pertronix 45,000 volt, 0.6 Ohm coil
    4 wire GM HEI Module

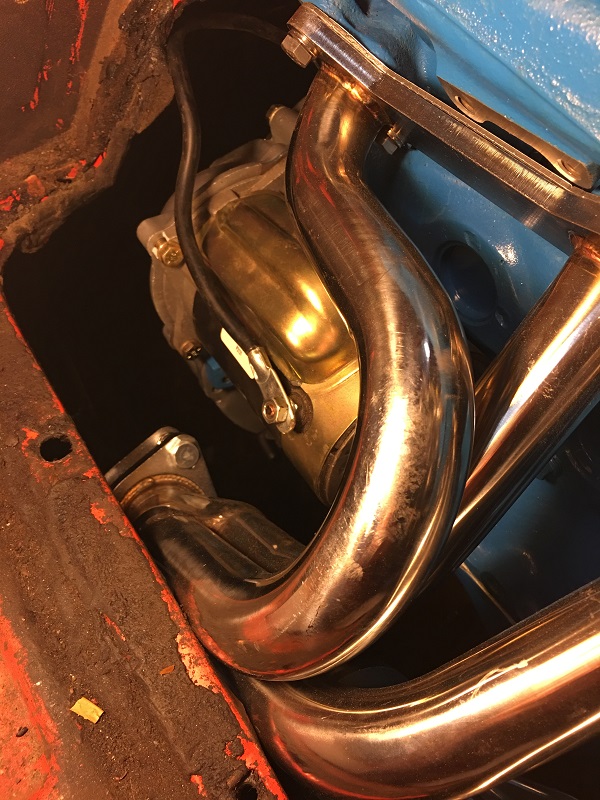
    6 – 2 Polished Stainless Steel Header

    Holley 5200 (weber 32/36 clone)

    Paper Stats:  ~9.8 static compression / ~8.2 dynamic compression
    Seth G
    Seth G
    Vintage-Vans Listings Manager
    Vintage-Vans Listings Manager


    Number of posts : 2086
    Location : Anacortes, WA
    Age : 50
    Registration date : 2013-04-24

    My 200 Build! Empty Re: My 200 Build!

    Post by Seth G Tue Apr 14, 2015 12:14 pm

    Nice build Das! Should be a big improvement! Are you using a 1v/2v adapter for the Weber? Standard valve sizes or did you up the exhaust valve size?
    Das Boot
    Das Boot


    Number of posts : 76
    Location : Spartanburg, SC
    Registration date : 2013-01-29

    My 200 Build! Empty Re: My 200 Build!

    Post by Das Boot Tue Apr 14, 2015 12:48 pm

    Thanks, Seth!  I haven't gotten it yet, but yes, I plan on using an adapter.  It will be the one from Classic Inlines.  I wasn't brave enough or could find a machine shop that would cut the intake.  I did think it through though, came up with a jig - but that's another story.  The main hurdle for me is how thin the intake is on the backside where the EGR valve mounts.  I was afraid that I wouldn't have a lot to work with after cutting it level with the engine.  In the end I decided to run it as-is and change it later if it was problem.

    As far as the valve sizes, they are stock. The shop I bought it from had rebuilt it before I picked it up. All I wanted at the time was .050 cut from it, but since they went to all the trouble of finding new valves, etc... I stuck with them.
    playnpossum
    playnpossum


    Number of posts : 115
    Location : spartanburg sc
    Registration date : 2014-02-17

    My 200 Build! Empty Re: My 200 Build!

    Post by playnpossum Tue Apr 14, 2015 1:06 pm

    Looks good Brian! Came by your house the other day..when do you plan to set it back in?
    Das Boot
    Das Boot


    Number of posts : 76
    Location : Spartanburg, SC
    Registration date : 2013-01-29

    My 200 Build! Empty Re: My 200 Build!

    Post by Das Boot Tue Apr 14, 2015 2:40 pm

    Thanks Rick!  I've got to steal a few things off the 170 that's in the truck right now.  The starter, flywheel, a few other odds and ends.  That's going to add some time to the swap. All in all, I'd say it's going to take 2 to 3 weeks given the premium on spare time before I get it back in and running.  Hopefully it will be awesome when it does!

    BTW, I do need to come by and visit - it's been a while!  Maybe you'll let me drive your van again and throw empty beer cans in my front yard as we ride by! Very Happy Wow! It's hard to believe it has been almost a year and half since I've driven the truck.  I really need to get it running again!
    Seth G
    Seth G
    Vintage-Vans Listings Manager
    Vintage-Vans Listings Manager


    Number of posts : 2086
    Location : Anacortes, WA
    Age : 50
    Registration date : 2013-04-24

    My 200 Build! Empty Re: My 200 Build!

    Post by Seth G Tue Apr 14, 2015 10:25 pm

    I know what you mean about it being really thin/too thin if you were to level it off. I've been contemplating that as well.
    Das Boot
    Das Boot


    Number of posts : 76
    Location : Spartanburg, SC
    Registration date : 2013-01-29

    My 200 Build! Empty Re: My 200 Build!

    Post by Das Boot Sun Apr 19, 2015 10:55 am

    Here's a little more I got to do recently.  Oil pump and pan along with the header.  It's coming along pretty good.  Seth, this shot shows that EGR valve port real well.  I haven't researched it, but I imagine cutting that intake would open up a can of cobras.
    My 200 Build! Imag1014
    Das Boot
    Das Boot


    Number of posts : 76
    Location : Spartanburg, SC
    Registration date : 2013-01-29

    My 200 Build! Empty Re: My 200 Build!

    Post by Das Boot Mon Oct 19, 2015 8:02 pm

    Just an update.. The engine is done and in the truck...  It has taken a while with vacations and life in general.  I was able to to take my son up up to Tim's part of the country, make a weekend out of it and spent a day at King's Island, and come back with a 9".  I haven't started it yet - hopefully this weekend.  Still to do is to fab a spacer / shroud for the fan and radiator.  Also is to cobble some make-shift wiring for it to start and run.  Since the last post, I added a Holley 5200 with added manual choke linkage (yes I wanted to keep the knob functional - call me an idiot).  I also went with a one-wire Delco 10si, 110 amp alternator.  The rest is the usual stuff - pulleys, fuel pump, etc...  I have also got the clutch disc resurfaced locally and bought a pressure plate for a Falcon.  Of course I replaced the bearings too.  Anyways, I hope to be posting a video the ole girl running after this weekend!

    -Brian


    My 200 Build! Img_0411

    My 200 Build! Img_0610

    My 200 Build! Img_0611

    My 200 Build! Img_0612

    My 200 Build! Img_0613

    My 200 Build! Img_0710
    Magic Bus
    Magic Bus


    Number of posts : 1422
    Location : -Gateway to the West - St Louis Missouri
    Registration date : 2009-12-02

    My 200 Build! Empty Re: My 200 Build!

    Post by Magic Bus Mon Oct 19, 2015 8:41 pm

    Even if it runs lousy it shoar looks Purdy! Very Happy
    Seth G
    Seth G
    Vintage-Vans Listings Manager
    Vintage-Vans Listings Manager


    Number of posts : 2086
    Location : Anacortes, WA
    Age : 50
    Registration date : 2013-04-24

    My 200 Build! Empty Re: My 200 Build!

    Post by Seth G Tue Oct 20, 2015 10:23 pm

    Nice!!! Wish I could be there when you fire her up
    Smile

    Is that the Classic Inlines header or the one off ebay? Looks like it would clear my low starter

    Use a good break in oil, like Joe Gibbs or whatever or at least an additive and then a good street mineral oil high in zddp

    I'm going to switch to synthetic after the 500 mile oil change, but still with the zinc-phos
    FIZGIG
    FIZGIG


    Number of posts : 334
    Location : Lynnwood, WA
    Registration date : 2014-01-23

    My 200 Build! Empty Re: My 200 Build!

    Post by FIZGIG Wed Oct 21, 2015 9:36 am

    Hell Yeah That thing is looking sweet!!!!!
    FIZGIG
    FIZGIG


    Number of posts : 334
    Location : Lynnwood, WA
    Registration date : 2014-01-23

    My 200 Build! Empty Re: My 200 Build!

    Post by FIZGIG Wed Oct 21, 2015 9:37 am

    I wanna see your distributor set up cause I think that is what my ePUP problem is right now. POST more pics
    Das Boot
    Das Boot


    Number of posts : 76
    Location : Spartanburg, SC
    Registration date : 2013-01-29

    My 200 Build! Empty Re: My 200 Build!

    Post by Das Boot Wed Oct 21, 2015 11:25 am

    Thanks, Seth! You may not want to be here when I fire it up! I keep wondering what else can go wrong with this build. As far as the headers, they are the eBay variety. You should have plenty of room for a low starter, but I will say they hug the dog house opening pretty close. I will probably notch a section out the floor and dog house to give them some space. I'm wanting to insulate it the best I can. As far as break in oil, I'm going to use some non-detergent 30 and some Redline ZDDP additive. I plan to do the 20 minute break in @ ~2,000 RPM then let it idle and adjust out the carb and timing. After that I'll change the oil and filter again along with another bottle of Redline for the first 500 miles. Beyond that... I haven't thought that far ahead yet.

    FIZGIG, thanks! I'll try to grab a few pictures when I get home tonight. What are you wanting pictures of? I'll do my best.

    -Brian
    whalemstr
    whalemstr


    Number of posts : 248
    Location : Corning, California
    Registration date : 2012-06-27

    My 200 Build! Empty Re: My 200 Build!

    Post by whalemstr Wed Oct 21, 2015 1:26 pm

    Beautiful!!!

    other than being slanted the wrong way!!! LOL
    Das Boot
    Das Boot


    Number of posts : 76
    Location : Spartanburg, SC
    Registration date : 2013-01-29

    My 200 Build! Empty Re: My 200 Build!

    Post by Das Boot Wed Oct 21, 2015 4:51 pm

    FIZGIG,
    Here's the distributor.  It's not really wired up at the moment, but it really isn't much different than wiring up an audio amplifier.  Clean power source, good ground, switched power, etc...  Maybe a 15 minute job setting up.  I ended up going with the MSD Street Fire which is a daily driver version of the 6AL.  The distributor is Duraspark II which I re-curved with a new spring and a little bending here and there.  It's supposed to be fully advanced at 1,800 RPM.  The coil is a Pertronix 0.5 ohm 45,000 volt which you can't see here.  MSD also offers an OEM harness to connect to the distributor which I got that makes it nice and clean.  I'm not sure what else I can help you with, but this is pretty much the ignition system.

    Whlemstr, Thanks!  A guy I work with is currently rebuilding a slant.  What a different animal that is!  The pistons look like beer cans and he's got a guy fabing a pair of 3 to 1 headers for it.  The head too can be shaved a mile and a half...  What a different world!

    My 200 Build! Dizzy110

    My 200 Build! Dizzy211
    .
    Seth G
    Seth G
    Vintage-Vans Listings Manager
    Vintage-Vans Listings Manager


    Number of posts : 2086
    Location : Anacortes, WA
    Age : 50
    Registration date : 2013-04-24

    My 200 Build! Empty Re: My 200 Build!

    Post by Seth G Sun Nov 01, 2015 7:55 pm

    Could you do me a favor? I'd like to know what the measurement is from the flat of the block to the inside edge of the header outlet spout and same to the inside edge of the outlet flange. That would help me out, if it's not to much trouble. Thanks.

    -Seth
    uante
    uante


    Number of posts : 1466
    Location : Tempe, Arizona
    Age : 61
    Registration date : 2014-01-26

    My 200 Build! Empty Re: My 200 Build!

    Post by uante Mon Nov 02, 2015 6:44 am

    Very Nice Das! I'd love to have time, knowledge, space, tools, and the money to rebuild mine Razz
    Das Boot
    Das Boot


    Number of posts : 76
    Location : Spartanburg, SC
    Registration date : 2013-01-29

    My 200 Build! Empty Re: My 200 Build!

    Post by Das Boot Mon Nov 02, 2015 10:12 am

    Uante, thanks...  Your van is looking good, far better than what I could pull off.

    Seth, I'm guessing your wanting measurements for the low mount starter.  I'll try to get them tonight when I get home.  Just a heads up, those headers will hit the opening of the dog house once the engine is leveled.  

    In the meantime, I made a fan shroud that doubles as a spacer out of 1" flat bar, 1" square tubing and some sheet metal.  I did have to go back and add a little more space with some washers, but it turned out pretty good.  The fan does a good job pulling air from the corners on the radiator which is the purpose.  I also used Summit's metal radiator hose kit.  I wasn't blown away by it and it did do what I wanted to, but I still have to run the engine.  I will know then if I'm going to keep it.  I have a feeling it is going to leak.  That's where I am right now.  It should be blowing smoke soon.

    -Brian

    My 200 Build! Img_0711

    My 200 Build! Img_0712

    My 200 Build! Img_0713

    My 200 Build! Img_0714

    My 200 Build! Img_0715
    FIZGIG
    FIZGIG


    Number of posts : 334
    Location : Lynnwood, WA
    Registration date : 2014-01-23

    My 200 Build! Empty Re: My 200 Build!

    Post by FIZGIG Mon Nov 02, 2015 10:17 am

    That looks great!!!!
    Das Boot
    Das Boot


    Number of posts : 76
    Location : Spartanburg, SC
    Registration date : 2013-01-29

    My 200 Build! Empty Re: My 200 Build!

    Post by Das Boot Tue Nov 03, 2015 9:19 am

    Seth,
    I didn't have a lot of time last night, but I did go out to measure.  I couldn't do it with the starter on.  I took some pictures, maybe that will help? Thanks FIZGIG!

    -Brian

    My 200 Build! Img_0310

    My 200 Build! Img_0311
    vanny
    vanny
    Moderator


    Number of posts : 14775
    Location : Ashburnham, MA
    Age : 65
    Registration date : 2012-09-22

    My 200 Build! Empty Re: My 200 Build!

    Post by vanny Tue Nov 03, 2015 1:39 pm

    Like you said, a little snug... Probably a Good idea to give it a little breathing room! That's one Fantastic looking engine and rad!!! cheers


    _________________
    “The future will soon be a thing of the past."

    http://public.fotki.com/Vintage-Vans/vintage-vans-es/ruff-diamond-1/?cmd=fs_slideshow
    Seth G
    Seth G
    Vintage-Vans Listings Manager
    Vintage-Vans Listings Manager


    Number of posts : 2086
    Location : Anacortes, WA
    Age : 50
    Registration date : 2013-04-24

    My 200 Build! Empty Re: My 200 Build!

    Post by Seth G Wed Nov 04, 2015 12:50 pm

    Thanks Brian. That does help. I think the extra 1 1/2" upward on the 250 will help clear the starter. I swear that's the same header classic inlines had made, but I wonder if he ever actually checked it on a low mount starter 200 like stanyon installed in his pickup or if they just checked it on a 250(FIZGIG's 250! lol Smile).

    This link shows what he did to give the headers some clearance with the doghouse.
    https://vintage-vans.forumotion.com/t36914p45-started-on-65-truck

    Build is looking good! Fire in the hole!!!!!!!!! Very Happy
    Das Boot
    Das Boot


    Number of posts : 76
    Location : Spartanburg, SC
    Registration date : 2013-01-29

    My 200 Build! Empty Re: My 200 Build!

    Post by Das Boot Tue Dec 01, 2015 11:39 am

    So I finally got around to firing it up!  It runs pretty good (surprised) - it needs a little valve adjustment and the carburetor needs a little tweaking too.  Here's a few pictures and a video.  I call the test rig - death by spaghetti.  BTW - those metal coolant hoses suck.  Five minutes into breaking the cam in and the hose pops off.  Got coolant all over everything.  I went back with a flex hose.  Works like it should - going to do it to the bottom hose before it's drivable.

    My 200 Build! Img_0410

    My 200 Build! Img_0411


    .
    Seth G
    Seth G
    Vintage-Vans Listings Manager
    Vintage-Vans Listings Manager


    Number of posts : 2086
    Location : Anacortes, WA
    Age : 50
    Registration date : 2013-04-24

    My 200 Build! Empty Re: My 200 Build!

    Post by Seth G Tue Dec 01, 2015 12:55 pm

    Nice
    Big W
    Big W


    Number of posts : 3282
    Location : Saskatoon,Sask,Canada
    Age : 60
    Registration date : 2011-01-13

    My 200 Build! Empty Re: My 200 Build!

    Post by Big W Tue Dec 01, 2015 7:21 pm

    sounds great.

    Sponsored content


    My 200 Build! Empty Re: My 200 Build!

    Post by Sponsored content


      Current date/time is Sun May 19, 2024 3:07 am