


Looks Great to Me! Nice work!
+11
FIZGIG
66mnecotruck
Seth G
dix
rickland
EcoPU
vanny
Big W
Magic Bus
G-Man
stanyon
15 posters
Started on 65 Truck

vanny- Moderator
- Number of posts : 14775
Location : Ashburnham, MA
Age : 65
Registration date : 2012-09-22
_________________
“The future will soon be a thing of the past."
http://public.fotki.com/Vintage-Vans/vintage-vans-es/ruff-diamond-1/?cmd=fs_slideshow

stanyon- Number of posts : 147
Location : Spokane, WA.
Registration date : 2013-08-29
Now that the engine is done I felt I needed to see what the total cash flow was. I got parts from a local Pull&Save when possible and shopped for the rest,
Complete 200 Six from 1981 Zephyr $163.73
New silvolite 1100 pistons $177.07
Oil Pump, Con-Rod bearings, Main bearings
Valve lifters, Ring set, Engine Gasket set $354.72
Cam & adjustable gearset & timing chain $290.92
Block bored, mains line bored along with cam
bearings, new pistons hung, all spinning parts
balanced, crank polished, Deck shaved .020
( could have gone .030 safely) $550.00
Misc. Stones for porting and relieving the Head $ 22.13
Head shaved .060, exhaust flange milled, new
valves with 4.0L springs & retainers set at 75#
3 way cut on valves, exhaust valves not back
cut, & new hardened seats. $363.00
Second cylinder head for the one I ruined $ 27.52
Like the Add says I could have had a V8, but
then know I will stick with the SIX.
TOTAL $1954.09
Old Skool- Econoline Guru
- Number of posts : 1306
Location : North Hills, CA
Age : 72
Registration date : 2009-06-13
Man that is a nice looking start!! Wishing my new purchase was next to yours and going also,,,, envious as little time for my own anymore.... Hopiing though,,,,,,,
I used to do a lot of welding on cylinder heads,,, and for what you are doing and going through I would opt for the bigger log head for sure. BEFORE I learned how to weld them up,, I remember that ill fated sound from across the shop a half hour later,,,,, it was more like a cracking pop as the cast iron told me my beautiful repair was junk,,,, LOL... cast iron is a lot of work to weld, even with the new rods. Pre heating the hole thing in the barbecue for half the day and then back into a HOT sand bank. Even the new rod for welding cast iron,,, between all of that and the smaller log,,,,, JUNK IT and be more careful on the new larger log head...
Building a six up can be fun but there comes a point of should I just put in a V8,, LOL...== Get the larger log head and an adapter for a good Weber, headers and a mild cam..... DONT FORGET adjustable rockers at the least. I just happen to have some for sale,,, LOL..
Anyways,,, IMO: I have built a few trucks and still building some here. I just also picked up a Spring Special with a good running 200 in it also..... My thinking,, as much time as it takes to detail and clean the underside,,, I will be taking this one apart,, ALL THE WAY,, and it goes right up to the sand blaster for the underside. All the glass out and all stripped. For $250 bucks they will blast it sparkling clean underneath. Immediate paint with Bullet paint. I have tried blasting and cleaning with everything you can think of,, and it was always more expensive in time and materials in the long run,,,, Just my thinking,, SO,,, plans are ASAP,,,, its gonna come apart,,,, dratzzzzzz
vic
Old Skool- Econoline Guru
- Number of posts : 1306
Location : North Hills, CA
Age : 72
Registration date : 2009-06-13
DUMMY,,,,,,,,,,,,,,,,,,,,,,,,,,,,,,,,,,,,,,,,,blipped through the pics and looking at the rocker shaft and the motor,,,, NICE!!!!!!!!!!!!!!!! go get em,,,,,
Vic
Vic
Old Skool- Econoline Guru
- Number of posts : 1306
Location : North Hills, CA
Age : 72
Registration date : 2009-06-13
Dummy was meant at ME,,,,
vic
vic
Old Skool- Econoline Guru
- Number of posts : 1306
Location : North Hills, CA
Age : 72
Registration date : 2009-06-13
Here is Ted's email,,, tell the him I said his truck only goes fast down a hill,,, LOL,,,
vic
ted@for-d.com
vic
ted@for-d.com
stanyon- Number of posts : 147
Location : Spokane, WA.
Registration date : 2013-08-29
I am in full agreement with old school about sand blasting. I don't even like to think about the hours underneath the truck cleaning it, and then the time I have spent on the cab interior and box interior
cleaning it just so it would accept paint. There have been posts about the left overs sand and paint particles when blasting, but you also have a lot of dust from sanding, not to mention sore and cut fingers trying to reach in to those small corners. Any way you go, a good methodical cleaning of every thing is needed before final painting. If I ever do another one it will be dipped or blasted, no question.
cleaning it just so it would accept paint. There have been posts about the left overs sand and paint particles when blasting, but you also have a lot of dust from sanding, not to mention sore and cut fingers trying to reach in to those small corners. Any way you go, a good methodical cleaning of every thing is needed before final painting. If I ever do another one it will be dipped or blasted, no question.
Seth G- Vintage-Vans Listings Manager

- Number of posts : 2086
Location : Anacortes, WA
Age : 50
Registration date : 2013-04-24
Looks like progress! That thing is going to be awesome with the port work, milling and 2-barrel mod you've done  What cam did you end up going with? Btw I like the brighter ford blue color, I'm using it to.
stanyon- Number of posts : 147
Location : Spokane, WA.
Registration date : 2013-08-29
Things have been slow here the last couple of months. Strange, all winter long I kept saying as soon as it warmed up I was really going to get this project moving then it warms up and other needs get jammed into the mix. Anyway got the dust and grit all vacuumed out and then a good blow with air to get the stubborn particles out. I coated all of the surrounding area with some POR-15 & then re-Sealed all the seams that I could get to. The fifty year old stuff was cracking and in some places gone. I used a Multi Tool to cut out any loose material first.
https://s22.photobucket.com/user/poorvanner/library/Vanning/2014%20Van%20Nats
https://s22.photobucket.com/user/poorvanner/library/Vanning/2014%20Van%20Nats
https://s22.photobucket.com/user/poorvanner/library/Vanning/2014%20Van%20Nats
https://s22.photobucket.com/user/poorvanner/library/Vanning/2014%20Van%20Nats
Seth G- Vintage-Vans Listings Manager
- Number of posts : 2086
Location : Anacortes, WA
Age : 50
Registration date : 2013-04-24
I know what you mean, I have to nibble at mine when I get a chance between all the summer stuff, kids, family, concerts ect.
stanyon- Number of posts : 147
Location : Spokane, WA.
Registration date : 2013-08-29
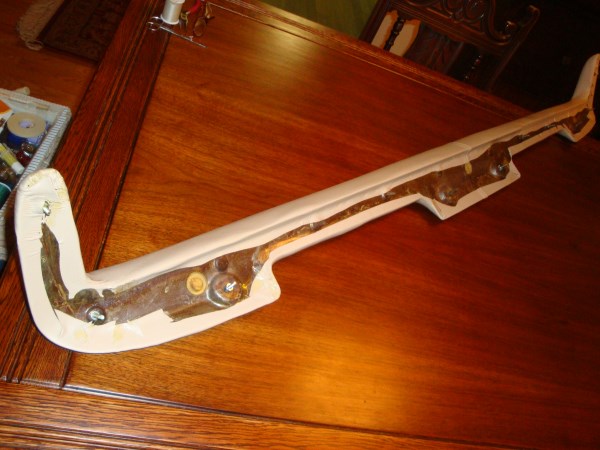
Havent been very good about posting updates, but I am making progress. I gat a Dash Pad at our local Pick&Save and in the process of removing it, broke off ten of the twelve bolts that secure the pad to the main dash. The Vinyl covering had multiple cracks and was really brittle so it has to come apart to replace the broken bolts. Using a heat gun on low and two hours of slowly peeling I got the Vinyl off with very little damage to the underlying foam. Removed the foam and replaced the broken securing bolts, replaced the foam and then onto recovering the pad. This took about four hours to stretch the new vinyl onto the pad.
If you are going to do this, get a vinyl that was a stretching ability in both directions, Use a good quality Contact cement, & double coat of cement on the Vinyl. These are just my recommendations,


[url=https://servimg.com/view/18526914/71][img]http://i38." />
If you are going to do this, get a vinyl that was a stretching ability in both directions, Use a good quality Contact cement, & double coat of cement on the Vinyl. These are just my recommendations,
[url=https://servimg.com/view/18526914/71][img]http://i38." />
vanny- Moderator
- Number of posts : 14775
Location : Ashburnham, MA
Age : 65
Registration date : 2012-09-22
Looks like all your hard work paid off!!! Looks Great!
_________________
“The future will soon be a thing of the past."
http://public.fotki.com/Vintage-Vans/vintage-vans-es/ruff-diamond-1/?cmd=fs_slideshow

Big W- Number of posts : 3282
Location : Saskatoon,Sask,Canada
Age : 60
Registration date : 2011-01-13
Damn..that turned out nice. What did you use to replace the broken bolts...any pics of the under side damage without the vinyl? Just curious as I have never seen the under side of one of these.
stanyon- Number of posts : 147
Location : Spokane, WA.
Registration date : 2013-08-29
Sorry about know before pictures, I seem to get started and then after completing a project I wonder why I didn't take pictures before I got stared. The bolts were replaced by some I bought off a Local Hardware stores rack, I had to drill out the old ones on the Dash Pad metal frame as the are welded on and then tack welded the new ones in place.

 " />
" />
[url=https://servimg.com/view/18526914/75][img]http://i38
" />[url=https://servimg.com/view/18526914/75][img]http://i38
Big W- Number of posts : 3282
Location : Saskatoon,Sask,Canada
Age : 60
Registration date : 2011-01-13
Oh wow.. there's a metal frame in there? Huh! I thought they were made of some kind of wood type substance covered in vinyl with holes drilled into it for some kind of nut insert. Learn something new on this site almost everyday. Thanks for posting pics. Saved them to file for later dash pad removal.

cali2chitown- Number of posts : 188
Location : Crown Point Indiana
Registration date : 2014-03-14
WOW, Very nice work stanyon! I have 2 dash pads one with the studs and the other without. I took the one with the broken studs to a interior shop and he said he couldn't do it and the person that could would charge me $$$$$! I just peeled the vinyl back slowly but most just cracked and broke off. Then I used a thin putty knife to separate the foam from the metal which came off pretty easy. I put a thin cutoff wheel on a die grinder and ground the heads of the studs out and found some copper coated steel studs and tacked them on. I can't doo what you did with the pad though lol. Any fastener shop sells weld studs Big W just make sure they are steel and not aluminum or anything else.
stanyon- Number of posts : 147
Location : Spokane, WA.
Registration date : 2013-08-29
Thanks for the positive feed back, Cali2 don't be afraid to do your own covering of the Dash. I checked with a local upholstery shop and they quoted me $225.00 plus materials if I had the sub frame clean and ready to go. Keep the Vinyl warm and do the inside corners and adjoining faces first. I seamed the vinyl in the middle so I could get by with only paying far one yard of material rather then two yards which would have allowed enough length to go seamless.
stanyon- Number of posts : 147
Location : Spokane, WA.
Registration date : 2013-08-29
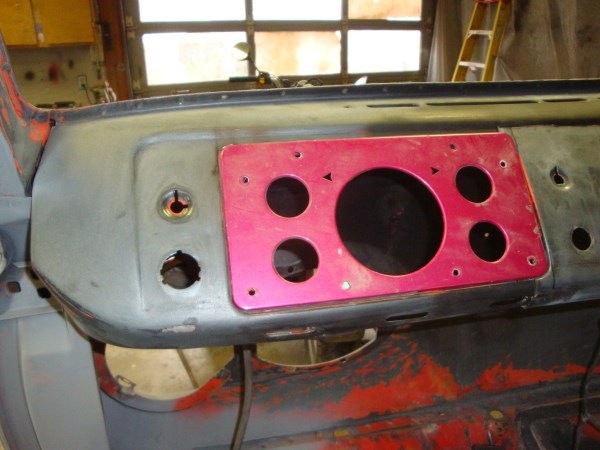
Above is the Dash originally, and I felt the need for a Tach as well as larger gauges that would help compensate for my failing eyes. The cluster I used came out of a 1980 Mustang that had a 200 engine in it.

I took a section out of a dash at the Pick&Pull, center of the cluster opening and over to the left side of the ash tray. Then I cut my dash out from the far right edge of the cluster opening and over to the right side of the ash tray opening.

This made the opening large enough for the Mustang cluster and only lost the ash tray.
stanyon- Number of posts : 147
Location : Spokane, WA.
Registration date : 2013-08-29
After some finishing work and paint I went to a local tin shop and got a piece of 3/16 aluminum to cover the face of the gauges. Took a couple of hours to get the access holes done, Made a pattern out of a cereal box first.

With the cluster in Place and the Dash pad in temporarily now time to start chasing the wiring.

With the cluster in Place and the Dash pad in temporarily now time to start chasing the wiring.

Bruce67Econoline- Number of posts : 809
Location : Charleston SC
Registration date : 2014-01-25
Major props to you Stanyon! 
vanny- Moderator
- Number of posts : 14775
Location : Ashburnham, MA
Age : 65
Registration date : 2012-09-22
Stayon, you've got me baffled. (Doesn't take much!) Is the width of the opening wider than the original? What's messing with my mind is that the ignition and light switches, etc, look like they're the same distance from the cluster as they were before but the cluster looks much wider than the original. Now there's four holes underneath the cluster on the bottom of the dash and in the first pic there were only three.
_________________
“The future will soon be a thing of the past."
http://public.fotki.com/Vintage-Vans/vintage-vans-es/ruff-diamond-1/?cmd=fs_slideshow
Old Skool- Econoline Guru
- Number of posts : 1306
Location : North Hills, CA
Age : 72
Registration date : 2009-06-13
BIGGER is better. The best combo would be to shave a 250 head and put adjustable rockers on it. HUGE intake, will take the Weber nicely. ALWAYS switch over to adjustables rockers IMO!!!!!!!! Past owner of an automotive machine shop, and you will never be able to get the valves adjusted as well with non adjustables,,,
I don't see any mention of letting the exhaust out better other than porting,, LOL.... IF you are going to do all of that work to make it go better why would you keep it all stuffed up with a stock exhaust manifold and not let it out also??????????????
Old Skool
I don't see any mention of letting the exhaust out better other than porting,, LOL.... IF you are going to do all of that work to make it go better why would you keep it all stuffed up with a stock exhaust manifold and not let it out also??????????????
Old Skool
stanyon- Number of posts : 147
Location : Spokane, WA.
Registration date : 2013-08-29
Vanny, yes the opening is wider to make room for the Mustang Cluster, looking at the last picture with the dash pad and gauge cluster notice the absence of the ash tray. I will measure tomorrow to see just how much wider it is.
vanny- Moderator
- Number of posts : 14775
Location : Ashburnham, MA
Age : 65
Registration date : 2012-09-22
Thank you!
_________________
“The future will soon be a thing of the past."
http://public.fotki.com/Vintage-Vans/vintage-vans-es/ruff-diamond-1/?cmd=fs_slideshow
Seth G- Vintage-Vans Listings Manager
- Number of posts : 2086
Location : Anacortes, WA
Age : 50
Registration date : 2013-04-24
That looks incredible! I love the color to. I'm kind of with vanny, what you did with that opening was requiring a double take or more. Did you cut and move the right end down and then weld in pieces in the middle and a seam on the right? Whatever you did, that cluster install is awesome.


|
|
|