VintAGE-Vans

Would you like to react to this message? Create an account in a few clicks or log in to continue.

BRINGING IT ALL TOGETHER.... A's, G's & E's


+2
donivan65
Scott
6 posters

    G Van Swaybar

    Scott
    Scott


    Number of posts : 1651
    Location : Anoka, MN
    Age : 54
    Registration date : 2008-05-20

    G Van Swaybar Empty G Van Swaybar

    Post by Scott Wed Sep 14, 2016 3:29 pm

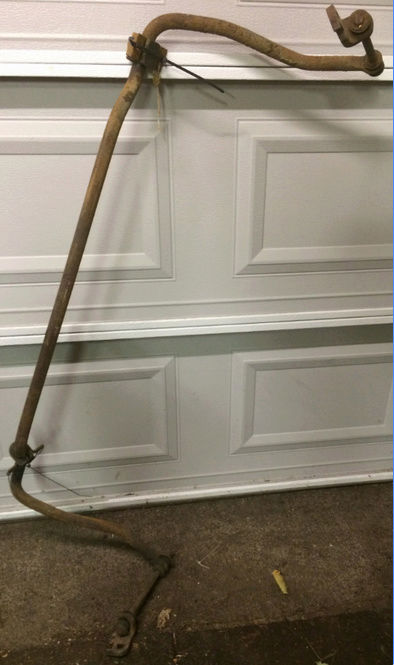
    It's time for me to get this Swaybar from the back of the garage and get it on the 68 G1500 where it goes. I bought from a guy that parted out his 67 G10.

    While I'm blasting the rust off and painting it I would like to have the replacement bushings on the way.

    Do any of y'all have the part numbers that I need to get the bushings ordered?

    And Donivan, can you re-post the images you have of mounting a Swaybar on vans that have a disc brake conversion.


    G Van Swaybar Swayba11
    donivan65
    donivan65
    Governor
    Governor


    Number of posts : 12245
    Location : San Diego, California
    Registration date : 2008-05-12

    G Van Swaybar Empty Re: G Van Swaybar

    Post by donivan65 Thu Sep 15, 2016 1:52 pm

    well to begin with, the dual line master cylinder is the problem,,,,,,,on our 1st Gens, we have a shorter single line master cylinder tucked up into the frame, so a straight bar sway bar just bolts to the frame, clearing the master cylinder,,,,,however when we put a dual line master cylinder on it,,it hits that sway bar,,,,,,but 2nd Gens come with dual line master cylinders and they put a loop in the sway bar to clear that master cylinder,,,,,,so you can be factory,,,,,,if you wanted to use a 1st Gen sway bar on a !st Gen and you put a dual line master cylinder on it,,,,you can use a 2nd Gen sway bar or put some 2" blocks on it to move it away from the frame to clear that dual master cylinder,,,,,,


    G Van Swaybar Dscn9140


    G Van Swaybar Dscn9139


    G Van Swaybar Dscn9141
    donivan65
    donivan65
    Governor
    Governor


    Number of posts : 12245
    Location : San Diego, California
    Registration date : 2008-05-12

    G Van Swaybar Empty Re: G Van Swaybar

    Post by donivan65 Thu Sep 15, 2016 2:05 pm

    G Van Swaybar Swayba10
    Scott
    Scott


    Number of posts : 1651
    Location : Anoka, MN
    Age : 54
    Registration date : 2008-05-20

    G Van Swaybar Empty Re: G Van Swaybar

    Post by Scott Thu Sep 15, 2016 5:09 pm

    Awesome, thank you Donivan..

    I'm finding the bushings are easy enough to track down, so no problems there.
    donivan65
    donivan65
    Governor
    Governor


    Number of posts : 12245
    Location : San Diego, California
    Registration date : 2008-05-12

    G Van Swaybar Empty Re: G Van Swaybar

    Post by donivan65 Fri Sep 16, 2016 1:27 pm

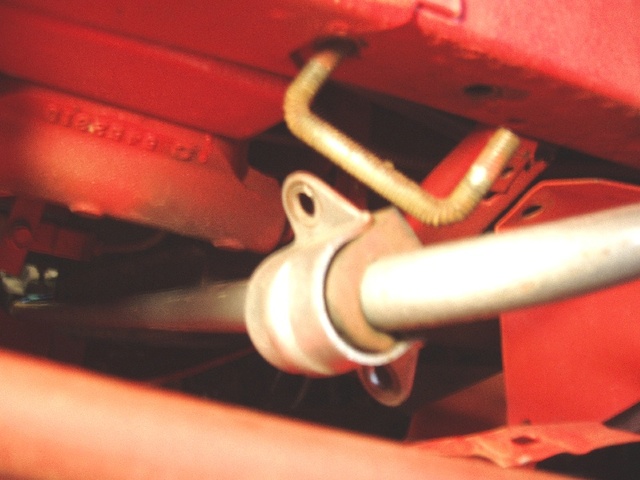
    let me know if your van aint set up to mount these bushings on the frame,,,,,,


    G Van Swaybar Swaze10
    Scott
    Scott


    Number of posts : 1651
    Location : Anoka, MN
    Age : 54
    Registration date : 2008-05-20

    G Van Swaybar Empty Re: G Van Swaybar

    Post by Scott Sun Sep 18, 2016 9:02 pm

    Nope, I don't have the mount holes for those bushings..

    I take it you have a plan for that too?
    donivan65
    donivan65
    Governor
    Governor


    Number of posts : 12245
    Location : San Diego, California
    Registration date : 2008-05-12

    G Van Swaybar Empty Re: G Van Swaybar

    Post by donivan65 Sun Sep 18, 2016 9:58 pm

    After marking and drilling holes for the bushings, I bent a piece of threaded rod and stuck it up, over and down through those holes and mounted the bushings to the frame,,,,,on Jackes radiator crossmember, I welded 2 bolts to a plate then pulled it down into the holes with a wire,,,,,through either  from the end of the frame or a hole in it,,,,,


    G Van Swaybar Sway_b10


    G Van Swaybar Gmc_ja10


    G Van Swaybar Gmc_ja11
    Scott
    Scott


    Number of posts : 1651
    Location : Anoka, MN
    Age : 54
    Registration date : 2008-05-20

    G Van Swaybar Empty Re: G Van Swaybar

    Post by Scott Mon Sep 19, 2016 6:23 pm

    Thank you Donivan, I'll post my results once I get it all together.
    Vantasia
    Vantasia


    Number of posts : 1412
    Location : New Jersey
    Age : 70
    Registration date : 2013-08-18

    G Van Swaybar Empty Re: G Van Swaybar

    Post by Vantasia Tue Sep 20, 2016 6:27 am

    donivan65 wrote:After marking and drilling holes for the bushings, I bent a piece of threaded rod and stuck it up, over and down through those holes and mounted the bushings to the frame,,,,,on Jackes radiator crossmember, I welded 2 bolts to a plate then pulled it down into the holes with a wire,,,,,through either  from the end of the frame or a hole in it,,,,,


    G Van Swaybar Sway_b10


    G Van Swaybar Gmc_ja10


    G Van Swaybar Gmc_ja11

    A lot of trailer hitch kits for jeeps, pickups, etc. come with bolts attached to long thin metal straps that you feed through the oval openings in the side of the frame to reach the mounting holes, just like you did! This is also handy for bumper brackets and other mounts to any box channel frames or other hard to reach spots.  My Jeep side step kit came with the similar U-bolts to mount them to the bottom of the frame....Our hands and fingers weren't designed to go everywhere as hard as we may try! LOL
    Scott
    Scott


    Number of posts : 1651
    Location : Anoka, MN
    Age : 54
    Registration date : 2008-05-20

    G Van Swaybar Empty Re: G Van Swaybar

    Post by Scott Wed Dec 06, 2017 5:42 pm

    I started installing the Swaybar today. I started with installing the brackets first, and as you can see the bracket is way to close to the brake caliper.

    When I did the conversion to disc I clocked the calipers at the 9 to 12 position. So, now I'm going to have to move the calipers back to the 12 to 3 position. Hopefully I don't find the reason why I put them forward in the first place.


    The Swaybar bracket is silver, and the brown rusty thing to the right is the caliper. The shiny black behind the bracket is the shock. Just ignore the hose-clamp, that's part of a rig I used to keep the brake line off the tire.

    To add the bracket I changed the Shock mount bolt from a 4.5" to a 5" bolt.
    I am using Grade 8, 1/2"-13, 5" bolts

    NOTE: The bracket is about 3/8" thick

    Once I started working on it I found the mount holes in the frame, I didn't think the van had them already.
    For those I am using Grade 8, 5/16"-18, 1" bolts

    G Van Swaybar 20171211
    mo_1040
    mo_1040


    Number of posts : 645
    Location : Hibbing, Minnesota...The land of 10,000 rednecks
    Age : 53
    Registration date : 2008-07-04

    G Van Swaybar Empty Re: G Van Swaybar

    Post by mo_1040 Sat Dec 09, 2017 1:37 pm

    My brackets hit the calipers so I just made new ones that moved them over about an inch. Pics are somewhere in the disk brake conversion discussion.
    Scott
    Scott


    Number of posts : 1651
    Location : Anoka, MN
    Age : 54
    Registration date : 2008-05-20

    G Van Swaybar Empty Re: G Van Swaybar

    Post by Scott Wed Dec 13, 2017 12:49 pm

    Thanks Mo,

    I took a look at what you put together, looks like a little welding was involved. Right now welding isn't something I've learned, so today I put the van up on stands and pulled the brakes apart. I'm going to go ahead and roll the backing bracket backwards and see if I find any different clearance problems.

    While checking out your posts I realized you live a in Minnesota too. I don't find my way up there much, but we've been looking to do some exploring so we will probably be around that area during the summer next year.
    m1dadio
    m1dadio
    Chevy Guru


    Number of posts : 1778
    Location : north saanich
    Registration date : 2008-10-06

    G Van Swaybar Empty Re: G Van Swaybar

    Post by m1dadio Wed Dec 13, 2017 9:55 pm

    Hello Scott:  Which disc brakes do you have?

    The fix is simpler than that

    you put the calipers forward to clear the shocks, otherwise you have to move the shocks.

    for the sway bar you swap the lower axle brackets to the opposite side , cut a bit of them off with a hack saw and they work great .

    look at post 6 and 7 of the linked thread. its all there

    https://vintage-vans.forumotion.com/t42615-m1d-disc-brake-3-technical-updates-july-2014?highlight=disc+brake


    M1D
    Scott
    Scott


    Number of posts : 1651
    Location : Anoka, MN
    Age : 54
    Registration date : 2008-05-20

    G Van Swaybar Empty Re: G Van Swaybar

    Post by Scott Sat Dec 16, 2017 4:29 pm

    Thank  you M1 for saving me the time of rolling the brackets back and then figuring out why I put them forward in the first place. I know someday I need to create a manual just for my van that explains why things were done they way they were, and what part numbers I used that were not originally for the van.

    Comparing your bracket (black) to mine (silver) they look like they have a slightly different shape to them.

    Looking them up in the GMC parts book..
    Your part #: 3931397 is "BRACKET - front stabilizer shaft at axle. LH (Eff. w/1968)"
    My part #: 3887742 is ""BRACKET - front stabilizer shaft at axle. RH (1967)

    It looks to me like the bracket you have brings the mount farther away from the wheel then the one I have. That makes me think I sill have to cut deeper into the bracket then you had to cut for yours.

    G Van Swaybar Swayba11

    G Van Swaybar Swayba12

    G Van Swaybar Swayba13

    I think my next step is to mount the bar to the frame, then make a bracket from cardboard to get a better look at my clearances. I may just go buy some fat angle iron and cut some brackets out. I'll just put the original brackets away with the rest of the original stuff I have not used.
    m1dadio
    m1dadio
    Chevy Guru


    Number of posts : 1778
    Location : north saanich
    Registration date : 2008-10-06

    G Van Swaybar Empty Re: G Van Swaybar

    Post by m1dadio Sat Dec 16, 2017 7:53 pm

    Scott

    You  might be right, they do seem to look as you say. Funny there must be other brackets out there also because some people have reported to me "No interference problems at all".

    Start by switching the axle brackets left for right so it mounts the link directly over-top the axle like mine is. See what you have and take it from there.

    This is a good example of what I have told many people about my disc brake conversion. " no two vans are completely alike". there are soo many differences there simply cannot be a "One Kit fits all". Which is also why the question "how much to convert my van" can never be answered.


    M1D
    m1dadio
    m1dadio
    Chevy Guru


    Number of posts : 1778
    Location : north saanich
    Registration date : 2008-10-06

    G Van Swaybar Empty Re: G Van Swaybar

    Post by m1dadio Sun Dec 17, 2017 12:10 pm

    Hey Scott had a van dream last night. Here is what came to me in the dream. Its just a "what if" thing.

    The axle has the (steering stop bumps that capture the sway bar bracket) on both sides of the axle.

    What if you put the sway bar axle brackets in between the shock and the axle on the shock side and use the appropriate bracket that places the sway bar link bolt directly over top the axle like mine is?

    Yes that will angle the shock slightly but the sway bar link should be relatively straight. (a little angler on either shouldn't bother anything). But it may cause clearance of the caliper hose banjo bolt and hopefully with no other modifications.

    Just dreaming outside the box>

    Let us know if you try this idea and what the results are please.

    m1D
    Scott
    Scott


    Number of posts : 1651
    Location : Anoka, MN
    Age : 54
    Registration date : 2008-05-20

    G Van Swaybar Empty Re: G Van Swaybar

    Post by Scott Sat Mar 10, 2018 6:06 am

    I don't think trimming the bracket I have is going to work, it's different then the one in M1's tread.

    I've tried flipping that brackets around different ways, here's what I got..

    ==================
    These top two pictures are drivers side, bracket placed where the factory made it to go. As you can see, from the front of the van looking back there is no clearance. The second picture is another shot looking straight down at it. In both pictures the front wheels would be straight, and wouldn't be able to turn without hitting the bracket.
    .
    G Van Swaybar Captur10
    .
    G Van Swaybar Captur13
    .
    ==================
    This next picture is where I tried to move the bracket behind the axle. As you can see it hits the shock, so I added a spacer to see if that would help. The second problem, and you can see it in the last picture, is the top of the bracket is so close to the top of the axle that I can't fit the swaybar bushings and bolt in place.
    .
    G Van Swaybar Captur11
    .
    ==================
    This last picture is of the passenger side bracket placed on the drivers side. As you can see it places the top of the bracket over the axle again, and you can see in this picture there isn't enough room for the bushing and bolt over the axle.
    .
    G Van Swaybar Captur12
    .
    ==================
    Scott
    Scott


    Number of posts : 1651
    Location : Anoka, MN
    Age : 54
    Registration date : 2008-05-20

    G Van Swaybar Empty Re: G Van Swaybar

    Post by Scott Sat Mar 10, 2018 6:23 am

    Hey mo_1040, I found that thread you were talking about..

    I see you had the same problem here.
    G Van Swaybar Oem_br10
    ..
    And the new bracket you made here.
    G Van Swaybar New_br10
    ..
    I think making a new bracket is my best bet for getting this worked out.
    panelmanrd
    panelmanrd


    Number of posts : 801
    Location : kcmo
    Age : 63
    Registration date : 2009-10-04

    G Van Swaybar Empty Re: G Van Swaybar

    Post by panelmanrd Sun Mar 11, 2018 2:14 pm

    when I did mine I reversed the sway bar brackets side to side
    placing the bolt for the link/bushings directly on top of the axle
    when I bolted everything up tight it all fit, it doesn't seem like
    it fits until you tighten everything up. don't have any pics of it
    but it does work after its all tightened up.
    Scott
    Scott


    Number of posts : 1651
    Location : Anoka, MN
    Age : 54
    Registration date : 2008-05-20

    G Van Swaybar Empty Re: G Van Swaybar

    Post by Scott Mon Mar 26, 2018 8:14 am

    Thanks, I will look to see if I can do that too, but I don't think the bushings I am using will squish that much.

    My Swaybar project has been shelved for now. I was going to go ahead and hang the bar to help with bracket measurements and discovered that the piping for the brake proportioning valve is in the way. I was going to tackle some upgrades to how I installed the brakes next year. So, I think I will just hold on the swaybar and brake line reroute until 2019. Right now I have a lot of little projects to get done before I can get the van on the road again, and have already promised the wife we cruising in it again this summer.

    Thanks for everyone's help and input.. I will pick this thread up again when I pluck the swaybar off the shelf again..
    panelmanrd
    panelmanrd


    Number of posts : 801
    Location : kcmo
    Age : 63
    Registration date : 2009-10-04

    G Van Swaybar Empty Re: G Van Swaybar

    Post by panelmanrd Mon Mar 26, 2018 9:00 am

    if you are having trouble getting the nut to start
    because of not enough threads showing, I would take
    the tubes and cut about 1/4 inch off of them, just make
    both the same length, and no more than 1/4 inch

    Sponsored content


    G Van Swaybar Empty Re: G Van Swaybar

    Post by Sponsored content


      Current date/time is Sun Nov 17, 2024 10:47 am