


Definitely interested. Even production isn't feasible, maybe you should consider selling the pattern for other to make their own. I, for one, would be willing to buy the pattern alone.
+36
o c car guy
NipRing
wussy31
AjaxCustom
Russell
Freakytikitv
Billsboat
gfleduc
rdsrds123
Seth G
donivan65
Deluxxx
RipVanArkie
roodancin@gmail.com
ChevyVanMan1
ditdater
Lazarusvan
EconoUSAparts
ALLZS
wideload
Vanish
Chevboner
xjamesx
Magic Potion
DanTheVanMan
bletman
No1rascal
Casimier
BILLS66
Joe Van
m1dadio
econopoor
pan58head
Twinpilot001
vanny
VANagain
40 posters
New Kick Panel for 1st Gens

wussy31- Number of posts : 7
Location : Portland,OR
Registration date : 2013-01-06

gfleduc- Number of posts : 367
Location : Kingwood Texas
Age : 68
Registration date : 2015-09-19
Just weighing in - I still remain interested also.

Billsboat- Number of posts : 8
Location : Rowlett tx
Registration date : 2015-09-03
I'd buy the pattern too!

NipRing- Number of posts : 336
Location : Waukesha WI
Registration date : 2011-08-14
I'm interested too

No1rascal- Number of posts : 306
Location : Toms River, NJ
Registration date : 2013-02-19
Any updates? its been a while......

VANagain- Number of posts : 1046
Location : San Diego, CA
Age : 62
Registration date : 2008-05-16
Hi guys, thanks for your patience. I think we have a plan that will get these things into production. Another Vintage-Vans member has offered to handle the ordering, production, and shipping of these panels! I'll never have the time but I will convey all of the details involved in making them.
He has access to a laser that can handle material big enough to cut the panel out of one piece. We'll have to look into shipping something that long. And I'm curious to see if more parts will need to be removed to install a long one-piece panel.
Next step, I need to send him some drawings so he can get a quote, along with the sources for the materials, so we can come up with a price.
Hang in there!
Chevboner- Number of posts : 209
Location : Skokie, IL
Age : 35
Registration date : 2012-09-15
Ohhh Vanagain….. Hows this for a template? I pulled it out last night after disassembling the whole interior of my entire van. its Came out in one piece minus some of the small pieces. Oh and the floor matt came out in whole also its brittle and has some cracks

gfleduc- Number of posts : 367
Location : Kingwood Texas
Age : 68
Registration date : 2015-09-19
FYI - Going to laser vendor for price quote - planning on a fixed quantity run; based on feed back approx 20 units.

o c car guy- Number of posts : 8
Location : garden grove california
Registration date : 2014-06-14
I can use 2 panels as soon as you get them finished. Thanks Gary
No1rascal- Number of posts : 306
Location : Toms River, NJ
Registration date : 2013-02-19
Thanks for the update, I'm still in for one.
Scott
Scott
VANagain- Number of posts : 1046
Location : San Diego, CA
Age : 62
Registration date : 2008-05-16
Gary is the guy that's going to make this thing happen! He has my master file and is working out the details.
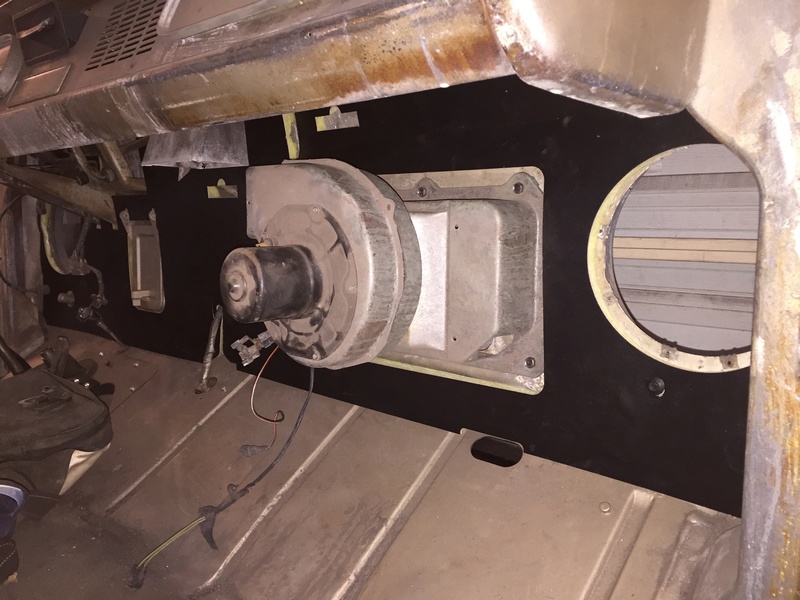
Chevbone, pretty impressive that you were able to remove that panel so well, and that it was still in that good of shape! I would like to see a straight-on, close-up photo of that area where the engine wire loom comes through it. I'm pretty sure I got it right but it would be nice to have a shot of one that is still intact.
My van still had the stock turquoise floormat and almost as good a shape as yours, but still not good enough to leave her in there. Tears and stains I can't get out. I'm not sure what I'm going to put on the floor up front but I like the idea of something easier to clean then carpet.
Chevboner- Number of posts : 209
Location : Skokie, IL
Age : 35
Registration date : 2012-09-15
Is this what you're looking for? Also what will you be using to hold the panel to the wall? I managed to save one of these plastic guys that hold the original one. Brothers has them but not sure if they are the correct ones.

gfleduc- Number of posts : 367
Location : Kingwood Texas
Age : 68
Registration date : 2015-09-19
Do you have their part number for the plastic part?
Chevboner- Number of posts : 209
Location : Skokie, IL
Age : 35
Registration date : 2012-09-15
Their part is rubber not plastic
https://www.brotherstrucks.com/60-72-FIREWALL-RETAINER-RUBBER-EACH/productinfo/RET72RB/
https://www.brotherstrucks.com/60-72-FIREWALL-RETAINER-RUBBER-EACH/productinfo/RET72RB/
gfleduc- Number of posts : 367
Location : Kingwood Texas
Age : 68
Registration date : 2015-09-19
Copy that - I will keep looking - thank-you for posting the info
No1rascal- Number of posts : 306
Location : Toms River, NJ
Registration date : 2013-02-19
Any updates on this? been awhile.....
Scott
Scott
gfleduc- Number of posts : 367
Location : Kingwood Texas
Age : 68
Registration date : 2015-09-19
Hi Scott,
There is progress - slow but it is moving. Laser guy is onboard, I committed to him a checked paper template. First pass template did not fit properly (Rich's files are pretty good) just tweaking our plot scale, minor adjustments etc. in work. Both the plotter & CAD work are gratis from friends & family so I not pushing the time line.
It is move along. Helpful incentive is I need one also!
Gary
No1rascal- Number of posts : 306
Location : Toms River, NJ
Registration date : 2013-02-19
Thanks for the update Gary.

AjaxCustom- Number of posts : 10
Location : San Francisco
Registration date : 2013-07-08
I would love one for my 64' when you have them ready to go.
Thanks,
E
Thanks,
E
gfleduc- Number of posts : 367
Location : Kingwood Texas
Age : 68
Registration date : 2015-09-19
Copy targeting end of the year
It goes a bit slow when some of the support is gratis
It goes a bit slow when some of the support is gratis

garagedoordennis- Number of posts : 45
Location : Elkhorn WI
Registration date : 2013-04-30
im in for one too!
gfleduc- Number of posts : 367
Location : Kingwood Texas
Age : 68
Registration date : 2015-09-19
Well first one piece panel (Chevy calls them Plenum Panels) fit well.
As noted prior, shipping is a BIG concern, over size package 20" x 65". Approximately 7 lbs with cardboard container. Right now using traditional shippers best I got was a $107 quote for cross country; I used Houston (77339) to Portland Oregon as test case pricing.
So collectively I am looking for shipping ideas; here are my first thoughts.
1) Combined packages for multiple vanners.
2) Cut panels at heater core location so It will not be an oversize package.
3) Is shipping by bus an option?
4) ?
Please hold off for now on I "want one" posts until I get a handle on final logistics /cost - other comments are welcome of course...
Note - I am roughly in the $80 cost range before shipping
VANagain- Number of posts : 1046
Location : San Diego, CA
Age : 62
Registration date : 2008-05-16
That looks fantastic!! One piece! One big piece.
What kind of insulation is that on the back? Looks more uniform than the jute I used.
You definitely need the headlight cans removed to install this. But you were able to leave the heater box on? Oh, but that has to come off too because the heater core hoses go on this side of the panel. So does that main wire look in the middle. It actually runs opposite of how it’s shown here. It comes out of that hole and runs across the front of the panel. And I recommend enlarging that hole. I made it the stock size but it puts too much strain on the panel and they always tear there because it’s so close to that other hole and the square opening for the windshield washer bag hook.
If you do end up offering them in two pieces, take another look at where I split mine. And the backing board to reinforce the seam. You could do that under the heater too.
My $0.02 worth! Looking good! Glad to see this happening!!
gfleduc- Number of posts : 367
Location : Kingwood Texas
Age : 68
Registration date : 2015-09-19
Thank-you for the reply.
I didn't think to look for a jute, I worked to select an insulation that would match the original.
The heater box had not been installed; I slapped it on after so I could see how the panel fit vs the box.
I did not remember where the wire ran; so I left it behind (it sure was easier leaving it in the back!). I will review the wire holes - your point is valid as I noticed that the fan wiring was straining the hole.
Cutting location is up in the air; your location looked good; I mentioned the heater box area as that would have minimal material to cut. I will let the van family weigh in, as I may cut them by hand post production. Hopefully I can potentially roll the panel enough for shipping with out cutting.
Take care
Gary
p.s. I sure am glad you did the bull work in laying them out!
VANagain- Number of posts : 1046
Location : San Diego, CA
Age : 62
Registration date : 2008-05-16
Hmm, I can't believe it didn't occur to me to find yellow insulation like the original stuff for mine!
This may be posted elsewhere but here is a source for the rubber grommet for our heater core pipes. I knew there had to be something like ours out there! This is for a Toyota Landcruiser. I bought one and it fits perfectly! The holes are made to stretch to fit different-sized pipes, so it will fit ours. Only $6
This site says it has them in stock but all the other sites I went to that sells these said they were out of stock and didn't know when they'd be getting them in...
https://www.cruisercorps.com/heater-line-grommet.html

Time to replace yours, which is no doubt hard as a rock!
This may be posted elsewhere but here is a source for the rubber grommet for our heater core pipes. I knew there had to be something like ours out there! This is for a Toyota Landcruiser. I bought one and it fits perfectly! The holes are made to stretch to fit different-sized pipes, so it will fit ours. Only $6
This site says it has them in stock but all the other sites I went to that sells these said they were out of stock and didn't know when they'd be getting them in...
https://www.cruisercorps.com/heater-line-grommet.html
Time to replace yours, which is no doubt hard as a rock!


|
|
|