


Thanks, Dix. But I am only the lookout man guiding the ship. The captain is doing all the work $$$ but exciting all the same...
+14
vanny
back2thewoods
Joe Van
Twinpilot001
dan nachel
jimthefred
dix
Bruce67Econoline
Space Truckin
econopoor
Digz
Van crazy
Xelmon
Lazarusvan
18 posters
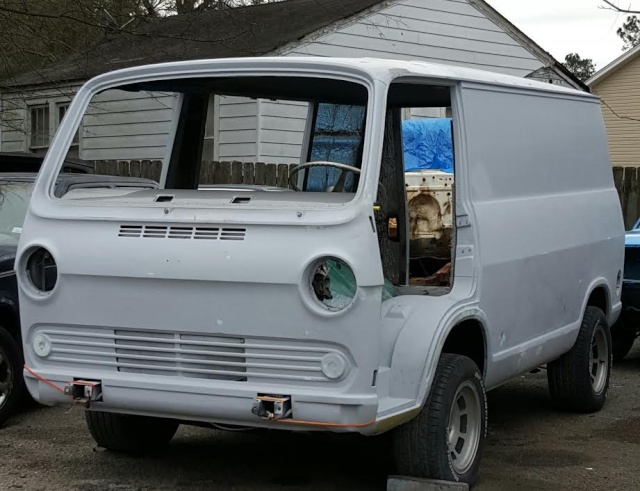
LAZARUSVAN'S 1964 CHEVY PANEL VAN RESTO

Lazarusvan- Number of posts : 1293
Location : Charleston, South Carolina
Age : 51
Registration date : 2011-02-22
Space Truckin- Number of posts : 1279
Location : Upland,Ca
Age : 68
Registration date : 2009-10-17
Looking GOOD! Bet u can't wait for "fire in the hole" 
Digz- Number of posts : 3794
Location : United States Six Lakes MI
Registration date : 2008-05-17
That's real nice ! What are you running for plug wires Lee? Premade or a DIY kit?
Lazarusvan- Number of posts : 1293
Location : Charleston, South Carolina
Age : 51
Registration date : 2011-02-22
Space Truckin wrote:Looking GOOD! Bet u can't wait for "fire in the hole"
Thanks, Brother Steve. Headers look to fit perfectly. Thanks for the advice. I am ready.
Had no idea I was running a cylinder down from Day 1. She never sounded right to me. Always thought she had a VW kind of motor sound which was a ticking noise I didn't realize I was hearing.
Re-running the exhaust as well. I had new exhaust installed a while back but they apparently attached it to the body and didn't hang it properly so it's going.
Last edited by Lazarusvan on Sat May 30, 2015 8:11 pm; edited 1 time in total
Lazarusvan- Number of posts : 1293
Location : Charleston, South Carolina
Age : 51
Registration date : 2011-02-22
Digz wrote:That's real nice ! What are you running for plug wires Lee? Premade or a DIY kit?
Thanks, Digz. He did a nice, tight job with the wires. My old ones were too long and sloppy.
Accel 8mm, custom, not pre-made. He said he used red zip ties to separate the wires, a trick he learned in school. Said he hasn't seen anyone else do that.
Lazarusvan- Number of posts : 1293
Location : Charleston, South Carolina
Age : 51
Registration date : 2011-02-22
Gas tank received the vinegar and screws shake and bake treatment, paint and mount. The inside was supposedly lined before I purchased it but hard to tell. Very minimal rust inside when we stuck a camera in there.
Stainless straps were already with the van (didn't know I had them) and got the Scotch Brite scuff treatment.
Is there any way to fix the dent in the tank? I never noticed it before it was painted and now it's definitely noticeable.
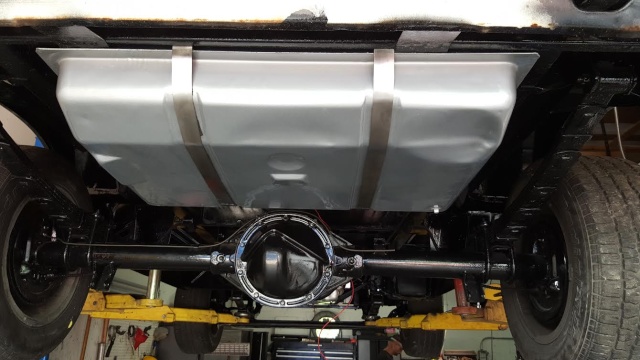
Stainless straps were already with the van (didn't know I had them) and got the Scotch Brite scuff treatment.
Is there any way to fix the dent in the tank? I never noticed it before it was painted and now it's definitely noticeable.
Space Truckin- Number of posts : 1279
Location : Upland,Ca
Age : 68
Registration date : 2009-10-17
Very nice! You could have "paintless" dent repair do your tank....

vanny- Moderator
- Number of posts : 14775
Location : Ashburnham, MA
Age : 65
Registration date : 2012-09-22
Nice and clean under there Laz!! Looks GREAT!!! 
_________________
“The future will soon be a thing of the past."
http://public.fotki.com/Vintage-Vans/vintage-vans-es/ruff-diamond-1/?cmd=fs_slideshow

Big W- Number of posts : 3282
Location : Saskatoon,Sask,Canada
Age : 60
Registration date : 2011-01-13
Crap...now the tank is cleaned and installed....Ummm How about a heat lamp ( so as not to burn the coating up inside ) on the dented area and then compressed air in the tank to give it some pressure, then use a rubber mallet and tap on the side of the tank and maybe it might pop out a bit. This may sound kind of silly but that's all I got. That's what I did to mine and it got quite a bit of the dent out......And that tank and strap look awesome by the way.

Vantasia- Number of posts : 1412
Location : New Jersey
Age : 69
Registration date : 2013-08-18
I recently did my tank and had a local shop clean it. It has a similar dent in the same place...guy said only way would be to cut top of tank open to hammer it out and then re-weld it back up, has done it many times for classic cars but I chose not to cut the tank. Painted my tank black and no one will notice it.
Digz- Number of posts : 3794
Location : United States Six Lakes MI
Registration date : 2008-05-17
Lazarusvan- Number of posts : 1293
Location : Charleston, South Carolina
Age : 51
Registration date : 2011-02-22
Digz wrote:https://www.youtube.com/watch?v=IahDEcy9Ssc
Thanks, JS.
That was helpful...
Ironic that the bus in that photo has "Charleston" along the side. My home. Been a little different here the past week after the shooting but people of this town are amazing.
Thanks for the feedback. The paint isn't such a big deal. I think that was a quick job in the scheme of things. It appears to have some liner inside, but almost looks like it's not everywhere. Since there is no shortage of things to spend money on, we decided to clean it real good and use a fuel filter as the rust was minimal.
They used vinegar and nuts and bolts to dissolve the rust. Dentless repair would be great but maybe consider cutting it if necessary down the line. I love the silver, so not going black to black to hide the ding.
They make those "As seen on TV" dent pullers. Not sure if that is too tight to pull out that way.
My dad used to work as a claims adjuster and he had a huge suction cup that would pull out flat dents. It was super tight and you put an amazing amount of force on it.
I'd recommend the Scotch Brite treatment on those straps. Too hard to keep shiny and that dulled patina will stay looking good.

Joe Van- Moderator 1st Class

- Number of posts : 4619
Location : Ocala fl
Registration date : 2012-10-11
Looking "Great" you are moving right along and have come a long way since you got it you will eventually reach your goal gonna be one sweet ride when your finished..!!!..  ..."Good Luck on your Build"..!!!...That suction cup puller might just pull that dent out I have used them before with good results and might prevent you from dropping the tank down again....
_________________
1966 GMC Handivan "Panel"....1975 Chevy Van G10 "Panel"....1991 Chevy Van G20 "Conversion"
Lazarusvan- Number of posts : 1293
Location : Charleston, South Carolina
Age : 51
Registration date : 2011-02-22
Thanks, Joe.
Progress is coming along if not but slowly...
Just scored some new to me vintage hardware from member Gr8ful/Derrick.
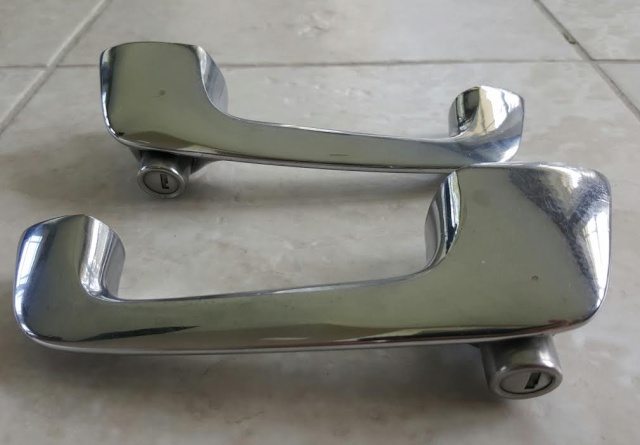

Speedo in near mint condition in terms of the dial face.

He is a stand up guy and everything was exactly as represented and his prices are more than fair.
Exterior handles are awesome with very mild pitting.
Interior pieces have some pitting but look sharp and shiny and glad to have originals.
FYI, this cargo door was shipped via USPS parcel post for $45.00 from Colorado to South Carolina. Not sure anyone knew this could be done, myself included. No wrap or anything. Just a label stuck on the door!
Arrived in perfect shape. Front door is coming Greyhound although he said his post office in North Dakota would have shipped it as well. (It was too large when CO post office measured it.)

Progress is coming along if not but slowly...
Just scored some new to me vintage hardware from member Gr8ful/Derrick.
Speedo in near mint condition in terms of the dial face.
He is a stand up guy and everything was exactly as represented and his prices are more than fair.
Exterior handles are awesome with very mild pitting.
Interior pieces have some pitting but look sharp and shiny and glad to have originals.
FYI, this cargo door was shipped via USPS parcel post for $45.00 from Colorado to South Carolina. Not sure anyone knew this could be done, myself included. No wrap or anything. Just a label stuck on the door!
Arrived in perfect shape. Front door is coming Greyhound although he said his post office in North Dakota would have shipped it as well. (It was too large when CO post office measured it.)
Lazarusvan- Number of posts : 1293
Location : Charleston, South Carolina
Age : 51
Registration date : 2011-02-22
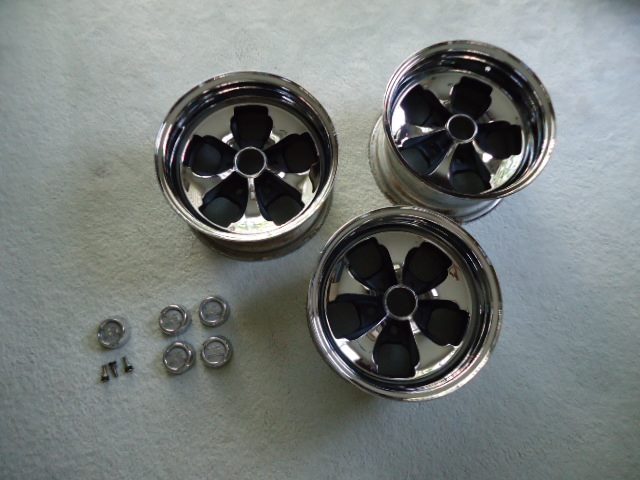
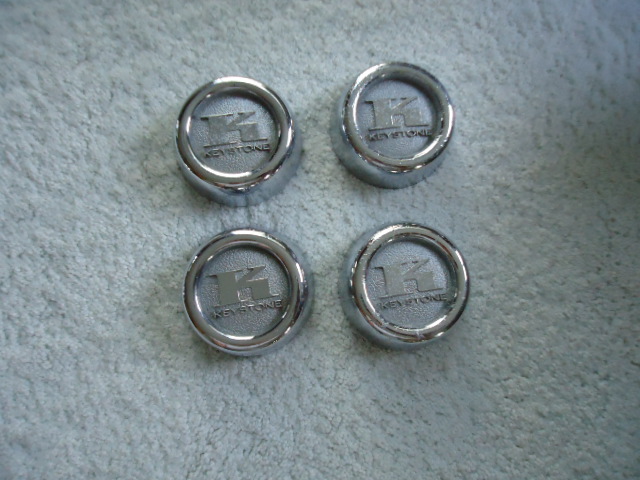

New old stock wheel candy coming my way.
American made Keystones from the 70's with hard to find Cragar S/S style caps.
15x8 set of three. (His mom sold one at a garage sale years ago..) so I have to find one more or go a bit smaller with a pair of 7's up front. I had to buy all three to make the deal.
Got a screaming deal on old ones ($75 a wheel) vs. the price of brand new models made elsewhere. New ones are over $200/each and not made as well. Caps were extra.
Considering powdercoating the black to keep it looking great for a long time. Will likely do the same or paint the center caps black and just keep the logo in chrome.
Glad to knock this decision off the list.
Lazarusvan- Number of posts : 1293
Location : Charleston, South Carolina
Age : 51
Registration date : 2011-02-22
(Relocated thread to the proper place.)
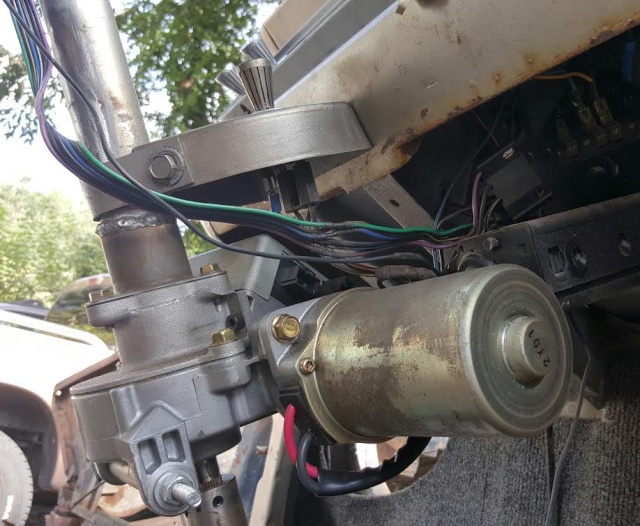
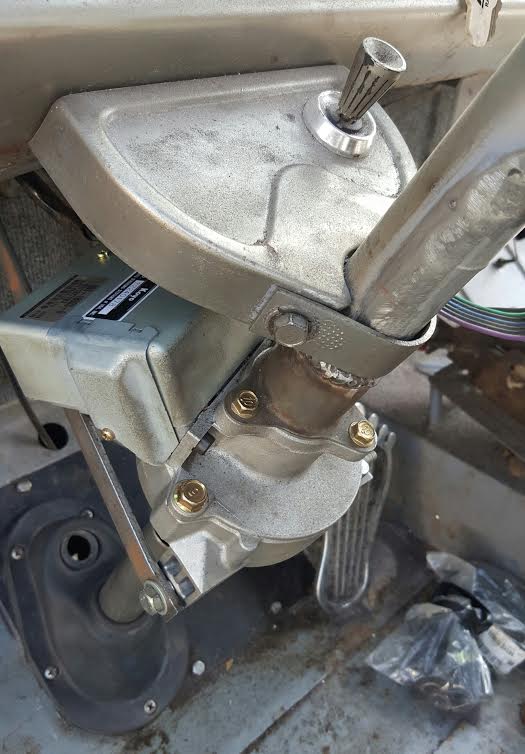
Got my first look at the power steering setup.
It was pointed out to me that the motor should have been separated from ECU and pointed to the rear. That would get it out of the way more.
A fabricated cover is going to be made to hide it all regardless but hoping motor will under the dash when done.
My fabricator said he wanted to keep the stock look and that is why he did not get rid of the column bracket. I thought that was the area the install was going or at least a bit higher up but even in its current setup, there is ample legroom.
No U bolts were used and stock column was used and mated to the Saturn column. Access to a lathe to custom size the fittings seems to make for a more stable setup. It would seem that if he could lathe more identical couplers, it would make the use of the U bolts unnecessary and make for a more stable setup. His number one concern is liability if it fails, and this is safest route in his mind.

samsvan- Number of posts : 672
Location : Sarasota, Fl.
Age : 61
Registration date : 2014-09-04
This is what I ended up with at the first shop I had try to do this conversion. I printed out Panheads whole thread for them and they looked at it long enough to say "huh" and chuck it in the trash. When Laz is mentioning u bolts, he is referring to the u joints that my (former) shop said they had to use. It's obvious that this setup will make the whole column basically flexible and most importantly, unsafe. I still think Panhead's setup is the cleanest and safest conversion I've seen and I don't know why any of these guys would think they need to do it differently. I'm having mine redone while it's at the new shop and redone right.
See what you started, Pan???!!!
Vantasia- Number of posts : 1412
Location : New Jersey
Age : 69
Registration date : 2013-08-18
Nice idea, agreed, if the motor can point to the front (you said "rear?") of vehicle it would be better if it clears the wiper motor? You should be able to find a rubber plug to seal the hole in the boot, even a plastic or metal electrical close-out plug might work and look nice and seal the hole from cold air, road spray etc. And yes, the last thing you want is that shaft joint to fail when you hit a bump and then loose steering, make sure its safe!
Lazarusvan- Number of posts : 1293
Location : Charleston, South Carolina
Age : 51
Registration date : 2011-02-22
Thanks, Vantasia. Yes, I meant to the front. I don't love the side location and it will require a large fabrication piece to cover.
The work is well done, just want it located properly. Not getting rid of the original column definitely seems to be the way to go.
I also lucked out because he damaged the bearing inside and ended up replacing that and putting all new grease inside, so everything is new inside.
I am pretty excited about this modification. Combined with the front sway bar and disks, this should make driving a breeze compared to before.
Lazarusvan- Number of posts : 1293
Location : Charleston, South Carolina
Age : 51
Registration date : 2011-02-22
Just updating my build with some underside improvements. Most everything in that department will be brand new other than leaf springs. M1D brackets ready to roll!

Bruce67Econoline- Number of posts : 809
Location : Charleston SC
Registration date : 2014-01-25
Looking good Lee, and happy Birthday as well!
Lazarusvan- Number of posts : 1293
Location : Charleston, South Carolina
Age : 51
Registration date : 2011-02-22
Got my air conditioning back from the chrome shop today. Completely rebuilt. Turned out nicely. Stiff windows and got to figure out why top section won't close completely even when latched.
Thanks to Space Truckin' for hooking me up with some solid Cali cores for the chrome. My originals were solid but not clean enough to have chromed. Will be selling my originals if anyone needs wing windows.
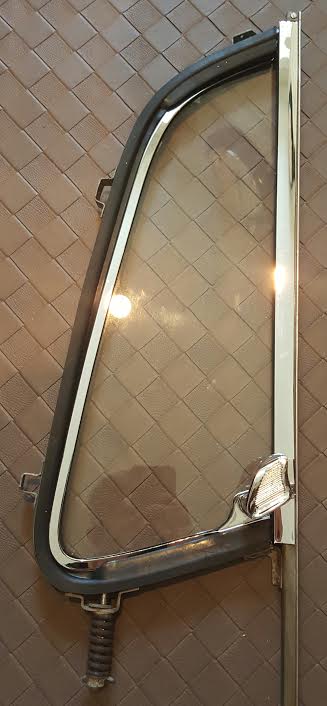

Primed and blocked and ready for paint:
Thanks to Space Truckin' for hooking me up with some solid Cali cores for the chrome. My originals were solid but not clean enough to have chromed. Will be selling my originals if anyone needs wing windows.
Primed and blocked and ready for paint:
wideload- Moderator 1st Class
- Number of posts : 1388
Location : Kevil, Kentucky
Age : 70
Registration date : 2008-05-11
Really looking good Lee !!!!!!!!
_________________
Mike
WIDELOAD
https://vintage-vans.smugmug.com/Chevy-GMC-Vans/Wideloads-65-66-67-68/i-CK5s29s
vanny- Moderator
- Number of posts : 14775
Location : Ashburnham, MA
Age : 65
Registration date : 2012-09-22
In a word, Beautiful!!! Congrats!
Can't wait to see the finished product...
Can't wait to see the finished product...
_________________
“The future will soon be a thing of the past."
http://public.fotki.com/Vintage-Vans/vintage-vans-es/ruff-diamond-1/?cmd=fs_slideshow


|
|
|