+16
Nightmoves
ChevyVanMan1
67a 100 pickup
crazee
mo_1040
savage
veefre
itruns
G-Man
Digz
Scott
Kakster
BvrWally
gp70
VANagain
donivan65
20 posters
My Springs are Sprung

donivan65- Governor

- Number of posts : 12248
Location : San Diego, California
Registration date : 2008-05-12
- Post n°51
 Re: My Springs are Sprung
savage- Number of posts : 2632
Location : Where Rust Never Sleeps in Ft Wayne IN
Registration date : 2008-05-15
- Post n°52
 Re: My Springs are Sprung
I had new(longer) one made at a spring place here in town.(I was told you should get new ones if you take it apart??) I'm not sure but you probably should torque the bolts a little at a time , and move around. Not all the way on one side, then try to get the other side??
Scott- Number of posts : 1651
Location : Anoka, MN
Age : 54
Registration date : 2008-05-20
- Post n°53
 Re: My Springs are Sprung
Funny, I showed the guy at NAPA the U-bolt, he said he couldn't even order one for me. Then he told me about that place in Dallas.
I did alternate around the bolts while torquing them down, didn't seem to matter. I already cut the bolts, but I'm going to take them back to Pep Boys to complain about the inferior product. Since their all cut down they probably wont take em, but maybe.. They did cost $30, and wont do what they were advertised to do.
Donivan, is the bolt you listed above one you've used on 2nd Gens before, or do I need to start there and start digging for the exact one I need?
Thanks for all the input, I'd be lost without your help..

donivan65- Governor

- Number of posts : 12248
Location : San Diego, California
Registration date : 2008-05-12
- Post n°54
 Re: My Springs are Sprung
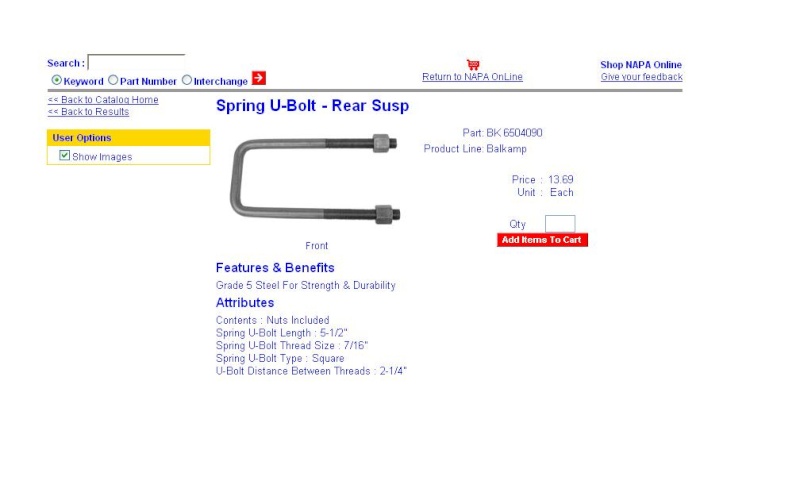
That's just a U bolt sample,,,,,A 1st Gen uses a 1/2" U bolt, 3 1/4" long, 2" wide. So what size are you looking for?

Scott- Number of posts : 1651
Location : Anoka, MN
Age : 54
Registration date : 2008-05-20
- Post n°55
 Re: My Springs are Sprung

donivan65- Governor

- Number of posts : 12248
Location : San Diego, California
Registration date : 2008-05-12
- Post n°56
 Re: My Springs are Sprung
So did the threads or nut give up on those U bolts you tried,,,,,,,they probably were not a high enough grade,,,,,,,,I guess your next best bet is an off road shop,,,,,,,or a place that sells fasteners,,,,,,or find a spring shop,,,,,,,,

donivan65- Governor

- Number of posts : 12248
Location : San Diego, California
Registration date : 2008-05-12
- Post n°57
 Re: My Springs are Sprung
Or a place that builds trailers or installs trailer hitches,,,,,,

Scott- Number of posts : 1651
Location : Anoka, MN
Age : 54
Registration date : 2008-05-20
- Post n°58
 Re: My Springs are Sprung
I'm on the road again till Friday, but I'm wondering if I can use 2.5" width U-bolts. I got 2 5/8 from measuring the bolt itself, but measuring the axle holes might show that 2.5" will work. Losing the 1/8th inch might open me to other brackets.
I'm sure I could make a 2.5" work since its so close..
It was the bolt threads that gave away, I think the nut was fine. I'm sure your right about the grade. I'm just glad it popped the threads in my garage and not driving down the freeway.
I'm sure I could make a 2.5" work since its so close..
It was the bolt threads that gave away, I think the nut was fine. I'm sure your right about the grade. I'm just glad it popped the threads in my garage and not driving down the freeway.

Scott- Number of posts : 1651
Location : Anoka, MN
Age : 54
Registration date : 2008-05-20
- Post n°59
 Re: My Springs are Sprung
Here's a picture of the U-bolts I bought from Pep Boys, don't waste your time or money on these. I bought them because I waited till the last minute and tried to make them work.
Lesson Learned..


 DO NOT BUY


When it came apart I didn't expect to find a steel wedge between the leafs and axle, you can see it here in this close-up. You can also see I have the bad U-bolt in place, getting ready to torque it down / strip the threads.

Here's another one, you can see the passenger side still only has two leafs. Between the new springs I put the spacers that came off my pick-a-part leafs, and coated them with white grease.

I ran down to Dallas and had some U-bolts made at 'Standard Spring & Axle'. I was in and out in 15 minutes, and total cost was $58 (including tax) for four bolts. They stock them as straight bolts and bend them to what you need.
Here's what I learned, the old U-bolt I brought is a 9/16" bolt, not 1/2" like I previously thought. They also said that a bolt that little is Grade 5 steel, not Grade 8.
They didn't have the length I needed, so they gave me the next longer ones at the price for the size I needed. I only needed an extra inch, you can see from this last picture that I have plenty of growing room.
Here's an old one next to a new one..

Lesson Learned..

When it came apart I didn't expect to find a steel wedge between the leafs and axle, you can see it here in this close-up. You can also see I have the bad U-bolt in place, getting ready to torque it down / strip the threads.

Here's another one, you can see the passenger side still only has two leafs. Between the new springs I put the spacers that came off my pick-a-part leafs, and coated them with white grease.

I ran down to Dallas and had some U-bolts made at 'Standard Spring & Axle'. I was in and out in 15 minutes, and total cost was $58 (including tax) for four bolts. They stock them as straight bolts and bend them to what you need.
Here's what I learned, the old U-bolt I brought is a 9/16" bolt, not 1/2" like I previously thought. They also said that a bolt that little is Grade 5 steel, not Grade 8.
They didn't have the length I needed, so they gave me the next longer ones at the price for the size I needed. I only needed an extra inch, you can see from this last picture that I have plenty of growing room.
Here's an old one next to a new one..


donivan65- Governor

- Number of posts : 12248
Location : San Diego, California
Registration date : 2008-05-12
- Post n°60
 Re: My Springs are Sprung
Those wedges are your alignment shims,,,,,And what grades are what,,,,1/2" or 9 /16"..... And did your new springs come with the pockets for the leaf spring inserts to fit into?????

Scott- Number of posts : 1651
Location : Anoka, MN
Age : 54
Registration date : 2008-05-20
- Post n°61
 Re: My Springs are Sprung
Well, I guess my alignment is going to be off since I just took them all apart. Or is the alignment set by the size of the wedge?
Both the old and new U-bolts are 9/16”, and Grade 5 Steel. When I asked him about Grade 8 he picked one up that was about an inch thick, and said the bigger bolts are Grade 8. They make bolts for anything in that place.
I was only able to use the inserts that had the center bolt through them, the ones on the end were so worn out I couldn’t reuse them. One fallback to using springs from the pick-a-part I guess, but I greased them up real good, and rounded the ends of the springs, so hopefully it wont squeak or grind to badly.
So far I’m into the project for $100, and should be able to do the back springs with what’s left. I will just need the U-bolts when I do the back.

donivan65- Governor

- Number of posts : 12248
Location : San Diego, California
Registration date : 2008-05-12
- Post n°62
 Re: My Springs are Sprung
We need to explore the Alignment shim situation. Do all 2nd Gens use them? Post some pictures of the set up. I don't think I have ever seen them on a 1st Gen,,,,,,,so why would a 2nd Gen use them,,,,,,do they have different specs for the caster on the vans? The idea is to push the front tires back to make it steer straight, kind of like a shopping cart. So you ain't finished with your front spring work yet, Scott...........

Scott- Number of posts : 1651
Location : Anoka, MN
Age : 54
Registration date : 2008-05-20
- Post n°63
 Re: My Springs are Sprung
I'll have to see what I can find on the shims, find out how they are used, I'm sure it would be tough to find someone that knows how to align with shims.
I had to stop working on the front springs because the longer U-bolts were to deep for my sockets. I picked up a real deep one tonight and hope to finish the front springs tomorrow. All the bolts and springs are cut and painted, tomorrow I will finish torquing down the drivers side, then do the passenger side. It's supposed to be 99 degrees out for the next four days so its going to be rough.
I had to stop working on the front springs because the longer U-bolts were to deep for my sockets. I picked up a real deep one tonight and hope to finish the front springs tomorrow. All the bolts and springs are cut and painted, tomorrow I will finish torquing down the drivers side, then do the passenger side. It's supposed to be 99 degrees out for the next four days so its going to be rough.

Scott- Number of posts : 1651
Location : Anoka, MN
Age : 54
Registration date : 2008-05-20
- Post n°64
 Re: My Springs are Sprung
Caster Shims / Camber
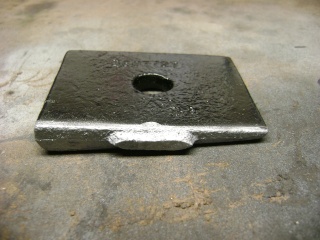
I found these shims wedged between the front springs and I-beam of my 68. I took a look at the 67 Service Manual and found them there too.
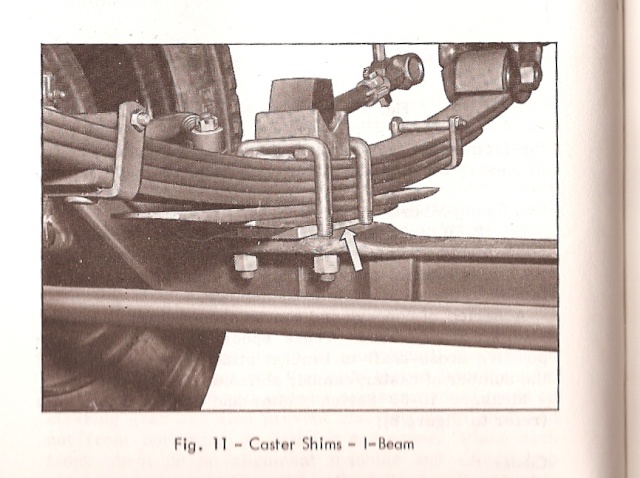
So we know they were used on the 67 and 68 G10, has anyone else seen them on different years? Probably safe to assume they were also on the 69 and 70, and probably on G20s too. But a confirmation on this might be helpful.
Here’s what the GM Service Manual has to say about it.
The Positive caster is the amount in degrees of the backward tilt of the kingpin. Positive camber is the amount in degrees that the front wheels are tilted outward at the top from a vertical position. Both angle adjustments are necessary for steering stability and safe vehicle handling.
I Beam Axle Models
On I beam axles, if camber angle does not fall within specified limits, the axle center or steering knuckle is bent. Caster angle is adjusted by the use of tapered shims placed between the axle spring seat and spring. To increase caster, place thick end of shim toward rear of vehicle; to decrease caster, place thick end of shim toward front of vehicle.


Ignore the 'Angle B', that was for something else, but the picture gives an idea of how the caster angle is figured.
Here's some pics of my setup going back together, when these were taken the drivers side was finished already.
This is a pic of the axle waiting for the loose parts to get stuffed back in place.

Here's one of the loose parts.

Here's the cap.
You can see that the U-bolt perch is thicker on one side then the other. I figured this was to help compensate for the angle the caster caused, but I didn't pay attention to which way it went when I took it off. On mine I put it together with the thicker side forward.

Cap again, but upside down with GM number showing.

This final is of my passenger side put together, I painted the shim silver to kind of help it stick out.

The part number on the Shim is 3887727, and on the Cap it's 3889961
The Cap and Shim measure 2.5" wide, and 3.25" long.
The Shim is 7/16" at its highest point and drops to 5/32" at its lowest.
The new Spring Center Bolt head wasn't as tall as the old one, so it didn't fall into the axle hole at all, the shim was thicker. I don't know that it made any difference so I tossed a couple of washers on there to make the bolt head drop past the shim.

I found these shims wedged between the front springs and I-beam of my 68. I took a look at the 67 Service Manual and found them there too.

So we know they were used on the 67 and 68 G10, has anyone else seen them on different years? Probably safe to assume they were also on the 69 and 70, and probably on G20s too. But a confirmation on this might be helpful.
Here’s what the GM Service Manual has to say about it.
The Positive caster is the amount in degrees of the backward tilt of the kingpin. Positive camber is the amount in degrees that the front wheels are tilted outward at the top from a vertical position. Both angle adjustments are necessary for steering stability and safe vehicle handling.
I Beam Axle Models
On I beam axles, if camber angle does not fall within specified limits, the axle center or steering knuckle is bent. Caster angle is adjusted by the use of tapered shims placed between the axle spring seat and spring. To increase caster, place thick end of shim toward rear of vehicle; to decrease caster, place thick end of shim toward front of vehicle.


Ignore the 'Angle B', that was for something else, but the picture gives an idea of how the caster angle is figured.
Here's some pics of my setup going back together, when these were taken the drivers side was finished already.
This is a pic of the axle waiting for the loose parts to get stuffed back in place.

Here's one of the loose parts.

Here's the cap.
You can see that the U-bolt perch is thicker on one side then the other. I figured this was to help compensate for the angle the caster caused, but I didn't pay attention to which way it went when I took it off. On mine I put it together with the thicker side forward.

Cap again, but upside down with GM number showing.

This final is of my passenger side put together, I painted the shim silver to kind of help it stick out.

The part number on the Shim is 3887727, and on the Cap it's 3889961
The Cap and Shim measure 2.5" wide, and 3.25" long.
The Shim is 7/16" at its highest point and drops to 5/32" at its lowest.
The new Spring Center Bolt head wasn't as tall as the old one, so it didn't fall into the axle hole at all, the shim was thicker. I don't know that it made any difference so I tossed a couple of washers on there to make the bolt head drop past the shim.

crazee- Number of posts : 331
Location : O-HIGH-O ---> :P
Registration date : 2009-02-24
- Post n°65
 Re: My Springs are Sprung
donivan65 wrote: We need to explore the Alignment shim situation. Do all 2nd Gens use them? Post some pictures of the set up. Mine is "NO SHIM.
MINE IS "no shim"...........

crazee- Number of posts : 331
Location : O-HIGH-O ---> :P
Registration date : 2009-02-24
- Post n°66
 Re: My Springs are Sprung
Scott wrote:.........................I had to stop working on the front springs because the longer U-bolts were to deep for my sockets. I picked up a real deep one tonight and hope to finish the front springs tomorrow. ...........................
That's why they make a wrench.
LOL

Scott- Number of posts : 1651
Location : Anoka, MN
Age : 54
Registration date : 2008-05-20
- Post n°67
 Re: My Springs are Sprung
Yeah, now if I could hook that wrench to my torque wrench I might be able to save a few bucks.
Strange that your 67 doesn't have them, I figured all second gens had them.
Strange that your 67 doesn't have them, I figured all second gens had them.

donivan65- Governor

- Number of posts : 12248
Location : San Diego, California
Registration date : 2008-05-12
- Post n°68
 Re: My Springs are Sprung
OR,,,,,,,,someone did not think they were important when they worked on it last,,,,,,,,

crazee- Number of posts : 331
Location : O-HIGH-O ---> :P
Registration date : 2009-02-24
- Post n°69
 Re: My Springs are Sprung
donivan65 wrote:OR,,,,,,,,someone did not think they were important when they worked on it last,,,,,,,,
Well.........I reckon the fact that my front end is tight and steers nicely proves they "are not needed" on all.
<wink>
And I say this after almost daily driving all summer.........back roads, highway, gravel roads.
She steers great!
I can't wait to see how the new shocks I just bought will improve the ride. Gas Shocks up front & Hi-Jacker air shocks on the rear. To be installed this week.
Of course the air shocks will only be used to bring up the ass when hooked to a trailer or with lots of fat chicks in back.........

BTW- I have 2 springs up front on each side.

donivan65- Governor

- Number of posts : 12248
Location : San Diego, California
Registration date : 2008-05-12
- Post n°70
 Re: My Springs are Sprung
so,,,,,,,,,,I am seeing my front tires wearing on the insides,,,,,I put my alignment gauge on it and there it is,,,1 degree of Negative Camber,,,,,wheels are leaning in at the top,,,,,so I guess I just ran this axle into the ground. I put my original one back on and one thing I noticed was that the riding height went up when the tires went back to standing straight up,,,,,so a bent axle is another cause if the front end of a van is sagging.....


VANagain- Number of posts : 1048
Location : San Diego, CA
Age : 63
Registration date : 2008-05-16
- Post n°71
 Re: My Springs are Sprung
Hey Don, looking good! Looks like your favorite hammered silver paint!
I just pulled out my entire front end too. Started out as just a brake job, then removing the backing plates to paint them, then I better look at the king pins, not to mention bearings, seals, and the leaf spring rubber bushings.

On the back brakes, I spent a lot of time grinding and sanding the backing plates down to bare metal to paint them. This time I got smart. I found a nearby shop that rents out a sandblasting booth for $35/hour. WELL worth it! This morning it took less than two hours to blast clean all these parts:

Even if I had a sandblaster gun, my little compressor would never keep up. I'd be at it for hours while I waited between bursts.
Unfortunately I couldn't fit the leave springs and sway bar into the sandblasting enclosure. But everything else looks great. Even the rusty brake drums came clean!
I couldn't believe how quickly it got down to bare metal. At first I thought the guy had mixed some silver paint in with the sand or something. The metal got silver but not shiny silver like when you're sanding or grinding. It looks just like you painted it with flat silver paint, I guess because the sand leaves it with a very finely pitted surface. When I got home I had to prove it to myself that this really was bare metal so I took this hub to the wire wheel. It immediately got the shiny look I was expecting.
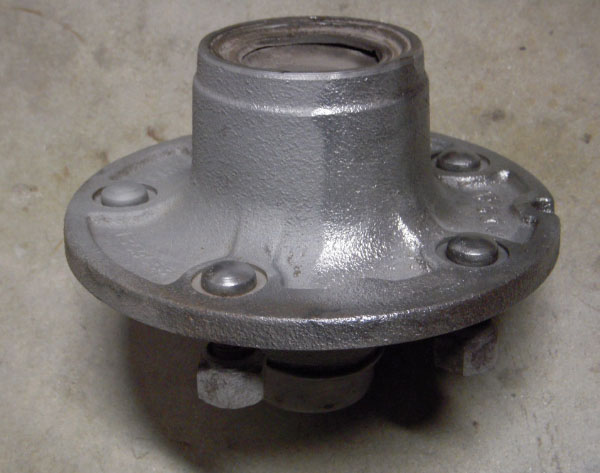
Question is, do I need to get it shiny like this before priming and painting? I hit the brake drum with some degreaser/rust neutralizer before priming, but on the other parts, maybe I don't need to do a thing. What do you think?
I just pulled out my entire front end too. Started out as just a brake job, then removing the backing plates to paint them, then I better look at the king pins, not to mention bearings, seals, and the leaf spring rubber bushings.

On the back brakes, I spent a lot of time grinding and sanding the backing plates down to bare metal to paint them. This time I got smart. I found a nearby shop that rents out a sandblasting booth for $35/hour. WELL worth it! This morning it took less than two hours to blast clean all these parts:

Even if I had a sandblaster gun, my little compressor would never keep up. I'd be at it for hours while I waited between bursts.
Unfortunately I couldn't fit the leave springs and sway bar into the sandblasting enclosure. But everything else looks great. Even the rusty brake drums came clean!
I couldn't believe how quickly it got down to bare metal. At first I thought the guy had mixed some silver paint in with the sand or something. The metal got silver but not shiny silver like when you're sanding or grinding. It looks just like you painted it with flat silver paint, I guess because the sand leaves it with a very finely pitted surface. When I got home I had to prove it to myself that this really was bare metal so I took this hub to the wire wheel. It immediately got the shiny look I was expecting.

Question is, do I need to get it shiny like this before priming and painting? I hit the brake drum with some degreaser/rust neutralizer before priming, but on the other parts, maybe I don't need to do a thing. What do you think?

67a 100 pickup- Number of posts : 1319
Location : ann arbor, mi
Registration date : 2009-01-29
- Post n°72
 Re: My Springs are Sprung
Spray them off with some brake clean to get any left over blasting powder off and paint them up.

BvrWally- Number of posts : 946
Location : Earlyville,Ohio
Registration date : 2008-05-19
- Post n°73
 Re: My Springs are Sprung
Yeah, having a blast booth is great! I just did my GF's oil pan last weekend and it only took me maybe 5 minutes!!

B.W.

B.W.

ChevyVanMan1- Number of posts : 425
Location : Your Nation's Capital
Registration date : 2009-07-19
- Post n°74
 Re: My Springs are Sprung
That hot bolt and wax trick is brilliant. Can't wait to try it on my next rusted nut. Thanks!!!

VANagain- Number of posts : 1048
Location : San Diego, CA
Age : 63
Registration date : 2008-05-16
- Post n°75
 Re: My Springs are Sprung
My 65 Sportvan has the caster shims. Plus it had brass kingpin bushings, so I figure someone overhauled the front end before. Perhaps the caster shims were added then. Since there is no other way to set caster on our axles, it seems to me that a thorough front end alignment could end up adding these shims.


