VintAGE-Vans

Would you like to react to this message? Create an account in a few clicks or log in to continue.

BRINGING IT ALL TOGETHER.... A's, G's & E's


+4
Lazarusvan
Twinpilot001
westcoastvanner
Abitibi
8 posters

    Goodbye Shaggy, Hello Woody. Custom interior

    Abitibi
    Abitibi
    Vintage-Vans Listings Manager
    Vintage-Vans Listings Manager


    Number of posts : 479
    Location : Vancouver BC
    Registration date : 2014-06-23

    Goodbye Shaggy, Hello Woody. Custom interior Empty Goodbye Shaggy, Hello Woody. Custom interior

    Post by Abitibi Sun Jun 28, 2015 11:11 pm

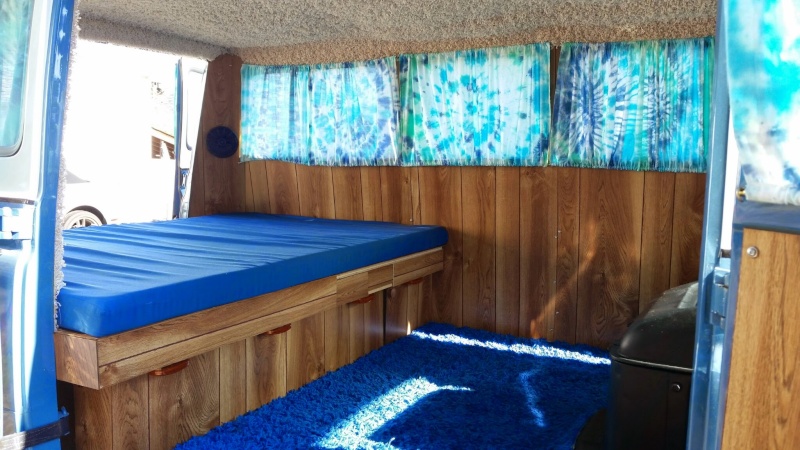
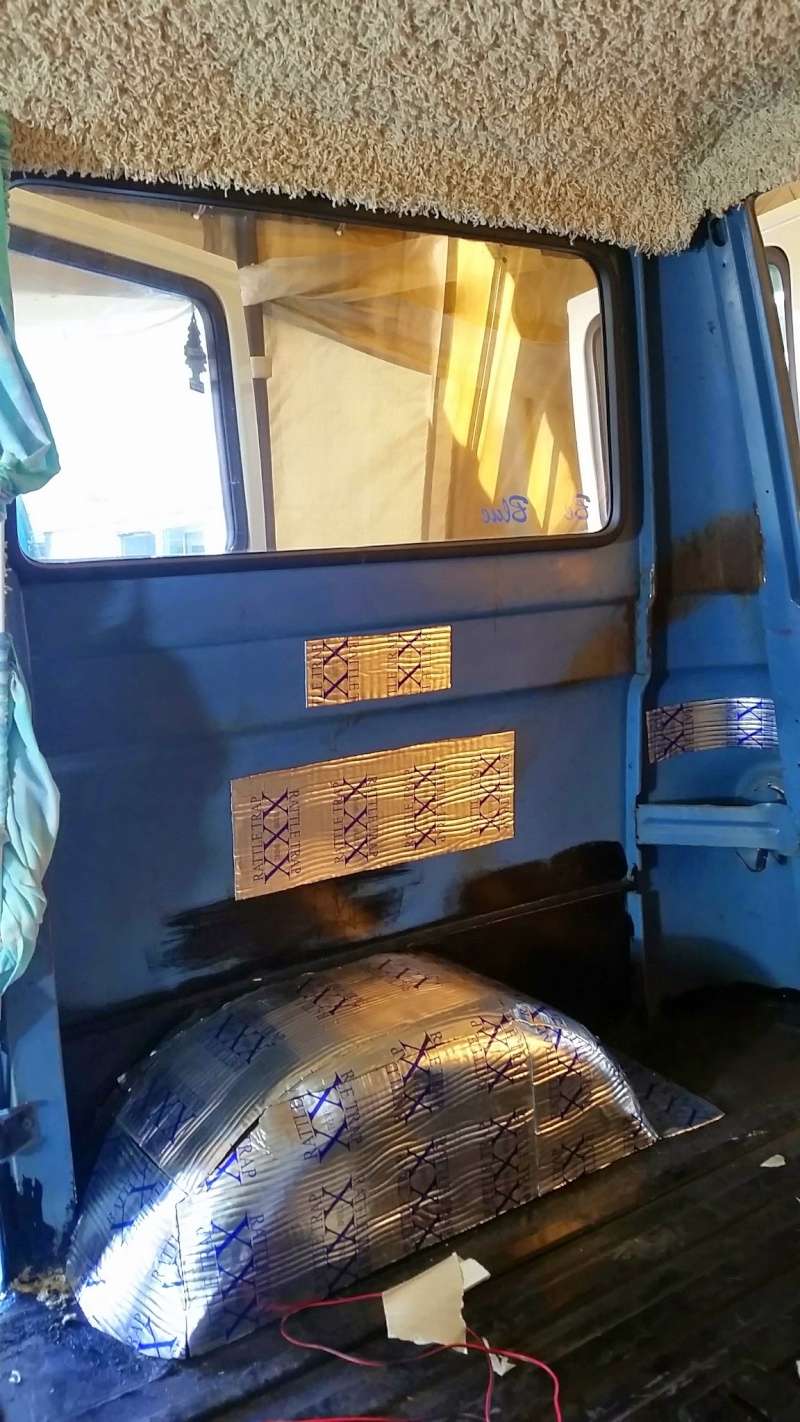
    Shaggy carpets might be cool but the amount of critters squatting in there freaks me out!  affraid  

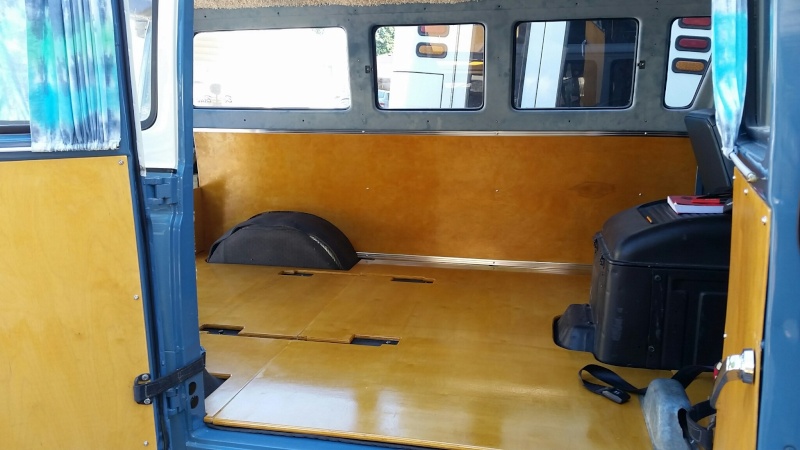
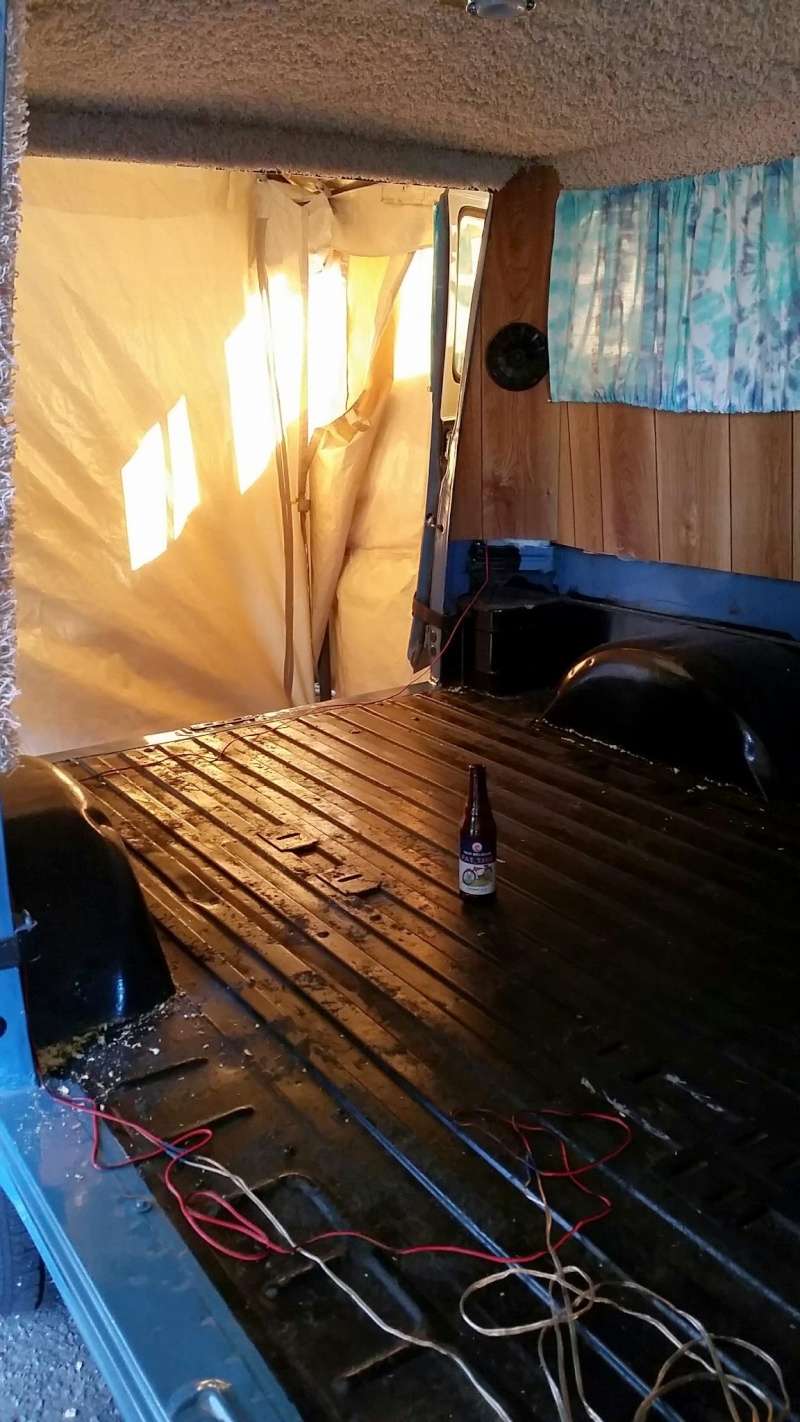
    I also have two young boys who love riding in the van but when I first got it there was only a bed in the back, no good. Here's how it looked when I first bought it.

    (BTW, all my pictures have been cut lengthwise while posting here but if you click on them you'll see the full picture)

    Goodbye Shaggy, Hello Woody. Custom interior 20150310

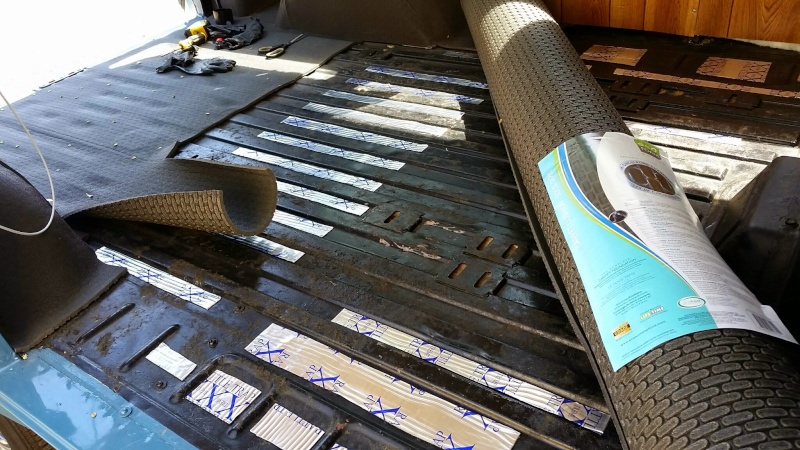
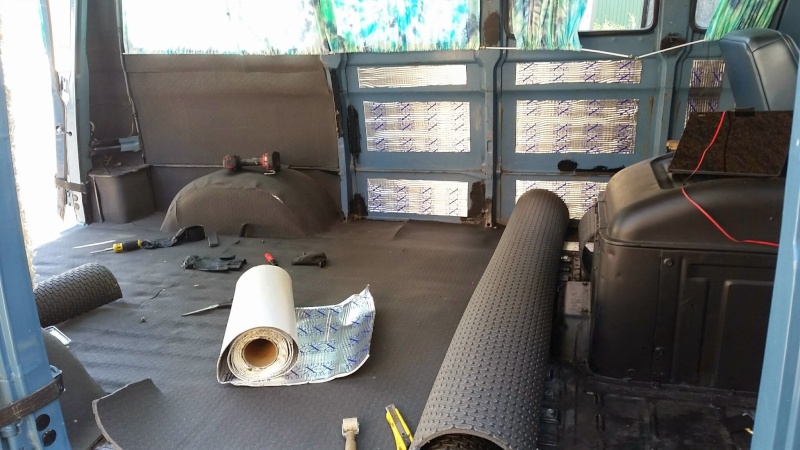
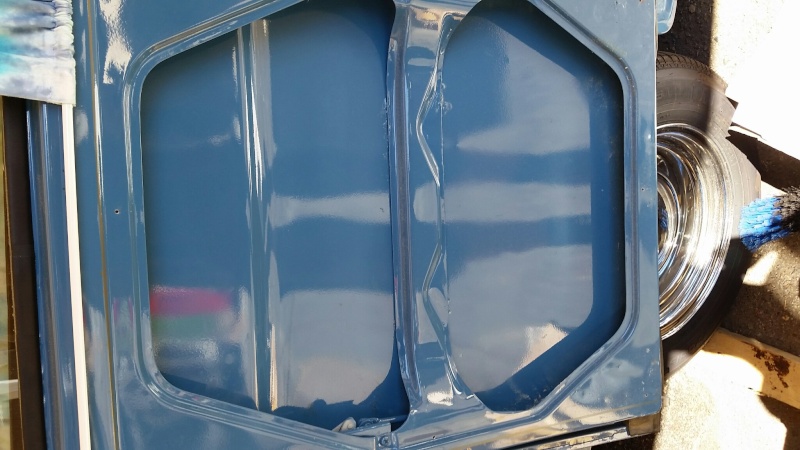
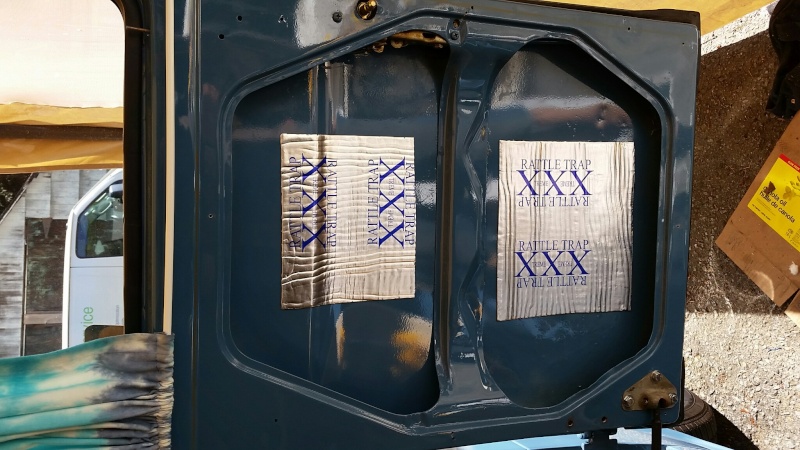
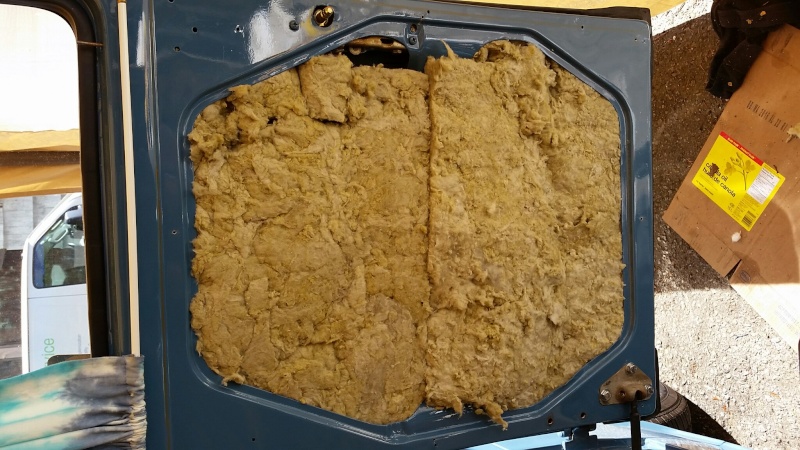
    First thing was to gut the interior. I kept the ceiling, for now, but it will be coming down later on as well.

    Goodbye Shaggy, Hello Woody. Custom interior 20150510

    So I went looking for a bench that could take care of my boys and double as a bed if needed. I also have collectors plates on the van so I'm limited as to what I can use, gotta be either original or Era correct.

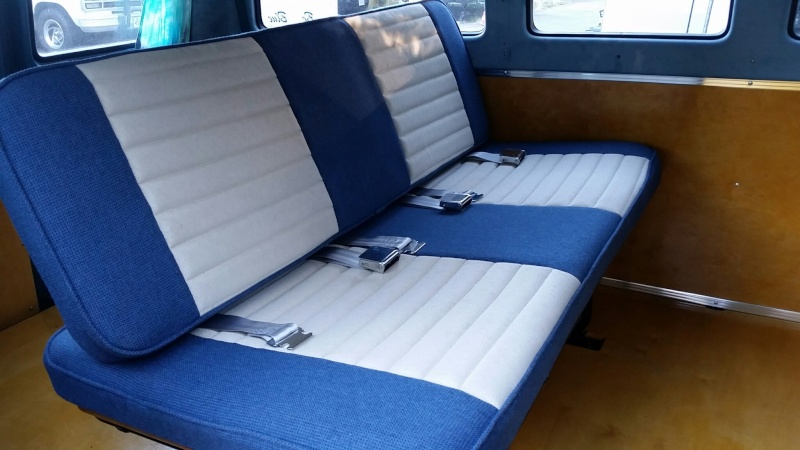
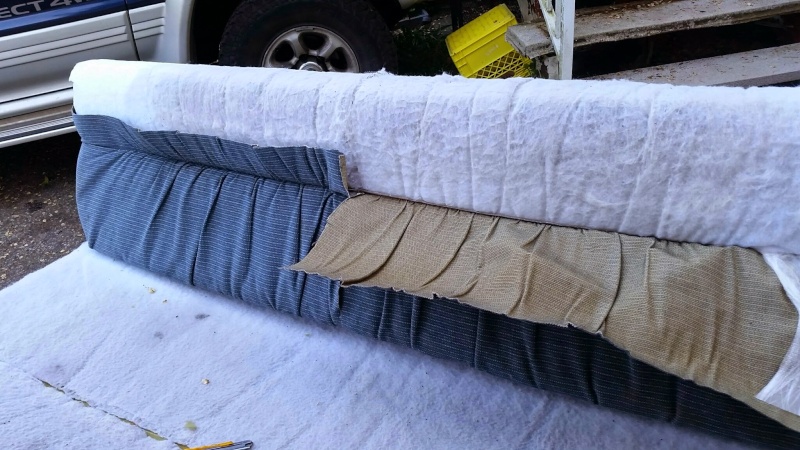
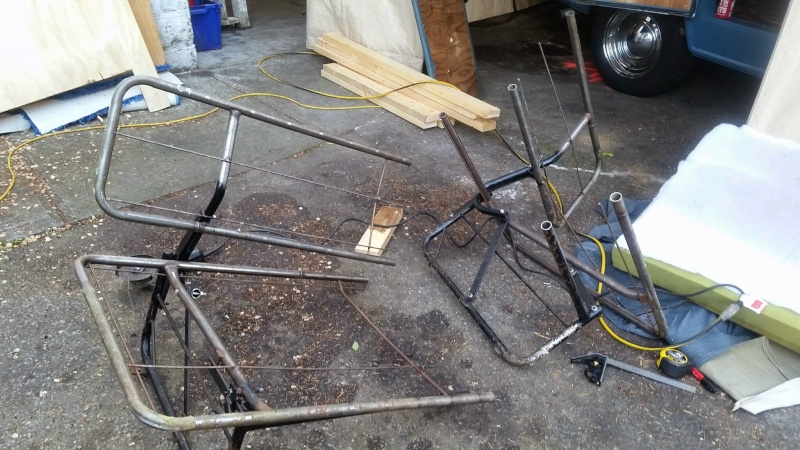
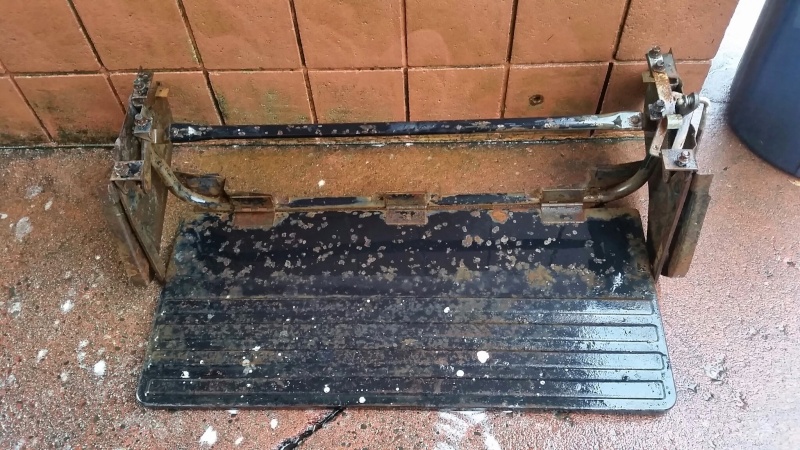
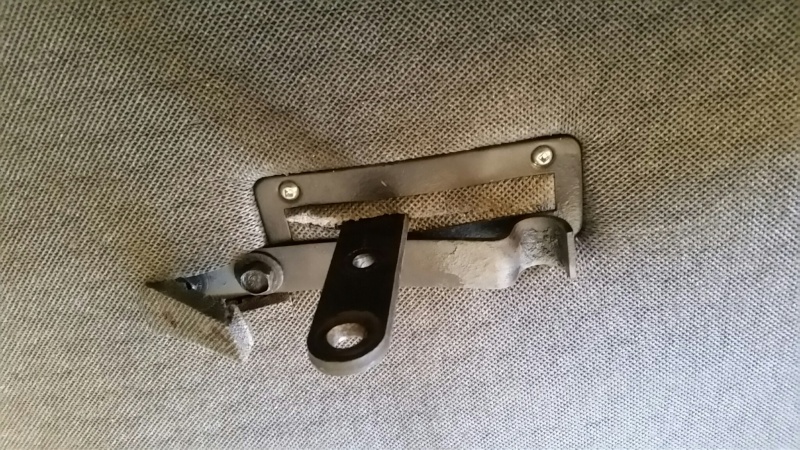
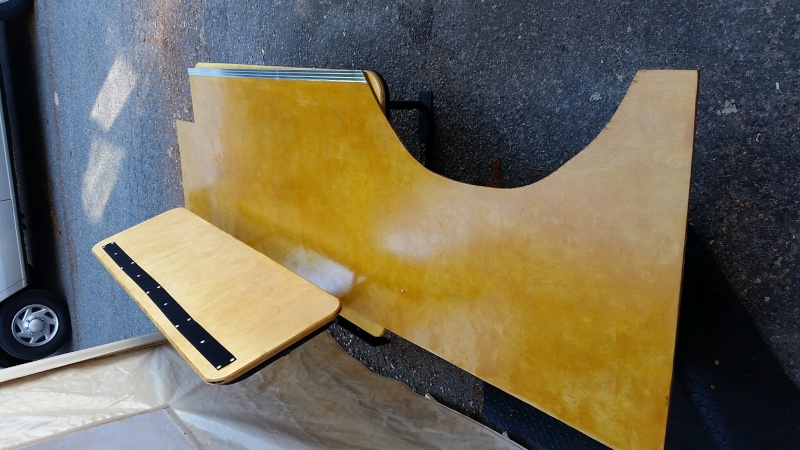
    A friend gave me this old reclining bench. The upholstery was trashed but the frame was fine and it will hopefully look old enough to keep my collectors status.
    Goodbye Shaggy, Hello Woody. Custom interior 20150511

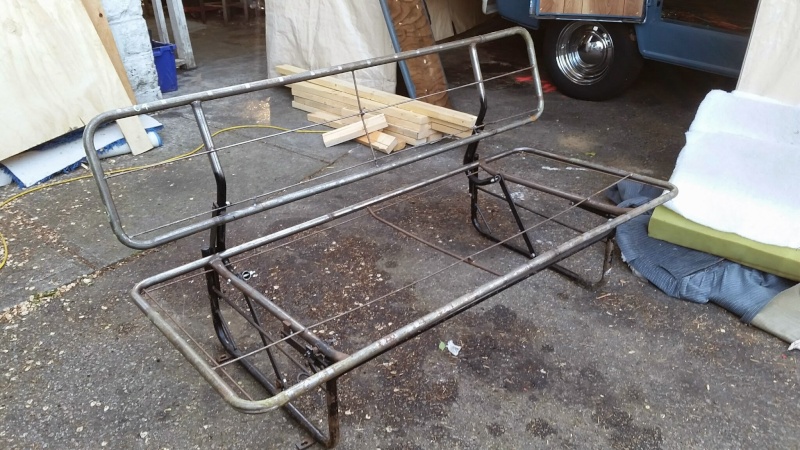
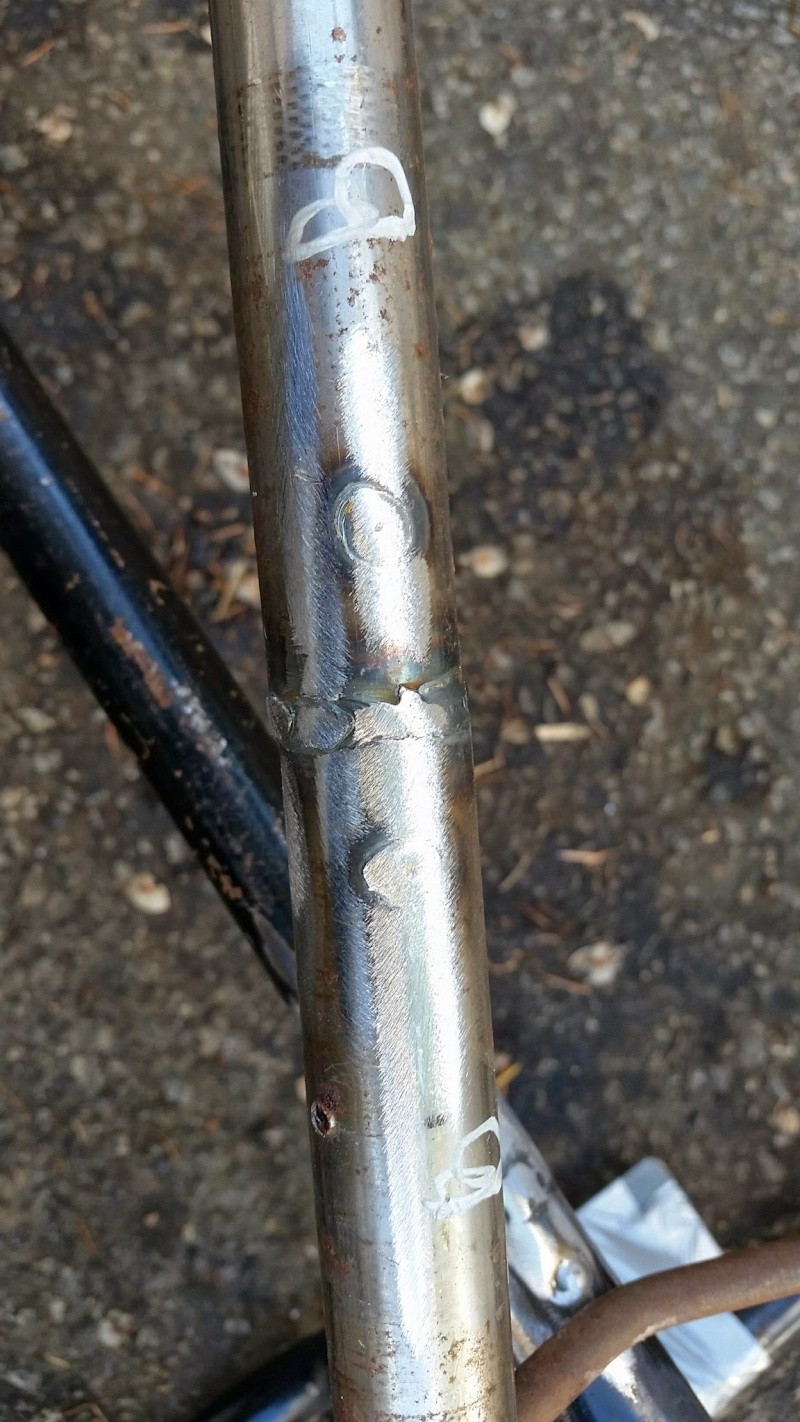
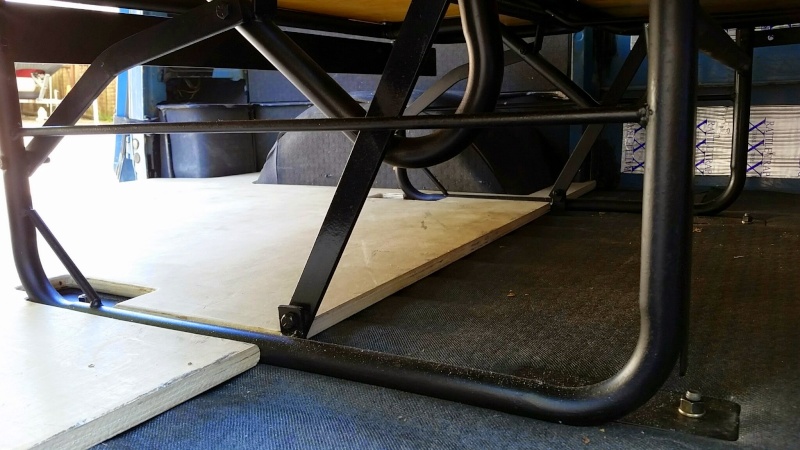
    It was too wide so I cut it in 1/2 and took 12" off the center, inserted some reinforcement tubes inside and welded it back together along with some tabs at the feet and a flat bar at the back for the seatbelts.

    Goodbye Shaggy, Hello Woody. Custom interior 20150512

    Goodbye Shaggy, Hello Woody. Custom interior 20150513

    Goodbye Shaggy, Hello Woody. Custom interior 20150514

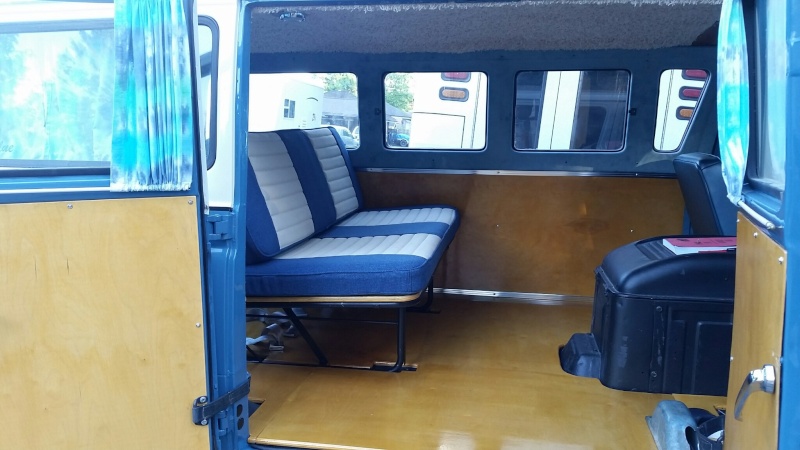
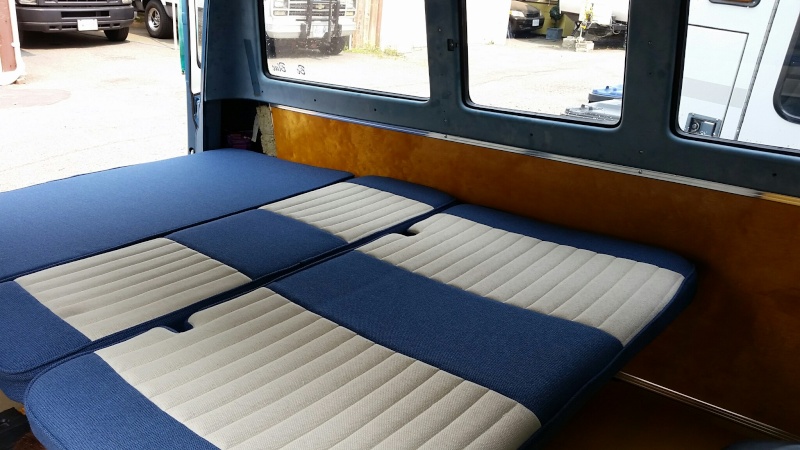
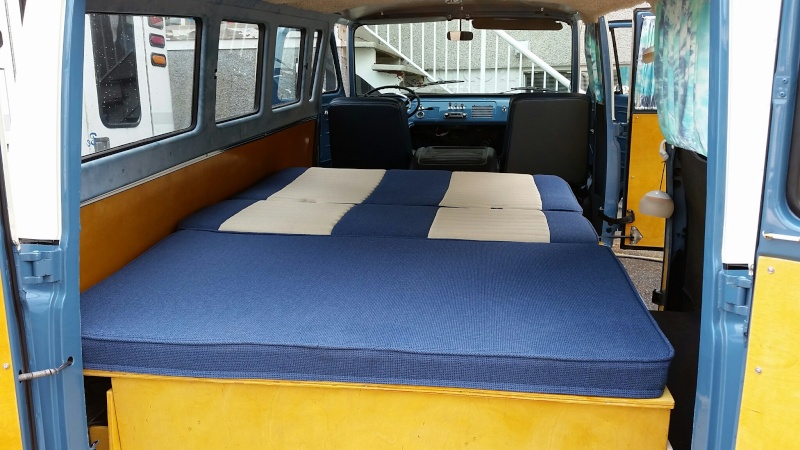
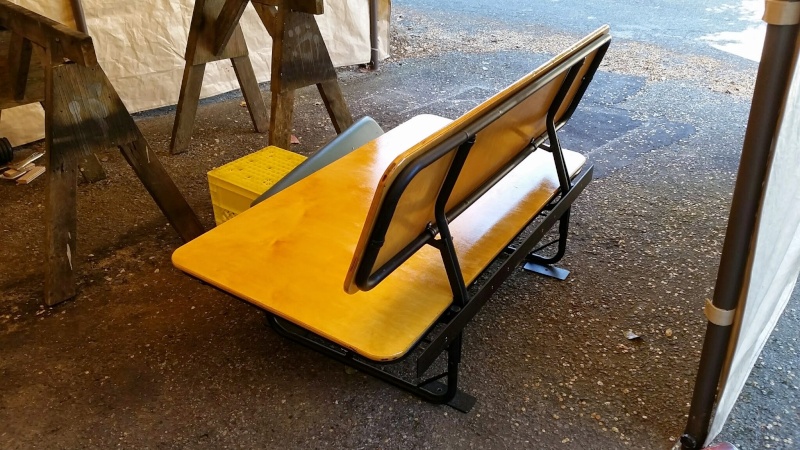
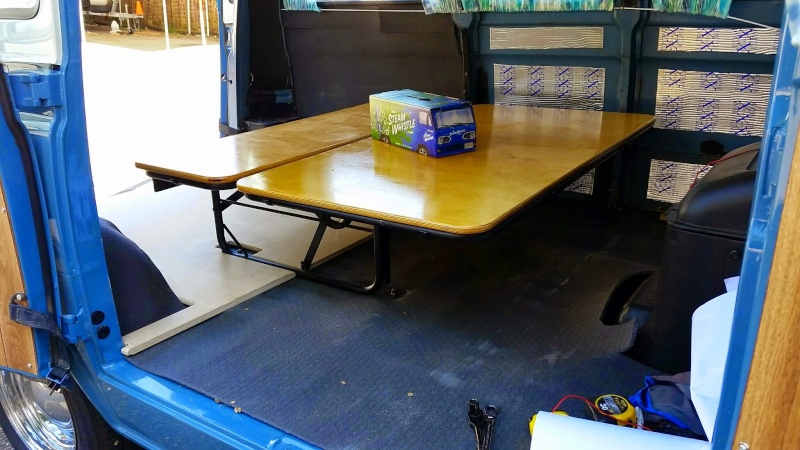
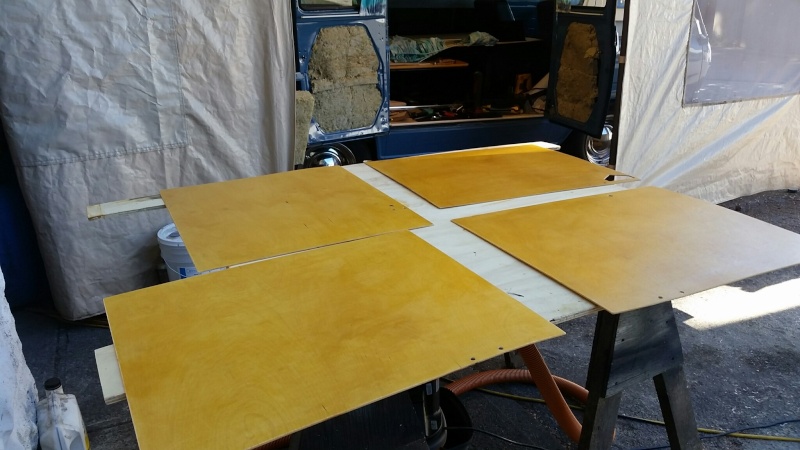
    Added some paint, 3/4" plywood (stained and varnished) and I'm back in the game!

    Goodbye Shaggy, Hello Woody. Custom interior 20150515

    Goodbye Shaggy, Hello Woody. Custom interior 20150516

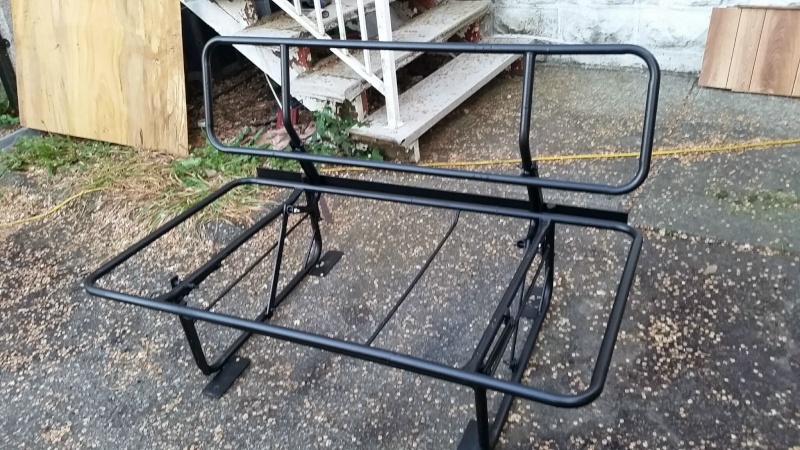
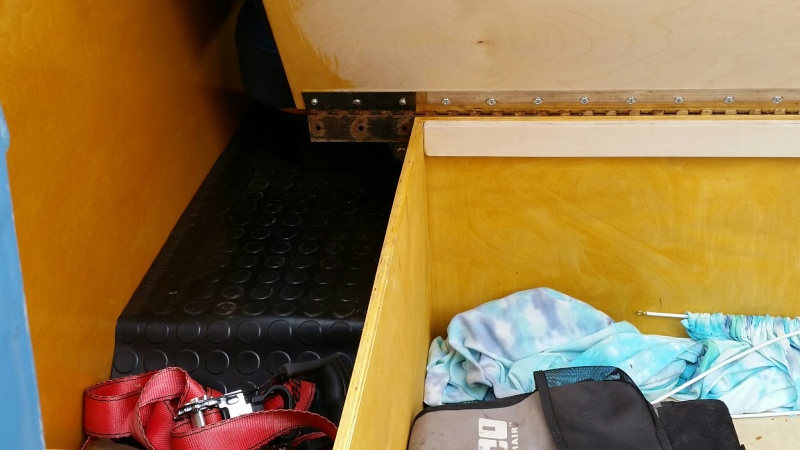
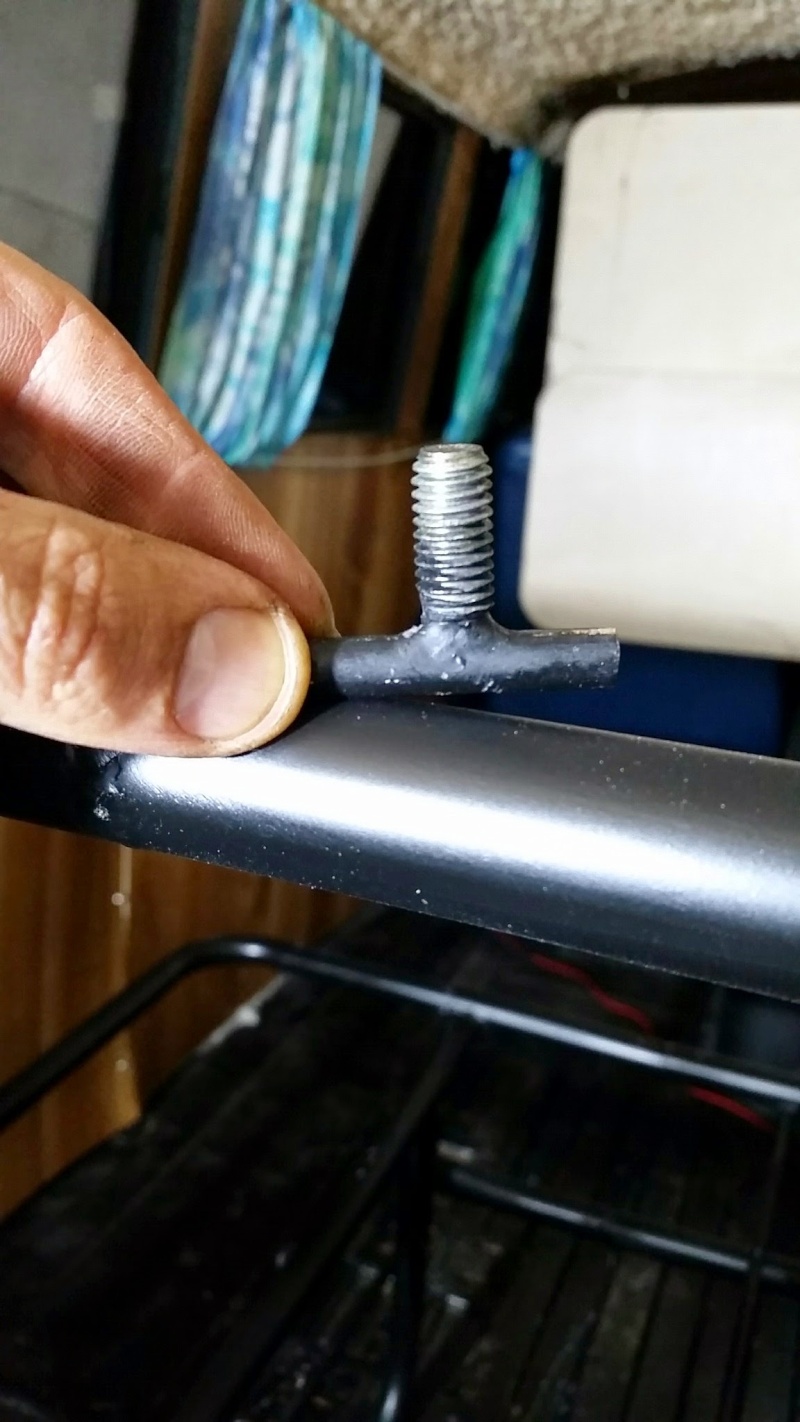
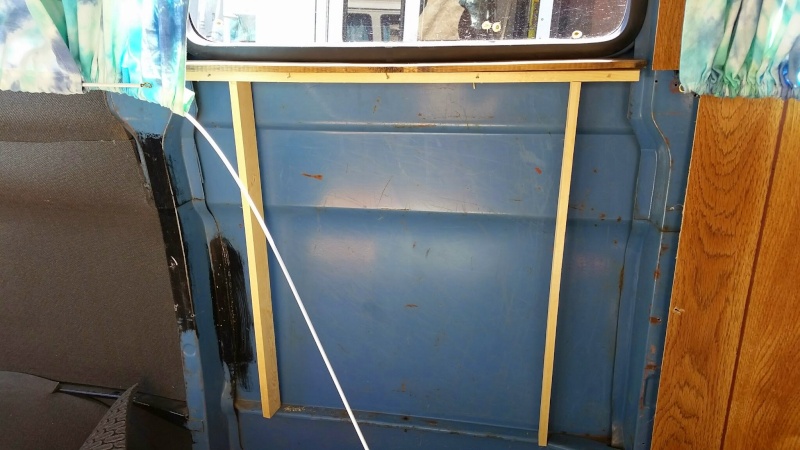
    Almost forgot... I really like the simplicity of how the bench originally attached to the floor. So I went ahead and tig welded some grade 8 bolts to use the original slots in the floor. Works a charm!

    Goodbye Shaggy, Hello Woody. Custom interior 20150523


    Last edited by Abitibi on Mon Jun 29, 2015 8:51 am; edited 3 times in total
    Abitibi
    Abitibi
    Vintage-Vans Listings Manager
    Vintage-Vans Listings Manager


    Number of posts : 479
    Location : Vancouver BC
    Registration date : 2014-06-23

    Goodbye Shaggy, Hello Woody. Custom interior Empty Re: Goodbye Shaggy, Hello Woody. Custom interior

    Post by Abitibi Sun Jun 28, 2015 11:40 pm

    I need a new floor!

    I was quite lucky to find a rust free floor under all that shag. So I gave it a good clean up and started with some Dynamat (FatMat) like material to absorb the "tin can" effect. No need to go crazy on the floor but on the wheel wells I decided to wrap the entire thing. From experience, noise intrusion (aside from the engine) comes mostly from the wheel wells and the doors.

    Goodbye Shaggy, Hello Woody. Custom interior 20150517

    Goodbye Shaggy, Hello Woody. Custom interior 20150518

    While at it might as well get started with the walls!

    Goodbye Shaggy, Hello Woody. Custom interior 20150519

    Next I added some closed cell foam (1/2") to provide some insulation for both temperature and noise. It's important to use closed cell foam as it doesn't absorb water or humidity. I found mine at HomeDepot as a carpet underlay. As you can see there's also ridges underneath to allow air to circulate. That stuff is not too expensive and it's easy to work with.

    Once I had it all over the floor I decided to go with 3/4" plywood. Making the template to ensure a good fit is quite time consuming but that's the way to go...

    Goodbye Shaggy, Hello Woody. Custom interior 20150520

    Goodbye Shaggy, Hello Woody. Custom interior 20150618

    Goodbye Shaggy, Hello Woody. Custom interior 20150521

    Goodbye Shaggy, Hello Woody. Custom interior 20150619

    In the Zzzzzzzzz position!

    Goodbye Shaggy, Hello Woody. Custom interior 20150522

    I also found this site step for dirt cheap ($25) so I sandblasted it, painted it and slammed it underneath. I made sure it would be fairly sealed from the element...

    Goodbye Shaggy, Hello Woody. Custom interior 20141210

    Goodbye Shaggy, Hello Woody. Custom interior 20150410

    Goodbye Shaggy, Hello Woody. Custom interior 20150620

    More to come! Very Happy


    Last edited by Abitibi on Mon Jun 29, 2015 8:47 am; edited 2 times in total
    Abitibi
    Abitibi
    Vintage-Vans Listings Manager
    Vintage-Vans Listings Manager


    Number of posts : 479
    Location : Vancouver BC
    Registration date : 2014-06-23

    Goodbye Shaggy, Hello Woody. Custom interior Empty Re: Goodbye Shaggy, Hello Woody. Custom interior

    Post by Abitibi Sun Jun 28, 2015 11:45 pm

    I could use some suggestions here...

    I'm not certain how to finish my floor. I could stain and varnish the plywood, I think it would look decent and maybe add an area rug.

    I also thought of using linoleum, maybe the white and black 1' squares (Chess pattern?)
    I just got to make sure it's old school for my collector's status.

    Any ideas?

    Cheers,
    Mr. D
    westcoastvanner
    westcoastvanner


    Number of posts : 1686
    Location : Santa Barbara, California
    Registration date : 2008-10-04

    Goodbye Shaggy, Hello Woody. Custom interior Empty Re: Goodbye Shaggy, Hello Woody. Custom interior

    Post by westcoastvanner Mon Jun 29, 2015 7:02 am

    Keep the photos coming.
    Twinpilot001
    Twinpilot001


    Number of posts : 6186
    Location : spokane ,Wa.
    Registration date : 2009-09-28

    Goodbye Shaggy, Hello Woody. Custom interior Empty Re: Goodbye Shaggy, Hello Woody. Custom interior

    Post by Twinpilot001 Mon Jun 29, 2015 7:36 am

    Looks Great!! Good Decision!! except!! Quit drinking that = "Fat Tire" Swill !! or= you will get a "Flat Tire"!! affraid Twisted Evil lol! lol! lol!
    Lazarusvan
    Lazarusvan


    Number of posts : 1293
    Location : Charleston, South Carolina
    Age : 51
    Registration date : 2011-02-22

    Goodbye Shaggy, Hello Woody. Custom interior Empty Re: Goodbye Shaggy, Hello Woody. Custom interior

    Post by Lazarusvan Mon Jun 29, 2015 7:48 am

    I think how you finish it depends on type of use. Will you load things and use it as it was intended from time to time. That is my dilemma. I want it to look great but also be durable enough to not look worn when I load boxes/bins/folding tables.

    Nice work!
    Abitibi
    Abitibi
    Vintage-Vans Listings Manager
    Vintage-Vans Listings Manager


    Number of posts : 479
    Location : Vancouver BC
    Registration date : 2014-06-23

    Goodbye Shaggy, Hello Woody. Custom interior Empty Re: Goodbye Shaggy, Hello Woody. Custom interior

    Post by Abitibi Mon Jun 29, 2015 8:17 am

    Twinpilot001 wrote:Looks Great!! Good Decision!! except!! Quit drinking that = "Fat Tire"  Swill !! or= you will get a "Flat Tire"!!  affraid Twisted Evil lol! lol! lol!

    As you can tell from another picture down the build I followed your advice and switched to a Canadian beer supporting our old Econolines. cheers

    As for type of load dilemma, it obviously crossed my mind. That's one reason I didn't do permanently attached cushions on my bench. As is the cushions can be removed to allow the loading of large items. I also have a trailer so all those greasy parts don't need to travel inside my van.

    I'm also getting ready to build my "trunk" which will be behind the bench to complete the last portion of the bed. One nice thing with this bench is that when it folds down it travels forwards. This allows me to build the trunk right against the back of the bench (and same height for the bed...) Should provide plenty of storage Very Happy


    Abitibi
    Abitibi
    Vintage-Vans Listings Manager
    Vintage-Vans Listings Manager


    Number of posts : 479
    Location : Vancouver BC
    Registration date : 2014-06-23

    Goodbye Shaggy, Hello Woody. Custom interior Empty Re: Goodbye Shaggy, Hello Woody. Custom interior

    Post by Abitibi Mon Jun 29, 2015 8:44 am

    westcoastvanner wrote:Keep the photos coming.

    A few more before I head out to do some more work on this project. Smile

    I already posted some of this in another post about wall insulation but here we go anyway.
    No disrespect to anyone but I hated the old paneling that came with the van. So out they came and while at it might as well do it right. Same process, clean it up (no rust nor critters), FatMat, Closed Cell Foam but this time I added a layer of Roxul insulation. This one is the sound barrier/fire retardant type. Again, it doesn't absorb water (unlike the typical pink insulation) and is much easier to work with. I could easily cut the thickness as needed.

    Sorry for letting some pictures fall on their side! No idea why this happened.

    Goodbye Shaggy, Hello Woody. Custom interior 20150621

    Goodbye Shaggy, Hello Woody. Custom interior 20150622

    Goodbye Shaggy, Hello Woody. Custom interior 20150624

    Goodbye Shaggy, Hello Woody. Custom interior 20150623

    Goodbye Shaggy, Hello Woody. Custom interior 20150625

    I build new panels out of 1/8" plywood with a nice coat of natural stain and a couple coats of varnish. Later I'll add some storage boxes against them but good for now, need to move on!

    Goodbye Shaggy, Hello Woody. Custom interior 20150626

    Goodbye Shaggy, Hello Woody. Custom interior 20150627

    You can also see in the background of the last picture my newly found fiberglass panel. It will need a nice paint job but I needed it in place to start on the lower panel which will be pretty much the same as the doors.

    Years ago I had this old VW, drove it for 10 years before selling it. The inside was all in plywood, just like my new doors and it was amazingly cozy, just like a little sailboat. So this is the plan for this one  cheers
    vanny
    vanny
    Moderator


    Number of posts : 14775
    Location : Ashburnham, MA
    Age : 65
    Registration date : 2012-09-22

    Goodbye Shaggy, Hello Woody. Custom interior Empty Re: Goodbye Shaggy, Hello Woody. Custom interior

    Post by vanny Mon Jun 29, 2015 9:58 am

    Coming along very nicely!!! Keep the pics coming, Please!


    _________________
    “The future will soon be a thing of the past."

    http://public.fotki.com/Vintage-Vans/vintage-vans-es/ruff-diamond-1/?cmd=fs_slideshow
    Abitibi
    Abitibi
    Vintage-Vans Listings Manager
    Vintage-Vans Listings Manager


    Number of posts : 479
    Location : Vancouver BC
    Registration date : 2014-06-23

    Goodbye Shaggy, Hello Woody. Custom interior Empty Re: Goodbye Shaggy, Hello Woody. Custom interior

    Post by Abitibi Mon Jun 29, 2015 8:14 pm

    vanny wrote:Coming along very nicely!!! Keep the pics coming,  Please!

    You guys sounds like 16 years old watching porn! lol!

    Today was mostly stain and varnish, not very exiting. I went ahead and did all the floors, this way I'll have the option to either use them as is or later on add another layer on top.

    I'm doing my best to keep it all modular, this way I should be able to easily bring it back as a cargo van if needed.

    Goodbye Shaggy, Hello Woody. Custom interior 20150628

    Goodbye Shaggy, Hello Woody. Custom interior 20150629

    I'm not done with the driver side wall. I still need to add another metal trim at the top but need to test fit first before gluing it in place...

    Goodbye Shaggy, Hello Woody. Custom interior 20150630

    I hesitated between going straight walls and thus framing it as so:

    Goodbye Shaggy, Hello Woody. Custom interior 20150524

    But at the end I decided to follow the natural curve of the van's ribs which 1/8" plywood allows me to do so.
    Joe Van
    Joe Van
    Moderator 1st Class
    Moderator 1st Class


    Number of posts : 4619
    Location : Ocala fl
    Registration date : 2012-10-11

    Goodbye Shaggy, Hello Woody. Custom interior Empty Re: Goodbye Shaggy, Hello Woody. Custom interior

    Post by Joe Van Mon Jun 29, 2015 9:04 pm

    Moving right along looks really "Good" gave me a few ideas Great job on the bench seat also..!!!... Very Happy


    _________________
    1966 GMC Handivan  "Panel"....1975 Chevy Van G10 "Panel"....1991 Chevy Van G20 "Conversion"
    Abitibi
    Abitibi
    Vintage-Vans Listings Manager
    Vintage-Vans Listings Manager


    Number of posts : 479
    Location : Vancouver BC
    Registration date : 2014-06-23

    Goodbye Shaggy, Hello Woody. Custom interior Empty Re: Goodbye Shaggy, Hello Woody. Custom interior

    Post by Abitibi Wed Jul 01, 2015 9:03 am

    G'morning van lovers!

    Yesterday really started to come together and I'm very pleased how it's turning out. Started the day by putting the newly stained/varnished floors in place. Followed by repeating my old recipe; clean, FatMat, Closed Cell Foam and Roxul. I used tape to hold it all in place until I could mount my paneling piece. I also added a metal trim at the top of the side panel. I tried without and it didn't look as good. Looks sharp doesn't it! (Although I'm not sure how long those floors will stay nice  What a Face )

    Goodbye Shaggy, Hello Woody. Custom interior 20150632

    Goodbye Shaggy, Hello Woody. Custom interior 20150633

    Once I put my new cushions in place I could really see light at the end of the tunnel!

    Goodbye Shaggy, Hello Woody. Custom interior 20150634

    Goodbye Shaggy, Hello Woody. Custom interior 20150635

    Goodbye Shaggy, Hello Woody. Custom interior 20150636

    And in the Zzzzzzzzz position. I have another cushion that will go at the back to complete the bed but first I need to build the base for it... Still, it gives an idea of what's to come.

    Goodbye Shaggy, Hello Woody. Custom interior 20150637

    Kids approved!!!

    Goodbye Shaggy, Hello Woody. Custom interior 20150638


    Cheers,
    Mr. D
    vanny
    vanny
    Moderator


    Number of posts : 14775
    Location : Ashburnham, MA
    Age : 65
    Registration date : 2012-09-22

    Goodbye Shaggy, Hello Woody. Custom interior Empty Re: Goodbye Shaggy, Hello Woody. Custom interior

    Post by vanny Wed Jul 01, 2015 9:31 am

    Nice to see you got the stamp of approval!!! They will remember this van for the rest of their lives!!!


    _________________
    “The future will soon be a thing of the past."

    http://public.fotki.com/Vintage-Vans/vintage-vans-es/ruff-diamond-1/?cmd=fs_slideshow
    westcoastvanner
    westcoastvanner


    Number of posts : 1686
    Location : Santa Barbara, California
    Registration date : 2008-10-04

    Goodbye Shaggy, Hello Woody. Custom interior Empty Re: Goodbye Shaggy, Hello Woody. Custom interior

    Post by westcoastvanner Wed Jul 01, 2015 10:07 am

    Anyone out there have a floor pattern for a Dodge A100?
    Big W
    Big W


    Number of posts : 3282
    Location : Saskatoon,Sask,Canada
    Age : 59
    Registration date : 2011-01-13

    Goodbye Shaggy, Hello Woody. Custom interior Empty Re: Goodbye Shaggy, Hello Woody. Custom interior

    Post by Big W Wed Jul 01, 2015 12:22 pm

    Abitibi that looks really nice. Nice choice of colors. cheers
    Abitibi
    Abitibi
    Vintage-Vans Listings Manager
    Vintage-Vans Listings Manager


    Number of posts : 479
    Location : Vancouver BC
    Registration date : 2014-06-23

    Goodbye Shaggy, Hello Woody. Custom interior Empty Re: Goodbye Shaggy, Hello Woody. Custom interior

    Post by Abitibi Sat Jul 04, 2015 3:33 pm

    Hey guys, thanks for the support! I got far enough with the conversion to take it out camping for the weekend and what a nice cozy sleep!!! Everyone at the campsite were jealous of my setup Very Happy

    I'll post more pictures once I'm done with the varnish but man do I have a lot of storage in the back now! I can easily load 6 milk crates in the trunk then I still have room under the bed and more.

    I'm also pretty much done with my front floor and it looks pretty sharp. Pics to follow...

    Only thing left for now is my tall side cabinet but that won't happen until next month because it is now holiday time!

    Cheers
    Mr. D
    vanny
    vanny
    Moderator


    Number of posts : 14775
    Location : Ashburnham, MA
    Age : 65
    Registration date : 2012-09-22

    Goodbye Shaggy, Hello Woody. Custom interior Empty Re: Goodbye Shaggy, Hello Woody. Custom interior

    Post by vanny Mon Jul 06, 2015 3:19 pm

    Can't wait to see the "Proof"...I mean pics! Sounds like a successful Camping trip. Congrats and get used to the attention.cheers People love these vans because they remember them growing up and there's not that many around with the exception of Van Diego, Portland, Arizona and some of the dryer,warmer states.

    I can't wait to see the day I can actually head out in my van again!


    _________________
    “The future will soon be a thing of the past."

    http://public.fotki.com/Vintage-Vans/vintage-vans-es/ruff-diamond-1/?cmd=fs_slideshow
    Abitibi
    Abitibi
    Vintage-Vans Listings Manager
    Vintage-Vans Listings Manager


    Number of posts : 479
    Location : Vancouver BC
    Registration date : 2014-06-23

    Goodbye Shaggy, Hello Woody. Custom interior Empty Re: Goodbye Shaggy, Hello Woody. Custom interior

    Post by Abitibi Mon Jul 06, 2015 4:44 pm

    Yes, had a great weekend with the family! It was nice to go camping in an old bus again after so many years! We even managed to squeeze all 4 of us on that bed but it was a tight fit although our boys are still pretty young. Nevertheless, I'll figure a second bed for the boys...

    So here we go with some "Proofs" Smile

    This is how the bed looks like. As for dimension is about 53" wide by 6'4" long. The foam is 3" thick and is really firm which is what I like.

    Goodbye Shaggy, Hello Woody. Custom interior 20150710

    Goodbye Shaggy, Hello Woody. Custom interior 20150711

    Here's a small storage compartment beside the larger one. I finished it with the same material that I used for the front area, some 1/8" thick rubber.

    Goodbye Shaggy, Hello Woody. Custom interior 20150712

    This is the main compartment and it's huge, 32" deep by 48" wide and 14" tall. I can easily pack the kids in there if they don't behave, or my wife Wink

    Goodbye Shaggy, Hello Woody. Custom interior 20150713

    Just a cool shot of the finishing trim on my side panel.

    Goodbye Shaggy, Hello Woody. Custom interior 20150714
    Abitibi
    Abitibi
    Vintage-Vans Listings Manager
    Vintage-Vans Listings Manager


    Number of posts : 479
    Location : Vancouver BC
    Registration date : 2014-06-23

    Goodbye Shaggy, Hello Woody. Custom interior Empty Re: Goodbye Shaggy, Hello Woody. Custom interior

    Post by Abitibi Mon Jul 06, 2015 4:51 pm

    And this is the front floor. I still need to work on the trim pieces but it's getting there. I pushed the rubber as far up as I could to prevent critters from finding their way behind the mat. It also goes towards the back all the way to the plywood floor. I like how the floor now tightly wraps around all the accessories (steering column, all the pedals...)
    It is now waaaaaaay easier to keep clean than the old shag carpet.

    Goodbye Shaggy, Hello Woody. Custom interior 20150715

    Goodbye Shaggy, Hello Woody. Custom interior 20150716

    So not much left at this stage. Need to finish the rear corner, build the tall cabinet on the rear passenger's side and later on re-do the ceiling. And a second bed for the kids!!!  cheers

    Cheers
    Mr. D
    Big W
    Big W


    Number of posts : 3282
    Location : Saskatoon,Sask,Canada
    Age : 59
    Registration date : 2011-01-13

    Goodbye Shaggy, Hello Woody. Custom interior Empty Re: Goodbye Shaggy, Hello Woody. Custom interior

    Post by Big W Mon Jul 06, 2015 6:24 pm

    You need to make a console for your cold drinks so they will be easier to reach while driving. But aside from that I must say that this looks totally awesome. That bed looks perfect back there and the size is nice. cheers
    Abitibi
    Abitibi
    Vintage-Vans Listings Manager
    Vintage-Vans Listings Manager


    Number of posts : 479
    Location : Vancouver BC
    Registration date : 2014-06-23

    Goodbye Shaggy, Hello Woody. Custom interior Empty Re: Goodbye Shaggy, Hello Woody. Custom interior

    Post by Abitibi Mon Jul 06, 2015 7:09 pm

    Thanks!

    It's in the work! It will incorporate armrest and will be secured by magnet. But patience Boyz, patience!
    kookykrispy
    kookykrispy


    Number of posts : 1533
    Location : Helendale, CA
    Age : 50
    Registration date : 2009-05-22

    Goodbye Shaggy, Hello Woody. Custom interior Empty Re: Goodbye Shaggy, Hello Woody. Custom interior

    Post by kookykrispy Mon Jul 06, 2015 7:40 pm

    very nice work!
    vanny
    vanny
    Moderator


    Number of posts : 14775
    Location : Ashburnham, MA
    Age : 65
    Registration date : 2012-09-22

    Goodbye Shaggy, Hello Woody. Custom interior Empty Re: Goodbye Shaggy, Hello Woody. Custom interior

    Post by vanny Tue Jul 07, 2015 4:06 pm

    Love the front floor, seems like that rubber will protect the floor from all the dirt and stuff that gets stuck on bottom of shoes. Great looking work. The bed looks comfy too! Did you do the seat covers yourself or did you have them made cause they look Fantastic! cheers


    _________________
    “The future will soon be a thing of the past."

    http://public.fotki.com/Vintage-Vans/vintage-vans-es/ruff-diamond-1/?cmd=fs_slideshow
    Abitibi
    Abitibi
    Vintage-Vans Listings Manager
    Vintage-Vans Listings Manager


    Number of posts : 479
    Location : Vancouver BC
    Registration date : 2014-06-23

    Goodbye Shaggy, Hello Woody. Custom interior Empty Re: Goodbye Shaggy, Hello Woody. Custom interior

    Post by Abitibi Tue Jul 07, 2015 4:11 pm

    Thanks a bunch. I'm much better with wood than upholstery so I just bought the high end automotive foam, cut it as needed and got a local lady to do the upholstery based on my idea. Turned out pretty good Smile

    For the front I did just like the rear and soundproofed and insulated the floor before laying down the rubber mat.

    I'm thinking of getting a skirt for the doghouse as well...

    Sponsored content


    Goodbye Shaggy, Hello Woody. Custom interior Empty Re: Goodbye Shaggy, Hello Woody. Custom interior

    Post by Sponsored content


      Current date/time is Fri Apr 26, 2024 1:01 pm