Gavin here, from upstate SC. Bought Snuffleupagus at the beginning of January '14 and had my blinders on at the time, but I don't have any regrets. It was listed as an "older restoration" in the craigslist ad when it really should have read "older hack-job". I drove it 180 miles back home from Statesville, NC. Well, more like limped it home haha. After the "restoration", they parked the truck in a garage and never got all the bugs worked out. Needless to say, I had to deal with all the bugs.
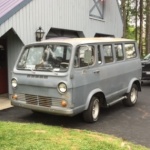
Here's the picture from the ad. Snuff sported wheel adapters with Oldsmobile wheels, a 307 sbc and TH350 trans, chevy pickup rear bumper, chevy seats, Chevy rear view mirrors, BMW steering wheel and a ton of diamond plate. They must have had a big piece laying around because the instrument panel, misc brackets, and even a tailgate cover were made from aluminum diamond plate. The guy I bought it from had already removed the tailgate cover. Not sure why anyone would want to cover it up?

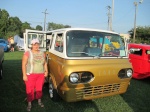
Finally home!!


I purchased some 14" wheels from summit racing and some super cheap tires from ebay. One of my friends painted them Galaxy Gray and cleared em. I'll eventually get center caps and beauty rings.


Ignore the rusty panel. It won't be there long.

The wiring was a disaster. Bad grounds, rats nest, corrosion, you name it. Got the 8 circuit kit from Rebel Wire. I love this kit. Super easy to install. Just don't forget connectors and heat shrink!! This has since been covered with a Telsa cloth tape.


The diamond plate dash had to go. I flipped it over and hit it with some cast gray paint I had on the shelf. I'll eventually find the factory stuff to go in it, but this works for now.

The brakes left a lot to the imagination during the test drive. The seller and his neighbor could only shake their heads in disbelief when I pulled out the driveway for the trek home. Once I pulled the brakes apart, I realized that driving that truck home was probably one of the dumbest things I've done before. The brake reservior was bone dry and rusty. The only fluid was what was inthe lines behind the plunger. EEK!!

Luckily all the components except the brake springs were salvagable. Installed new wheel bearings, flushed the lines and rebuilt the master cylinder. Now I can stop with confidence.

Found the front letters along with a rear driver corner patch panel on Norfolk craigslist for a good price. I drilled the body filler out of the mounting holes and popped em in. Now it's starting to look like a proper e-pup.

Used some paint stripper to get the flat black off of the bezels. That was way more work than I anticipated. They still aren't perfect, but look way better than before. Sprayed some aluminum color behind it, for now.

First time back on the road!! Had to stop for a couple of artsy fartsy iphone pics.


I'm finally to the point where I can get rid of some of the rusty areas and body filler. Started with the left rear corner since I already had the patch panel.
Some spots were about 3/8" thick!! This came off in one big chunk.

I could have just drawn a line and cut it out but I just HAD to see how much filler a person could possibly use. The pictures don't do this everlasting gobstopper justice.

Probably should have removed the tank and filler neck before cutting. Oh well, I've done dumber things.

After I got it cut out, I saw someone's advice to leave about an inch of old metal. Oops. I still have about 1/8" to weld to. I'll just have to be super careful with that seam when I'm grinding the proud.

I still have to do some test fitting of the panel and drill holes for the filler neck before I can get busy making it look pretty. I'll try to update the progress as I go.
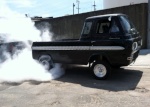
Here's the shadow and the reason for the name.

A shot in the garage, next to my '41 Chevy Coupe.

Thanks for looking!!
Here's the picture from the ad. Snuff sported wheel adapters with Oldsmobile wheels, a 307 sbc and TH350 trans, chevy pickup rear bumper, chevy seats, Chevy rear view mirrors, BMW steering wheel and a ton of diamond plate. They must have had a big piece laying around because the instrument panel, misc brackets, and even a tailgate cover were made from aluminum diamond plate. The guy I bought it from had already removed the tailgate cover. Not sure why anyone would want to cover it up?
Finally home!!
I purchased some 14" wheels from summit racing and some super cheap tires from ebay. One of my friends painted them Galaxy Gray and cleared em. I'll eventually get center caps and beauty rings.
Ignore the rusty panel. It won't be there long.
The wiring was a disaster. Bad grounds, rats nest, corrosion, you name it. Got the 8 circuit kit from Rebel Wire. I love this kit. Super easy to install. Just don't forget connectors and heat shrink!! This has since been covered with a Telsa cloth tape.
The diamond plate dash had to go. I flipped it over and hit it with some cast gray paint I had on the shelf. I'll eventually find the factory stuff to go in it, but this works for now.
The brakes left a lot to the imagination during the test drive. The seller and his neighbor could only shake their heads in disbelief when I pulled out the driveway for the trek home. Once I pulled the brakes apart, I realized that driving that truck home was probably one of the dumbest things I've done before. The brake reservior was bone dry and rusty. The only fluid was what was inthe lines behind the plunger. EEK!!
Luckily all the components except the brake springs were salvagable. Installed new wheel bearings, flushed the lines and rebuilt the master cylinder. Now I can stop with confidence.
Found the front letters along with a rear driver corner patch panel on Norfolk craigslist for a good price. I drilled the body filler out of the mounting holes and popped em in. Now it's starting to look like a proper e-pup.
Used some paint stripper to get the flat black off of the bezels. That was way more work than I anticipated. They still aren't perfect, but look way better than before. Sprayed some aluminum color behind it, for now.
First time back on the road!! Had to stop for a couple of artsy fartsy iphone pics.
I'm finally to the point where I can get rid of some of the rusty areas and body filler. Started with the left rear corner since I already had the patch panel.
Some spots were about 3/8" thick!! This came off in one big chunk.
I could have just drawn a line and cut it out but I just HAD to see how much filler a person could possibly use. The pictures don't do this everlasting gobstopper justice.
Probably should have removed the tank and filler neck before cutting. Oh well, I've done dumber things.
After I got it cut out, I saw someone's advice to leave about an inch of old metal. Oops. I still have about 1/8" to weld to. I'll just have to be super careful with that seam when I'm grinding the proud.
I still have to do some test fitting of the panel and drill holes for the filler neck before I can get busy making it look pretty. I'll try to update the progress as I go.
Here's the shadow and the reason for the name.
A shot in the garage, next to my '41 Chevy Coupe.
Thanks for looking!!