


just tried to install my windshield in my 64g-10. install alot of windshields in other vehicles using the rope trick with no prob. busted the flat windshield in the first 20min. besides going slow, lubing alot and don't force anything ...... is there any tricks to getting these windshields in in one piece? john
+3
donivan65
Digz
JOHNFIELY
7 posters
WINDSHIELD

JOHNFIELY- Number of posts : 124
Location : NORMAN OKLAHOMA
Registration date : 2012-08-30

Digz- Number of posts : 3794
Location : United States Six Lakes MI
Registration date : 2008-05-17
I have only helped (2 guys) on one and it was a slow and steady approach and sounds like the method you used. Some one with way more talent will give you much better advice here I'm sure. Good luck.

donivan65- Governor

- Number of posts : 12245
Location : San Diego, California
Registration date : 2008-05-12
,,,,,,,of all the windshields I have put in,,,,,,spraying silicone works the best for me,,,,,does the gasket seem too big or little? ,,,,you want that glass to float in the gasket and not be sticking in it with sealer until after the glass and gasket have found their home on the van....
JOHNFIELY- Number of posts : 124
Location : NORMAN OKLAHOMA
Registration date : 2012-08-30
its funny that you say that because when i put the gasket on, (from a 66 chevy truck, it was one closed loop rubber gasket )dry on my living room floor it appeared to be about 1 1/2 to 2'' to much, then adjusting it around the glass it appeared to fixt just fine. i took this into consideration when placing it in the van opening and kinda feel that maybe i was stuffing an oversized gasket into the opening.
i kinda feel i should have cut out about 1 1/2 and butted the ends together.
i kinda feel i should have cut out about 1 1/2 and butted the ends together.
donivan65- Governor
- Number of posts : 12245
Location : San Diego, California
Registration date : 2008-05-12
,,,,,now that is a common problem,,,,,,seems like no two pick up gaskets are alike,,,,,,I have the best luck with a Precision WBL 653,,,,,,,but that silicone spray sure helps everything slip into place,,,,sealer just grabs the glass and it won't slide into its place and you end up pushing too hard to get it to move,,,,,if the glass is still in 1 piece,,,,you can try and put it in with silicone spray if you have not tried it that way,,,,,the glass lives about 1/4" below and away from the frame opening,,,,,,


Twinpilot001- Number of posts : 6186
Location : spokane ,Wa.
Registration date : 2009-09-28
Having many glass's installed in older vehicles= i've seen several diff installs- what i noticed is = every glass installer used a mix of liquid dish detergent & some water!! makes the rubber -super slick on install!! Never seen any glass broken to date.
donivan65- Governor
- Number of posts : 12245
Location : San Diego, California
Registration date : 2008-05-12
I have tried it, but as soon as the soap gets squeezed out, it dries and sticks,,,,,I won't use it,,,,,,
FIZGIG- Number of posts : 334
Location : Lynnwood, WA
Registration date : 2014-01-23
Ive been an autoglass installer for over 20 years and spray silicone is okay to use to lube the gasket but if you all want to know of an old trick I was taught sometime ago is to use linseed oil because its works as a great lube and a better sealant if you dont want to use urethane or liquid buytl to seal the glass.
donivan65- Governor
- Number of posts : 12245
Location : San Diego, California
Registration date : 2008-05-12
I think another good thing is to put the glass up in place without the gasket and put masking tape on the 4 sides to mark
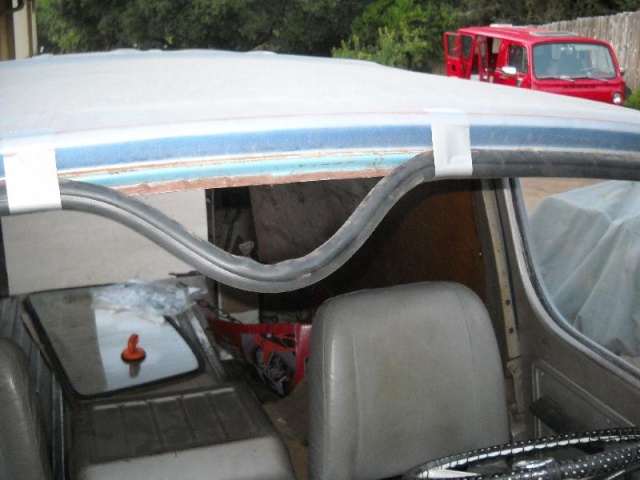
where the glass should sit,,,,,once you put the gasket on, you need to have the glass in the center for the gasket to slip over the frame,,,,otherwise you you'll be pushing too hard,,,,,,you should be pushing on the outside gasket while pulling it over the frame in the inside,,,,,I kind of like to use 12 gauge electrical wire for the rope, it seems to guide the gasket over the wall pretty well,,,,,you should be able to put a suction cup on the outside and move the glass around in the gasket so it takes the pressure off the gasket and allows you to pull it into the inside of the frame,,,,,I would try the gasket on the frame,,,,,this one was too big,,,,,,

where the glass should sit,,,,,once you put the gasket on, you need to have the glass in the center for the gasket to slip over the frame,,,,otherwise you you'll be pushing too hard,,,,,,you should be pushing on the outside gasket while pulling it over the frame in the inside,,,,,I kind of like to use 12 gauge electrical wire for the rope, it seems to guide the gasket over the wall pretty well,,,,,you should be able to put a suction cup on the outside and move the glass around in the gasket so it takes the pressure off the gasket and allows you to pull it into the inside of the frame,,,,,I would try the gasket on the frame,,,,,this one was too big,,,,,,
FIZGIG- Number of posts : 334
Location : Lynnwood, WA
Registration date : 2014-01-23
You guys must have bad gaskets because these windows are the easiest windows to install im talking 10 minutes tops. Ive had problems with some of the products Precision puts out like the Porsche 911 model that gasket was way too thick making it impossible to install. If you guys are installing this window ALWAYS put the rubber gasket on the glass then rope it in. Never put the glass on the pinch weld then try hhooking it in because there is more chances for you to clam the edge of the glass then breaking it that meathod is for the locking and lockstrip gaskets. Goodluck!
donivan65- Governor
- Number of posts : 12245
Location : San Diego, California
Registration date : 2008-05-12
you need to test fit the gasket in the frame 1st,,,,,,there is no van gasket,,,,,we use a curved windshield pick up gasket which has 2 extra curves formed in it, if it is that big, like in my picture, you will break the glass because it will jam between the glass and frame,,,,,,I have sent many back,,,,,but that Precision WBL 653 gives me the least problems,,,,,,,
JOHNFIELY- Number of posts : 124
Location : NORMAN OKLAHOMA
Registration date : 2012-08-30
so whats wrong with me cutting the gasket i have now and put the two ends together at the center bottom and seal it?
donivan65- Governor
- Number of posts : 12245
Location : San Diego, California
Registration date : 2008-05-12
Thats the way they end up doing it,,,,,,,,,but its kind of hard to get it right,,,,,,and that seam will start opening up as the rubber drys up and shrinks,,,,,but thats what 3M black weatherstrip adhesive is for,,,,,,,
chasgas- Number of posts : 23
Location : upstate ny
Registration date : 2013-06-05
no expert here but i've done a couple dozen windshields over the years. here's my take after pulling my 66's windshield out last weekend and putting on a new gasket. cut the rubber all around inside the truck about a 1/4 inch from the glass. carefully pushed it out from the top while laurie held it from outside. i suggest you leave the gasket on the windshield as a reference for proper placement of the new gasket. keep in mind, it will fit the right way or backwards! i find handling old brittle glass is best upright from the bottom. rested it, leaning up, on 3 inches of foam. i bought the stylin trucks #653 (if memory serves me). i fit it to the truck opening and then to the window. too long, agh! fitting it to the window (straddling it) required spraying it with water and twisting the gasket to open it to fit over the glass while pushing down with my thumb to keep it in place. silicone was too slippery and certainly will effect sealant if required. my opinion based on my experience. water worked great. within a few minutes it was on the glass with the excess at the lower center of the glass. i marked the glass center with masking tape and figured it so the factory splice was centered. i cut the gasket through the splice (sharp knife, squarely) and simply overlapped the 2 ends. left it 3/8 or so long (nearly 2 inches cut off) and fit it to the glass. i used poly bailing twine around the entire gasket where it needs to split to fit into the van's opening. i suggest 1/8 - 1/4 rope/cord versus thicker. i figured it so the ends of the poly rope would meet in the passenger side lower corner. taped the rope ends together with masking tape to hold them. windshield/gasket center (marked with tape) placed in center of van opening, laurie (in van) pulls tape from rope ends and pulls the one end across the bottom of the gasket/glass watching as the gasket opens over the metal ridge. she pulled it around the drivers corner where it gets tougher to pull. we changed positions and i work the gasket around the corner with an old (fairly large) phillips head screwdriver that i'd bent the end (inch or so) to a 45 degree angle and also ground smooth. no sharp edges! i googled windshield tools for my "guide". went half way up the drivers side then the same for the passenger side. the upper corners get tougher, spray plenty of water (drop or two of dish detergent). i suggest working the two sides evenly until you're at the top. pull the rope across the top, spraying and pulling the gasket inward with the tool. keep instructing your assistant not to push on the glass! brittle glass is not very forgiving to any flexing. the glass was far from being seated so i started at the lower corners and worked the gasket inward. up the sides and across the top a couple of times. CAREFULLY. each time it improved. it's easy to judge the fit from inside the van. i'd guess it was 90% "there" when we decided a short ride to the local restaurant was in order. hey, it was in and not broken! when we got home it was nearly seated. another couple of minutes with the tool and voila, done! the 3/8 that i left too long seemed to squeeze together about right. it rained like heck and no leaks (no sealant). looks fine. just over 30 dollars total, thanks donivan!
i wrote this for other novices out there, hopefully it will help.
good luck.
chasgas
i wrote this for other novices out there, hopefully it will help.
good luck.
chasgas
panelmanrd- Number of posts : 801
Location : kcmo
Age : 63
Registration date : 2009-10-04
I did mine the same way, when I got half way up the sides
I started in the middle of the bottom of the rubber on the inside
and pushed the rubber firmly down over the metal frame of the van
this let the glass fall down into place when I was ready to pull the
rope/twine the rest of the way around the glass.
I started in the middle of the bottom of the rubber on the inside
and pushed the rubber firmly down over the metal frame of the van
this let the glass fall down into place when I was ready to pull the
rope/twine the rest of the way around the glass.

Similar topics
