VintAGE-Vans

Would you like to react to this message? Create an account in a few clicks or log in to continue.

BRINGING IT ALL TOGETHER.... A's, G's & E's


5 posters

    Shambulance door pillars

    sasktrini
    sasktrini


    Number of posts : 2067
    Location : Saskatoon, SK, Canada
    Registration date : 2008-05-20

    Shambulance door pillars Empty Shambulance door pillars

    Post by sasktrini Sun Jun 13, 2010 11:04 pm

    Well, my side doors rattled something terrible and the gaps were bad.

    The guide at the top of the door was loose. It is like a plate that's spotwelded inside the door, and then has a three-sided pocket that slips into some slots on that plate. Then it is somehow crimped to hold it tight and keep the door pin guided properly and quietly. I found that the crimped part was loose. It would be easier to access this from the exterior surface of the door, but my welding skill isn't quite up for that yet... I went from the interior.

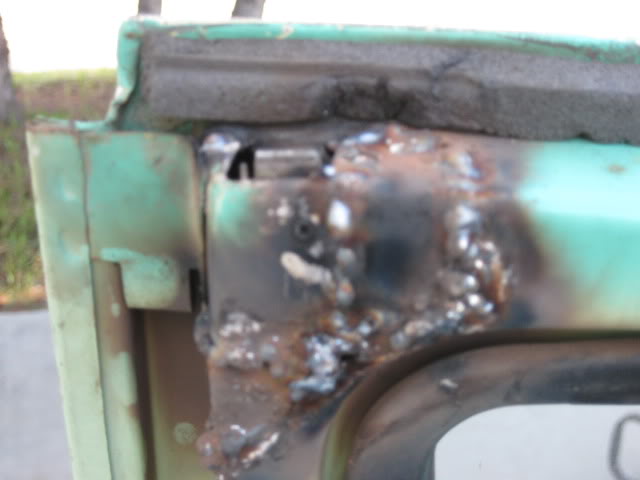
    I quickly welded it up, totally not finished work.

    Shambulance door pillars IMG_0405

    When studying the gaps, I realized that the problem seemed to be with the upper hinge... there was a bulge in the exterior sheet metal at the upper hinge, and the gap at the top was non-existant. Then the front and rear door didn't even overlap... could see daylight through there really bad. It was hard to determine how the pillar was constructed or where it was damaged. And I couldn't fit a jack to push it out. Decided to cut and figure out what was up with the pillar from the outside. I realized that the pillar was also somewhat distorted! So through my access hole, I was able to straighten it out. Pillar didn't budge though. Finally, my brother showed up and immediately knew how to position the jack to work the pillar. To my surprise, a scissor jack fit perfectly, and I watched my brother tweak the jack and even out the gaps! Tonight it sits with the jack in place, a little beyond square Awesome!

    Shambulance door pillars IMG_0402

    Shambulance door pillars IMG_0408

    Also then. to the back door, where the broken hinge that previously existed had contributed to the rear panel being badly dented.

    Shambulance door pillars IMG_0205

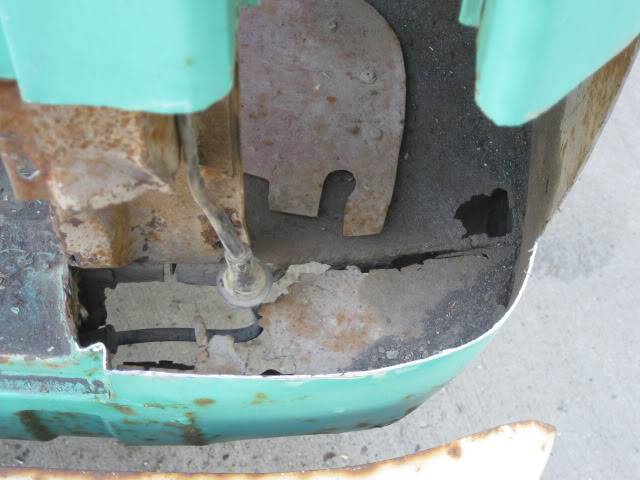
    Also, this corner has a rustout in the floor, and a suspect pillar. So I cut it open for enough access to the floor, and ultimately had to cut away the base of the pillar. At least I now know how the pillars are constructed. Towards the exterior, they are bent in a u-shape. Toward the interior, the panel that covers the pillar is relatively flat with the edges just curled around. There is a plate made of thicker gauge that the lower hings bolts to, and is sandwiched between the front and back plates. It was loose, and made access to the hinge bolts tricky. So, first I have to make the outer pillar, and then the floor. Anyway, this pillar was distorted and rusted.

    Shambulance door pillars IMG_0407

    Shambulance door pillars IMG_0406

    I used my Dremel to cut these patches out... very tiny gaps for welding! More to come later (I have a couple holes in my van... gotta get er dun!)


    Last edited by sasktrini on Mon Jun 14, 2010 10:50 am; edited 1 time in total (Reason for editing : missing block of text)
    sasktrini
    sasktrini


    Number of posts : 2067
    Location : Saskatoon, SK, Canada
    Registration date : 2008-05-20

    Shambulance door pillars Empty Re: Shambulance door pillars

    Post by sasktrini Wed Jun 16, 2010 12:07 pm

    Nobody has any comments? Are you thinking "There's just no polite way to say 'Corey, you're a dumb@$$ for doin that!'"? Laughing

    Well, forecasting heavy rain, so I did what I needed to and buttoned up my holes. The use of the dremel with cutting discs about 1/16" thick made rewelding the panels very easy! Used a lot of little discs, but saved a ton of time not having to weld up big gaps! There was also vritually no distortion! I'm feeling a little "full of it" so to speak! Laughing I didn't grind down the spot welds all yet, but I can tell you that the welding results are better than my wiper and door repairs I completed recently!

    The spacing and gaps for the side door are now fixed!!! cheers

    Demondog, I think I need to come out there this weekend and cut out a lower pillar for the repair on the rear door... I need to replace the hinge mounting place in the pillar, as I don't have speed nuts the same thread as the hinge bolts... will you be home and do you have a cutting tool we can use out there? Might grab doors and sheet metal too.
    Digz
    Digz


    Number of posts : 3794
    Location : United States Six Lakes MI
    Registration date : 2008-05-17

    Shambulance door pillars Empty Re: Shambulance door pillars

    Post by Digz Wed Jun 16, 2010 3:12 pm

    Hey ya gotta do what ya gotta do!! If you have a donor to work with thats the way to go. besides Rust Warriors have no fear !!
    At least theres nothing to lose trying!!
    richie61
    richie61


    Number of posts : 445
    Location : Van Nuys, CA
    Age : 63
    Registration date : 2010-01-04

    Shambulance door pillars Empty Re: Shambulance door pillars

    Post by richie61 Wed Jun 16, 2010 4:17 pm

    I'm getting ready to start patching mine. I've never welded before so it should be interesting. Mine is on top of both front doors that's going to require cutting the windshield frame and door jambs. Looks like your doing what you need to do. Neil Young sang" Rust Never Sleeps" maybe he was inspired by our early vans??
    sasktrini
    sasktrini


    Number of posts : 2067
    Location : Saskatoon, SK, Canada
    Registration date : 2008-05-20

    Shambulance door pillars Empty Re: Shambulance door pillars

    Post by sasktrini Wed Jun 16, 2010 7:14 pm

    I'm pretty happy with the side, but will have to cut the back corner off again to finish the repair there. I ground down the welds on the door jamb in the first pic, so that they wouldn't interfere with the door. The patch on the rear had a lot of bondo and rippled steel. Going to try to fix that before repainting it.

    Shambulance door pillars IMG_0410

    Shambulance door pillars IMG_0411

    richie, wookie told me "it's only steel!" If you mess it up, cut it out and start over. You need to take your time cutting out your patch panels to fit and getting the right shapes before you weld it in. Using the dremel to cut, it's making butt welds very easy to accomplish even for me!
    avatar
    Guest
    Guest


    Shambulance door pillars Empty Re: Shambulance door pillars

    Post by Guest Wed Jun 16, 2010 9:04 pm

    Saturday I should be home. Give me a call Friday night. If you come bring that drag link so I can move the silver van. S
    Sunday is Fathers day.
    The cut outs are good looking and neat. Like you said no distortion for welding back. I will have to do this when I get at my truck and rebuild it from the inside out once opened up.
    Your cargo doors. I wonder did you do any measuring diangonally from cornr to corner to see if the door opening was square. It concerns me there.
    It looked like the hinge may of got stretched over time as an ambulance door. I cannot say for sure without seeing the door.
    But it looks like your off to a goo start at getting the bad areas fixed before they get worse. Also less chance of the van being flagged at a spot check for safety.
    sasktrini
    sasktrini


    Number of posts : 2067
    Location : Saskatoon, SK, Canada
    Registration date : 2008-05-20

    Shambulance door pillars Empty Re: Shambulance door pillars

    Post by sasktrini Mon Jun 21, 2010 10:16 am

    Well, here's Saturday... my brother and I enjoyed the morning out there... thanks! Witness the carnage.

    Trust me... the white "Melville" van was beyond trailer duty, though there is ample amount of quality sheet metal above the floor line. So this Econoline is giving it up to all the other projects... Shambulance, Grimstone, the 68 Fargo, any of DemonDog's... whatever it takes!

    Shambulance door pillars Getoutofdamyface

    Shambulance door pillars Demondogsupvisingthework

    Shambulance door pillars SteprightupIcecoldIcecreamBeerinthe

    We cut out a rib for the Grimstone... one of them was severely mashed. We learned that the ribs extend down to into the rockers. A word of warning to anyone contemplating a frame-off resto... ribs welded to the frame, floor welded to the frame around the ribs, skin welded to the ribs all the way down the rockers...

    Shambulance door pillars Cutoutoflowerportionofvansrib

    The pillar for the Shambulance repair. I FOUND THAT THE FLOOR CONTOUR FROM THE WHITE VAN HAD A DIFFERENT CURVE THAN THE SHAMBULANCE!!! Maybe because Shambulance is extended? So a rear corner from an Econoline may not fit another.

    Shambulance door pillars CutthebackcornerforfixingtheShambul
    G-Man
    G-Man
    Mayor
    Mayor


    Number of posts : 30743
    Location : Fowlerville, MI
    Age : 62
    Registration date : 2008-05-06

    Shambulance door pillars Empty Re: Shambulance door pillars

    Post by G-Man Mon Jun 21, 2010 12:36 pm

    Cutting one up to save many is a good thing
    Digz
    Digz


    Number of posts : 3794
    Location : United States Six Lakes MI
    Registration date : 2008-05-17

    Shambulance door pillars Empty Re: Shambulance door pillars

    Post by Digz Mon Jun 21, 2010 4:24 pm

    The side ribs ona chevy are the same way, if you have holes in the rockers or inner panels its a sneaky place for fumes and dust to get into the van.
    avatar
    Guest
    Guest


    Shambulance door pillars Empty Re: Shambulance door pillars

    Post by Guest Wed Jun 23, 2010 7:12 pm

    Gee no comments of me looking out the new picture window installation of this van.
    Excuse the hair I did not comb it that day.
    sasktrini
    sasktrini


    Number of posts : 2067
    Location : Saskatoon, SK, Canada
    Registration date : 2008-05-20

    Shambulance door pillars Empty Re: Shambulance door pillars

    Post by sasktrini Wed Jun 23, 2010 11:31 pm

    LOL The demondog in the picture is good lookin'

    I cut out the rockers on the drivers sides of both my vans... and have been hand-forming new rocker panels The section cut out from the "picture window" has the curved contour of the lower rocker portion. I'm using a workmate and 3/4" plywood length, and have worked in one of the folds. One more fold, and then ready to go. I wish I had a 10' brake, but oh well!
    EconoUSAparts
    EconoUSAparts


    Number of posts : 2198
    Location : Ft Thomas,Ky
    Registration date : 2008-05-17

    Shambulance door pillars Empty Re: Shambulance door pillars

    Post by EconoUSAparts Thu Jun 24, 2010 8:32 am

    Supervan corners are different and no replacements are available. Short van or pickup ones wont work in place of them
    sasktrini
    sasktrini


    Number of posts : 2067
    Location : Saskatoon, SK, Canada
    Registration date : 2008-05-20

    Shambulance door pillars Empty Re: Shambulance door pillars

    Post by sasktrini Thu Jun 24, 2010 11:48 am

    Yup, learned on the fly. It wasn't too hard triming the corner though.
    sasktrini
    sasktrini


    Number of posts : 2067
    Location : Saskatoon, SK, Canada
    Registration date : 2008-05-20

    Shambulance door pillars Empty Re: Shambulance door pillars

    Post by sasktrini Mon Jun 28, 2010 8:49 am

    I attacked the side door surface rust and cound that a pillar repair masked a serious problem! Most of the pillar was rotted away and filled with tar (note the black spray pattern caused by grinding out the outer skin).

    Note the rot under the hinge...

    Shambulance door pillars IMG_0306

    After removing all the tar. There are five patches required: The floor seems to tack to the wheelwell, and then there are two sides to the pillar and a side that faces the interior. From the perspective of this picture, the patch for the left pillar is shaped like a 'z'. It seems to me that this pillar doesn't protrude through the floor here, due to the close proximity of the wheel well (???).

    Shambulance door pillars IMG_0425

    Floor patch:

    Shambulance door pillars IMG_0433

    Shambulance door pillars IMG_0435
    Digz
    Digz


    Number of posts : 3794
    Location : United States Six Lakes MI
    Registration date : 2008-05-17

    Shambulance door pillars Empty Re: Shambulance door pillars

    Post by Digz Mon Jun 28, 2010 3:11 pm

    Yeah , thats a nasty spot and no easy task, I had to pretty much do the same , have to work from the inside out, I was happy just to get it sealed up! Lookin good Sask !

    Sponsored content


    Shambulance door pillars Empty Re: Shambulance door pillars

    Post by Sponsored content


      Current date/time is Wed May 08, 2024 2:55 am